On Priora cars equipped with additional options, such as hydraulic power steering or air conditioning, due to the specific location of the units and, accordingly, the drive belt of the mechanisms, the tension of this drive is arranged using a tension eccentric. The tension roller is also used on the latest releases of the Priora car. This tensioning mechanism is modeled after the tension of the Kalina drive belt. Due to differences in design, tensioners are available in two types:
- metal plastic with options;
- plastic for standard vehicles.
Replacing the alternator belt with air conditioning on a Priora, part 2
A new belt with markings suitable for the 126th engine.
When installing a belt with a tension roller, I encountered the following difficulties. My first thought was that I bought a short belt, it’s all bullshit. I loosen the top bolt of the generator with two 13mm wrenches. I hook it with a 60 cm long pipe and move the “gen” towards the roller (someone may not need this manipulation). In this position I fix the generator by tightening the bolt. After this simple procedure, we managed to put the video in its place. But the bolt could not even be tightened. After thinking a little, I came up with a small device like a crane...
The meaning is this: slightly raised and leveled the position of the bolt. By the way, do not forget about how the belt lays on the pulleys and roller; the belt should not go beyond the edge of the pulley or roller. In the end, everything started spinning and fell into place as it should. We do not tighten the bolt all the way right away, because... We still need to adjust the belt tension. We take an open-end wrench 17 and a belt tension adjustment key
Use the tension key to tighten the belt counterclockwise. Holding the key in the desired position, carefully tighten the bolt to 17. Done. We start the engine. There are no extraneous sounds, which means everything was done correctly.
Source
Replacing the generator tension roller
It worked for exactly a year and 10 thousand mileage, and began to make noise and whistle. Perhaps the reason for this was the belt tightening, I adjusted it according to “feelings”. I thought about first disassembling the roller and filling it with lubricant, as many do when driving, but I decided to buy a new one. This time I took AT 1056-012B
I adjusted the tension using the frequency analysis method. I found the technique in the logbook: www.drive2.ru/l/471004669011820971/
I armed myself with a program from Google play, “sound spectrum analyzer” (link: play.google.com/store/app…hanik.splspectrumanalyzer), an old phone headset, bent pliers and a 17 key. I tuned it to a frequency of 135-139 Hz. After setting up, I started the car with all consumers turned on, and there was silence, but for how long)))))
If anyone needs data on frequencies (the post is old, so there is no 127 motor, but the design in the area of the generator belt has not changed from 126, if I’m wrong, correct it in the comments):
By car make, regardless of engine Lada Kalina with air conditioning 190/240/260 Hz Lada Kalina without air conditioning 120/140/160 Hz Lada Priora 120/140/160 Hz
By engine, regardless of the car brand 11194: with air conditioning 190/240/260 Hz 11194: without air conditioning 120/140/160 Hz 21126: 120/140/160 Hz
Source
Replacing the belt and tension roller of the generator drive on a Priora
In the summer, the whistling of the belt disappeared, although three months ago in winter and spring it was annoying with its squealing. The opportune moment came and I did not wait for a new howl of the alternator belt.
Purchased: Alternator belt
from tens with air conditioner Balakovo 570 rub.
Tensioner roller
Vologda 650 rub.
I disassembled the original roller, the lubricant is solid and not all around, the balls are dry. When rotated quickly, it makes a hum and there is a decent amount of play.
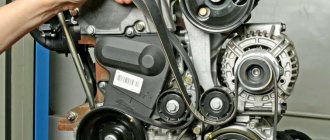
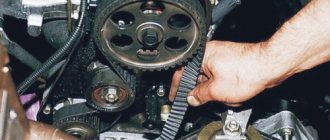
Replacing the belt turned out to be a hectic task; my friend Sanek changed the belt.
Briefly it looks like this: The belt needs to be threaded through the engine mount. To do this, unscrew the Trox bolts in the photo.
Using a pry bar, we lift the engine and insert a strap between the support and the body.
There was also the problem of inserting the belt onto the pulley. It's like the belt is a few mm off. smaller than the old one. Maybe I should have looked for an original belt from Priora if one exists in nature. Well, something like this, we still have to change the power steering hose and power steering fluid. See you again on the bortovik;)
TENSIONER FOR PRIORA AND KALINA NOT EQUIPPED WITH OPTIONS
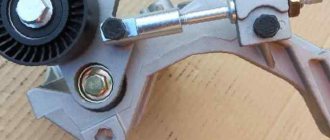
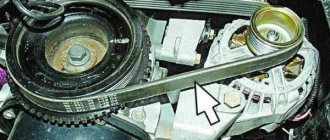
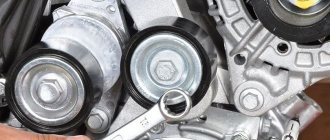
On the Priora, which does not have power steering or air conditioning, the belt is much shorter. It works on only two points: the crankshaft pulley and the generator pulley. The latest samples are equipped with a tensioning system similar to the VAZ Kalina. That is, if on other VAZ cars the tension is done by moving the generator itself, then on the Priora, a plastic roller of the tension system presses on the drive from above. A special tensioning mechanism is installed to move the roller. It consists of several parts:
The entire system is clearly visible in the photo. To adjust the drive and replace the tensioner, the following keys are needed. Slip on 19, end and socket on 13 and any wrench on 8. First, loosen the bolt and nut holding the movable platform with the roller with a wrench on 13. Then release the lock nut securing the adjusting rod using a wrench on 19. Using a wrench or socket on 8, unscrew the adjusting rod cravings The generator remains motionless. When the belt is loose, unscrew the bolt with the bushing on which the desired part is attached. Now remove the roller and install a new one in its place.
Check the free rotation of the tensioner for the generator drive and, having tightened the rod to the normal state of the drive, securely fix all the fasteners.
How to adjust the generator roller on a Priora with your own hands
The generator belt tensioner roller is a small but very important part of the machine. If it fails, the operation of attachments and electrics is at risk. But you can diagnose, lubricate and even change a spare part yourself; it does not require much effort or serious knowledge in the automotive industry.
On Lada Prioras with air conditioning and power steering, as well as those equipped with power steering (electric or hydraulic power steering), the alternator belt is additionally maintained in an optimally tensioned state by a special roller. The Priora generator belt tension roller is an important part that ensures the operation of the attachment.
Signs of tensioner failure
The following symptoms indicate poor adjustment or failure of the unit:
- whistling, increased noise, rustling from the generator unit (extraneous sounds are not necessarily associated with the tensioner, but may indicate its misadjustment or malfunction);
- hum and buzzing that occurs when the belt roller bearing of the Priora generator wears out;
- vibration of the roller and belt, indicating a worn bushing;
- too much belt deflection (more than 8 cm) or excessive tension (less than 0.6 cm) - if detected, adjustment must be made;
- the fastening bolt begins to heat up;
- backlash in the tension roller (this, like the hum, indicates a worn bearing);
- uneven wear and stretching of the belt on one side (as a rule, this sign indicates a bend in the tensioner bracket).
Replacing the drive belt with the air conditioner installed
Communities Lada Priora Lada Priora Club Blog voltage on mass air flow sensor
As already mentioned, the main difficulty lies in the location of the drive of the Priora’s additional mechanisms. The fact that it goes around the engine mount in a closed quadrangle creates serious problems during replacement. Of course, removing the rubberized strap is no problem. But installing a new one in this place is a rather complicated process.
Tools and accessories
In this case, much more tools and devices will be needed for replacement. It is best to have a full set of professional auto mechanic tools on hand. On a Priora with air conditioning or hydraulic power steering, the tension of the generator drive and other mechanisms is carried out by displacing a special eccentric roller - the tensioner roller. A special key is also required to adjust it. When replacing the belt, you will have to lift the entire engine so that it comes out of the front mounting stud of the engine mount. Therefore, it is necessary either to have a professional car mechanic jack on hand, or to work in a room equipped with special hoists for removing the motor or, in extreme cases, with a hydraulic or electric lift.
How to lubricate the timing pulley without removing the belt
Usually the part is dismantled only for the purpose of replacement, and in this case the new roller is usually already filled with lubricant. It is easier to lubricate it without removing it, since dismantling takes too much time and effort.
First of all, use a screwdriver with a flat head or an electrode with a sharpened end to remove the boot.
Next, you need to take two two-cc syringes. The first is filled halfway with lubricant, that is, one cube is enough.
In order for the lubricant to come out of the syringe better, it is heated to 40 degrees. Hold the syringe needle, otherwise when pressed it may fly out from strong pressure.
When the contents begin to come out, the composition is pumped into the mechanism. To do this, insert a needle into the gap and, moving in a circle, apply the product in several areas.
The last injections will have to be done with a second syringe, since the piston of the first one may bend due to high pressure. More than half of one cube should fall into the mechanism. After lubrication, some of the composition may leak out.
Next, start the engine so that the lubricant is evenly distributed.
After turning, the lubricant will spread throughout the entire bearing rim. At the same time, there should also be no excess on the surface.
Tensioning the alternator belt: a guide for car enthusiasts
The distinctive features of the Priora from previous modifications of the manufacturer are noticeable immediately, literally as soon as we open the hood. Here the new owner of the Lada will have to learn a lot again. This seemingly not very complicated procedure, which allows you to tighten the alternator belt in a Priora car to the required limit, will require considerable effort.
The peculiarity of new car models is that the ability to choose a car equipped with optional equipment is already present as standard. So in the “base” “Priora” can already be equipped with power steering or air conditioning.
Naturally, driving the car becomes even more convenient, but the recompense for comfort in this model is a more complex design of the generator belt drive. After all, the belt itself on a Priora car, which has air conditioning or power steering, is significantly longer, has a more complex trajectory, is serviced and replaced according to completely different rules.
Description and location
The generator's job is to provide power to the vehicle's electrical equipment. Like other components in a car, the generator is powered by the engine; to ensure constant rotation of the rotor, pulleys are installed on the generator shaft and the crankshaft of the power plant. A belt is pulled between them. After starting the engine, the crankshaft begins to rotate, and the movement is transmitted through the belt to the rotor.
On the latest Priora models, this element operates the air conditioning and power steering. This material discusses the replacement and tensioning of the belt in a new model car, where additional equipment is installed.
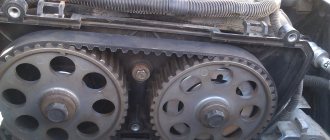
Tensioning the timing belt on a Priora: user instructions
In addition to the alternator belt in a Priora car, another important component is the timing belt. For this reason, many car enthusiasts are wondering how to tighten the timing belt on a Priora? It is not difficult to carry out this procedure; it is enough to prepare a tool: a “5” hexagon, a “17” and “15” head.
Before tightening the Priora timing belt, you should:
— unscrew the two screws securing the cover;
— remove the bottom cover covering the timing drive;
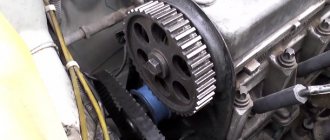
— insert the tips of the pliers into the grooves of the outer race of the tension roller in order to remove the locking rings.
- tighten the belt by turning the tension roller directly with pliers, counterclockwise.
— these actions are performed until the cutout of the outer race is aligned with the rectangular protrusion of its inner sleeve;
— after the above steps, the roller mounting bolt is tightened with a wrench;
— we check that the marks on the camshafts and crankshaft are aligned, as well as the cutout matches the mark on the tension roller. If the marks do not match, you should repeat the operation to tension the timing belt.
From the above it follows that tightening the alternator belt is as simple as tightening the handbrake on a Priora. An experienced driver will be able to do this quickly and without unnecessary movements. Care and the correct sequence of actions when tensioning the alternator belt will preserve its functionality for a long time of operation, and your car will always remain a PRIORITY.
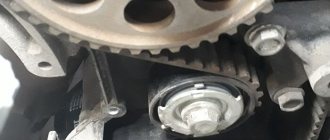
How to lubricate timing rollers
Depending on the car model, one or two tension rollers are installed to provide the necessary tension on the timing belt. The part is a pulley mounted on a closed ball bearing. When the engine is turned on, the roller rotates under the action of the rotating belt.
Timing drive device 1 - crankshaft toothed pulley; 2 — timing belt; 3 - tension roller; 4 - camshaft toothed pulley; 5 — toothed pulley of the coolant pump.
Lubricants used for heavily loaded bearings are suitable for the unit in question. The roller can heat up to temperatures above 80 degrees, so the chosen product must withstand high heat. High-temperature greases are recommended, which are made from petroleum products thickened with various soaps.
Tensioner rollers and Castrol lubricant
Lithium greases
Manufacturers use Litol-24 as a standard; they also lubricate bearings at the VAZ plant. But this product dries out quickly and has to be replaced. Therefore, it is better to replace this lubricant with an analogue, which is also made on a lithium basis, but has improved properties. Its operating temperature range should not differ from Litol-24: from -40 to +120° C. However, already at -30° C this lubricant begins to lose its properties. In colder conditions, it can only work due to the heated insides of the car, which level out the temperature difference. The shelf life of the lubricant is from 5 years. However, it is usually much larger.
Litol-24 is a standard, but not the best lubricant for timing rollers
Often, car enthusiasts purchase Ciatim 221 or Ciatim 201 with a lithium complex. These brands are also used by most automakers for processing parts. Cyatim 221 is made from more expensive components and can withstand high temperatures up to +150 degrees. In cold conditions, it can be used at temperatures from -60° C. This lubricant has a longer shelf life - up to 40 years.
Cyatim 221 is a more durable and heat-resistant analogue of Litol-24
Cyatim 201 was developed in the USSR and is considered obsolete, but it will cost 4 times less. The maximum temperature that the product can withstand is only 90° C. This product retains its original properties even at -60 degrees, therefore it is often used in the regions of the Far North. When stored, the substance does not deteriorate for up to 4 years. Then, due to low colloidal stability, liquid oil begins to separate from the lubricant.
Tsiatim 201 is an outdated but cheap analogue of Tsiatim 221. Suitable for northern latitudes, as it does not freeze even at -60° C
Recommended imported analogues have class EP2. Car enthusiasts often use Suprema EP2 universal lubricant, suitable for all types of heavily loaded bearings. It contains additives that reduce wear and reduce stress on metal parts. It is resistant to water washout, has good adhesion, prevents the formation of rust, and costs only a little more than Litol. Operating temperature range: -35°C to 160°C, so the lubricant may not be suitable for very cold climates.
Suprema EP2 is an excellent foreign lubricant at a price comparable to the price of Litol-24.
Domestic lubricant MS 1510 Blue
Xado restorative lubricant contains revitalizant. After application to the surface, a metal-ceramic coating is formed, due to which the original geometry of the parts is partially restored. It is recommended for repairing bearings; it is often purchased by drivers when problems are detected in the operation of the rollers. The manufacturer produces many types of lubricants that differ in purpose, characteristics, cost, and temperature ranges; on average, their operating range is from -20° C to +130-150° C.
Xado Reconditioning Lubricant
Gazpromneft also produces products in this range, for example, G-Energy LX EP 2. Thanks to a set of additives, it has extreme pressure properties and is resistant to oxidation. Operating temperature range - from -30 to + 160 degrees.
G-Energy LX EP 2 grease
A brief comparative description of the presented lubricants can be found in the table below.
Name
Base oil
Manufacturers typically indicate whether the product is suitable for mixing with other lithium-based products. For example, you can mix Shell Retinax EP 2 with domestic MS 1000. In this case, the determining parameter is the temperature range. If you take a non-high-temperature composition, it will melt and leak during operation.
CV joint grease-4
Lubricants of this series are produced by thickening with lithium soap. But they work better at medium and elevated temperatures than Litol-24. After a short overheating, the composition retains its original shape and can work without replacement. Typically, motorists choose CV joint-4, which was originally designed to lubricate constant velocity joints. Its temperature range is no different from Litol-24, that is, it can withstand from -40 to +150 degrees. Properties are improved due to molybdenum disulfide, which acts as an anti-wear additive.
Now different brands produce products under the name CV joint-4. Therefore, the quality of the composition and type of additives depends on the chosen company. Usually on sale there is a 4M CV joint, for example, from the company Rusma. The components of the product do not react with plastic and non-ferrous metals. The lubricant works well even in frosts down to -50º C, the only drawback is that it loses its properties when exposed to water.
Synthetic lubricants
Products from this category are protected from being washed out by water and do not harden before the specified period. This allows you to avoid re-lubrication throughout the entire service life of the unit. For the timing roller, high-temperature Total ALTIS SH 2, made on the basis of synthetic ester and polyurea amplifiers, is suitable. The service life of this product is twice as long as that of those made from polyurethane. Due to increased adhesion, the composition is not washed out even with frequent contact with water. The temperature range of the lubricant is from -40 to 180° C.
Total ALTIS SH 2 grease
Total Ceran XS 80 grease
Replacing the alternator belt of a Lada Priora with air conditioning and power steering
Replacing the alternator belt of a Lada Priora with air conditioning
A recent inspection revealed defects in the alternator belt. The decision to replace was not long in coming. At 99, the belt was changed within 1 minute. I spent about 1 hour here.
Unscrew the two bolts securing the right engine mount. Here was the first ambush, the bolts were star-shaped, I had to buy an E10 head.
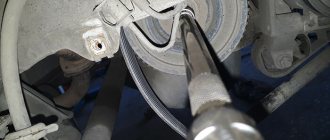
We place a stop under the hole in the standard protection, where the drain plug is, and lower the jack, hanging the engine. Under the hole formed between the right engine mount and the bracket, remove the old belt. First unscrew the tension roller with a 17 key.
OLD BELT, TRACES OF DEFECTS AND BELT SIZE VISIBLE
Here I would like to dwell in more detail. About the belt size. How to choose? In markets and shops, 90% said take 6rk1125, the remaining 10% 6rk1115. And one good person said the following and I advise you too
1. Look at the old belt, maybe the size is the same. 2. Take 2 belts, with the condition of returning one of them.
In my case, the first option worked. I purchased a German 6rk1115 belt
Just a note: according to the manual you had to buy 6rk1125.
We install the new belt in the reverse order, assemble the units, simultaneously check the tension roller for defects, and, if necessary, change it.
Adjusting the belt tension
I forgot that I gave the key for such rollers to the owner of 99. I used a circlip remover to tighten it.
When properly tensioned, the belt should not flex more than 8 mm.
In fact, I expected big problems, but everything went like clockwork
Replacing the alternator belt on a Priora with Panasonic air conditioning
I will try to tell you in more detail about this rather simple process, as it seems at first glance, and for which some services are trying to rip off more money, they say, you need to remove the pillow, and all that. I carried out the replacement on the ground without a lift, and the car does not have crankcase protection, which, of course, will have to be removed when replacing. We will need a belt (I will also write about them in more detail.) two jacks, preferably one, a rolling one or just a hydraulic one (since there is no special place to turn the usual handle under the car), a ratchet, a head for 17, a ratchet extension for 15, and a cardan , as well as a wrench for tensioning the roller and a screwdriver for unscrewing the boot (it depends on which screws are screwed on). We remove the wheel.
Remove the tension roller.
This view opens up to us
We roll the jack under the crankcase and push it a little. You don't need to lift it too much just yet.
Then we completely unscrew the nut number 17. There is absolutely no need to unscrew the mounting of the airbag to the body, as many people do, the metal there is thin, the thread can only be tightened once.
It will look like this
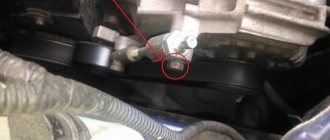
Next we unscrew the pillow bolt by 15. It is quite long, but there is no need to unscrew it all the way. About half, maybe a little more
For clarity, I took this photo for those who don’t know, it can be very useful. Between the pillow and the bracket there is an intricate nut that fits into the groove of the bracket, thereby we can easily unscrew the bolt from the bottom of the pillow.
Now the manipulations with the jacks begin. We lift the car body in order to get the distance to push the belt through the cushion.
But you shouldn’t get carried away as you might break the guitar. since the body goes to the top, and the engine remains below. We pick it up and look at the guitar: as soon as it becomes a pity, that means that’s enough. For convenience, you can look at the bottom one - they bend the same way.
We insert a belt into the gap that appears between the pillow and the bracket, lift the engine a little and pull it out from below.
We push the new one behind the cushion, lower the engine a little and push it into its place.
Raise the car and lower the engine slightly. You can do both, you can do one thing or the other, the main thing is to look at the guitar. We put the bracket back on this nut and make sure it fits into the grooves of the bracket
Next, tighten the pillow bolt all the way. If the bracket is not placed on the cushion, most likely the bolt will spin, and holding that nut is extremely inconvenient and a second person will be needed. Also, make sure that the pillow remains standing as it was, so that it does not turn. I don’t know what effect this will have, but I’m in favor of leaving it as it was.
Once we tighten the bottom bolt to 15, carefully lower the engine onto this bolt so that it looks like in the photo, and tighten the nut to 17 until it melts.
We put the belt with the roller in place. we pull. install the boot and wheel. The result should look like this.
Here it is not yet stretched.
It took me about 30 minutes to replace the belt and take pictures along the way. I spent another 30 minutes tightening it and checking the charging with and without load. In general, nothing complicated. Once you change it, it will be easier later. I seem to have described all the nuances.
And now about belts from personal experience: I installed a Contitech belt. This belt length is perfect for a Priora with Panasonic air conditioning. I haven’t encountered any problems with other air conditioning systems, so I can’t say anything. but you can also put 6pk1120, it’s a little shorter. I also read that they stuff in 6pk1115, but there you already need to move the generator towards the engine. and it will be possible to tighten it, but it will be more difficult. This is one of the easy options. 25 and 20 I set the belt for myself. fit without problems. I didn’t see much point in making the belt shorter. Well, that seems to be all.
General questions about working with the Grant generator
How to adjust headlights with your own hands
Let's consider general questions: everything except replacement.
Tension check
There are two approaches: visual assessment and physical.
Visual assessment of condition:
- the car is on a flat surface, the gear is in neutral, the handbrake is off, the hood is open;
- We don’t start the car - we put it in 5th gear;
- We opened the hood and found a generator: we push the car back, resting against the bumper;
- We inspect the required part along its entire length: are there any breaks or cracks? It needs to be changed.
Poor quality will lead to unexpected problems on the way. Physical assessment:
- if you have a tool that measures pressure force: press the belt with a force of 10 kg*s - the deflection should be no more than 10 mm;
- there is no special tool: we try to turn it across - it should turn no more than 90 degrees.
How to tighten the alternator belt on a Grant
This section applies only to machines with a tensioner. No - change the part or see above how to install it.
Subsequence:
- we use ring wrenches 8, 19;
- Throw key 19 onto the lead screw;
- wrench 8 for locknut;
- we touch;
- Now you can turn the lead screw: clockwise to loosen, counterclockwise to tighten;
- got the desired result - tighten the locknut.
It is better to take ring wrenches, since a head with a ratchet or a wrench will not work.
When to change: technical regulations for replacing a VAZ 2190 belt
AvtoVAZ requires checking the condition of this part every 15,000 kilometers.
Replacement is required every 30,000 kilometers, regardless of condition.
How to remove a generator on a Grant
It needs to be removed for repairs, replacement of bearings or rollers.
The step-by-step process involves:
- remove the negative terminal from the battery;
- working with the generator: disconnect the wiring harness from it;
- remove the cover of the power wire nut, remove the nut and remove the wire from the bolt;
- unscrew and pull out the upper and lower fastening bolts - to work with the lower one, you may need to climb into a hole, throw off the tin protection of the internal combustion engine and dismantle it from below;
- move the part to the right mudguard, remove the belt, and remove it.
You can do without a hole. Example:
How to replace and tension the alternator belt on Lada Priora
The Lada Priora car is very popular. This is another proof that Russian cars can be of high quality. They actually boast good comfort, handling, and attractive appearance. The differences between the new model and previously released cars are primarily hidden in the engine compartment. Here everything is located completely differently. Therefore, even experienced craftsmen do not always know how to replace the alternator belt on a Priora, as well as how to tension it.
The new Priors are equipped with a large number of systems and are also available with an impressive list of additional equipment. Read more about the new generation Lada Priora 2022 in our article.
Although the installation of air conditioning and power steering on the Priora had a positive effect on comfort, as a result of such changes, access to the generator became quite difficult. The alternator belt of a Priora with power steering or air conditioning is longer than the regular version of the car, so we will consider the procedure for replacing the alternator belt for two modifications.
As a rule, the need to tension the generator belt arises due to its wear during use, as well as a decrease in the quality of adhesion of the belt surface to the planes of the generator rollers and pulleys.
If the alternator belt on your beloved Lada Priora begins to whistle, you will have to start tightening it. You can tighten the alternator belt on the Priora using a 19mm wrench, as well as a special wrench for the pulley. He is shown in the photo below.
The belt tension is performed as follows:
If the procedure is performed correctly in the basic version of the model, in the longest section between the pulleys the belt should bend by about 10 mm. In the case of a version equipped with air conditioning or power steering, you need to tighten the belt a little more. As a rule, this procedure is trusted to specialists.
According to official data, the belt should be replaced every 60 thousand kilometers traveled. If the car is used very rarely, the alternator belt on the Lada Priora needs to be changed every two years, and in this case it does not depend on the mileage.
Before replacing the belt, you must place the vehicle in an inspection pit. Next comes the preparation of the following tool:
First you need to loosen the nut using a 13mm wrench (see photo).
Next, you need to unscrew the bolt intended for adjustment, using a 10mm wrench (more details in the photo below).
Next, we move the generator itself in the direction of the power unit. Unscrew the front right wheel and remove it. Then we perform similar actions with the fender liner. Only then can you remove the old alternator belt and replace it.
After installing the new belt, you must perform all steps in reverse order. Do not forget to correctly adjust the tension of the alternator belt on the Priora. If the belt is too loose, the battery may not charge fully, and if the belt is too tight, it will cause the alternator bearings to fail too quickly.
Since the power steering pulley in this modification of the model is installed at a low height, the designers decided to run the generator belt around the support of the car’s power unit. This means that in such a machine, replacing the alternator belt can only be carried out under appropriate conditions.
Next, we will look at the procedure for replacing the alternator belt on a Priora with air conditioning. First you need to prepare the following tool:
New Lada: Updated Lada Priora: what's new? - KOLESA.ru - automobile magazine First, we use WD40 to wet the bolts securing the engine mount and bracket.
After about 10-15 minutes, you need to unscrew the bracket nut, after which we lift the front right wheel using a jack. Then you need to place something suitable under the motor and remove the wheel.
Next, you need to slightly lower the car, unscrew the tension roller, bend the belt and unscrew the bolts that secure the airbag.
After this, you need to lower the car so that the engine begins to hang out. The cushion should be moved towards the engine, which is enough to remove the alternator belt and install a new one.
At the final stage, you need to jack up the car to lower the engine. During the procedure, it is necessary to control the position of the pillow, as well as the generator belt, which we replaced. Then do not forget to tighten the pillow bolts, as well as the nut that secures the bracket.
As you can see, those who want to change the alternator belt on a Priora will have to work a little, but the reward will be the correct operation of all car systems.
(1 votes, rating: 5.00 out of 5)
Roller maintenance
Our task is to replace the bearing grease. To do this, you need to remove the rings, remove the old grease, wash and blow out the bearing, drive in new grease, install protective rings and remove excess grease.
Removing the protective rings
To remove the protective rings, you need a thin, flat tool. I have this small, worn-out screwdriver.
Carefully insert the tool between the protective ring and the inside of the roller. Be careful not to damage the ring.
We pry up and remove the ring. After removing the ring, you need to straighten it.
Removing old grease
As you can see, the remaining lubricant is scattered throughout the bearing rings, but there is no grease in the separator at all.
I removed the old grease from the rings with the same screwdriver and cleaned it off with thick paper napkins (or a rag).
Washing the roller
We wash the roller and rings with WD-40. After which it would be ideal to blow out the bearing with compressed air, but the operation was performed at home, where there are no tools.
We wipe and dry everything.
Bearing lubrication
We will need lithium grease. I scored Litol-24. The jar says expiration date is 5 years, but the manufacturing date has already been erased. I think it is already more than 5 years old, it has not changed in any way, so it is suitable for use.
We put lubricant on the open side of the separator and, turning the bearing, push it in the opposite direction.
It is necessary that the lubricant completely fills the cavity of the separator and comes out from the back side. For convenience, lubricant can be pumped using a medical syringe.
On the reverse side, add lubricant to the plane of the protective ring.
Installing protective rings and removing excess lubricant
We install protective rings. We turn the roller by hand so that excess lubricant is squeezed out along the inside of the ring. We remove the leaked grease. The part of the roller in contact with the belt must be clean.
How to determine the need for replacement or adjustment
The condition and tension of the belt must be checked at least once a quarter.
This will allow you to quickly detect weak tension or damage to the belt. A whistle that appears when starting the engine and accelerating the car indicates weak belt tension. Rapid battery discharge (as well as weak charging current) may also indicate a loose alternator belt. The service life of a high-quality alternator belt is 40–60 thousand kilometers or 2 years. After this, the belt must be replaced, even if it looks normal. If cracks or breaks appear on the belt, it must be replaced, regardless of mileage. To determine the condition of the belt, it is necessary to carry out diagnostics.
Sn9shimo
The belt should not rotate more than 90°. Otherwise, the belt tension needs to be adjusted. To tighten the belt, turn the tension roller counterclockwise, and to loosen it, turn it clockwise. To do this, insert a special key into the holes of the tension roller in the form of two rods with a diameter of 4 mm, welded to the base of the key (the distance between the rods is 18 mm). You can use the key for the old-style timing belt tension roller, installed on all front-wheel drive VAZ cars. If you do not have a special key, you can insert two pins (screws) with a diameter of 4 mm into the holes of the tension roller. Using the screwdriver shaft located between the pins, turn the roller.
Tension adjustment using a roller
Adjusting roller and key for it
Some modern machines use special adjustment rollers . They allow you to quickly and easily tension the belt. As an example of using this method, consider adjusting the belt on a Lada Priora car with air conditioning and power steering, as one of the most popular cars in our country.
How to tighten the alternator belt on a Priora
Work on tensioning the alternator belt on a Lada Priora car is carried out using a special tension roller, which is part of the structure. To work, you will need a 17 mm wrench to unscrew and lock the mentioned roller again, as well as a special key to turn the adjusting roller (it is a structure of two rods with a diameter of 4 mm, welded to the base, the distance between the rods is 18 mm). Such a key can be purchased at any auto store for a nominal price. Some car owners use curved pliers or “duckbills” in their work. However, we advise you to still buy an adjustment wrench, given its low price and ease of further work.
Does it whistle and skid? Diagnosing the alternator belt
As long as the belt works normally and adequately, we do not notice it. The generator operates in normal mode and provides reliable power supply to the on-board electrical network and recharges the battery .
This is evidenced by stable ammeter readings and quiet engine operation. However, one fine day the belt makes itself known with a high-pitched squeal or lack of charging current to the battery. This will be indicated by the ammeter on the instrument panel and the battery charging indicator lamp.
Alternator drive belt
Open the hood and see if the belt is in place at all. Some unfortunate drivers' belts break while on the road, and it is quite difficult to find a replacement.
On the VAZ-2114, the engine is located transversely, so the alternator belt is located on the opposite side of the gearbox, to the right in the direction of travel. If the belt is in place, it is enough to tighten it and the operation of the on-board electrical system will stabilize.
To do this, you will need only two keys from the standard set of tools - 10 and 13, but it is more convenient to use heads with a ratchet. And preferably a lever! Everything is ready, you can start working.
How to tighten the alternator belt on a VAZ-2114
The procedure for tightening and adjusting the belt will take about five minutes, but it is important to know a few subtleties that will save you from problems on the road in the future.
The first subtlety is that over-tightening the belt is just as dangerous as under-tightening it. You can ruin the generator bearings, and replacing them will cost five times more than the most expensive belt. In addition, to replace the bearings you will have to completely disassemble the generator or change it altogether. Tightening the belt is unacceptable!
The procedure for tightening a belt is simple and even a child can handle it if you follow a simple algorithm and do not break a certain sequence:
Generator drive diagram: 1 - mounting bracket to the engine block; 2 — connection of the generator with the bracket; 3 — tension screw; 4 — generator set pulley; 5 - axial screw; 5 - drive belt; 6 — generator pulley on the crankshaft.
Loosen the lower generator mounting bolt
Loosen the top nut securing the generator
Tighten the generator belt
Checking the belt tension after tightening
When is it necessary to tighten?
Actually, the reasons why the belt needs to be tightened are simple - the generator does not produce enough current to operate all consumers on board and cannot charge the battery. The primary sign of weak belt tension will be a whistling sound from under the hood. Nevertheless, the belt can whistle when water gets in, sometimes when the pulleys become oily, and even less often when the generator bearings fail. If the belt cannot be tensioned or the adjustment rail does not allow the generator to be moved further, the belt must be replaced.
Subtlety two. Rubber tends to crack, and even taking into account the reinforced structure of the drive belt, it will not last long with cracks.
The most common mistake is storing a spare belt under the hood, in one of the niches. Due to constant high temperature, even the best and new belt can become unusable in just a couple of months if it lies as a dead weight under the hood. New or spare belts should be stored either in the garage or in the trunk.
Lithium greases
Typically, these are the tools used by automakers. One of the most popular products in this category is Litol-24. Other car owners choose Tsiatim-221 and Tsiatim-201. The highest technical characteristics among them are Tsiatim-221, which is able to withstand temperatures from -60 to +150.
Another noteworthy domestic development is the MC 1510 Blue. It is suitable for operation at temperatures up to +180 degrees, and the dropping point reaches +350 degrees. For many peers this is a sky-high figure.
It is worth considering XADO restorative lubricant. This is a universal material suitable for any components and mechanisms. The product contains revitalizant. XADO allows you to partially restore the geometry of parts, forming a metal-ceramic coating after application. This product is suitable for repairing bearings.
The lubricant from Gazprom, G-Energy LX EP 2, is also in demand. It has excellent extreme pressure properties and high oxidation resistance.
Imported analogues
Here it is worth noting Suprema EP2. It is universal and suitable for all types of heavily loaded bearings. The composition is not washed out by water, protects the metal from corrosion, significantly reduces the load and slows down the wear of parts. The only negative is that the product is not suitable for northern regions, where the thermometer can drop below -35 degrees.