In our short article we will look at how to replace brake discs on a Chevrolet Niva. The brake system is the most important part of any car, because it allows you to stop traffic as quickly and safely as possible. Naturally, this affects road safety - the system allows you to avoid emergency situations. It is prohibited to operate vehicles with a malfunction of the braking system; this entails not only administrative punishment. After all, if this mechanism breaks down, you can get into an accident.
What are brake discs for?
All drivers know that a car is stopped using friction. It is simply unrealistic to stop the colossus, whose mass sometimes reaches several tens of tons, by any other means. The metal disc also rotates along with the wheels – it is by friction that the pads stop it. The latter are made of special materials (they are called friction clutches). The disc is usually made of durable cast iron. But sometimes carbon fiber or ceramics are used. As for the disks on the Chevrolet Niva, they are made exclusively of cast iron.
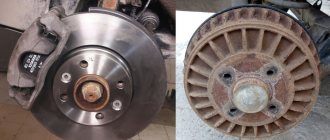
On most modern cars, discs are installed only on the front axle; drums are used on the rear axle. Their purpose is the same, only the operating principle and design are different. It doesn't take a level 80 mechanic to figure out that drum brakes are less efficient. And most importantly, they are somewhat more difficult to repair. Therefore, they are placed on the rear axle, since it accounts for no more than 30% of the load when braking. Therefore, the service life of the rear pads is greater than that of the front ones.
And replacing the front pads is several times easier than replacing the rear drums. All work can be completed in a few minutes.
Installation of rear disc brakes with a mechanical drive of the parking brake (kit from “AST”)
Device Description
Rear disc brakes with a mechanical drive of the parking brake for VAZ 2121-2123 (Niva-Chevy Niva) cars are recommended for installation on cars in order to increase the safety, reliability and efficiency of the braking system, and reduce the braking distance. At the time of writing, the kit cost 20,000.00 rubles.
This kit is designed for installation on VAZ 2121-2123 cars. The device uses the parking brake principle used by many European and Japanese car manufacturers, which ensures their reliable operation.
The rear brake mechanisms are activated in a timely manner, increasing the information content of the brake pedal, which allows for more efficient use of the braking system during dynamic driving.
The device is connected to the standard hydraulic system and the original cables of the parking brake system (handbrake).
The standard pressure regulator performs the function of braking force distribution.
You can install this device yourself by carefully following these instructions, provided you have the appropriate qualifications, conditions and tools.
Equipment
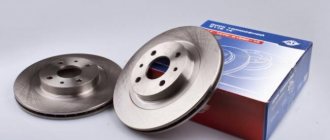
- Brake discs – 2 pcs.
- Brake caliper – 2 pcs. (right and left)
- Guide bracket – 2 pcs.
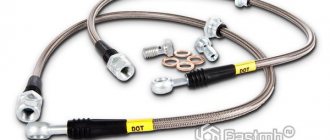
- Brake hose – 2 pcs.
- Plan – mounting washer – 2 pcs.
- Protective disc cover – 2 pcs.
- Brake disc pads – 4 pcs.
- Parking brake cable – 1 pc.
- Brake tee – 1 pc.
- Fixing springs – 2 pcs.
- Fasteners:
- Bolt .M10x1.25 30 mm (4 pcs.)
- spring washer f 10 (4 pcs.)
- flat washer 10 x 25 (8 pcs.)
- caliper bracket guide pin – 4 pcs.
- copper washer – 8 pcs.
- brake hose fitting – 4 pcs.
- spacer ring (for axle shaft) – 2 pcs.
- bolt M6x1 (with collar) – 6 pcs.
- Instructions with warranty card
- Box
Required tools and materials for installation
- Jack, 2 stands (if there is no lift)
- Wheel key
- Open-end wrenches: 8,10, 13, 17mm.
- Socket wrench with 17mm head
- Socket and Phillips screwdrivers
- Pliers
- Hammer
- Wooden spacers (planks)
- Metal brush
- File
- Brake fluid
- Liquid for wetting threaded connections
- Graphite lubricant
- Sealant
- Bitumen mastic
- Split wrenches for dismantling and installing brake lines
Installation
First of all, it is necessary to dismantle the drum brake mechanisms of the rear axle, following the instructions for the maintenance of VAZ 2121-2123 vehicles. You will not need all the components of drum brakes, with the exception of the axle shaft with standard bolts.
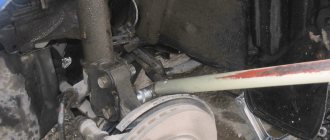
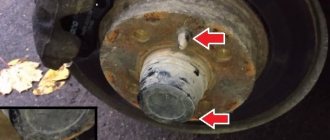
Before installing the axle shaft, install a spacer ring into the rear axle housing
then place a washer on the axle shaft so that the concave side is oriented towards the brake disc, and the holes for attaching the caliper are directed upward at an angle of 45 degrees. back as shown in the picture
Secure the assembled assembly to the rear axle housing with the standard axle mounting bolts
Major mechanism failures
When using a car, natural wear and tear occurs on all elements. And the disc is no exception - the pads gradually erase it. It is also worth noting that the service life of the pads is much shorter than that of the disc. But driving on dusty roads and water will significantly reduce the life of the pads and disc.
The most obvious sign that some kind of breakdown has occurred is the appearance of problems when braking. Any driver can feel changes in performance, but it is still recommended to carry out diagnostics at a service station. This will allow you to identify all problems in the brake system and more. But you can try to identify faults yourself if you have the desire and opportunity.
Finally
We discussed how you can install an HTD on a Niva. Such a solution will significantly improve the performance of the braking system, making it safer and more efficient. At the same time, to carry out this work you need to have a good understanding of the operating features of the vehicle. If you do not have the proper knowledge and skills, you should turn to professionals, because if you damage your brakes, you may find yourself in an unexpected situation on the road. Which is fraught with serious consequences.
How to diagnose breakdowns?
Before replacing the Chevrolet Niva brake discs with your own hands, you need to diagnose the entire system. The fact is that tubes and hoses can also become unusable, and this also affects driving safety. But let's get back to the pads and discs. Checking them for malfunction is quite simple:
- Pay attention to whether there are any extraneous sounds when braking - grinding, noise, jerking, and others.
- Are there any cracks, gouges, or chips on the surface of the disc? It is also necessary to carefully inspect the pads and check the thickness of the friction layer.
If you notice such malfunctions, you need to take immediate action. The disc wears out after prolonged use, so you will have to check its thickness with a caliper. When grinding a disk, you need to pay attention to its final thickness - it should be more than 9.5 mm. If the thickness of the disc is less, it is prohibited to install it on the car. It may also happen that the metal becomes covered with cracks and breaks into pieces.
Looking for the root of the problem
So, what causes such a characteristic ringing? The reason lies in insufficient pressure of the pads to the discs. As a result, a gap appears between them. On bumps, the pads vibrate and involuntarily come into contact with the surface of the disc.
This is what causes the haunting sound. What is noteworthy is that from the street it looks more like a ringing sound. And dull blows are felt inside. Sometimes this indicates a problem with the shock absorbers or ball joint. But don’t rush things and sort out the suspension. Perhaps your brake calipers are just rattling.
Tools for repair
When replacing brake discs on a Niva Chevrolet, you need to use a standard set of tools; no scarce equipment is needed.
List of tools:
- Socket wrenches, open-end wrenches, socket wrenches for 10, 14, 17, 27. If you use socket heads, it is inconvenient without a ratchet.
- Pliers.
- Screwdrivers.
- Hammer.
- Jack.
- Wheel chocks and supports.
Inspection of calipers
In 40 percent of cases, the front caliper rattles due to dry lubricant. Many car owners do not know that this part requires periodic maintenance. How often should you do it? Experts give the answer - lubrication is carried out every time the pads are replaced. The service life of the latter can range from 20 to 60 thousand kilometers, depending on the location (front or rear), as well as the driver’s driving style.
How to perform an audit? First you need to find a quality lubricant. It must be specialized - specifically for guides. Reviews do not recommend using grease for hubs, as well as copper and ceramic analogues. They dry out quickly and are not suitable for use in this location. A popular manufacturer of specialized lubricants for calipers is Liquid Moly. Typically this product is sold in vacuum bags. One is enough for two guides. The lubricant does not lose its properties at temperatures up to 200 degrees Celsius.
Note! If the piston boot is damaged, it must be replaced immediately. Otherwise, the rear and front calipers will rattle constantly.
The same work must be done on the adjacent brake mechanism. In order not to run to the store when you discover a damaged boot, it is recommended to purchase a repair kit in advance (in extreme cases, it will remain “in reserve”).
Repair algorithm
And now you can start replacing the discs and brake pads on the Niva. The manipulations are not very complicated, follow these instructions:
- First, park the car on a level surface, squeeze the handbrake lever and hang out the entire front part. Be sure to place reliable supports under the car so that it does not fall. Place chocks under the rear wheels.
- Unscrew the nuts securing the wheel being repaired. Remove the wheel from the car.
- Remove the brake pads. If you plan to put them back, then mark which were on the outside and which were on the inside.
- Now you need to remove the caliper. There is no need to disconnect the hoses during removal. It is enough to unscrew the two bolts that secure the caliper to the steering knuckle, lift it and secure it with a wire to the car body. Try not to hang the caliper on the hose, as this may damage it.
- Now you can start removing the disk. To do this, just unscrew the casing bolt.
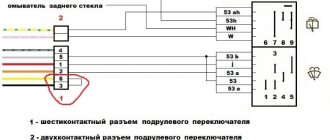
Design of the working hydraulic system
In order to increase the reliability and safety of control, the hydraulic brake system of the Chevrolet Niva is built according to a dual-circuit diagonal design. The first hydraulic drive circuit drives the front right and rear left wheels, and the second drive drives the front left and rear right wheels. Thus, controllability is maintained in the event of failure of one of the hydraulic drive circuits. The hydraulic braking system includes:
- brake pedal located in the cabin under the driver’s right foot;
- vacuum pedal pressure booster;
- master cylinder with reservoir for filling brake fluid;
- dual-circuit hydraulic drive pipeline;
- working brake cylinders of the rear and front wheels;
- pressure regulator with actuating lever.
The pressure of the driver's foot on the brake pedal is increased by a vacuum booster and transmitted to the piston of the master cylinder, which, moving, compresses the brake fluid. The fluid pressure increases and is transmitted through pipelines to the working cylinders of the front wheels and the brake pressure regulator of the rear wheels. The pistons of the front calipers and rear working cylinders, under pressure from the brake fluid, extend and press the Chevrolet Niva brake pads to the surface of the discs and drums, slowing down their rotation.
Brake disc disassembly sequence
It is worth noting that replacing the front brake discs on a Chevrolet Niva is a little more complicated than on any other passenger car. You'll have to work hard before disassembling the entire mechanism.
Perform the following manipulations:
- Using a screwdriver, bend the tab of the plate on the lower and upper bolts that secure the brake pad guide to the knuckle.
- Remove two bolts.
- Remove the casing and guide block.
- Now unscrew the hub securing nut and remove the entire mechanism.
- Disconnect the hub and brake disc.
After this, repairs can begin. All elements are assembled after repair in the reverse order. We looked at how to remove a brake disc on a Chevrolet Niva. But the tightening should be done cross to cross. Only in this case will you be able to achieve high connection reliability.
Chevrolet Niva
To do this, unscrew the casing mounting bolt. Using a screwdriver, it is necessary to bend the tendril of the locking plate of the lower and upper bolts securing the shoe guide to the steering knuckle. Now you need to unscrew the lower and upper bolts securing the pad guide.
The casing and guide block are removed. The hub nut must be unscrewed, and then the hub must be removed along with the brake element. Next, you need to disconnect the hub from the part.
To do this, screw on the hub nuts and knock out the studs one by one. A nut screwed onto a bolt will not allow the thread to be damaged, since direct impacts will fall on its surface. By separating the disk and the hub, you can carry out the necessary measures. This can be either replacement or repair of the product. After the repair or replacement has been made, it is necessary to assemble all the elements in the reverse order of removal.
How to remove a stuck brake disc / DIY puller
During the assembly process, it is important not to forget to lock the bolts securing the guide pads. Thus, replacing the disc will prevent brake system malfunctions.
What to do if the disk gets hot? During the operation of a Chevrolet Niva, moments arise when the brake discs heat up. And this is a normal phenomenon, because the physical process of friction is caused by heating of the rubbing parts.
8.9.5 Replacing the brake disc
Heating the surface of a product is a negative phenomenon that entails many problems: What to do if the brake elements get hot? Is there any adequate solution to this problem? From the factory, Chevrolet Niva cars are equipped with cast iron brake elements that have a hollow surface.
Currently, many manufacturers produce so-called ventilated products. Ventilated discs are products that have special holes or notches.
With their help, thermal energy is removed, thereby preventing the element from overheating to a critical temperature. The notches reduce friction to a minimum, so the brake elements do not heat up as intensely. The reliability of such products has been proven in practice, so a solution to the problem if the brake elements get hot has been found.
On a Chevrolet Niva, replacing brake discs can be done on your own. To do this, you will need a standard set of wrenches, a ratchet, a hammer, a jack, a screwdriver and pliers.
To replace the front brake discs, place the car on a flat surface. Then we tighten the handbrake, put shoes under the wheels and hang the front of the car using a jack. We dismantle the wheel from the side from which the spare part is being replaced. In this case, it is not necessary to disconnect the hoses. We hang the caliper with a wire so that the brake hoses are not damaged. Then disconnect the brake pads from the disc.
In order not to confuse these spare parts during assembly, it is recommended to put marks on them.
After that, we proceed to removing the disk. To do this, unscrew the bolt securing the casing. Then we tighten the two bolts that secure the pad guide. We dismantle the guide block and casing. Unscrew the hub nut and remove this element along with the brake disc. Then we disconnect the hub and disk. To do this, you can screw on the hub nuts and knock out the studs one by one. This method will preserve the thread when struck with a hammer.
Having disconnected the disk from the hub, you can proceed directly to replacing the spare part. When installing a new drive, it is important to correctly reassemble the removed elements.
During the assembly process, you should pay special attention to the bolts securing the guide pads.
What if the disk gets hot?
When operating a vehicle, it may occur that the disk becomes very hot. Of course, it will heat up during friction; this is a completely normal process. But sometimes it happens that the temperature just goes off scale. And many problems may appear - cracks, defects, severe wear. The problem of excessive heating can be solved quite simply if you take this issue seriously.
It is equipped with cast iron discs. Today you can find ventilated products on sale that have notches and holes on the working surface. It is with the help of such elements that a large amount of heat can be removed. And the brake disc will not heat up to critical temperatures.
Plate
Many manufacturers install special anti-squeak plates from the factory. They follow the contours of the block and are up to one millimeter thick. Many people do not see the point in installing these elements. But they have an effect. If the spring is not able to properly press the pads, this pad partially compensates for this gap. If the calipers rattle, what should I do? It is necessary to inspect the brake mechanism and check for the presence of an anti-squeak plate.
Installing ventilated discs
But what needs to be done when replacing brake discs on a Chevrolet Niva? Installing ventilated discs instead of standard ones is quite difficult; you will have to perform several costly manipulations:
- Replace wheel rims. Instead of size R15 you will need to put R16.
- Of course, you need to buy the discs themselves.
- You will also need a new set of pads.
- You still need to install new calipers and fasteners.
After installing all the elements, you can start operating the car. And do not forget to promptly check the condition of the brake mechanisms. If necessary, you need to replace the brake discs on the Chevrolet Niva. If the standard ones do not suit you, you need to install ventilated ones - they can not only eliminate overheating, but also significantly improve braking efficiency.
Lada Priora Hatchback USiK › Logbook › ZDT AST with ABS
Immediately after I bought USiK I wanted a ZDT, but somehow I didn’t have the funds. And only a year later I decided to buy it. I thought for a long time about which company to take. I just wanted a ready-made kit. In the end, I settled on two options: Lucas and AST. Lucas seems to be a well-known company, and AvtoVAZ puts them on the Kalina sport. They also have a 2108 disc - you can buy it anywhere. AST has all its own spare parts, but they provide a certificate and conclusion from US. This outweighed Lucas. I will only hope that the office will not burn out and that I will still be able to buy consumables.
I won’t describe the packaging; I did a very good description of the RZ296 in my magazine: Review of rear disc brakes.
I'll tell you how I installed it. There is no ditch in the garage, only a jack is available for help. I took the winter kit, lifted each side and put two wheels on it.
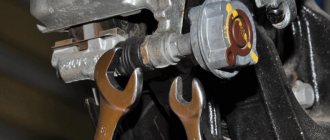
Now everything is ready for dismantling and installation. First, we unscrew the 2 nuts of the handbrake equalizer, there is very little space there - the muffler is in the way, it took me about 40 minutes to unscrew - everything is sour. We take out the standard parking brake cables. Then we throw off the drums, remove the pads, unscrew the ABS sensor and brake pipe. (this is, in principle, well described in the Murzilka).
Next, take a 8mm hexagon (mine had to be filed with a grinder to remove the bolts) and unscrew the hub from the beam.
The bolts are then unscrewed, BUT the hub does not fall off. Great! Well, never mind, take a heavier hammer and a small board. A couple of hits and everything flies off with a bang!
We clean the beam from rust and dirt, and I lubricated it with a thin film of lithol so that it does not rust. (And in general, it’s better to wash everything from sand and dirt before starting work, and spray WD40 everywhere. A couple of bolts were not easy.)
Next, we begin installation. The instructions, I’ll be honest, are not entirely successful. It’s written too cleverly and instead of photos it’s better to have a diagram. Well, it’s okay, after reading it several times, you get into what’s written and it goes like clockwork.
We take the plates, attach a strip to them through the pinion and the bushing - the ABS sensor mount. We secure the ABS sensors with standard fasteners. The main thing is not to confuse the plates - they should have their convex side facing outward. It turns out that the inscription “AST” on the left hub is on the inside, and on the right hub it is on the outside.
Then you need to secure the hub, brake shield and plate. For Priora, the shield is placed between the hub and the plate.
I tightened the hub with the bolts from the kit, although I really wanted to use standard hexagon bolts, but it is written to use only the fasteners from the kit. Tighten with great effort. Next, we attach the brake disc and caliper assembly. We fasten the brake hoses and brake pipe.
ATTENTION! Now let's pump. I didn't succeed the first time
It is necessary to pump as follows: 1. We take a smart assistant (in my case, an assistant), a 30 cm transparent tube (suitable for a washer), a transparent bottle.2. Pour some brake fluid into a bottle, start with the right rear wheel, attach the tube to the bleeder fitting and prepare the key for 10.3. The assistant first presses the pedal several times and holds it, and only then you need to turn the fitting with a key and bleed the air. Then we tighten the fitting and repeat until all the air comes out (you can see it by the bubbles in the bottle). 4. In the same way, the left wheel. Is the pedal tight? All OK! if not, then step 3 again. By the way, you don’t need to reset any terminals, you don’t need to turn on the ignition either - everything is the same as on a car without ABS. Just don't forget to add brake fluid.
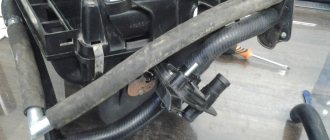
For me, the most difficult thing was to crawl under the car and insert the cables into the equalizer. It was already faster than when I was filming.
Dirty and happy with the result, I went to wash myself.
The first time I pumped it poorly, so the result was zero. I pumped it again - it felt great! It’s still getting used to it, but you can already feel the difference - it’s like a parachute being opened from behind)))