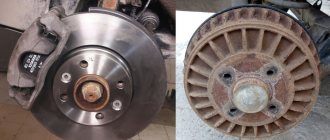
The quality of braking depends on the condition and thickness of the front brake discs on a Lada Granta car. Of course, the thicker and smoother the discs, that is, their smoother surface, the better the braking properties will be. Let's look at the main reasons why it is worth changing these parts of the brake system:
- Increased disc wear. For new ventilated discs it must be at least 17.8 mm
- Furrows and surface irregularities left by pads or foreign particles (stones, sand, etc.)
- Bent surface - does not happen so often, but this may cause such features as vibration during braking and runout
If you notice at least one of the above symptoms, you need to check the condition of the brake discs and, if necessary, replace them. To perform this DIY repair you will need the following tool:
- Balloon wrench
- Jack
- 7, 13 and 17 mm wrench
- Torx head t12
- Ratchet and extension
- Hammer
- Copper grease
When to change brake discs
There is no specific operating time or set mileage of the car in case of replacing the TD. And yet, many car enthusiasts face this problem.
Signs of a faulty brake system are determined quite simply:
- squeaking around the wheels when you press the brakes;
- increased brake pedal travel, so-called sagging;
- a significant decrease in the fluid level in the main brake reservoir;
- When you press the brakes, the car pulls to the side or a vibration is felt.
What caused the appearance of such signs of malfunction in the vehicle is determined by a visual inspection of the condition of the mechanisms, in particular, the degree of wear of the brake discs and pads on all wheels is determined. Based on its results, a decision is made whether the brake pads need to be changed or whether the brake discs need to be replaced.
Let's summarize
As you can see, the process of replacing brake pads is not complicated; it is important to initially understand how to fix it. The work will not take much time - half an hour, and the second or third time you will do it even faster. Pay attention to the sounds when braking: if there is a whistle, grinding or creaking, you feel kickback in the pedal, the system begins to “beat” - it’s time to install new pads. Practice shows that on a Lada Granta, for a driver with a calm driving style, the service life of the kit increases to 50 thousand kilometers, for motorists and reckless drivers it decreases to 30 thousand kilometers.
Preparing to replace the AP
Having determined that the TD is faulty, you need to prepare to change them yourself. To do this, you first need to buy a new spare part from a car store.
When choosing brake discs for his car, the car owner must take into account his driving style. Does he like to accelerate sharply and actively maneuver? How often does he use the brakes? He drives a lot around the city or mostly intercity trips on the highway.
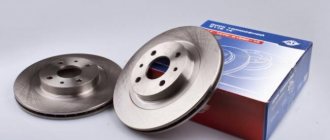
The spare part from which manufacturer you need to buy depends on these factors. Discs can be standard or sports.
- Standard TD - made of cast iron, the casting is processed on a milling machine. They are ventilated and non-ventilated. Without ventilation, it is a single disc that is pressed on both sides by brake pads. A disk with ventilation is easy to distinguish - it is two disks connected by bulkheads. Ventilation occurs during movement due to air entering between these pancakes. Some of the respected manufacturers of these products are Bosh, Zimmerman, ATE.
- Sports TD - made of durable and ultra-strong gray cast iron, as well as austenitic stainless steel. These are considered to be more durable products that can last much longer and with more aggressive driving. Such discs are produced by EBC, DBA, Brembo.
The driver must remember that when the front brake discs are replaced, they must be changed in pairs, even if one of them is suitable for further use in all respects. The same rule applies to rear brakes.
This rule is explained by the fact that unequal weight of the same type of spare part on the wheels of the same axle will lead to loss of directional stability.
Thus, for repairs, two or four TDs are purchased, but in no case one or three.
In the garage or at a special technical site, the tools and materials needed for repairs are prepared in advance.
- Jack and wheel wrench.
- Keys to "13" and "17".
- Ratchet wrench.
- Large flathead screwdriver.
- Thin flathead screwdriver.
- Clamp.
- A piece of wire to fix the stupor.
- Hammer.
- WD fluid to unscrew stuck fasteners.
- Brake fluid, in case of bleeding the brakes.
- Rags.
Recommended tire pressure for Lada Granta: sedan, liftback
Car: Lada Granta. Asks: Vasily Petrovich. The essence of the question: What pressure should be in the tires of a car, and what are the recommendations of the plant and the owners of the Lada Grant?
I purchased a Lada Granta in the “NORMA+” configuration. The former owner drove on 15-radius tires, but I, taking into account the quality of our roads, decided to change the wheels to R14 in order to increase the profile of the tire itself.
- At the same time, the question arose: at what pressure is it optimal to ride on tires of different radii?
- What tire pressure will be optimal for the Lada Grant?
- There is also a popular idea that if you reduce the pressure, the car will become “softer”. Is this so and what does it mean?
What is tire pressure?
First, it’s worth understanding the very concept of tire pressure. After all, this indicator is relative, and it does not show how much air is in the tire, but indicates the ratio of the amount of air to the volume. Therefore, for tires of different radii, width and profile height, the tire pressure will be approximately the same.
Factory pressure settings
Yes, indeed, if you look at the Lada Grant’s operating book, different tire sizes correspond to different pressures.
Factory recommended tire pressure parameters
But the difference is not too significant. For wheels with size R13, the front and rear wheels should be kept inflated to 1.9 atmospheres, and R14 and R15 should be inflated to 2 atmospheres.
Lada Granta sedan
| Equipment | Tire size | Air pressure in front/rear tires, MPa (kg/cm2) | |
| at partial load | at full load | ||
| Standard | 175/70 R13175/65 R14 | 0,19/0,19 (1,9/1,9)0,20/0,20 (2,0/2,0) | 0,19/0,21 (1,9/2,1)0,20/0,22 (2,0/2,2) |
| NormaLux | 175/65 R14185/60 R14185/55 R15 | 0,20/0,20 (2,0/2,0)0,20/0,20 (2,0/2,0)0,20/0,20 (2,0/2,0) | 0,20/0,22 (2,0/2,2)0,20/0,22 (2,0/2,2)0,20/0,22 (2,0/2,2) |
13 tires on the Norma configuration
Lada Granta liftback
| Equipment | Tire size | Air pressure in front/rear tires, MPa (kg/cm2) | |
| at partial load | at full load | ||
| StandardNormaLux | 175/65 R14185/60 R14185/55 R15 | 0,20/0,20 (2,0/2,0)0,20/0,20 (2,0/2,0)0,20/0,20 (2,0/2,0) | 0,20/0,22 (2,0/2,2)0,20/0,22 (2,0/2,2)0,20/0,22 (2,0/2,2) |
14th tires for Granta liftback
Pressure and load on the vehicle
In this case, you should also take into account the load with which the car is operated most of the time. If the payload is around half of the maximum load capacity, then the tires should be inflated as described above.
But, if the car constantly drives under full load, then the pressure in the rear tires should be increased slightly. For 13th wheels at the rear you need to pump up to 2.1 atm., and for 14th and 15th radius the pressure in the rear tires of the Lada Grant needs to be increased from 2.0 to 2.2 atmospheres.
If you drive on wheels whose pressure is slightly lower than required by the car manufacturer, it will indeed be a little more comfortable. But there are several factors to consider.
Factors to consider
Firstly, it is safety. It is not for nothing that the manufacturer prescribes a specific pressure value for tires.
When driving at low speeds, for example up to 60 km/h, this will not have much effect, but if you are a speed lover, then it is better not to experiment.
Tires with pressure even slightly less than the nominal pressure will worsen the vehicle's handling at high speeds and also increase its braking distance.
Less pressure - more flow
Secondly, lower tire pressure means greater rolling resistance, and therefore higher fuel consumption, as well as increased wear of the tread itself. Therefore, almost all tire manufacturers recommend that drivers regularly check the tire pressure of their car. This should be done at least once every three weeks.
Optimal tire size for Lada Granta
As for how to make driving on rough roads more comfortable with tires, it is best to choose those that have the highest profile. Due to this, the wheels will be able to absorb large irregularities.
In this case, the best option for the Lada Grant is tires with size 185/60R14.
How to remove a brake disc
In order to replace a failed TD, you need to perform a series of actions sequentially.
- Press out the piston of the brake working cylinder.
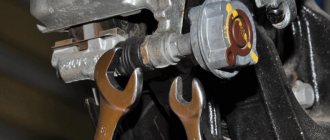
- Disconnect the caliper. To do this, two mounting bolts are unscrewed from the inside of the hub.
- Without disconnecting the brake hoses, move the caliper, thereby freeing the disc. Release the brake pads and secure them with a clamp.
- Secure the caliper using the prepared wire.
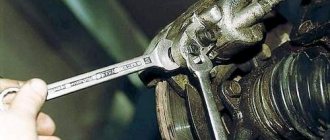
- On some car models, the caliper frame interferes with disc removal. In these cases, you need to unscrew the frame fastening and remove it.
- Before removing the TD from the hub, you need to unscrew the stuck fastening bolt, having previously lubricated the mounting location with WD fluid or brake fluid, if it is not available. There may be one or two such bolts securing the disc to the hub. It depends on the car model.
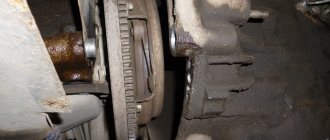
- Once the mounting bolts have been removed, you can begin to remove the TD. Often, it is stuck to the surface of the hub. To facilitate its dismantling, you need to lightly tap it with a hammer to separate it from the wall of the adjacent part.
- After removing the old brake disc, be sure to remove rust, scale and dirt from the surface of the hub. If this is not done, then after installing a new spare part, the hub will run out more than the permissible value.
- Install a new disk in the free space. During its installation, a torque wrench is used to tighten the mounting bolts. Torque force - 100-120 Nm. If you overtighten the fasteners, this can lead to radial runout of the hub.
- Assembling the brake mechanism on a new disc is carried out in the reverse order.
- After the brake mechanism with the new disc is assembled, the runout of the hub and disc is checked. To do this, a special meter is installed with a needle at a distance of 5 mm from the surface of the new disk, which must be rotated. The runout should not exceed the value permitted for a specific vehicle model.
- In the same way, the brake disc on the opposite wheel is changed, and the rear brake discs are also replaced.
Experience shows that replacing brake discs, although a labor-intensive process, is relatively simple. However, if the driver does not have enough skills in handling the tool, it is better to seek help from professionals.
Minimum thickness
To be honest, this is a different indicator for all manufacturers, that is, there is no unified value when it is necessary to make a replacement. For example, for our VAZs this is one thing, but for my Chevrolet AVEO it is completely different. All these parameters depend on the structure of the calipers, pads and the disc itself.
For example, on some Nissan models, as well as Renault Logan, the standard thickness is 22 mm
The minimum recommended by the manufacturer is 20 mm.
For VAZ
The minimum for ventilated options is 17.8 mm
For non-ventilated ones - 10.8 mm.
It should be noted that the manufacturer usually indicates wear of 1 mm on the sides. Then you need to replace it! However, I know from practice that many tighten them to unacceptably thin sizes, sometimes wear of 3 or more millimeters on the sides is wrong.
Video on replacing TD. We recommend viewing
When using an aggressive driving method, active wear of the vehicle's systems and mechanisms occurs. In this case, it is important to control the production of elements responsible for safety; this largely applies to the braking system. In addition to the wear of the friction linings, the metal disk with which they are in contact is abraded. This means that a responsible driver must know how to remove the brake disc from the hub in order to replace it.
The need to replace disks
The regulated period established by manufacturers for replacing a disc is not always available to car owners. In most cases, this parameter is controlled based on operating hours for each vehicle. Replacement is carried out when negative indirect signs are identified. The main problematic symptoms are:
If such signs appear, a diagnostic examination must be performed. It is advisable to carry out monitoring on each wheel in order to have a complete picture of the condition of the braking system. In many cases, replacing the pads will be enough. However, if obvious traces of wear are visible on the metal surface or the thickness is below the limit parameter, then the brake disc will need to be removed to replace it or partially restore it.
Which pads are better to put on a VAZ?
Today there are a large number of companies on the market that sell linings for classic or modern VAZ cars. The following are the 10 best companies, according to consumer reviews and sales statistics.
10th place: AvtoVAZ
Typically, pads are used in everyday use where there is no need for increased performance or durability. The products are not suitable for fans of high-speed driving - the standard material does not like overheating, which can cause brake failure.
Users install such brake pads on the VAZ 2107 and other classic-type models.
Advantages:
- full compatibility with car models;
- sufficient reliability;
- moderate cost;
- durable base;
- available in every store.
Minuses:
- do not like overheating;
- may squeak a lot;
- a lot of debris is formed;
- do not withstand aggressive use.
9th place: DAFMI
The controversial reputation of the brand imposes certain restrictions on customer demand. On the one hand, users praise the products, saying that the pads wear out for a long time and hold critical loads well. Others insist on a large number of shortcomings, pointing out strong creaking, lack of effective braking even after prolonged grinding.
I am pleased with the minimum price of the products. If you have a limited budget, you can buy brand pads and play the lottery.
Advantages:
- minimum price;
- wide use;
- wide selection of models.
Flaws:
- questionable quality;
- there is a high probability of buying a defect.
8th place: TRUCKMAN
A competent approach to the arrangement of materials and technical processes during manufacturing eliminates crumbling of the linings due to overheating or shock loads. This provides the necessary durability and practicality of use.
On the other hand, increased rigidity of the composition negatively affects the comfort of use. The pads make a lot of noise and are not effective enough when exposed to water or snow, which forces motorists to be careful when driving in bad weather.
Advantages:
- optimal cost;
- good wear resistance;
- hold heat well;
- take a long time to grind in.
Flaws:
- fasten;
- require careful handling during operation in bad weather.
7th place: QUATRO FRENNI
The company's arsenal includes Vesta and XRay brake pads, as well as for other modern car models. Thanks to a wide range of organic mixtures and pad sizes, there is a choice to suit the individual needs of the user. Cheap modifications are perfect for production cars operated in standard mode without heavy loads. For modernized cars, semi-metallic linings with an increased margin of strength and durability are suitable.
Among the disadvantages, buyers highlight the fakes they come across, which greatly damages the brand’s reputation.
Advantages:
- wide choice of modifications;
- normal quality of budget products;
- low noise level.
Flaws:
a large number of fakes.
6th place: HERZOG
In Russia, the quality of the brand is well known. Brake pads can last 1.5-2 times longer than standard brake pads on Lada Largus or classic modifications. Users like the absence of squeaks, a normal reaction to overheating and minimal formation of chips, which ensures comfortable operation of the car and an adequate response to driver manipulations.
Advantages:
- good product quality;
- no squeaks;
- do not crumble when overheated;
- sufficient durability.
Flaws:
- slightly overpriced;
- there are fakes.
5th place: EZATI
Advantages:
- good braking performance;
- increased service life;
- does not eat discs - well-thought-out composition;
- sufficient distribution.
Flaws:
limited assortment.
Advantages:
decent value for money.
Flaws:
limited assortment.
3rd place: MARCON
Advantages:
- minimum price;
- sufficient efficiency;
- rapid heat removal from the contact zone.
Flaws:
- creaking;
- wipe off quickly.
2nd place: ROSDOT
Separately, we can highlight the company’s assortment. The company produces brake pads not only for VAZ, but also for imported cars.
Advantages:
- good quality;
- reasonable price.
Flaws:
wear out quickly.
1st place: STS
Advantages:
- impressive reliability;
- adequate price tag.
Flaws:
not detected when used correctly.
Preparatory operations
You can dismantle the old disk and install a new one yourself, even in a garage. You will first need to buy wheels suitable for your specific car model. This must be done carefully, since sometimes even the year of manufacture of the same car affects the parts being installed.
It is worth choosing a specific manufacturer of these spare parts based on your driving style. The required characteristics for a driver who uses an active style with frequent use of the brake pedal or for a driver who spends most of his time on a country road will be different.
It is customary to divide TDs into classic (standard) and sports (reinforced):
- The classic design uses malleable cast iron, machined to the desired dimensions. Non-ventilated and ventilated specimens are available. In the first case, the basis is a single disc, next to which a caliper with brake pads is installed. In the second case, a dual system of disks separated by ribs is used. Due to the entry of air between them, the unit is ventilated. Popular brands that manufacture these parts are ATE, Zimmerman, Bosh.
- In the production of reinforced discs, more durable grades of cast iron or high-alloy stainless steel are used. These elements provide longer service life under increased loads while driving. Well-known brands in this area offer more expensive products. Most often in auto stores you can find brands such as Brembo, DBA, EBC.
Brake discs must be replaced in pairs on both sides of the axle.
This will ensure proper operation of the entire braking system. Even if one of the sides is in satisfactory condition after visual inspection, and the other is significantly worn, it is recommended to replace both disks. If dismantling work is carried out on one side, then the discrepancy will lead to loss of directional stability. The rule applies to both the front and rear axles.
To carry out installation and dismantling work you will need the following tools:
- car jack (mechanical, hydraulic, pneumatic);
- clamp;
- a hammer with a wooden handle (a rubber or wooden mallet is allowed), in some cases a reverse hammer is used;
- a set of wrenches and screwdrivers;
- rust treatment fluids (WD-40 or analogues);
- brake fluid, if bleeding of the brakes is required;
- clean rags and personal protective equipment (work gloves, safety glasses, etc.);
- metal brush or power tool with a special attachment;
- torque wrench.
Priora or Granta
The price category of Grants and Priors is different. But these cars also have many common features, which complicates the choice. Consider the car interior and exterior. If we take the cars individually, they are better in appearance than the Grant. It compares favorably with the Priora car with its modern design.
https://youtube.com/watch?v=C6pPm-cL880
These cars were equipped with identical engines. The only differences are in the configuration. The Granta has a better gearbox than the Priora. The creators updated the Grant and installed a new manual transmission. It is superior to the previous one, and this cannot be ignored. At the moment there are no vibrations in the car, and gear shifting has become more comfortable. Priora and Granta have identical technical characteristics, so fuel consumption will be corresponding.
The interior of the car is presented in European style. It has a high level of comfort and is quite quiet. The only drawback of the Grant is that, after driving several thousand kilometers, the car begins to “crack.” The Grant does not have a sensor that would show the engine temperature. If we talk about safety, the car meets all standards and requirements. Despite these shortcomings, this model is still considered successful. The Granta has an automatic transmission, which cannot be said about the Priora. Priora and Granta have the same high-quality suspension.
But remember that Granta appeared on the Russian car market later, which means its suspension is newer and improved. In addition to all the technical characteristics, the prices of both machines should be compared. Priora is inexpensive compared to Granta. It can be noted as a fairly economical model. Priora is popular among young people. The downside is her stance. Due to the quality of the roads, they simply begin to fall apart. But overall the model is not bad.
Replacement process
The machine for repair work is installed on a straight, level surface. Use a jack to lift the required side and remove the wheel. In the opened space we free the disk for dismantling. Press the piston of the working cylinder to remove the caliper. First loosen the mounting bolts on it.
There is no need to disconnect the hydraulic pipes of the brake system; just move the unit to the side and pull it with a wire to any beam or rod. We unclench the brake pads and block them with a clamp.
In some assembly designs, dismantling is hindered by the caliper frame. It is enough to unscrew its fasteners and get rid of the obstacle. In most cases, the mounting bolt sticks and prevents removal from the hub. To weaken it, use WD-40 or brake fluid. Some machines have a pair of these bolts.
Having freed yourself from problematic hardware, you need to remove the stuck brake disc. Here you can also pre-use special fluids for corrosive areas. Then you need to apply one of the proven methods:
- Tapping with a wooden tip on the back side. This should be done with short sharp blows so as not to create problems.
- Using a wooden or rubber mallet, tap the reverse plane. This method is more gentle on the parts than using a heavier metal hammer.
- Apply a reverse hammer . To do this, you will need to buy or borrow this relatively rare but effective instrument.
- You can use a puller. However, you should feel the effort so as not to break the tool or disk, because in some cases stronger pullers can damage a heavily stuck part. Then you can forget about restoring the latter.
After getting rid of the old disk, we clean the surface from contaminants in the form of scale or dust. To do this, we use a metal brush or an attachment for power tools. Later we clean the surface with special liquids. If cleaning is not carried out, the new part may sit on the surface with large runout, which will lead to undesirable consequences.
Using a reverse hammer
We install the restored or new brake disc in the free space. The bolts for fastening it will need to be tightened with a force of 20 Nm , which a torque wrench will help with. The caliper will require increased force, which should be in the range of 100...120 Nm . Do not over-tighten the fasteners to avoid radial runout of the hub. The remaining elements of the unit are assembled in the reverse order of disassembly. Be sure to check the position of the hoses so that they are in their proper places.
Factory galvanizing methods
https://youtube.com/watch?v=e32cQIMcd0Y
Discussions about domestically produced cars do not subside. They argue about the Lada Granta, whether the body is galvanized, how the price corresponds to the quality, meanwhile the giant AvtoVAZ continues its strategy of improving the cars it produces and improving galvanization as well.
The factories use the following coating methods:
• thermal galvanizing – the most reliable;
• galvanization, when zinc is deposited from a solution on the surface of parts under the influence of electric current;
• coating with a primer with preliminary application of manganese, zinc and iron salts to the metal surface.
Final operations
The assembled assembly must be checked for acceptable runout. To do this, a micrometer is mounted on the stationary part, and the disk is rotated. Each car model has an acceptable runout value. The indicator can usually be found in the car manual.
For high-quality brake discs, the runout should not be more than 0.05 mm.
Having installed the wheel in place, we lower the raised car with a jack. We press the brake several times from inside the car. At this time, the pads are in contact with the disc. If necessary, the brakes are bled or the parking brake is adjusted.