In the gas distribution system, the belt is of particular importance. It is he who is responsible for the possibility of connecting the crankshaft and camshaft. In addition, without this drive, synchronous operation of the pistons in the cylinders and the intake/exhaust valves is impossible. The timing belt turns the camshaft pulley exactly half a revolution of the crankshaft pulley.
Quality and reliability are especially important in engines where the piston and valve group are a single unit, for example, like Kalina’s. Why should every car owner know how to change the timing belt on Kalina? The valves and pistons are located in the same block, but thanks to the belt they do not touch. Accordingly, when they break, the pistons hit the valves, which leads to expensive engine repairs.
Removing the timing belt
You will need : remove the generator belt, the right wheel and the plastic shield of the engine compartment, prepare a “10”, “17” key, a “19” socket, and a screwdriver.
Procedure:
- Remove the plastic engine cover.
- Remove the timing drive protective cover by unscrewing the three fastening bolts.
- Timing diagram.
Set the piston of the first cylinder to the top dead center position:
- Turn the crankshaft clockwise by the bolt until the mark on the toothed pulley aligns with the antennae on the rear timing cover.
- Remove the window plug at the top of the clutch housing and make sure that the mark is not located opposite the scale slot.
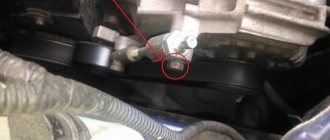
- Secure the crankshaft from turning by inserting a screwdriver through the window between the flywheel teeth.
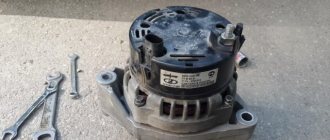
- Remove the bolt securing the generator drive pulley while holding the screwdriver. Remove the generator drive pulley.
- Loosen the tension roller nut. Remove the timing belt by turning the pulley so that the belt is loosened as much as possible.
- Remove the tension roller by unscrewing the nut securing it.
Have you noticed that the timing belt is eating or slipping? The reason may be a defective belt, rollers, or a pin that is overtightened.
Design and principle of operation
Torque transmission (rotation of the belt with maximum efficiency) occurs only at a certain belt tension. The device that provides the necessary force is the tension roller of the viburnum generator.
In essence, the roller is a regular bearing with a plastic coating on the outside. The tape moves along the surface of the roll. There is a bushing inside.
Types of roller construction:
- Eccentric. One of the simplest types of products. Its design is quite simple and reliable. The product consists of a bearing, bushing and outer plastic cushion.
- Bracket type. In this case, adjustment is made by moving the bracket on the motor.
How to install and tension the timing belt
- Place the timing belt on the crankshaft pulley.
- By tensioning both branches of the belt, we put the rear branch on the pump pulley and wind it behind the tension roller.
- We put the front branch on the camshaft pulley.
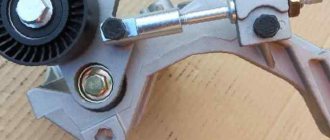
- Tension the timing belt by turning the tension roller counterclockwise and inserting a screwdriver (as in the photo).
- Tighten the bolt securing the generator drive pulley and turn the crankshaft by the bolt 2 turns clockwise.
- We check the coincidence of the crankshaft and camshaft marks. If the marks do not match, repeat the operation to install the belt.
The entire process of replacing the timing belt of an 8 valve engine is also shown in the video:
Causes of breakage and consequences
There are several factors why a part fails. Here are just the main ones.
| Factors |
Why is this happening
It is also important to change parts on time. The consequences of untimely replacement may vary. If the timing belt breaks on a Kalina with an 8-valve engine, the valves do not meet the pistons, which means the consequences are not as catastrophic as when the belt breaks on an internal combustion engine with 16 valves.
Untimely replacement can cause the following problems:
- severe wear of the piston group and liners;
- increased oil consumption;
- camshaft wear;
- valve bend;
- gear deformation.
Every car owner should periodically inspect the timing belt and know the signs indicating the need for replacement. You can do it yourself. This way, you will be able to avoid serious troubles in time that will lead to expensive and time-consuming repairs.
On Lada Granta and Lada Kalina cars, we check the condition of the timing belt of an 8-valve engine according to the maintenance regulations on a cold engine (15–35 °C) every 15 thousand km.
LADA > Granta
LADA > Kalina
Replacing the timing belt without special tools
The method can be used if there is no need to change the rollers.
- Cut off half of the old timing belt with a utility knife.
- Remove half of the old timing belt.
- We put a new timing belt on the crankshaft pulleys.
- We cut the second half of the old timing belt and remove it.
- Pull the new timing belt onto the crankshaft pulleys until the end.
Where can I buy
: Timing belt kits at low prices are available in our online store (Timing belt category).
Share on social networks:
Found an error? Select it and press Ctrl+Enter..
Source
Weaknesses of the product and signs of malfunctions
Whatever type of roller is used, the tightest point is the bearing. The fact is that the product is under constant load and operates in conditions of temperature changes, so breakdowns and wear of the device are quite common.
Signs of a faulty alternator belt tensioner:
- decrease in battery charge level;
- failure or interruption of operation of some energy-intensive consumers in the car;
- hum from the side of the unit when the engine is running;
- noticeable play when the roller is operating;
- uneven wear of the alternator belt (usually occurs on one side).
STAGE 1
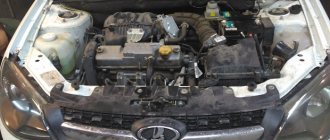
We drive the car into the inspection hole and lift the front right wheel with a jack. We remove the wheel and, opening the hood, let the engine cool. It is desirable that the engine temperature is approximately 60 degrees Celsius. Before getting to the Kalina timing belt, you need to remove the generator belt and its drive pulley on the crankshaft.
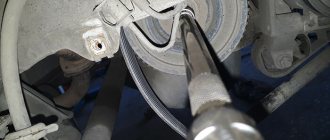
The generator drive device is shown in the photo below:
FIGURE 4 Installing the generator belt for 8 valve Kalina
As can be seen from the photo, the generator belt is tensioned using a roller. To remove the poly V-belt, you need to loosen the tension on this roller. To do this, you first need to loosen the rod locknut with a wrench (19). We loosen the lock nut and use a wrench ( we tighten the rod itself until the belt loosens and it becomes possible to remove it. Now it’s time to get to the generator drive pulley on the crankshaft. To do this, you need to go down into the pit and remove the engine “boot” protection on the right side. Also you need to remove the flywheel protection, which is secured with three bolts (10) from the bottom of the engine, on the gearbox housing. We remove the protection and, by inserting a flat-head screwdriver between the teeth of the ring gear and the gearbox housing, we will lock the flywheel. This is necessary so that when the bolt is unscrewed, the crankshaft does not turn. Bolt ( the key 17) is tightened very tightly, so to unscrew it, you will need to apply some force. To do this, it is better to use a socket with the same size and a pipe as a lever. After tearing off the bolt, unscrew and remove the generator drive pulley.
STAGE 2
At the second stage, we begin to directly remove the timing belt of the Lada Kalina 8 valves...
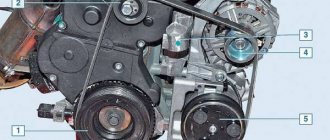
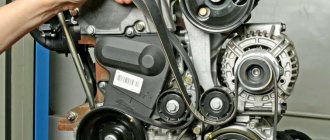
We leave the pit and remove the upper plastic engine protection. It is attached to the engine with four clips; you just need to carefully pull it off from each clip in turn. Next, remove the timing belt protective cover of the Lada Kalina. To do this, you need to unscrew the three mounting bolts with a wrench (10). One of them is located in front of the casing, and the other two are on the side. Having unscrewed the bolts, we removed the casing, and the entire gas distribution mechanism drive opened in front of us (see photo).
FIG.5 Timing drive Kalina 8 Cl
Now the crucial moment has come! It is necessary to install the entire Kalina timing belt drive strictly according to the marks. To do this, you need to take a socket head (19), preferably with an extension, and screw back the bolt that we unscrewed when removing the generator drive pulley.
Using this bolt, turn the crankshaft clockwise until the marks on the crankshaft and camshaft gears match. The locations of these marks are indicated in the illustrations above.
It is better to turn it by the crankshaft, but it is not advisable to do this with the camshaft. This must be done because the Kalina timing mechanism is driven precisely by the crankshaft, and not by the camshaft.
Snapshot
The surface of the toothed part of the belt should not have folds, cracks, undercuts of teeth and separation of fabric from rubber. The reverse side of the belt should not have wear, exposing the cord threads, or signs of burning. There should be no delamination or fraying on the end surfaces of the belt. If defects are found on the belt or there is a significant discrepancy between the belt tension control elements (see photo above), the belt must be replaced. You should also replace the belt with a new one if traces of engine oil are found on it (before installing a new belt, the cause of oil getting on the belt must be eliminated) or when replacing the coolant pump.
Attention! Failure of the timing belt (breakage and cutting of teeth) can lead to valves sticking into the pistons due to mismatch of the rotation angles of the crankshaft and camshaft and, as a result, to expensive engine repairs.
We replace the timing belt in accordance with the maintenance regulations every 75 thousand km or if defects are detected on the belt.
To avoid damaging the crankshaft position sensor, it must be removed.
Hello, readers of the blog RtiIvaz.ru. Today we will look at how to replace the timing belt of a Kalina with an 8-valve engine.
To begin with, here is a diagram for installing the timing belt of Kalina with an 8-valve engine:
FIGURE 1 Timing drive Kalina 8 Kl and location of marks
As can be seen from the schematic image, first of all, you need to correctly set the marks on the camshaft and crankshaft pulleys.
In the photo below, please see the position of these marks:
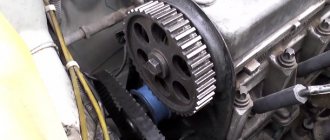
FIGURE 2 Crankshaft pulley on Kalina 8 Kl
FIGURE 3 Camshaft pulley 8 valve Kalina
Cost of replacement work
Prices for Lada Kalina timing belts in our auto stores vary from 400 to 1000 rubles per unit. If you also need to replace the tension roller, be prepared to shell out another 400-600 rubles.
The cost of replacing a belt is 500-800 rubles. With a roller – up to 1000 rubles.
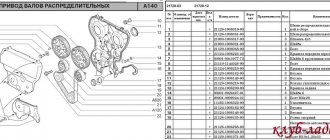
When buying a timing belt, it is better to give preference to a branded VAZ product. If this is not possible, you can purchase an analogue produced by a well-known brand. Below are samples showing the catalog numbers of the original belt and worthy imported analogues.
| MANUFACTURER | CATALOG NUMBER OF SPARE PARTS |
| TIMING BELT VAZ 2110 (8 VALVES) | |
| AVTOVAZ | 2112-1006040 |
| BOSCH | 1987949559 |
| CONTI | CT996 |
| CONTITECH | CT 996 |
| GOODYEAR | G1535 |
| GATES | 5539 |
| FLENNOR | 4428 |
| LUZAR | LTB0112 |
| LYNX | 136CL254 |
| PILENGA | CTP0996 |
| OPTIBELT | ZRK1538 |
| TENSION ROLLER | |
| AVTOVAZ | 21120-100612000 |
Troubleshooting
When testing the functionality of a node, it is recommended to follow the following sequence of actions:
- The first step is to visually inspect the tape and roller. To do this, you need to open the hood of the car, start the engine and observe the operation of the unit. At the same time, pay attention to the presence of vibrations in the tape and in the video itself.
- The second stage is checking the tension of the generator belt. All you have to do is grab the belt with your hand (with the car engine off) and turn it ninety degrees clockwise. If you can do it, then everything is fine. If the rotation angle is greater or less than 90 degrees, adjustment will be required.
- The third step involves video access and verification. To gain access to the product, you must remove the belt. Before you do this, you need to remember its original location. The belt can only be removed freely after loosening the roller adjusting nut.
- It's time to test the video's functionality. Turn, pay attention that there are no jams when scrolling, rotation should be free. In addition, it is worth carefully inspecting the outer plastic side of the roller (on which the belt runs). The surface of a serviceable device should be smooth, without deep grooves or other damage to the coating that would prevent the belt from rotating or contribute to its wear. If there is any sign of damage, the belt tensioner part will need to be replaced.