To enlarge the picture, click on it
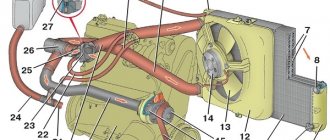
1. Heater casing mounting bracket; 2. Heater control damper; 3. Left heater casing; 4. Leg heating damper rod; 5. Radiator gasket; 6. Radiator; 7. Heater gasket; 8. Electric motor; 9. Fan shrouds; 10. Fan impeller; 11. Heating damper; 12. Heated windshield air duct; 13. Side nozzle air duct; 14. Side nozzle; 15. Central nozzle flap; 16. Blade pusher; 17. Blade axis; 18. Shoulder blade; 19. Lever for shutting off the central nozzle; 20. Windshield heating damper rod; 21. Lever for changing the direction of air flow; 22. Air heating control handle; 23. Windshield air supply handle; 24. Leg air supply handle; 25. Control lever bracket; 26. Bracket for fastening the rod shell; 27. Crane control rod; 28. Heater control damper rod; 29. Foot heating flap; 30. Axes of air heating control levers; 31. Screw clamp; 32. Heater valve; 33. Crane body; 34. Valve lever; 35. Hoses connecting the tap to the heater radiator; 36. Internal ventilation duct; 37. Windows for heating the feet of rear passengers; 38. Heater valve; 39. Driver's foot heating window; 40. Facing the central pillar; 41. Internal cavity of the central pillar; 42. Exhaust ventilation duct; 43. Center pillar upholstery; 44. Exhaust ventilation deflector lining; 45. Rubber valve; 46. Deflector housing; 47. Exhaust ventilation deflector; 48. I. Heater; 49.II. Heater operation diagram; 50.III. Heater valve; 51.IV. Exhaust ventilation of the interior of VAZ-2108 and VAZ-2109 cars.
Heating of the interior is provided by air heated in heater radiator 6, which is included in the engine cooling system parallel to the main radiator. The heater is mounted in the cabin under the instrument panel with four nuts to bolts welded to the air supply box. The air heated in the heater is directed into the passenger compartment through a system of air ducts attached to the bottom of the instrument panel and through air duct 36 of the internal ventilation. The air ducts are sealed with the heater using gaskets.
The heater consists of 3 right and left plastic heater casings, which are connected along the perimeter with 1 fastening brackets. To seal the casings, a special harness is placed in the grooves.
To force air into the cabin, an electric fan is attached to the top of the heater with two screws. The design of the heater allows the electric fan to be removed from the engine compartment.
The electric fan consists of two plastic casings 9, to which an electric motor 8 type 45.3730 is attached. An electric fan impeller 10 is installed on the electric motor shaft. To obtain the required rotation speed of the impeller, there is an additional resistor, which is attached with a screw on the left side into the hole in the casing 3 of the heater. Two resistor spirals provide three speeds of rotation of the impeller.
The air heating radiator 6 is installed in the heater casings, secured with three screws to the right casing and sealed with a polyurethane foam gasket 7. The heater radiator consists of two rows of tubes, cooling plates and two plastic tanks.
The heater valve is connected to the cooling system with rubber hoses. The circulation of liquid through the radiator is carried out by the cooling system pump. The valve consists of a body 33 with two pairs of pipes. In the valve body on the supply line, a plate valve 32 of the valve with a hole for the passage of coolant is installed on the axis. The valve lever 34 is connected by a rod 27 to the lever of the handle 22 for controlling the air heating. When lever 34 is turned, the hole in valve 32 opens the line for fluid to enter the heater radiator.
The heater is controlled by three handles 22, 23, 24, the levers of which are mounted on the axes of a plastic bracket 25, which is secured with four screws to the instrument panel. The air heating control handle 22 acts through the rods 27 and 28 on the valve lever 34 and the heater control damper 2 drive lever. When handle 22 is moved completely to the right, valve 38 and damper 2 open, air will be supplied by an electric fan through the heater radiator 6, in which the heated coolant of the cooling system is circulated. In the middle position of the handle 22, the valve and damper 2 will be in intermediate positions, the air will pass both through the radiator and bypassing it. This more reliably ensures the required degree of air heating. When the handle 22 is in the extreme left position, valve 38 and heater control damper 2 are closed, and the air supplied to the cabin will not be heated.
The upper left handle 24 for supplying air to the feet of the driver and passengers is connected by a rod 4 to the damper lever 29. When the handle is moved to the left, the foot heating damper opens, air is directed from the heater casings into the windows 39 on the left and right sides to the feet of the driver and passenger in the front seat, as well as through air duct 36 of internal ventilation to the feet of passengers in the rear seat.
The handle 23 for supplying air to the windshield is connected by a rod 20 to the drive lever of the windshield heating damper 11, which blocks or opens the path for air through the air duct 12 to the glass (see heater operation diagram).
To supply air into the cabin directly to the passengers and also to blow the side windows of the car, the heater has left and right side nozzles 14 and two central nozzles. A damper 15 with polyurethane foam seals is installed in the body of each nozzle. By opening or closing the damper using lever 19, the intensity of ventilation is changed. The direction of the air flow is changed by lever 21, which allows you to rotate the nozzle with guides, as well as the blades, to the desired position.
The heater provides an average temperature in the cabin at an outside air temperature of minus 20″C in the maximum heating mode – plus 20°C, and in the footwell area – plus 25°C. Cars have exhaust ventilation that removes air from the vehicle interior. On VAZ-2108 cars, air is sucked into the gaps under the roof trim (mainly from the rear of the cabin) and enters the internal cavities 41 of the central pillars, then through rubber air ducts 42 and holes in the rear edges of the facings 40 it comes out. The suction is carried out due to the vacuum that occurs when the car moves at the rear edges of the B-pillar linings.
What is the danger of having air in the system?
An air lock in the VAZ injector 2109 cooling system and heater can cause a number of troubles:
- uneven heating or overheating of the engine due to lack of adequate cooling;
- lack of coolant circulation;
- unreliable information output coming from motor sensors;
- Cooling does not reach the radiator, resulting in engine overheating.
Signs of air locks
A number of signs such as:
- Malfunction of the thermostat - rapid switching on of the cooling fan, the arrow showing the coolant temperature shows zero, although the engine is running at full speed.
- Antifreeze fluid is leaking - this can be easily determined by the stains left by antifreeze on different parts of the car.
- The appearance of noise in the pump is noticeable, even if the damage is not significant.
- Faulty operation of the furnace is the main reason for this, the formation of plugs in the cooling system.
The manifestation of one of the signs signals an urgent diagnosis of the vehicle.
Summarizing what has been written
As you can see, the design of the interior heating system of the domestic VAZ-21099 does not belong to the category of complex, but still, all its elements are interconnected. And this situation greatly complicates the troubleshooting of the heater in the event of a breakdown. For this reason, most car owners prefer to contact service station specialists rather than diagnose and repair the device themselves.
The measures for complete tuning of the VAZ-21099 include a procedure for modernizing the stove, which can significantly increase its efficiency. But it is meaningless, since with a properly functioning heater, the car interior warms up quite well.
Possible reasons for the appearance of air in the system
Air plugs can form due to:
- If the tightness of the system is broken at the joints of the tubes and hoses, air enters through them, resulting in a plug.
- As the water pump loses its seal due to gasket damage, the components will suck in air as a result.
- With a violation of the process of filling and adding antifreeze. A one-time change of fluid contributes to the formation of air bubbles in the tubes; starting the engine will provoke the combination of small air bubbles into one large air jam.
- On VAZ 2109 cars, the air in the system is accompanied by the formation of antifreeze bubbling.
Replacing the heater tap and fan on sensor
Hello dear reader. After treating the floor with zinc, while it was drying, I began to change the stove faucet. Everything has been taken apart and if anything leaks, everything will dry quickly.
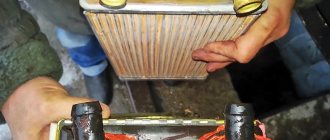
This is what we have, the faucet itself and the pipes in connection with the radiator are leaking.
Leaks from pipes and faucet
Ceramic heater tap YAVVA – 2108-8101150-12 was purchased for 285 rubles earlier.
YAVVA
And the pipes were available, they were still left over from my brother’s wife’s 9K. This is like 8 years ago. I only bought Norm clamps for them. But when the old tap was removed and found itself in my hands along with the pipes, it dawned on me that the existing pipes did not fit in any way. I began to wonder why this was so. And this is what happens. Remembering the location of the heater radiator on my Razvedchitsa 086, it stands more vertically, but on the right-handed one it is also located on the passenger side, that is, on the left side. It turns out that the existing pipes were from the old-style stove body (low panel).
The pipes didn't fit
When I removed the faucet, I noticed that the intake pipe bracket was unscrewed. I tried to tighten it and broke both studs. I also noticed a missing nut on the exhaust pipe. There was still time, so I went shopping for pipes. Taking with you the existing pipes.
All sellers unanimously were initially interested in a carburetor or injector.
And they took out a set of heater pipes (4 pieces) to the carburetor. But there are exactly the same pipes as in my hands, that is, they are not suitable. When they brought it to the injector, 3 pipes were what we needed, but one was not the right one. After visiting 2 stores, I realized that I couldn’t buy it separately today, so I returned home. On Sunday morning I went to my favorite store (it was already closed yesterday) and purchased the necessary pipes there separately.
Having also bought 2 engine compartment pipes - 326 rubles. 4 standard clamps – 80 rub. Cover of the expansion tank of an auto-device - 132 rubles. Copper washer for fan activation sensor – 3 rubles. Rubber plugs – 25 rubles. (They were damaged when installing the alarm system). Bracket for the exhaust pipe – 113 RUR. Fastening kit – 20r. Intake pipe nut – 4p. Corner with jack left - 113 rubles. Threshold amplifier left 120r.
Purchases
Pipes per piece
Front exhaust pipe bracket and nut
The plugs were damaged during installation of the signaling
Expansion barrel cover
It’s good that there is a store that has almost all the spare parts, especially by the piece. I still can’t understand why the sets of stove pipes are divided into carburetor and injection ones. "Red Lees" 1999. The likelihood that the heater housing was replaced is minimal.
Turning to the available books, I immediately found the difference. And there is no attachment to the carburetor or injector. Excerpt from the text “Since August 1998, part of Samar has been equipped with a heater 2108-01. The 2108-01 heater is distinguished by an almost horizontal radiator arrangement and a different air flow distribution: in intermediate damper positions, hot air enters from below, thanks to which cooler air is supplied to the windows. And it’s warmer at the feet.”
Difference between housings 2108 and 2108-01
On the pipes themselves there are markings 2114-8101200 and 2114-8101204, but this is again all doubtful, since the catalog shows 2108 - the old model of the stove body and 21082 - the new model. These are the roots of the injector.
Pipes
I started installing the pipes. I preliminarily outlined how they would be located, how it would be easier to tighten the clamps.
Let's put it like this
I took them off, coated them with sealant and installed them.
For sealant
I did the same with the pipes under the hood.
Installed
Everything is in place here too
Note one more feature: when I changed the heater valve and pipes on the Razvedchitsy 086, I also bought a heater radiator tube seal 2108-8101210-01, there is a recess on the body for it. She's not here. And I'm not going to install it.
heater radiator tube seal 2108-8101210-01 missing
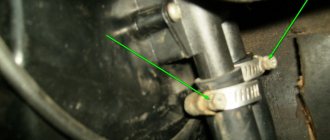
Installed a new exhaust pipe bracket and the missing nut.
Bracket in place
Nut too
Let's move on to the fan activation sensor. This is what we have. The terminals are already green.
It’s terrible how everything is neglected
I decided to install a previously purchased sensor TM 108 99-94Cº 1A, which involves installing a switching relay.
sensor TM 108 99-94Сº 1A
I decided not to drain the antifreeze from the radiator, I mean, not to torment the drain plug. The generator was protected with a plastic bag. And unscrewed the sensor. I immediately spun a new one. Some of the liquid splashed out. The removed sensor was Finord FN 9103, and the response temperature was 92-87 Cº. This means that it is for the VAZ 2106. I think this was the reason for its quick demise. Since the native one has a threshold of 99-94Cº, it turns out that the fan will turn on more often in traffic jams, and may not turn off at all. It is likely that the sensor holds 16A no, therefore, even with a 4-pin relay, it simply died after some time.
The removed sensor was Finord FN 9103 92-87 Cº
How to remove an air lock from the cooling system
When making a replacement, you should remember that air in the VAZ 2109 system appears at the top of the cooling system.
Before starting work, it is recommended to open the heating tap all the way. 3 time-tested ways to expel air plugs:
The first way to remove an air lock from the cooling system
Algorithm of actions on how to remove an air lock from the cooling system of a VAZ 2109 carburetor:
Warm up the engine, raise the temperature to operating condition, turn it off and leave for about 5 minutes. Disconnect the hose going to the heating carburetor block or throttle pipe. Start the engine or crank it using the starter. Wait until coolant comes out of the tube, reconnect it to the fitting. We must not forget about caution and the required safety measures, because the cooling liquid is flammable.
The second way to remove an air lock from the cooling system
Algorithm of actions on how to expel air from the VAZ 2109 stove:
This method is considered radical and is more recommended for how to ventilate the VAZ 2109 stove. Drive the vehicle downhill so that the hood is in a raised position slightly higher than the trunk. Warm up the engine, raise the temperature to operating condition, turn it off. Disconnect the hose going to the carburetor block or throttle pipe. Start the engine or crank it using the starter. As soon as cooling begins to flow in the hose, connect it to the fitting.
The third way to remove an air lock from the cooling system
Algorithm for performing actions on how to remove an air lock from the cooling system of a VAZ 2109 injector:
Determine the location of the throttle valve and remove it. Unscrew the cap on the expansion tank and, if necessary, top up the coolant. Build up the pressure in the cooling system, blow hard into the tank. Thanks to the created pressure, the coolant will begin to be pushed out of the reservoir, pushing the air blockage in front of it into the removed throttle tube; the appearance of liquid will signal the removal of the plug.
If necessary, air removal can be done repeatedly until the desired result is achieved. For convenience and control of the situation, it is better to do this work together.
Air lock VAZ 2109, what you need to know to properly replace the cooling:
- Add cooling slowly, in small volumes.
- When filling, clamp the pipes going to the radiator and thermostat, pumping up the incoming cooling.
- Before carrying out work on filling the coolant, disconnect the hose on the carburetor heating block or throttle pipe, this will help displace unwanted air.
Preventive measures
Monitor the presence of antifreeze in the cooling system and top it up in a timely manner.
Frequent addition of cooling signals system problems, which additional diagnostics will help determine. Monitoring the presence of traces of liquid leakage; for this it is better to use an inspection hole. It is recommended to use the same antifreeze specified by the manufacturer for a specific car model. You should purchase the liquid from a trusted, licensed store; this will help avoid counterfeits and the consequences of a low-quality product. Manufacturers' instructions and requirements should not be ignored.
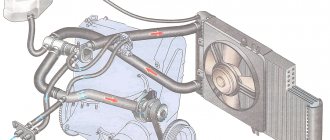
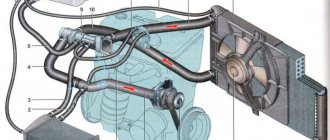
Features of the VAZ 2109 stove design
1. Heater casing mounting bracket; 2. Heater control damper; 3. Left heater casing; 4. Leg heating damper rod; 5. Radiator gasket; 6. Radiator; 7. Heater gasket; 8. Electric motor; 9. Fan shrouds; 10. Fan impeller; 11. Heating damper; 12. Heated windshield air duct; 13. Side nozzle air duct; 14. Side nozzle; 15. Central nozzle flap; 16. Blade pusher; 17. Blade axis; 18. Shoulder blade; 19. Lever for shutting off the central nozzle; 20. Windshield heating damper rod; 21. Lever for changing the direction of air flow; 22. Air heating control handle; 23. Windshield air supply handle; 24. Leg air supply handle; 25. Control lever bracket; 26. Bracket for fastening the rod shell; 27. Crane control rod; 28. Heater control damper rod; 29. Foot heating flap; 30. Axes of air heating control levers; 31. Screw clamp; 32. Heater valve; 33. Crane body; 34. Valve lever; 35. Hoses connecting the tap to the heater radiator; 36. Internal ventilation duct; 37. Windows for heating the feet of rear passengers; 38. Heater valve; 39. Driver's foot heating window; 40. Facing the central pillar; 41. Internal cavity of the central pillar; 42. Exhaust ventilation duct; 43. Upholstery of the central pillar; 44. Exhaust ventilation deflector lining; 45. Rubber valve; 46. Deflector housing; 47. Exhaust ventilation deflector; 48. I. Heater; 49.II. Heater operation diagram; 50.III. Heater valve; 51.IV. Interior exhaust ventilation
The stove consists of 2 plastic casings (right and left), which are connected to each other along the perimeter with fastening brackets. A special harness is placed into the grooves of the casings for sealing. The electric fan, which forces air into the passenger compartment, is secured with two screws on top of the heater. The design of the stove is made in such a way that the electric fan can be easily removed from the engine compartment.
An electric motor of type 45.3730 is attached to the fan casings, on the shaft of which an electric fan impeller with three rotation speeds is installed thanks to two resistor spirals. To obtain the required rotation speed of the impeller, an additional resistor is provided, attached to the hole in the stove casing on the left side with a screw.
The radiator for heating the supplied air is installed in the heater casings. It is attached to the right casing with three screws and sealed with a polyurethane foam gasket. It consists of:
- two rows of tubes,
- cooling plates,
- two plastic tanks.
The heater tap, consisting of a housing with two pairs of pipes, is connected to the cooling system by rubber hoses. The cooling system pump circulates fluid through the radiator. On the supply line in the faucet body, a plate faucet valve is installed on the axis, which has a hole that allows coolant to pass through. The valve lever is connected by a rod to the handle lever, which can be used to control air heating. When you turn this lever, the hole in the valve will open the line so that fluid begins to flow into the radiator. Read more about replacing the heater valve here.
FakeHeader
Comments 52
You shouldn’t have bought a new type of stove, the old type of stoves are cooler, there’s a metal partition, I installed one for myself, it heats perfectly. True, my controls are not mechanical, I plugged in a priory with geared motors and now there is climate control, I can honestly say, there have already been frosts and the heat is not shabby, the only negative is that the air ducts in the legs, on the europanel and this stove are somehow not They fit together, and in the end it blows half of the air under the panel)) the main thing is not to forget to tape the heater radiator in a circle at the ends when you install it. By the way, I just left the faucet open and don’t control it, I tested it in the summer, the heat doesn’t come out, so the damper is enough)
Execution of work
The car must be placed on a pit or ramp. Its wheels are fixed with stops. You should start working no earlier than the engine has cooled down. Don't forget to apply the handbrake! You will also need to disconnect the battery - it will be enough to remove the negative wire from it.
It will not be possible to do without draining the antifreeze. Therefore, the prepared container is placed under the hole intended for this purpose and, unscrewing the plug, wait until the coolant drains out completely.
Next, you need to disconnect the pipes connecting the engine directly to the mechanism that has become unusable. The fastening clamps on them are loosened. Use a brush to clean the threads on the two studs that hold the heater tap itself. As reviews indicate, without WD40 it is most likely impossible to easily remove a faulty unit.
Only after this can you completely unscrew the clamps and remove the pipes. Please note that sometimes some antifreeze remains in them. You should be prepared for this and have a vessel ready. To avoid getting your hands dirty, you should also wear gloves.
Having completed the work on the hood side, you need to go to the interior. It will also be impossible to do without removing the torpedo, or rather, its side panel. Having opened access to the remaining pipes, they are dismantled. In those situations when it turns out that they have completely retained their properties and do not need to be replaced, they will only need to be disconnected from the tap. And coolant often leaks from these pipes - be prepared for this.
After the tap has been rid of the tubes, we move again under the bottom of the vehicle. Here, using a 10mm wrench, unscrew the nuts holding the above element in place. Then, returning to the salon, they pull out the tap itself, removing the spring retainer. Only after this is it possible to dismantle the cable leading to the regulator.
When installing a new mechanism, do not forget to return the rod to its place.
Reassembly is carried out in reverse order.
As practice shows, quite often car owners leave the old gaskets behind when replacing the faucet itself. This should not be done under any circumstances. Even if the seals look good, they still have a very limited life and can quickly become unusable. The new ones are supplied complete and you won’t have to spend extra on them.
When returning the pipes to the tap, the joints should be treated with silicone sealant; this will allow you to forget about grooves for a long time.
Before filling the system with antifreeze, return the drain plug to its place.
DIY repair
To carry out repairs yourself, you need to use the following tools:
- a Phillips head screwdriver;
- 10mm wrench.
When dismantling, you need to remove the plastic trim, which is located on the outside of the windshield. To remove it, you need to open the hood and remove the 5 bolts that secure the trim to the body. Remove the rubber seal from the engine compartment and pry the casing with a screwdriver to get to the motor and oven fan. Now you can remove the motor. It is attached to the body of the VAZ 2108 with two bolts.
When the clamps are disconnected, you can turn off the power and disconnect the positive wire of the furnace under the dashboard. The negative one is attached over a special thread and pressed down with a special nut. You need to unscrew the nut by touch and fold back the negative wire. By disconnecting the wires, you can remove the motor and install a new fan. The entire structure is assembled in reverse order.
It is important to note that breakdowns associated with the stove also depend on which panel is installed on the VAZ - low or high. Both have their downsides
For example, on a high one the central flap does not open completely. It is she who is responsible for supplying cold and hot air to the car interior. To solve this, you need to adjust the damper. And to get to it you need to disassemble the dashboard.
If we talk about the low panel, this is where the thermostat often breaks. Of course, if it wears out, the oven will not work. It is recommended to change it every two or three years. And if replacement does not solve the problems, it is worth replacing the hoses that connect the stove and radiator.
Photo gallery “Stove removal and repairs”
In the photos provided below you can see in more detail how the furnace repair scheme occurs.
1. Unscrew the motor fixing bolts.
Malfunction - characteristic symptoms
What actually happens is that the faucet is leaking, as evidenced by the following signs:
- traces of water are found on the floor in the cabin;
- There was a corresponding smell of antifreeze in the car.
Having found one of the above symptoms, you must certainly examine the broken unit. Remember that if you do not fix the damage on time, then the repairs will cost even more money, and it is probably no longer possible to do it yourself.
How to perform an inspection? It will be useful to get under the hood of an unfamiliar engine. It must be emphasized that leaks sometimes occur in different places of the cooling system of accounting programs, so it is useful to examine it all. It is more convenient to do this with a flashlight. Coolant, namely, often drips from:
- radiator;
- joints of hoses and pipes.
When it turns out that the faucet is the culprit of the malfunction, the owner needs to start replacing it as soon as possible.
This requirement is even more pressing if it is winter, because without heating in a car it will be very uncomfortable and also unsafe if you have a long trip through a sparsely populated area.
What you need to replace the heater tap
Before you start working on the VAZ stove, you should prepare all the necessary tools and consumables. In particular, you will need:
- new working faucet;
- steel clamps (2 pcs.), opening up to 23 millimeters;
- antifreeze, at least 4 liters;
- tap gaskets;
- sealing compound (special automotive or plumbing silicone with a neutral reaction);
- bucket for old coolant;
- sets of keys and screwdrivers;
- pliers.
Prevention of aeration
Follow these simple rules when replacing the cooler and you can avoid the problem of airing:
- Pour in coolant slowly, slowly, in small portions.
- When pouring coolant, compress the pipes, pumping it.
- First remove one of the hoses on the carburetor heating block or on the throttle pipe on an injection engine, as excess air will be squeezed out there. After which you can fill in coolant.
Usually, after replacing the coolant on a VAZ-2109, an air lock occurs in 90% of cases. The stove begins to not cope with its task. But you can avoid this problem by following our simple recommendations for replacing the coolant.