Without a working lubrication system, no car will last long. Its most important element is the oil pump, which provides full pressure in the system. However, it also does not last forever, and in case of failure it must be replaced. You can solve the problem even without contacting the service, but you will have to spend a lot of time. Today we’ll talk about why the oil pump fails on a Priora and how to change it if it fails.
What kind of oil to pour into the engine
There are no difficulties with choosing the oil and filter elements used.
This engine is not so critical to the quality of consumables, so the car owner can purchase inexpensive semi-synthetic Russian oil, which is recommended by this automaker. If we talk about what kind of oil to pour into Priora, then most car owners purchase Lukoil lubricant, which in terms of its viscosity should correspond to the climatic region where the car is operated.
You will also need to purchase an oil filter for this job. It is best to buy it original in the appropriate stores, since its cost today is not too high.
Purpose
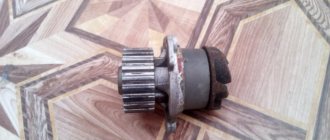
The purpose of the oil pump is to circulate oil through all engine components to lubricate them evenly and increase their service life. It is driven by an internal combustion engine (internal combustion engine) and is structurally divided into two different types, based on the principle of coupling with the crankshaft. In our case, it connects directly to the crankshaft, that is, it rotates with it. This is the operating scheme of the unit for front-wheel drive VAZ cars. Cars with all-wheel drive, as well as classics, have a more complex system installed. There, the drive contains additional links: an intermediate shaft, a timing chain (gas distribution mechanism), and toothed gears, through which torque is transmitted from the crankshaft to this device.
Common faults
- Most often, the pump of the VAZ 2112 and other VAZ models with front-wheel drive leaks through the seal, which has to be changed.
- The oil receiver also often fails, especially if you use low-quality oil, or missed replacing it in a timely manner, or the oil does not meet specifications (too thick).
- Too liquid simply will not be pumped and the pressure sensor will immediately light up.
- In this case, the oil receiver mesh becomes clogged, the circulation of oil through the engine becomes difficult, causes oil starvation, and as a result, the service life of the engine is significantly reduced.
- This includes a malfunction of the pressure reducing (bypass) valve: either it is stuck in the open position, and then the oil pressure drops. Either it does not bypass, and then the oil will squeeze out through the oil seal
What oil to fill and at what frequency?
The manufacturer recommends changing the engine oil after 10 thousand kilometers, however, it is recommended to shorten this period if possible, and at the same time change the oil filter. You should only buy oil from well-known companies and, when choosing it, beware of counterfeits. The ideal option is to pour oil recommended by the manufacturer and not be fooled by cheapness or high cost (expensive does not mean high quality).
Recommendations for choosing spare parts
- The oil pump usually does not cause car owners much trouble, since it has a service life of at least 120 thousand kilometers. However, no one is immune from breakdowns
- If suddenly you still need to replace the oil pump on a VAZ 2112, it is better to take original spare parts and not save
- Among the well-known suppliers of parts for VAZ cars, the official one is the Tolyatti Automobile Assemblies Plant (TZA for short).
- It also produces oil pumps for the VAZ 2112
- This is one of four varieties of such units in the VAZ line, which fits all front-wheel drive fuel-injected cars
- Typically, removing the oil pump on any car occurs when disassembling the engine.
- Only if necessary, this work is carried out on the car without removing the engine from it.
- Before starting this procedure, first drive the car into the inspection hole.
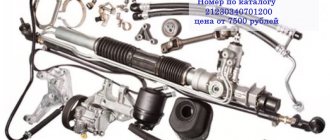
- And immediately purchase everything you need to carry out a full replacement, as shown in Photo No. 2.
Photo No. 2, everything you need to replace the pump
Designations in the photo:
- 1 - oil pump
- 2 – pan gasket
- 3 - pump gasket
- 4 - sealing ring
- 5 - sensor mounting bracket
Necessary tool
- A set of wrenches (open-end - spanner preferably)
- Socket set and ratchet
- Two strong flathead screwdrivers
- Hexagon set
DIY replacement
And so, if you have enough skills and free time, you can replace the Priora oil pump yourself, while saving money. To do this you will need a tool such as:
• Set of wrenches; • Set of heads; • Tools necessary for measuring gaps; • flat screwdriver.
If all the necessary parts and tools are prepared, you can begin replacing the oil pump:
1. First of all, disconnect the cable from the negative terminal of the battery; 2. Then drain the engine oil; 3. Then you need to remove the timing belt from the timing drive; 4. Disconnect the connector from the crankshaft position sensor; 5. Using screwdrivers, remove the pulley from it and remove the key from the groove; 6. After which you need to remove the oil sump; 7. Then, using a key of eight, turn the bolts of the oil receiver and remove it; 8. Remove 6 bolts from the oil pump to the cylinder block, use a screwdriver to move it, and remove the oil pump from the VAZ 2170 Priora; 9. Clean the cylinder block and pump housing from the old gasket; 10. Before replacing, fill the cavity of the oil pump with lubricant for better suction of oil from the crankcase during startup; 11. Install the oil pump and all the removed parts on the Lada Priora VAZ 2170 car, also in the reverse order; 12. And upon completion, adjust the tension of the timing belt and generator drive, after which you can fill the engine with oil.
Tip: after replacing the pump, it is recommended to change the oil filter!
Problems when paying with bank cards
Sometimes difficulties may arise when paying with Visa/MasterCard bank cards. The most common of them:
- There is a restriction on the card for paying for online purchases
- A plastic card is not intended for making payments online.
- The plastic card is not activated for making payments online.
- There are not enough funds on the plastic card.
In order to solve these problems, you need to call or write to the technical support of the bank where you are served. Bank specialists will help you resolve them and make payments.
That's basically it. The entire process of paying for a book in PDF format on car repair on our website takes 1-2 minutes.
If you still have any questions, you can ask them using the feedback form, or write us an email at
Oil pump pressure reducing valve - what is it and what is it for?
A car engine cannot function normally without constant lubrication with engine oil: parts will heat up from excessive friction and quickly become unusable. In order to ensure constant lubrication of all necessary elements, a design such as an oil pump was developed. It is he who is responsible for the supply and distribution of the lubricant.
The main function of the oil pump is to supply lubricant to the engine.
However, here you need to pay attention to one important point: if the oil flowed freely, solely under the influence of gravity, many remote and hard-to-reach parts would not receive their share of lubrication and would run dry. On the other hand, too much pressure inside the pump would also increase wear on a number of elements
Oil seals and gaskets especially suffer from this, because due to the strong flow pressure they become thinner and begin to leak oil through themselves.
From all of the above, it is easy to conclude that the oil pump needs a special device responsible for maintaining stable pressure inside the system. Based on this feature, all pumps are divided into two categories:
The first type regulates pressure by changing the position of a certain part of the pump. But in the second, this function is performed by a pressure reducing valve. This is what we will talk about in more detail.
1- intake gears; 2- valve; 3-lock spring
Big Encyclopedic Dictionary
As the name of this device suggests, the main purpose of the pressure reducing valve is to normalize the pressure inside the oil pump system. That is, it reduces or increases pressure at the right time.
Reducing valve location
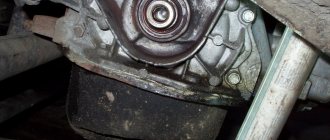
The oil pump itself is hidden under the hood of the car. To find out where your pump is located, check your vehicle's owner's manual, as the relative positions of the elements may vary depending on the make and model. For example, in a number of VAZ cars it is located behind the crankshaft pulley, so it is not immediately noticeable. As for the regulator, there are two options for the location of the device:
On a hot engine
As the oil temperature drops, its viscosity rises. This is good for efficient pump operation. To obtain adequate measurement results, it is best to measure pressure on a warm engine. Since the oil heats up much more slowly than the coolant, the engine is allowed to run a little longer after reaching operating temperatures.
In the lubrication system of a working engine with a working pump, the pressure should be in the range of 3.5-4.5 kgf per square centimeter at a crankshaft speed of 5600. If the measurement values differ from the nominal value, then the engine will experience a lack of lubrication in some modes.
Causes of poor engine pressure
There may be several reasons for this. The most common are:
- The oil level in the engine is lower than it should be, and therefore it does not completely enter the system.
This is how the oil in the editorial car was drained. Through the O-ring of the oil dipstick.
The oil pickup is cracked. Through such a crack, air enters the system, and viscous oil cannot reach components and sensors. The oil pump does not work well due to worn parts. There is oil loss in the lubrication system.
Inoperative oil filter.
The oil is diluted. A replacement is required, we have already written in more detail about the choice of oil for the 16-valve VAZ-2112 engine.
The light may also come on when the oil pressure sensor is broken or a wire has simply come off it. In this case, you need to play it safe and double-check everything.
Low engine oil level
Checking the oil level
Oil cannot be sucked into the oil pump. In this case, there will be air at the outlet. In the VAZ-2112 engine, the oil receiver is located in the lowest part of the crankcase so that it is always immersed in oil.
If you do not regularly add oil and do not control its level, this can negatively affect the operation of the engine. The oil will also lose its properties. It will not be able to wash the rubbing parts, and will also fall on them in the form of sediment. A particularly thick mixture will clog the oil receiver mesh, preventing it from sucking in full oil.
The solution in this situation is to constantly monitor the oil level and add it. It is also necessary to carry out a complete oil change in accordance with the regulations. It is not recommended to drive more than 15,000 kilometers on one oil. The oil change on the VAZ-2112 should be done every 10,000 - 15,000 km.
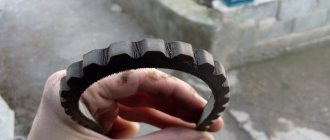
Oil pickup cracked (clogged)
Cleaning a clogged oil receiver
An oil receiver is located between the pump and the oil. When it cracks, a vacuum occurs in the tube and oil cannot enter the system. The cause of such a breakdown may be engine vibration, which results in the formation of a crack. It can increase during operation, taking less and less oil. This could also be caused by a manufacturing defect. This will require a complete replacement of the part.
We recommend: Possible malfunctions and their independent elimination on Eberspacher autonomous heaters
Oil pump failure
Oil leak from oil pump
In this option, the pump will pump less oil into the system than it may need. As a result, the pressure in the system will not be sufficient. This will be especially noticeable when starting the engine.
Losses in the lubrication system
To distribute the oil evenly between all components that require lubrication, one pump will not be enough. This will require coordinated work of other parts. Among these we can note:
- Oil nozzles.
- Crankshaft bearings.
- Gaps at the oil filter mounting location.
- Broken bushing on the balance shaft.
Oil dilution
Since liquid oil passes through all the cracks that are in the system, the pump cannot create sufficient pressure in it. Such unsuitability of the oil may occur due to the fact that it loses its performance properties. Its additives stop working, and it can additionally be diluted with gasoline.
Oil filter failure
In the context in the literal sense of the word. Look how much dirt it filtered out. Here is the answer to the question about his role!
The filter has valves and an element that cleans the oil. When the latter becomes clogged with dirt during operation, it can no longer pass oil through itself. Then the bypass valve helps him. It is normally in the closed position. When the filter becomes clogged, oil begins to flow through the valve. But if the valve hangs in the closed position, then there is nowhere for the oil to come from in the system. In this case, the engine begins to starve of oil. The way out of this situation is to timely change the oil and filter.
Screwing in the drain plug
Next, screw the drain plug into the pan. There is an O-ring installed on the plug. You need to make sure it is in place. Sometimes it falls. Without it, the plug will leak oil. It is advisable to lubricate the threads of the plug with a thin layer of sealant. During operation, the tray heats up. And oil that gets on the threads forms carbon deposits. It burns so badly that it is very difficult to unscrew the plug at the next oil change. The sealant will prevent the formation of carbon deposits on the threads. And the stopper is secured by an O-ring. It contracts under pressure when twisted. And prevents the cork from unwinding. In addition, it creates a tight connection.
Disassembly and assembly of the oil pump Lada Priora (Lada Priora), VAZ 2170, VAZ 2171, VAZ 2172
You will need: a “10” wrench, “5” and “8” hex keys, two screwdrivers, a caliper, a micrometer.
1. Remove the oil pump from the VAZ 2170 (see “Removing and installing the oil pump for the Lada Priora”).
2. Using a 10mm wrench, remove the bolt securing the crankshaft position sensor...
3. ...and remove the sensor.
4. Using a 5-point hex key, remove the six bolts securing the pump cover. Lada Priora
5. Using two screwdrivers, lift the priora pump housing so that the locating pins on the cover come out of the holes in the housing and remove the pump housing from the cover.
6. Remove the drive from the housing.
7. . and the driven gear of the pump.
8. Using a 8mm hex wrench, remove the pressure reducing valve plug.
Please note that there is an aluminum O-ring installed under the plug. Replace a badly compressed ring.
9. Remove the pressure reducing valve spring.
10
Remove the relief valve by gently tapping the cap on a clean wooden board. If the Lada Priora valve does not come out, remove it using a pointed wooden stick
11. Inspect the cover. In the contact area of the gears there should be no noticeable signs of wear, scuffs or deep scratches. Otherwise, replace the cover.
12. Inspect the VAZ 2172 pump housing. There should be no noticeable signs of wear, scuffs or deep scratches on its working surfaces. Otherwise, replace the housing.
13. Measure the diameter of the driven gear socket in the VAZ 2170 pump housing. The maximum permissible diameter is 75.1 mm. If the size exceeds the specified one, replace the VAZ 2171 pump housing.
14. Measure the width of the pump housing segment in the middle part. If the width is less than 3.4 mm, replace the housing.
15. Measure the thickness of the drive gear. If it is less than 7.42 mm, replace the gear.
16. Measure the thickness of the driven gear. If it is less than 7.35 mm, replace the gear.
17. Check the axial clearances of the gears. To do this, install the drive gear in the cover, place a metal ruler on the cover and measure the gap between the ruler and the gear with a feeler gauge.
18. In the same way, measure the axial clearance of the driven gear. The maximum permissible axial clearance of the drive gear is 0.12 mm, the driven gear is 0.15 mm. If the clearances exceed the specified values, replace the gears.
19. More accurately, the axial clearances of the gears can be obtained by calculation. To do this, measure the thickness of the case along the outer surfaces with a micrometer.
20. . and the thickness of the cover in the area of the gear socket in several places (along milled surfaces). Calculate the axial clearance as the difference between the arithmetic mean of the socket depth and the thickness of the gears.
21. Inspect the pressure reducing valve seat. There should be no burrs or deep scratches on its inner surface. Otherwise, replace the housing.
22. Replace the pressure reducing valve of the VAZ 2171 if it has burrs and deep scratches.
23. Replace a bent, broken or cracked Lada Priora pressure reducing valve spring. The height of the spring in the free state should be 44.72 mm, under load (4±0.24) kgf - 31.7 mm. Otherwise, replace the spring.
24. Install the driven gear into the pump housing. The chamfers on the gear teeth should face the housing.
25. Install the drive gear into the pump housing. The chamfers on the gear teeth should face the housing.
26. Place the housing on the cover and screw in the fastening bolts.
27. Lubricate the VAZ 2172 pressure reducing valve with engine oil and install it in the seat with the bottom down. Then install the spring and tighten the plug with the O-ring.
28. Fill the pump with engine oil through the hole under the oil receiver of the Priora.
29. Turn the gears of the Lada Priora pump a few turns to lubricate their working surfaces.
Source
Troubleshooting
Direct connection of the pump to the crankshaft avoids damage associated with its drive. This, however, does not exclude the possibility of other malfunctions.
Pump malfunctions and their symptoms
The main malfunctions of the VAZ 2110–12 oil pump include:
- clogging of the oil receiver mesh;
- damage to the device body;
- wear of gear seats in the housing and cover;
- wear of the drive or driven gear;
- damage to the pressure reducing valve;
- deformation or damage to the valve spring.
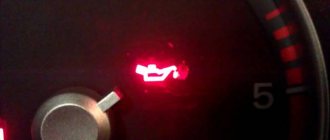
A constantly burning warning light in the form of an oil can indicates a drop in pressure in the lubrication system to a critical level
Disassembly and assembly of the oil pump Lada Priora (Lada Priora), VAZ 2170, VAZ 2171, VAZ 2172
You will need: a “10” wrench, “5” and “8” hex keys, two screwdrivers, a caliper, a micrometer.
1. Remove the oil pump from the VAZ 2170 (see “Removing and installing the oil pump for the Lada Priora”).
2. Using a 10mm wrench, remove the bolt securing the crankshaft position sensor...
3. ...and remove the sensor.
4. Using a 5-point hex key, remove the six bolts securing the pump cover. Lada Priora
5. Using two screwdrivers, lift the priora pump housing so that the locating pins on the cover come out of the holes in the housing and remove the pump housing from the cover.
6. Remove the drive from the housing.
7. . and the driven gear of the pump.
8. Using a 8mm hex wrench, remove the pressure reducing valve plug.
Please note that there is an aluminum O-ring installed under the plug. Replace a badly compressed ring.
9. Remove the pressure reducing valve spring.
10
Remove the relief valve by gently tapping the cap on a clean wooden board. If the Lada Priora valve does not come out, remove it using a pointed wooden stick
11. Inspect the cover. In the contact area of the gears there should be no noticeable signs of wear, scuffs or deep scratches. Otherwise, replace the cover.
12. Inspect the VAZ 2172 pump housing. There should be no noticeable signs of wear, scuffs or deep scratches on its working surfaces. Otherwise, replace the housing.
13. Measure the diameter of the driven gear socket in the VAZ 2170 pump housing. The maximum permissible diameter is 75.1 mm. If the size exceeds the specified one, replace the VAZ 2171 pump housing.
14. Measure the width of the pump housing segment in the middle part. If the width is less than 3.4 mm, replace the housing.
15. Measure the thickness of the drive gear. If it is less than 7.42 mm, replace the gear.
16. Measure the thickness of the driven gear. If it is less than 7.35 mm, replace the gear.
17. Check the axial clearances of the gears. To do this, install the drive gear in the cover, place a metal ruler on the cover and measure the gap between the ruler and the gear with a feeler gauge.
18. In the same way, measure the axial clearance of the driven gear. The maximum permissible axial clearance of the drive gear is 0.12 mm, the driven gear is 0.15 mm. If the clearances exceed the specified values, replace the gears.
19. More accurately, the axial clearances of the gears can be obtained by calculation. To do this, measure the thickness of the case along the outer surfaces with a micrometer.
20. . and the thickness of the cover in the area of the gear socket in several places (along milled surfaces). Calculate the axial clearance as the difference between the arithmetic mean of the socket depth and the thickness of the gears.
21. Inspect the pressure reducing valve seat. There should be no burrs or deep scratches on its inner surface. Otherwise, replace the housing.
22. Replace the pressure reducing valve of the VAZ 2171 if it has burrs and deep scratches.
23. Replace a bent, broken or cracked Lada Priora pressure reducing valve spring. The height of the spring in the free state should be 44.72 mm, under load (4±0.24) kgf - 31.7 mm. Otherwise, replace the spring.
24. Install the driven gear into the pump housing. The chamfers on the gear teeth should face the housing.
25. Install the drive gear into the pump housing. The chamfers on the gear teeth should face the housing.
26. Place the housing on the cover and screw in the fastening bolts.
27. Lubricate the VAZ 2172 pressure reducing valve with engine oil and install it in the seat with the bottom down. Then install the spring and tighten the plug with the O-ring.
28. Fill the pump with engine oil through the hole under the oil receiver of the Priora.
29. Turn the gears of the Lada Priora pump a few turns to lubricate their working surfaces.
Source
Troubleshooting and repair of a removed element
Let's look at how to test a removed oil pump. The check consists of visual inspection, measurements and comparison of the measurement result with the nominal dimensions.
Unscrew the oil receiver cap together with the pressure reducing valve. It is worth making an effort so that the spring thrust washer does not get lost. Next, note that some bolts will be smaller than others. This bolt should then snap back into place.
Use a caliper to measure the spring. At rest, it should be at least 38 millimeters in length. Then remove the cover, which will have marks from the wear of the gears. If the scoring is deep, then the oil pump has a lot of wear. The cover can be repaired - its plane should be leveled.
Next, remove the drive gear and visually check the condition of its teeth. If there are abrasions and burrs on the teeth, this indicates a lot of wear. The driven gear should also be checked. The main thing about it is the hole in which the fixation axis is located.
Then check the walls of the device housing and the axis of the driven gear. Potholes, grooves, and various defects indicate that debris has entered the working area inside the pump.
How to change the oil in a manual transmission of a Lada Priora
Before changing the oil in the gearbox on a Priora car, you need to prepare first. First, you need to prepare:
- a basin with a volume of more than 5 liters, an old rag (to collect all the waste liquid and prevent it from spilling on the floor);
- key "10";
- a special syringe (as an analogue - connect a small hose and a funnel (just make the connection airtight), pour through the hose);
- clean cloth.
Secondly, you need to drive for about 15 minutes to warm up the gearbox.
After this, you can proceed with the replacement according to the following instructions:
- After the trip, park the car on a ditch, or use a car lift. Some people manage to carry out all the work by jacking up the front end and then placing supports under it.
- Remove the engine splash guard.
- Place a basin or other container under the gearbox, and place an old rag under it - it will collect small drops that will splash out beyond the boundaries of the container.
- Unscrew the drain plug with a wrench; at the end turns, try to quickly remove your hand so as not to get dirty. Wipe the cork with a clean cloth, you can rinse it and leave it to dry.
- Inspect the fluid that was drained. Before replacing it, check the cleanliness of the gearbox housing. If the waste fluid is dirty (lots of metal shavings, impurities), take the flushing fluid, tighten the drain plug, and fill in about 1.2-1.4 liters. After this, start the engine and engage first gear. Leave the machine for 2-3 minutes, then repeat the procedure with draining.
- Clean the threads of the drain hole. Place the plug and tighten it.
- Remove the dipstick from the gearbox.
- Pour the recommended amount of replacement fluid inside – about 3.2 liters. At the same time, monitor the liquid level relative to the Max and Min marks. Try not to overfill.
- Replace the dipstick.
- Install the engine splash guard.
- Lower the car, start the engine. Try driving a couple of kilometers to evaluate the changes. If the gears are difficult to shift, try adding a little more, but do not exceed the maximum mark - most often up to 4 liters is enough.
Changing the oil
This procedure is not particularly difficult; you do not need to use any professional tools or equipment, and it can take one hour to complete. Just remember the need to use high-quality consumable parts and lubricating fluids, which will eliminate any difficulties in the future with the operation of the car.
Tools used
To perform this work you will need a filter, engine oil, a clean rag, a container with a volume of at least 4 liters, a wrench for removing the oil filter, a 17 wrench.
If you are unable to unscrew the filter manually, you can pierce its housing with a screwdriver and use it as a lever, thus removing the filter element. If you use a screwdriver to remove the filter, then you need to pierce its housing at the very bottom. This will prevent damage to the fitting.
Step-by-step instruction
Changing the engine oil must be done on a hot engine. To do this, you should either drive the car first, or start the engine and let the engine run for about 10 minutes. Warm oil will flow out easily through the lower hole, and you can almost completely drain it from the crankcase of the power unit. To perform such service work, the vehicle must be driven onto a lift or inspection pit. Open the hood and unscrew the oil filler plug. You can easily unscrew this plug by hand. Next, we go down under the car and remove the existing engine protection. We place a plastic container with a volume of at least 4 liters under the engine crankcase. We find the drain plug located on the engine crankcase, and then carefully loosen the tightening with a 17 key. When unscrewing the plug, act as carefully as possible, as you can get burned by hot oil. We unscrew it completely and wait for the oil to completely drain out. This usually takes about half an hour. If the car has a good mileage and the oil has not been changed for a long time, you can flush the engine. Why is a special washing composition used? It is poured into the engine after twisting the drain plug. We start the engine and let it run for about 15 minutes. After this, drain the washing liquid and change the filter. Replacing the oil filter is not particularly difficult. It is mounted on a thread and you only need to unscrew it, carefully draining the old oil
Fill the new filter element halfway with fresh auto lubricant and carefully screw it onto the mounting thread. Please note the presence of a rubberized gasket, which is responsible for sealing such a connection. The filter must be tightened by hand three quarters of a turn from the point of contact between the cylinder block flange and the ring. Next, pour approximately 3 liters of auto lubricant into the engine and check the level using a dipstick
The level should be in the middle between the minimum and maximum risk. Then close the oil filler neck, start the engine, and let it idle for several minutes. After this, we turn off the engine and wait for it to cool, check the oil level with a dipstick and, if necessary, add about 500 milliliters more. This completes all service work.
About filters and oils
I immediately recommend pouring oil no lower than Motul 5W40, which will provide all rubbing surfaces of the engine with an oil film. Oil and air filter from Bosch.
What is the approximate cost of the above spare parts?
- The bottom of the motor will cost 24,000 rubles.
- Cylinder head 16500 rub.
- Mounted 20,000 rub.
- Oil and filter 5000 rub.
In total, excluding work, spare parts cost 65,500 rubles, or $1,100. Such repairs for a domestic car are too high, since the assembled unit 21126 will cost 75,000 rubles, but in our case you will have an engine with a higher compression ratio, higher compression, good pick-up from below, reduced fuel consumption, power of approximately 120 hp and a resource of 350,000 km minimum. If the belt breaks, the valves will no longer meet the valves; it will be enough to set the marks and install a new belt. Since there will be a long intake manifold and an exhaust manifold without a catalyst, the engine will “breathe” more freely, which means fuel consumption will decrease and power will increase.
An important factor is proper running-in and timely maintenance, which will contribute to the stable operation of the engine throughout its entire service life. I strongly recommend the following activities:
- every 7-8 thousand km. change oil and all filters;
- With each oil change, remove the oil receiver and clean it;
- clean the throttle valve every 20,000 km;
- pour G11 antifreeze into the cooling system and change it every 3 years;
- pour gasoline with octane number A-95;
- change the timing belt every 50,000 km.
If you want to increase engine power by installing wide-phase camshafts, a direct-flow exhaust system, a throttle valve with a diameter of 52-56 mm, boring the cylinder head channels, and get 150 hp at the output, then the engine life will be reduced to the factory mark of 200,000 km. For stable operation of the engine, you should not install “shafts” with a very wide phase, otherwise the engine will operate unstably and “spit” gasoline into the exhaust pipe.
Select the vehicle modification to search for the oil receiver
Engine: volume – 1.6 liters, power – 82 hp, type – petrol, model – BA3 21703. Drive: front-wheel drive. Year of manufacture: 2008-present time
Engine: volume – 1.6 liters, power – 96 hp, type – petrol, model – VAZ-21126. Drive: front. Year of manufacture: 2008-present. time
Engine: volume – 1.6 liters, power – 98 hp, type – petrol, model – VAZ-21126. Drive: front. Year of manufacture: 2008-present time
Engine: volume – 1.6 liters, power – 106 hp, type – petrol, model – VAZ-21127. Drive: front. Year of release: 2014-present time
In the next step, for an expanded selection, you can enter the vehicle's Vin code to go to illustrated catalogs, where you can find the layout of parts down to the bolt and duplicates that are not in the catalog of analogues.
Other VAZ cars
Let's look at how to check the oil level on VAZ series cars using the example of the VAZ 2112 and Lada Priora 16 valves.
Level measurements on these vehicles are carried out only on a warm engine. The probes here have a special appearance - a corrugated area with marks along the edges without letters.
Therefore, if the engine is cold, you will have to start it and warm it up until the fan turns on.
Then turn off the engine, wait 3-5 minutes until the oil drains into the crankcase and take measurements, see the algorithm above.
Since the dipstick itself between the marks has a corrugated shape, this causes a problem for many drivers.
Everything is simple here - the working fluid must be in the grooved zone, then the level is considered normal. But where this place should be, opinions differ.
Experienced drivers recommend proceeding from the operating conditions of the vehicle.
If the VAZ 2112 and Lada Priora are operated under normal conditions on flat terrain, then it is considered normal if the oil level is in the middle in the corrugated zone.
If cars are driven on moderately rough terrain, then the normal level may be 2/3 from the bottom mark in the corrugated zone, and if in mountainous terrain, then 3/4.
Also, many experienced car owners rely on the number of engine revolutions.
POPULAR WITH READERS: How to make an antifreeze with your own hands
If during driving the number of crankshaft revolutions does not exceed 3000 rpm, then the oil level can be kept in the middle, if more than 4000 - at 3/4 of the lower mark. Filling 1 liter means raising the level from the lower to the upper marks.
How to measure correctly?
How to check the engine oil pump? The technology is the same for all motors. But, if you lack some equipment for the service station, then it is better to buy it in advance. There is a slight difference only in the values of the threshold pressure level - it is different for different engines. You can find out about the minimum permissible pressure and its level for the valve to operate in the instructions for the car.
Using a classic VAZ as an example, we will look at how to check whether the oil pump is working. Measurements should be made in two modes - on a cold and hot engine.
Why does the breakdown occur?
Most often it all starts with a late oil change. For this reason, solid deposits appear in the engine, which over time fall off the walls and, when entering the pump, destroy it.
And it doesn’t matter what kind of filter you have, because any filter is after the pump
All this leads to a decrease in oil pressure, which subsequently leads to wear of other parts. And then the likelihood that replacing one pump can be done is very small
Therefore, it is very important to monitor the oil level and change the oil pump on time!
As follows from the purpose, improper operation of the oil pump leads to the fact that the oil does not circulate sufficiently throughout all engine systems. If the pump is not replaced in a timely manner, this leads to the so-called “oil starvation”. The consequences of this phenomenon are different and can be very dangerous. So, insufficient oil leads to:
• Excessive wear of units and components; • Penetration of mechanical wear products into the oil; • Reduced oil pressure in the system; • Overheating of parts; • Ingress of solid particles into various units and their jamming.
Why does the oil pressure light come on when braking, what does it mean?
Some vehicle owners notice that when braking hard, and sometimes when driving on rough roads, the red oil pressure indicator lights up. This happens because when braking particularly hard for various reasons (rough road, sharp turn, etc.), the engine speed drops. In this regard, the oil pressure in the system decreases sharply. Accordingly, if the oil pressure drops sharply and there is little oil in the system, the sensor is activated automatically.
Therefore, if the oil pressure light in your car comes on when braking, you should immediately check the oil level in the engine unit. Most likely, the problem lies precisely in the lack of working fluid.
The oil pressure light warns the driver that there is a malfunction in the engine and signals immediate action.
Every car owner knows that the performance of the car itself fully depends on the condition of the engine unit, so it is very important to change oils and filters on time, as well as monitor the condition of the oil level throughout the entire period of operation of the car.
What could this mean when the oil pressure light comes on at idle? On the panel of any vehicle there are corresponding indicators that indicate a malfunction of one or another vehicle system. The said lamp traditionally has a red backlight
If this indicator lights up while the engine is running, then there is a clear hint that the driver should promptly pay attention to the existing problem and take all necessary measures
Is it worth reminding once again what the consequences of ignoring this signal may be? The situation could end in serious problems. For this reason, every driver needs to know what to do in such cases.
Removal and installation of the oil pump Lada Priora (Lada Priora)
Over time, every motorist is faced with the fact that a light on the instrument panel lights up for insufficient oil pressure. This signal tells us that the pressure in the engine lubrication system has decreased. The most common cause of this is a broken oil pump. That is why the problem cannot be ignored, and the oil pump of the Priora VAZ 2170 must be replaced as soon as possible.
The majority of new cars are equipped with oil pressure lights on the instrument panel. Loss of oil pressure is a serious problem as it is necessary to supply oil to engine parts to prevent wear.
Most often it all starts with a late oil change. For this reason, solid deposits appear in the engine, which over time fall off the walls and, when entering the pump, destroy it.
And it doesn’t matter what kind of filter you have, because any filter is after the pump
All this leads to a decrease in oil pressure, which subsequently leads to wear of other parts. And then the likelihood that replacing one pump can be done is very small
Therefore, it is very important to monitor the oil level and change the oil pump on time!
As follows from the purpose, improper operation of the oil pump leads to the fact that the oil does not circulate sufficiently throughout all engine systems. If the pump is not replaced in a timely manner, this leads to the so-called “oil starvation”. The consequences of this phenomenon are different and can be very dangerous. So, insufficient oil leads to:
• Excessive wear of units and components;
• Penetration of mechanical wear products into the oil;
• Reduced oil pressure in the system;
• Ingress of solid particles into various units and their jamming.
Naturally, it is best to turn to professionals! If you have not encountered this breakdown before, then intervention on your own can cause even more serious consequences, as a result of which you will lose a lot of time and additional funds.
The Priora VAZ 2170 oil pump is not an expensive part, but its removal and installation is not a simple task. It is also necessary to carry out diagnostics, because Along with the pump, you often have to change the filter and, of course, the engine oil itself.
And so, if you have enough skills and free time, you can replace the Priora oil pump yourself, while saving money. To do this you will need a tool such as:
• Set of wrenches;
• Tools necessary for measuring gaps;
If all the necessary parts and tools are prepared, you can begin replacing the oil pump:
1. First of all, disconnect the cable from the negative terminal of the battery;
2. Then drain the engine oil;
3. Then you need to remove the timing belt from the timing drive;
4. Disconnect the connector from the crankshaft position sensor;
5. Using screwdrivers, remove the pulley from it and remove the key from the groove;
6. After which you need to remove the oil sump;
7. Then, using a key of eight, turn the bolts of the oil receiver and remove it;
8. Remove 6 bolts from the oil pump to the cylinder block, use a screwdriver to move it, and remove the oil pump from the VAZ 2170 Priora;
9. Clean the cylinder block and pump housing from the old gasket;
10. Before replacing, fill the cavity of the oil pump with lubricant for better suction of oil from the crankcase during startup;
11. Install the oil pump and all the removed parts on the Lada Priora VAZ 2170 car, also in the reverse order;
12. And upon completion, adjust the tension of the timing belt and generator drive, after which you can fill the engine with oil.
Tip: after replacing the pump, it is recommended to change the oil filter!
You can replace the oil pump on a Priora with your own hands, but this process requires special skills and experience. Therefore, it is better to contact specialists who will perform diagnostics and also, before replacing a worn part, flush the engine, thereby clearing it of solid particles that can harm other parts.
As we have seen, a malfunctioning oil pump is a serious failure. Replacing it in a timely manner can save you from unnecessary problems and protect your engine from additional wear, thereby extending the “life” of your car. Don't forget to change your engine oil on time and look at the dashboard.
Features of replacing the oil sensor on a Priora
The principle of carrying out work to replace the DDM on Priora is quite simple and does not require explanation. However, it is important to take into account some recommendations in order to perform the procedure correctly. To do this, consider the step-by-step process of removing and replacing the oil sensor on a Priora:
- It is important to know that to replace the DDM, the oil does not need to be drained from the system. When unscrewing the product, oil will not flow out of the mounting hole in the cylinder head housing. Let's get to work.
- Remove the plastic cover from the engine.
- Having access to the device, you need to disconnect the chip with the wire from it. To do this, squeeze it with two fingers and pull it towards you.
- Next, you need to unscrew the product with a key set to “21”. If you use a regular open-end wrench, then you should remove the air filter housing so that it does not interfere. If a head of appropriate length is used, then there is no need to remove the filter housing.
- Screw a new sensor into place of the dismantled product (do not forget to check the removed device). Moreover, it should be screwed in with a torque of 10-15 Nm according to the manual. When installing, do not forget to install the sealing washer or ring, which should be sold with the product.
- After screwing, do not forget to put on the chip and check that the product is working correctly.
Detailed replacement process in the video below.
To summarize, the importance of the sensor in question should once again be emphasized. You should pay attention to it not only when it lights up while the engine is running, but also when the “oiler” indicator does not light up when the ignition is turned on. This also indicates a sensor malfunction or possible wire damage. Correct the breakdown so that if the oil pressure in the system decreases, the sensor will send a corresponding signal to the dashboard. With the help of this expert instruction, you will be able to replace the emergency oil pressure sensor yourself, and you will also be able to check its functionality.
Dear readers! Write in the comments what type of oil pressure sensors are installed on your car (with an extended or shortened upper part) depending on the engine model: 21116 (8 valves) and 21126, 21127, 21128 for 16 valves.
Engine oil pressure. What should it be? Let's analyze the 16-valve engine from the VAZ 2112
Nowadays, fewer and fewer cars are equipped with an engine oil pressure sensor, if you look at budget foreign cars - I don’t even remember which ones have it. However, now there are enough cars of previous generations on the market, but they had such a sensor. For example, on some VAZ, UAZ, VOLGA, etc. Many people ask the question - what oil pressure should be in the engine, that is, what is the normal value and what is not? It is not always possible to find information specifically about your model, so this article will be useful to everyone...
Why do you need oil at all?
I often hear that oil is the lifeblood of the engine. This is not entirely true, of course, the comparison is very rough, but still, the engine will not function without oil (or it will, but not for a very long time).
Modern motor oils lubricate and protect all rubbing parts, and these are pistons (with their rings), shafts, bearings, etc. Let's just say that good oil extends the life of the engine by many thousands of kilometers.
BUT oil must flow through the system, just like blood itself through human vessels, if the oil is simply poured in a pan and does not go to the rubbing parts - IT IS USELESS!
What builds up oil pressure in the system?
Everything is simple here - there is a special oil pump that takes oil from the engine sump and pumps it through the system. It is usually installed in the engine sump and driven by special gears that the engine turns during operation.
Oil through many channels begins to be supplied to the right places under pressure, as I already wrote, this is the crankshaft and its bearings, the camshaft and its “bed”, pistons, and much more.
It is the pump that is responsible for the pressure; if the pump stops, the pressure indicator will drop to zero. THIS CANNOT BE ALLOWED! Because the engine will not be lubricated at all, which will lead to instant breakdown, especially at high speeds.
BUT often the oil pump does not stop, but simply begins to pump worse, this indicates its wear, which is why you need to know the oil pressure in the engine! To respond in time to the nearest oil pump failure.
Alarm indication
Of course, now in almost all cars there is an emergency indication for a complete lack of pressure, this is known to us all - a “burning oil can”. If it does not go out for some time after starting, for example 10 - 20 seconds is one thing, it is almost always the fault of the oil filter. But if the lamp is constantly on, then this is already an alarm bell. Perhaps the oil pressure sensor has simply failed, or perhaps the oil pump has failed.
In any case, the emergency indication is very important, and I do not advise you to joke with it; nevertheless, this is fraught with a major overhaul of the engine.
Remember this rule, if the lamp comes on, then turn off the car and preferably immediately to a service station, either a tow truck, or in tow.
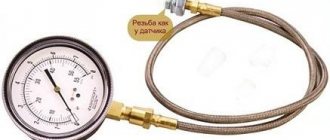
How to check oil pressure?
The actual check is carried out using a special device - a pressure gauge. It is also worth noting that you need to warm up the engine to operating temperature, usually 90 degrees Celsius.
If you measure with a cold engine, especially in winter, the pressure can jump to high values, from 0.5 BAR or even higher, but measuring with a cold engine is WRONG!
In order to check the pressure, you need to find the emergency sensor, which is responsible for the indication on the dashboard. It is worth noting that it is not always located nearby and it is convenient to unscrew it. We unscrew it, and in its place we attach the test output connected to the pressure gauge.
The check can then be divided into two options:
- AT “idle” it is usually from 900 to 1200 rpm.
- Then at “higher” speeds, usually 4000 - 5000 engine speeds.
It is also worth noting that if you unscrew the emergency sensor, the “oil can” will light up on your instrument panel, this is normal.
Now a short video showing how measurements are taken.
What value should it be?
To begin with, it is worth noting that pressure is measured in bars (BAR), because we are measuring liquid. It’s unlikely that anyone will tell you the exact values now, because the structures of the engines are different, but there is a certain normal interval.
AT idle speed it is 2 BAR (or 0.2 MPa), for most cars
At 4000 - 5000 rpm - this is 4.5 - 6.5 BAR (0.45 - 0.65 MPa), also for most brands
If we take our VAZ 2112 16 valve version, then the pressure at idle is slightly higher, about 1.5 - 2.5 BAR. But at 4000 - 5000 rpm 0.4 - 0.6 BAR.
Actually, I’ll end here, I think the information was useful, read our AUTOBLOG.
Cold engine measurements
In order to measure the pressure, before starting the engine, you need to make sure that the oil temperature is equal to the ambient temperature. The emergency sensor in the VAZ is configured to trigger at a pressure of 0.33 kgf per square centimeter. If the measurement result turns out to be like this, then it is necessary to dismantle the pump and troubleshoot it. With a gradual increase in the crankshaft speed, the pressure should increase to 4.5 kgf per square centimeter. The pressure relief valve should work, so the pressure will not increase further.
Conclusion
You can replace the oil pump on a Priora with your own hands, but this process requires special skills and experience. Therefore, it is better to contact specialists who will perform diagnostics and also, before replacing a worn part, flush the engine, thereby clearing it of solid particles that can harm other parts.
As we have seen, a malfunctioning oil pump is a serious failure. Replacing it in a timely manner can save you from unnecessary problems and protect your engine from additional wear, thereby extending the “life” of your car. Don't forget to change your engine oil on time and look at the dashboard.
Bottom line
Self-repair of a car is allowed only after studying the mechanism. Having learned how to check the oil pump, you can independently determine the cause of the pressure drop inside the system. However, it is better to entrust complete repairs and troubleshooting of the device to a qualified specialist.
Sources
- https://autoexpert174.ru/vidy-ustrojstvo-masljanogo-nasosa-dvigatelja-diagnostika/
- https://FB.ru/article/402092/kak-proverit-maslyanyiy-nasos-sposobyi-proverki-remont-sovetyi-spetsialistov
- https://masladvig.ru/kak-proverit-maslyanyy-nasos-diagnostika-i-sovety/
- https://carnovato.ru/zamena-maslyanogo-nasosa/
- https://autolirika.ru/soveti/kak-proverit-maslyanyj-nasos.html
[collapse]
Engine modifications
Due to the presence of free space inside the block and cylinder head, immediately after the creation of the basic version of the two-shaft 16-valve engine 2112, its versions began to appear:
- 21124 – boosting the internal combustion engine to 89 hp. With. due to the volume of 1.6 l;
- 21126 – modernization of the engine to a power of 98 hp. pp., volume 1.6 l;
- 21128 – maximum combustion chamber volumes 1.8 liters, power increase to 105 liters. With.
In the second version, the designers tried to ensure the maximum operational life of the units. For this purpose, special cylinder honing is used using the Federal Mogul method. Block 21126 is gray in color, and the number of classes of repair kits for pistons and cylinder liners has been reduced to three in increments of 0.01 mm.
Version 21128 is not manufactured by AvtoVAZ, but by a third-party manufacturer, ZAO Super-Avto. Engine characteristics have been significantly improved:
- volume 1.8 l;
- torque 162 Nm;
- power 75 kW.
The cylinders are bored by 0.5 mm (diameter 82.5 mm), an original crankshaft has been developed that provides a piston stroke of 84 mm, the width of the rings has been changed to 2 mm (oil scraper), 1.5 mm (lower compression) and 1 mm (upper compression) . The throttle flow area has been increased to 51 mm, Siemens injectors with increased performance have been installed.
There are two more modifications of the ICE 2112:
- 21127 - created in 2013, torque increased to 148 Nm, volume to 1.6 liters, power to 106 hp. With.;
- 21179 is the first option in the manufacturer’s line with a volume of 1.8 liters for Largus and Vesta.
ICE 2127
ICE 21179
In the first version, the problem of floating speed is solved by replacing one MAF (mass air flow) with two sensors DTV (air temperature) and DBP (absolute pressure).
Phase shifter 21179