Lada K alina 2 . REMOVAL AND INSTALLATION OF GENERATOR - PART 2
For removing the generator of cars with VAZ-21126 and VAZ-21127 engines
do the following. On cars with and without air conditioning, generators are secured in different ways, since to install the air conditioning compressor, a bracket common with the generator is used, of a new design, significantly different from the bracket of the previous design. The operation is shown using the example of a car without air conditioning. Techniques for removing a generator on a car with air conditioning are specifically discussed. You will need: keys “10” and “13”.
1. Disconnect the wire from the negative terminal of the battery.
4. Place the car on a lift or jack and remove the right front wheel (see “Replacing a wheel”, p. 50).
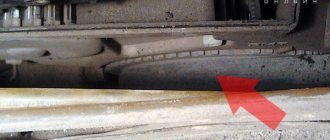
5. Remove the right front wheel arch liner
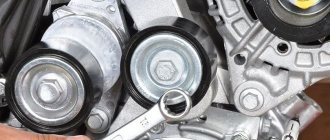
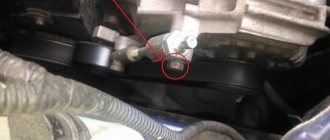
This is where contact bolt A and terminal block B of terminal D+ of the generator of a car with air conditioning are located.
This is how the adjusting bolt is located on a car with air conditioning. Do not forget to tighten the locknut of the adjusting bolt after completing the adjustment!
20. Tighten the nut securing the generator to the tension bar to a torque of 21 Nm.
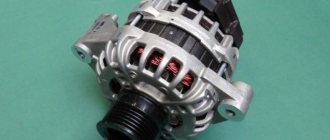
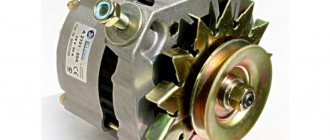
Lada Kalina cars are equipped with generators of two brands - 5132.3771 or 9402.3701-06. The standard Kalina generator is a three-phase alternating current device, which has a built-in rectifier unit and an electronic voltage regulator.
There are very different reviews regarding the quality and reliability of the devices with which these cars are equipped during factory assembly. If the unit fails, you can replace or repair it yourself.
Operating principle
The basic principle of operation of the generator is as follows: a three-phase alternating current is induced in the stator winding, which is converted into direct current using a rectifier unit attached to the cover of the device. On the cover there is a unit consisting of an electronic voltage regulator and a brush holder. The rotor rotates from the crankshaft of the car engine via a serpentine belt.
The Lada Kalina generator has the following characteristics:
- maximum output current - 85-90 A;
- voltage - 14.4-15.1 V;
- engine-generator gear ratio - 1:2.4;
- direction of rotation is right.
4 bolts secure the stator and covers of the device. The covers contain bearings in which the rotor shaft rotates. The rear bearing is located on the rotor shaft; it is mounted in the rear cover with a small gap. The front bearing, which slides along the rotor shaft, is installed in the front cover with a slight interference fit and covered with a pressure plate. The device is covered at the back by a plastic casing.
Removal, disassembly and installation of the generator VAZ (lada) kalina 1117 2004-2021
Tool:
- Driver for socket attachment
- 7mm wrench attachment
- 8mm wrench attachment
- Knob attachment 13 mm
- Knob attachment 17 mm
- High nozzle on the wrench 24 mm
- Hex key 8 mm
- Pipe wrench
- Medium flat screwdriver
- Marker
- Mandrel
- Large hammer
- Double jaw puller
- Soldering iron
- Electrical tester
- Rear bearing diameter guide
New Lada: Kalina is heated by cold air from the stove - discussion on the forum
Parts and consumables:
Removing the generator
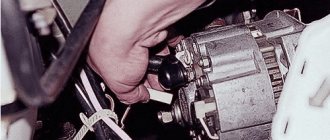
1. Disconnect the wire terminal from the negative terminal of the battery. Remove the generator belt. By pressing the lock of the block of the generator pre-excitation wire, disconnect the block from the voltage regulator connector.
2. Using a “13” socket, unscrew the nut securing the wire lugs to terminal “B” and remove them from the terminal.
3. Using a 17mm socket, unscrew the bolt of the lower mounting of the generator and remove it. Remove the nut from the generator bracket.
4. Using a 13mm socket, unscrew the nut of the bolt for the upper mounting of the generator.
5. Remove the generator.
Disassembling the generator
1. We disassemble the generator 5132. 3771 to replace the voltage regulator, rectifier unit, rotor, stator and bearings. Using the “8” socket, unscrew the three nuts securing the casing.
2. Remove the casing.
3. Remove three metal washers from the casing mounting studs.
4. Using a slotted screwdriver, unscrew the two screws securing the voltage regulator terminals.
5. Using the “8” socket, unscrew the two nuts securing the voltage regulator.
6. Remove the regulator.
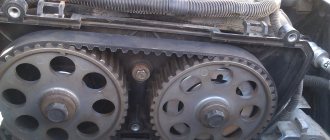
7. Use a marker to mark the relative positions of the generator covers.
8. Using a “7” head, unscrew the four bolts holding the covers together.
9. Remove the back cover with the stator assembly.
10. If the stator does not come out of the front cover, pry it off with a screwdriver from different sides relative to the front cover. We put a high “24” head on the pulley fastening nut and through its hole insert a “8” hexagon into the hole of the rotor shaft.
11. Unscrew the pulley fastening nut, holding the tool head with a pipe wrench or in a vice. Remove the spring washer. We remove the pulley.
12. Remove the spacer washer.
13. Push the rotor shaft out of the front cover.
14. Remove the cover.
15. To replace the front bearing, use a slotted screwdriver to unscrew the four screws securing the bearing pressure plate.
16. Remove the pressure plate.
17. Use your hands to push the bearing out of its seat.
18. Remove its bearing. If it is not possible to push out the bearing, we knock it out using a mandrel or tool head of a suitable diameter.
19. To replace the rear bearing, use a two-jaw puller to press the bearing off the rotor shaft.
Warning:
When performing this operation, the puller screw should be pressed exactly into the center of the shaft so as not to damage the plastic insulator of the rotor slip rings. To install the puller grips, two flats are made on the plastic rotor bushing.
20. If it is necessary to remove the rectifier block or stator, unsolder the six terminals of the stator winding from the terminals of the rectifier block.
21. Having unscrewed the three fastening nuts with a “8” wrench, remove the rectifier unit and stator. Using a tester, we check the stator and rotor windings for open circuits and short circuits to the housing.
22. We assemble the generator in the reverse order. To install the rear bearing, we support the front end of the rotor shaft on a wooden block, and press the bearing onto the rear end of the shaft with a mandrel or a piece of pipe of a suitable diameter, applying force only to the inner ring of the bearing.
23. If the front bearing cannot be inserted into the generator cover, press it with a suitable tool head, applying force to the outer ring of the bearing.
The article is missing:
- High-quality photos of repairs
Source
Replacing bearings
AvtoVAZ cars are very often subject to fair criticism from the owners of cars produced by this company. The Lada Kalina model was no exception to the general rule. Almost all current converters installed on cars of this brand break down after 10 thousand kilometers, after which the generator requires repair or replacement.
As practice has shown, the cause of many breakdowns is not only the bearings, but also the Kalina generator bracket. Car owners often fix this problem on their own. Doing this with certain skills is not so difficult.
To repair the generator, it is necessary to disassemble it. To do this, use a screwdriver to hook the tips of the stator wires and pull them out a little from the springs of the diode bridge. Then unscrew the bolts that attach the diode bridge. After this, the connecting bolt is unscrewed.
After disassembling the generator, check whether the rear bearing is in good condition. To do this, you need to twist its outer ring. If it rotates easily, without noise or rattle, and there is no play, then the bearing is in good condition. At the slightest suspicion of a malfunction, it is better to replace the bearing.
Next, you need to dismantle the Kalina generator bracket. Using a screwdriver, the stator is picked up and removed from the device casing. The bracket includes a bearing, which should also be checked. If a malfunction is detected, the part must be replaced.
The front bearing of the unit is rolled into its casing. Although AvtoVAZ does not recommend changing it, it would still be more advisable to do so, because otherwise you may then need to buy an expensive new generator for Kalina.
The bearing is removed by removing the pulley and spacer plug. After this, the rotor is removed from the rubber using a hammer, and the front casing of the unit is clamped in a vice. The bearing is carefully removed.
When to change?
VAZ Lada Kalina vehicles use a belt drive for auxiliary units. On cars with air conditioning, the service life of such a belt is no more than 30 thousand km. On simple versions of cars, the strap can last longer, but most owners try to change it after the same 30 thousand kilometers traveled. For various reasons, the belt may fail earlier, so it must be checked periodically during vehicle operation. There should be no cracks on the working track, and delamination on the outer part of the belt is unacceptable. If such defects are present, we immediately change the strap. Another signal to replace this element is a whistle or other noise when the unit is operating.
The process of replacing the belt on a Kalina with air conditioning (sixteen valves) is presented in a video from the user Alexander.
Replacing the roller and brushes
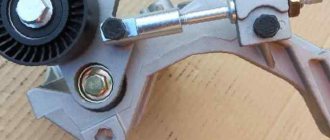
If you hear a rustling noise coming from the tension roller of the Lada Kalina generator belt, then you need to check its serviceability and replace it.
To perform this procedure, you need to use a set of wrenches and a flat-blade screwdriver. Replacing the roller is a very simple procedure. To perform this, you must first loosen the belt tension by unscrewing the rod. Then use a flat-head screwdriver to pry off the protective cap of the roller and unscrew the bolt securing the bearing to the bracket.
Stages of work
To adjust the degree of belt tension on Kalina engines, a mechanical tensioner is used, in contrast to the timing drive, which uses a hydraulic tensioner. When changing an element, it is recommended to carry out preventive maintenance of the roller by adding fresh lubricant.
To complete the work you need to do the following:
- Loosen the roller bolt. The thread on it is reversed.
- Use a screwdriver to pry up the plastic plug on the roller and carefully remove it.
- Unscrew the fixing nut on the tensioner rod a few turns.
- Loosen the belt tension by rotating the rod nut clockwise. The nut must be unscrewed until the rod begins to move freely in the seat.
- Unscrew the side bolt securing the rod end, located next to the tension roller.
- Remove the tensioner and set it aside.
- Proceed to dismantle the strap. The procedure must begin with the generator pulley, while overcoming the slight resistance of the belt.
- Remove the element from the crankshaft pulley and remove it completely.
- Unscrew the roller bolt and remove it.
- Using a needle, carefully pry up and remove the protective caps on the bearing. Wash the bearing with white spirit or gasoline.
- Refill with fresh grease and install protective rubber caps.
- Assemble all the parts and mount the roller in place. When assembling, you must remember that the bushing is in the bearing on the side of the bracket.
- Change the belt by installing it in the reverse order - from the crankshaft pulley to the generator pulley.
- Install the tensioner and begin tightening the belt by turning the nut counterclockwise. The nut must be tightened until the resistance increases. A well-tensioned strap should be slightly pressed when pressed by hand.
- Tighten the nut securing the tensioner rod.
- Check the operation of the mechanism; if a whistle occurs, tighten the strap.
Loosening the 17mm left nut
Removing the cover on the roller
Disassembled tension roller
Bearing with caps removed
Washed roller
Reassembling the unit
Belt tension
Tightening the control nut
How to replace a generator
Sometimes repairing a generator on a Lada Kalina does not help eliminate the problems associated with it. In this case, you have to replace the old unit with a new one. It is necessary to judge which generator is best to purchase from those available for sale by paying attention to its technical characteristics. Replacing the device is quite quick, the whole procedure takes about an hour.
To do this you need:
- remove the belt by loosening its tensioner;
- disconnect the plug and wire terminals;
- unscrew the nut securing the upper part of the device and remove the bolt;
- remove the bolt at the bottom in the same way;
- Remove the generator from the engine compartment.
The new unit is installed in the reverse order. Replacing a generator with a Kalina, as well as repairing it, is not difficult if you have certain skills in car repair. If such skills are not enough, then it is better to contact car service specialists.
Usually, even factory generators on Kalina serve for quite a long time and do not require replacement, of course, unless you come across a car with a factory defect of this device. If this electrical equipment unit fails, it will have to be replaced. Although this is not difficult to do, it will take at least an hour, especially if this is your first time doing this procedure. So, we will need the following tools:
- Open-end or ring wrenches for 8, 13 and 19
- Small and large ratchets and heads for 8, 13 and 19 for more convenient and faster work
- Wrench with extension
Most common faults
During operation, the surface of the roller is constantly in contact with the generator belt. In addition, it is in continuous rotation, which places additional demands on the reliability of its bearings. The tensioner bracket is also subject to heavy load. Hence the main problems:
- Bearing wear. It simply runs out of service life or becomes unusable due to dust and dirt getting on it.
- Damage to the work surface. As already mentioned, the roller itself is made of plastic. Despite its high wear resistance, it often cannot withstand loads. This manifests itself in the form of scratches and chips, which quickly render the alternator belt unusable.
- Misalignment. This means that the belt and tensioner are at a certain angle to each other. Alignment can be disrupted in both the horizontal and vertical planes (due to the curvature of the bracket). This always causes rapid wear of the belt and the roller itself.
Often the cause of the malfunction is the driver himself. When trying to make adjustments, he forgets or does not loosen the locknut enough. As a result, the hexagon of the stud breaks off, and the Kalina generator belt tensioner fails.
Guide to replacing the Kalina generator yourself
So, let's proceed to a very detailed description of all the types of work that need to be performed. First of all, we need to loosen and release the belt tensioner and then remove it. So be sure to check out this Alternator Belt Replacement Guide first. After this, you can proceed directly to removing the device from the car.
First, we disconnect the plug, which is secured with a plastic latch, just lightly press it and pull it to the side, it will come out without any problems:
And the wire terminals that are under the rubber protective cap, pry it off and unscrew the nut:
Then we unscrew the nut securing the upper part of the Kalina generator, this is clearly shown in the photo below. You can first move it with a knob, and then work with a ratchet handle:
And tapping the protruding bolt a little so that it moves, remove it from the back side, as shown in the photo below:
Next, we proceed to the lower fastening bolt, and proceed by analogy, only if necessary, hold the nut on the reverse side, since it can scroll:
Be careful when removing this rod as there are bushings there. Hold them immediately so that they do not fall and get lost. And holding the generator body with one hand so that it does not fall, we remove this bolt with the other hand:
Now almost everything is ready and you can safely remove this device from the engine compartment, turning it slightly from side to side, finding the most convenient position for its removal.
To replace the generator on the Lada Kalina, we purchase a new one and install it in the reverse order of removal, putting all the bushings in place in the same places as they were. The price of a new generator ranges from 4000-5000 rubles, so you will have to fork out a little.
Sequence of actions when modifying the generator bracket with your own hands on the Lada Granta
- We grind 2 - 3 cm on each side of the generator mount. It is better to do this in a stationary vice using drilling equipment. Due to the lack of equipment, we use a grinding machine, which is known as a “grinder”.
Sew 2-3cm on each side
- Using a drill with a metal drill (at “8”), we drill out the standard hole on the mount, making the stroke length for the bolt 1.5 - 2.0 cm.
Drill out the standard ring
- Using a grinder, we partially grind down the stiffening rib on the mount so that it does not interfere with the free movement of the converter.
- We cut out a corner of metal 40 mm long and 30 - 40 mm thick, and bend the edge. It turned out to be something like the letter “G”. One end is attached to the bracket, on the other we weld a nut to “10”.
Corner letter G
- We assemble the structural elements, screw in the bolt to tension the generator drive belt.
- We install the converter and the bracket without tensioner in its original place.
- We move the rocker to the third gear position, put on the drive belt, and turn the crankshaft pulley by hand.
- Check the degree of belt tension.
Belt tension level
Note to the driver!
At home, we check the tension level of the generator drive belt as follows. Using your finger, press on the section of the belt between the crankshaft pulley and the tensioner. The belt bends by 10 - 12 mm, no more. Tighten the fastening (tension) as necessary.
Finally, we start the engine and check the functionality of the system.
conclusions
Replacing the generator regulator relay on a Lada Kalina is quite easy and simple, since no special knowledge or skills are required. The choice should be taken carefully, since the market already consists of 50% fakes. When purchasing, you should check for quality certificates and holograms.
Replacement of brushes occurs in the following order.
2. To do this, you will need to unsolder the wires.
3. It would also be a good idea to clean the contacts and check the elasticity of the springs.
After you have completed the dismantling and preparatory work, proceed directly to replacing the generator brushes.
2. Slowly, carefully install the regulator into place. Be careful, the part is very fragile, so try to proceed with extreme caution.
That's all, the brushes have been replaced!
Replacing brushes is not a complicated procedure; it is only important to understand the principle of operation of the device, as well as to have some skills. I hope this article will help you understand all this.
Vehicle voltage
For normal operation of all consumers in the car, the generator must maintain a certain voltage; for the Lada Kalina on-board network, with a working generator, it must be in the range from 13 to 14.8 volts.
Within specified limits, the voltage is provided by a relay regulator, and with any deviation from the specified norm, various problems arise:
- At high voltage, the electrolyte in the battery banks boils, and the battery quickly fails;
- If there is insufficient charging, there is not enough current for consumers, as a result the battery quickly discharges.
The voltage generated by the current source is measured in the following way:
- On a digital multimeter (voltmeter), set the limit to 20 volts;
- We connect the probes of the measuring device to the battery and start the internal combustion engine, the voltmeter should show a voltage of about 14 volts;
- Without turning off the engine, we turn on the load - headlights (high beam), heater motor at maximum speed, windshield wipers, radio, etc. If the generator is in good condition, when the engine is idling, the voltage should not fall below 13.2V, optimal The voltage is considered to be 13.7-13.9 V.
Disassembling the device
To disassemble the generator, you need to perform several simple manipulations:
- Remove the drive pulley. Try not to lose the key.
- Unscrew the nuts from the back cover that secure all parts of the structure.
- Remove the voltage regulator. At the same time, evaluate the condition of the brush assembly.
- Disconnect all parts of the generator.
After this, you can begin to carry out repairs.
Bearings often fail, especially the one located in the front cover. The reason for this is excessive belt tension. To make a replacement, you need to unscrew four screws and press the bearing out of its seat. Instead, install a new bearing. To increase reliability, change both rollers at once.