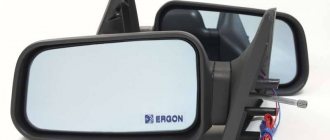
Detailed and universal method
Universal method
In the car interior, you need to unclip the plastic cover that covers the mirror mounting screws. After removing the cover, unscrew the three screws that hold the mirror in place and remove it. After this, you need to carefully remove the rubber gaskets -
If the rubber gaskets are damaged, it will be very difficult to buy new ones; they are rarely sold separately.
Now you need to unscrew the two screws securing the mirror adjustment joystick. Disassembling the joysticks themselves is a simple procedure; you just need to carefully remember the position of the cables and the color, since different colors are responsible for their adjustment. Next, you need to remove the three screws that are located on the lower plastic corner - it is most susceptible to damage during vehicle operation. After that you need to remove it too. How to remove the mirror element has already been described above. After removing the mirror element, you need to unscrew the four screws and remove everything else.
Place on silicone glue
The easiest way, of course, is to ask a mechanic you know or send the car to a car service center if you need to replace the mirror or paint it. But most owners are accustomed to repairing their car themselves - after all, this is a significant saving of money.
Installation
Remove the door trims and dismantle the old exterior mirrors (by removing the mounting screws). Mirrors of the new SE model are installed in place of the old ones without modifications.
To install the joystick, make a hole in the door trim using a file or a utility knife. Sample:
To stretch the wires from the interior to the doors (see connection below), you will need to drill a hole in the door rosette with a drill (or find a suitable female-male connector).
To watch online, click on the video ⤵
Lexus mirror repeaters Grants are the BOMB! More details
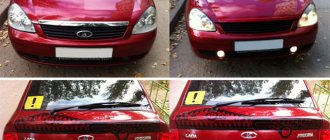
Painting mirrors Lada Kalina. More details
Lada Granta - installation of mirror covers. More details
Mirror Lada Granta VAZ 2191. Replacing the cladding and mirror element on mirror 2191 electrician. More details
Replacing the mirror element on the exterior rear view mirror of Kalina, Granta and Priora Read more
GRANTA FL — WE INSTALL A NEW STEERING STEERING, MIRROR COVERS, SPACERS (lada granta FL/granta 2019) More details
Replacing the side rear view mirror for the Lada Granta (Granta) 2017 Read more
Mirrors Lada GRANT VAZ 2191 cable. Review 3. Install the turn signal, change the trim. More details
Mirrors Kalina, Granta, Datsun Model range of exterior rear view mirrors VAZ 1118, VAZ 2191. Read more
Lada Kalina. Luxury mirrors with repeaters from Liftback. Refinement of wiring Read more
Lada Kalina replacing the glass in the side mirror. More details
How to install SE mirrors on a Lada Granta WITH YOUR OWN HANDS More details
Granta Liftback mirrors with full power accessories. Unboxing, first look Read more
How to properly remove the mirror trims (cladding) of the Priora, Granta. We disassemble mirrors Read more
INSTALLING HEATED MIRRORS ON THE LADA GRANT BY YOURSELF Read more
Solution to the problem of whistling mirrors Granta Liftback for 5 rubles and rear window seals from Kalina Read more
Granta Liftback - (2-part). Installing repeaters in mirrors without repeaters. More details
Mirrors VAZ 2191 GRANT cable drive. Review 2. Replacement of cladding and mirror element. More details
Heated mirrors Lada Granta detailed installation Read more
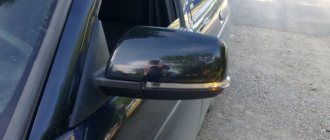
Disassembly and removal of external mirrors Grants
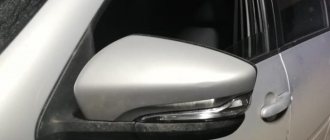
| The side mirror on Grant can be removed in connection with the installation of heating, repair or replacement with a new one. Mirror covers can be dismantled for painting or replaced with new ones of a different shape. Let's look at the process step by step: |
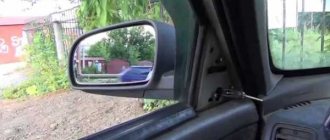
How to remove the trim and the side mirrors themselves of a VAZ 2190
- Remove the mirror element. To do this, carefully bend it with your fingers so that you can see the latches that are located along the entire contour of the mirror. You need to bend 5 pieces.
- Remove the mirror covers. To do this, we snap off the latches that are visible from the side of the removed mirror; another latch is visible when bending the mirror towards the stack.
How to remove Lada Granta mirrors
You will need : flat-blade and Phillips-blade screwdrivers, pliers and remove the door trim.
Depending on the Grant configuration, rear view mirrors can be installed with a mechanical or electric drive.
Removing power mirrors:
- Remove the mirror adjuster retaining bracket.
- Remove the 3 screws securing the mirror to the door frame.
- Remove the mirror.
- The photo shows the Granta side mirror assembled.
Installation of mirrors is carried out in reverse order.
Removing power mirrors : First you need to disconnect the negative terminal of the battery, and then:
- Disconnect the connector from the power mirror wires.
- Remove the 3 screws securing the mirror to the door frame.
- Remove the exterior mirror Grant assembly.
By the way, do you know how to paint the mirror caps in the body color and install heated mirrors?
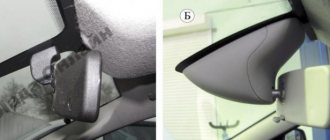
How to glue a rear view mirror to a car windshield
The need to dismantle the rear view mirror does not arise often, mainly in the event of an accident, collision, or impact with oncoming traffic.
Many car owners complain about the lack of methodological information on removing the rear view mirror of a Lada Vesta.
To help drivers, we will consider the main points during dismantling:
- Open the hood.
- Remove the terminals from the battery.
- Open the driver and front passenger doors wide.
- Remove the top and bottom plastic covers.
- Press the metal lock and slide the mirror up from the mount.
Note to the driver!
In the “luxury” configuration of the Lada Vesta, the rear view mirror (hereinafter referred to as the rear view mirror) is installed with a rain and light sensor. You need to move the mirror mount up. In all other configurations, sensors are not installed; the mount must be moved down.
Take this information into account when replacing the CBV to avoid damaging the equipment. Many craftsmen do not know the intricacies of attaching the interior mirror, which damages two digital sensors.
Disassembly procedure
Once the structure has been removed, disassembly can begin. If it is required, of course. Perhaps you have found a new mirror whose price suits you completely. Then you can skip this point.
If it is necessary to disassemble an element, we start from whether it is internal or external.
The interior mirror is disassembled as follows:
- there is a place where the glass and the body are connected;
- spin is inserted;
- pressed with little force;
- a gap appears;
- use a mediator to pass along the entire length of the gap;
- the body is divided into 2 parts;
- the mirror is removed;
- everything else is located underneath it;
- We carry out the necessary work.
You may also need to disassemble your car side mirror.
It doesn't matter whether left or right
- Using a hairdryer, the area between the case and the glass is heated;
- Do not heat to high temperature. Use a household hair dryer on medium power;
- Use a flat-head screwdriver to separate the body into 2 parts;
- Sometimes it is necessary to bend the terminals;
- If you are afraid of damaging the mirror, wrap the instrument with electrical tape;
- On some cars you need to slightly press the mirror to the center and move it to the side;
- The glass is carefully removed;
- Remove the screw from the plastic frame, if there is one;
- Under the frame we see the entire mechanism;
- Use a screwdriver to remove the broken structure and replace it with a new one.
That's it, the work is almost completed. But since we disassembled everything and changed the necessary components, now we need to assemble the structure and install it back on the car.
Review of Manufacturer Prices
| Name / catalog article | Price in rubles |
| LadaVesta and Lada XRAY, Renault Megane 3 with light and rain sensors (8200000509) | From 2000 - 2200 |
| Reflector without light and rain sensors (7700838529) | From 1200 |
| *price indicated as of 04/05/2019. |
Conclusion
Replacing a mirror in a Lada Vesta car yourself is quite simple. The task completes within 10 minutes. Difficulty may arise when purchasing equipment. Check the modification of the car, the presence of pre-installed rain and light sensors. There are no significant differences between domestic and foreign components. The owner of the technical equipment chooses based on personal preferences.
Reassembly
I will say right away that the assembly is carried out simply in the reverse order of the previously carried out dismantling work. Therefore, I see no point in talking about this separately.
With mirrors on special mounting brackets, everything is also extremely simple. All that remains is to tighten the fasteners and fix the mirror on the ceiling or side of the car.
But what’s really more difficult is gluing a car mirror. To begin, choose the appropriate composition. Household superglue or double-sided adhesive tape will not work. Tested by many car owners. It's better to ask for the appropriate adhesive at an auto parts store. If found, for gluing you need:
- choose a warm and sunny day without high humidity;
- create a temperature in the garage of 25-27 degrees;
- remove all dirt and traces of old glue from the body;
- walk a little along the joint with sandpaper;
- sand the gluing area on the mirror;
- degrease all surfaces;
- Apply the required thin layer of glue to the holder;
- spray the purchased activator on the fastening area;
- attach the glass to the surface;
- press the mirror to the glass;
- keep as long as the glue manufacturer said;
- remove the remnants of the used activator and glue from your mirror and also the holder itself;
- put the entire structure in its rightful place;
- use as intended.
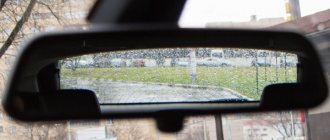
Adjusting the mirror in the cabin
This element is also important when driving a vehicle, as it allows the driver to obtain complete information about the situation occurring behind the vehicle. To adjust it you need:
- Sit comfortably in a chair.
- Position the mirror so that the rear window can be seen completely.
- Adjust the tilt angles so that the axes coincide with the axes of the rear window.
In fact, in this mirror the driver should only see the rear window of the car, nothing more. Many drivers mistakenly believe that it is used so that passengers can be seen. Therefore, when adjusting it, they try to grab the passenger seats, but this should not be done. This is one of the important tips for the driver on how to properly adjust the mirrors in a car, because many people do the opposite. As a result, visibility in the interior mirror is limited, and this should not be the case.
Disassembling the rear view mirror
Salon
In order to disassemble the internal, you will need special picks and push-ups. The case is divided according to the same principle as a mobile phone or control panel to replace the battery.
- Find the junction of the body and the mirror part.
- Insert the wringer into this area and press firmly. A gap should form on the housing.
- Carefully walk the pick along the entire gap and divide the body into two parts.
- Remove the mirror. All the elements you need will be located under it.
Lateral
Once you have separated the side mirror housing from the car body, it should be disassembled. First of all, you need to remove the mirror element. This process may not be the same for different brands, however, the following procedure is most often used.
- Use a regular household hairdryer to thoroughly heat the junction of the reflective element with the body. The temperature of the air flow should not be too high, so a technical hair dryer will not work here.
- Using a flat-blade screwdriver or a small spatula, pry the mirror away from the housing. On some models, at this stage you need to bend the terminals. To avoid damaging the glass, you can wrap a screwdriver or spatula with electrical tape or a soft cloth.
- In some designs, to separate it, you need to lightly press it in the center and, as it were, push it to the side. After this, the reflective element can be removed with careful movements.
- Then remove the center screw from the plastic frame (if equipped).
- All side mirror mechanisms are located under the frame. Using a screwdriver, you can unscrew any of them and put them in place. You can independently divide the structure into all its component parts, including adjustment and folding motors.
Possible malfunctions and their elimination
After independently dismantling, disassembling and installing a modified mirror, some problems may arise. Very often, incorrectly glued mirrors fall off at the most unexpected moment, which can lead to an accident.
What to do if the mirror comes off
The interior mirror may fall off due to physical impact or on its own. The main reason that the structure with the bracket does not stay in place is the wrong glue. If you chose epoxy, the platform holder was probably not locked in one position long enough. The same problem could occur if you used a light-curing product without special UV lamps. Household glue will also not give a good result: temperature changes and active vibrations of the car can lead to the mirror coming off while driving.
To fix this, the structure must be returned to its place and glue with a chemical hardener must be used.
Sometimes the platform with the bracket may fall off along with a piece of glass. This means that microcracks have already formed in it, which can spread throughout the rest of the glass. In this case, contact a car service: specialists will be able to carry out diagnostics and tell you how necessary it is to replace the windshield.
Nowadays you can find brackets with special suction cups on sale. They don't hold as tightly as the adhesive ones, but you can remove them and put them back in place repeatedly without fear of damaging your windshield.
What to do if it's cracked
A cracked mirror can cause a lot of inconvenience to a car owner. A serious crack can distort the image, and therefore make it difficult to assess the real distance to the object behind. This problem can occur in both the interior and side mirrors. Most often this happens during improper dismantling or installation. Although the reasons may be different: for example, a sharp pebble flying out from under the wheels, careless owners of neighboring cars, and even ordinary hooligans.
Be that as it may, the reflective element should be replaced. To do this, carefully remove the mirror from the housing and install a new one. Carefully follow the instructions for disassembling and reassembling the part. If you are not sure of your actions or are afraid of damaging the element again, contact a specialized workshop. The mirror replacement service does not cost very much, but it will help save you nerves and money on unsuccessful attempts.
How to remove an old mirror element
Everything here is done, although not complicated, but quite neatly. If you rush and make excessive efforts, you can damage the internal fasteners of the element, and then you will definitely have to buy the entire part assembled.
First, we remove the mirror assembly from the car, and only after that can we begin the repair. Then we move one side of the mirror element as far as possible to the side so that you can get inside this structure with a screwdriver.
Now, using a screwdriver or by hand, if you were able to insert it there, we move the element latches to the side, as is clearly shown in the photo below.
The latches are located along the entire circumference, so you need to unlatch them from all sides. After which this part can be easily removed with minimal effort on your part.
To see what the design of this fastener looks like, look at the picture below.
In addition to the hooks (clamps, latches), there are 4 more guides that must match the holes in the case when installing a new element. The new one is somewhat easier to install than it is to remove, so there shouldn’t be any special problems with installation. The main thing is not to use excessive force when fixing the element, and try to press the element itself as evenly as possible so that it does not break.
The price of a new such part for Grant is about 300 rubles, and as mentioned above, it is much cheaper than buying an assembled mirror. There are a few more points that relate to replacing the mirror element:
- the design can be electrically driven
- the element may be heated
Due to this, certain issues may arise that have not been described here. This article examined the simplest type of mirror element.
Removing the door trim
To gain access to the elements that fix the mirror, you first need to remove the door trim.
- Removing the key blocking the lock.
- Removing the plugs.
- Sequentially unscrew the screws and screws holding the upholstery.
- To remove the upholstery, you need to insert a flat-head screwdriver wrapped in electrical tape into the groove between the upholstery and the door panel (but it’s better to use a special device). The clamps provide some resistance, but significant force during dismantling is unacceptable.
- The rods of the locking mechanism are removed, the upholstery is moved back to a distance limited by the length of the wires supplying the lifts.
- The wiring is carefully removed, after which the door trim is also dismantled.
How to remove an old mirror element
Everything here is done, although not complicated, but quite neatly. If you rush and make excessive efforts, you can damage the internal fasteners of the element, and then you will definitely have to buy the entire part assembled.
First, we remove the mirror assembly from the car, and only after that can we begin the repair. Then we move one side of the mirror element as far as possible to the side so that you can get inside this structure with a screwdriver.
Now, using a screwdriver or by hand, if you were able to insert it there, we move the element latches to the side, as is clearly shown in the photo below.
The latches are located along the entire circumference, so you need to unlatch them from all sides. After which this part can be easily removed with minimal effort on your part.
To see what the design of this fastener looks like, look at the picture below.
In addition to the hooks (clamps, latches), there are 4 more guides that must match the holes in the case when installing a new element. The new one is somewhat easier to install than it is to remove, so there shouldn’t be any special problems with installation. The main thing is not to use excessive force when fixing the element, and try to press the element itself as evenly as possible so that it does not break.
, and as mentioned above, it is much cheaper than buying a complete mirror. There are a few more points that relate to replacing the mirror element:
- the design can be electrically driven
- the element may be heated
Due to this, certain issues may arise that have not been described here. This article examined the simplest type of mirror element.
Sequence of actions when replacing a side view mirror yourself
- We place the car on a level platform and provide unobstructed access to the front door from the side where the replacement will be.
- We unscrew the two screws that secure the door card trim and pry the plastic clips around the perimeter.
- From the back side, disconnect the block with wires from the electric drive control unit, disconnect the speaker terminals, and remove the card.
- Using a Phillips-head screwdriver, unscrew the three screws and remove the side-view mirror from its seat.
- We replace the block with a new one and screw it into place. We lay the block with wires and connect them to the sockets. We assemble the structure.
How to secure and how to glue a new one
If you have successfully dismantled the mirror yourself, then returning it back will not be difficult. As a rule, all actions are performed in reverse order.
But you should pay special attention to the selection of glue, since not everyone is suitable for this process
it is necessary to choose the right adhesive for attaching the mirror to the windshield
Glue selection
There are three types of compositions for gluing mirrors:
- chemically cured;
- light-curing;
- compositions based on epoxy resin.
A composition with resins will work well only if it is allowed to dry properly. This usually takes from 10 hours to a day. In this case, the part must be pressed tightly at all times. This approach is not very convenient, so such products are not used in everyday life.
Light-curing mixtures operate when exposed to special ultraviolet lamps. This is one of the most common methods in production. However, if you are not the happy owner of a lamp, you should not purchase such a composition. Sunlight, especially diffused light, is not able to have a sufficient effect.
For these reasons, chemically cured compounds are the most popular. A special hardener starts the polymerization process. As a rule, they consist of the glue itself and an aerosol activator, although one-component compositions are also found.
Please note that some materials cannot be used to glue the mirror
- household superglue;
- double-sided adhesive tape.
The adhesive component of both materials has such a composition that when used on glass or metal, it will not be able to harden completely. High air temperature inside the cabin or heating of the glass from sunlight will soften it and the mirror will fall off. You can use household adhesives only if the mirror fell completely unexpectedly, and now you need to urgently get to a car service center.
Max
https://homo-habilis.ru/v-garazhe/223-chem-prikleit-zerkalo-zadnego-vida-v-avtomobile
How to stick to windshield
Having selected the appropriate glue, you can begin returning the rear view mirror to its rightful place. Choose a warm day for this or install a heater in the garage: the air temperature should be between 20 and 25 ° C.
process of applying glue to the holder platform
- Clean the holder platform of any old adhesive residue.
- Lightly sand the surface of the holder to improve the adhesion effect.
- In the same way, sand the area of the windshield where it is glued.
- Degrease the holder and glass area.
- Apply a thin layer of glue to the holder.
- Spray a special activator onto the place where the part is attached.
- Place the adhesive side of the part onto the glass. Try to follow the trail left from the previous time.
- Press the mirror firmly against the glass and hold for the time indicated on the package.
- After making sure that the part is firmly in place, clean the mirror from any remaining activator and glue around the holder.
- Reinstall the windshield (if you removed it) according to the owner's manual.
Ready! If you followed all the instructions carefully, the mirror looks like it was installed at the factory or at least in a car repair shop.
How to install on bracket
If during dismantling you did not separate the bracket platform from the glass, it will be even easier to assemble it. To do this, find a fixing element: it may be a screw or a latch. After this, connect the bracket leg to the platform.
There are also special brackets that are not glued to the glass, but are installed on the ceiling or other elements of the car, for example, on sun visors.
Assessing the extent of damage
Loctite 37438 two-component adhesive for universal use
If the mirror falls off the window, there may be 3 scenarios, on which the method of further fastening depends:
- There were no traces of glue or scratches left on the glass after the mirror fell from there. This is the best option, and you need to glue it back with a special adhesive.
- There was a layer of glue left on the glass when the mirror came off. To re-fix the component, you just need to wipe off the old adhesive composition with a solvent or special substance.
Of course, some brands of cars, for example VAZ, sell brackets for attaching to the roof of the car. There are also universal mirrors with suction cups on sale. However, it is worth considering that installation on brackets requires making new holes. And the suction cups may turn out to be of poor quality and quickly come off. Therefore, the best option is to use glue.
What happens if you make the wrong choice?
If you install unsuitable or low-quality spark plugs in your car, the following troubles may arise:
- deterioration of engine ignition. When starting the engine, the owner will have to crank the starter for a long time, and this can reduce the functionality of the battery. In some situations it will be impossible to start the vehicle;
- excess fuel consumption;
- Once started, the engine will be much noisier and the sounds will subsequently increase in volume. This is especially noticeable during the process of warming up the car;
- the production of harmful substances in exhaust gases will increase. The analysis can be carried out using special equipment;
- the power and dynamics of the motor will decrease. This will be noticeably felt as you climb the hill.
In order to avoid such problems with your car, we recommend buying only high-quality spark plugs from trusted manufacturers.
In this article we discussed how to change spark plugs and the principles of choosing the right part for the full functioning of the power unit
It is necessary to pay due attention to the choice of spark plugs, since they play a major role in the vehicle operating system
Wiring diagram for mirrors on Grant Liftback
There are six pins in total, of which:
- No. 1 – horizontal adjustment;
- No. 2 – —/— vertically;
- No. 3 – weight of the control unit;
- No. 4 – heating;
- No. 5 – turn signal repeater;
- No. 6 – general “minus”.
Connection diagram by wiring color
- blue – left side;
- white – side lights;
- blue – right side;
- white – black – “plus”;
- black – “minus”;
- green – common on both sides of the mirrors;
- red – general.
Wiring diagram for Lada Granta Liftback mirrors on the control unit
- gray - black and blue - black - control unit on the driver's side;
- black - “minus”;
- white-black - “plus”;
- pin No. 7 - not used. Connect third-party contacts;
- white - dimensions;
- green, orange - control unit on the passenger side.
If you want to connect Grant Liftback mirrors to a VAZ, purchase a control unit from a Lada Kalina or a VAZ Niva. The standard unit is not intended for installation on other VAZ models. The pinout of the terminals occurs according to the following diagram:
- blue – left and right side;
- black – “minus”;
- yellow – common on both sides;
- red is a plus.
Reviews
| № | Positive |
| 1. | Vitaly: There were no problems connecting the reflector. I installed it myself, the scheme is quite simple and intuitive. |
| 2. | Kirill: in winter the mirror on the left side cracked, I replaced it myself with a new one. There were no difficulties with disassembly, the design is quite simple, the connection diagram consists of two blocks. |
| 3. | Vasily: after a side impact, the right side mirror cracked. I had plenty of free time, so I installed the new one myself. At the same time, I replaced the rubber seal; it was deformed and moisture penetrated inside. |
| 4. | Alexander: after two years of operation of the Lada Granta Liftback, the insulation in the doorway on the wiring was worn out. Replaced the entire block with wires. Now the line is completely new. |
| 5. | Konstantin: when the reflector burst, I didn’t contact the experts, I installed a new one myself. The procedure is simple, the case is held on by three screws, the block with wires is connected to the standard connector. |
| 6. | Victor: the housing on the left mirror was cracked, I bought a new one at the car market. I transferred the filling myself, it turned out to be very simple. I didn’t contact the specialists at the service station, I did everything with my own hands and I advise you. |
| 7. | Gennady: the right turn signal suddenly stopped working, so I disassembled the reflector myself. The reason was poor contact at the terminal. I pressed it with pliers and everything works fine. |
| Negative | |
| 1. | Ignat: the design of the side reflectors is not perfect; they do not fit tightly, despite the presence of a rubber seal. I decided to buy a reflector block from Renault Logan, it has an identical mount. |
| 2. | Vasily: the quality of the wire insulation is poor; after two years of use, Granta replaced it with new wiring. Insulation cannot withstand freezing temperatures. |
| 3. | Sergey: I changed the left side mirror adjustment cables for the second time in a year. Low quality components. |
Conclusion The process of independently replacing side-view mirrors on the Lada Grante Liftback is not at all difficult. The design is fixed with three screws, connection to the power circuit is carried out by two blocks with wires. Following the recommendations given in this manual, replacing a new mirror will take no more than 10 minutes. Negative reviews from some owners are unfounded and are caused by violation of the operating conditions of the technical equipment and failure to comply with maintenance schedules.
Source
Installation and replacement of mirror covers on Lada Granta
Car enthusiasts have heard a lot about the completely new model from VAZ that has caused a stir. This is the famous Lada Granta. The model was created as a worthy replacement for the popular “Sevens”, “Samar”, “Kalin”. Granta began production in 2011. And today it is one of the most budget-friendly domestic cars. Recently the company released a modernized Lada Granta liftback. Many car enthusiasts were really looking forward to this model.
The exterior of the car with such a body turned out to be very stylish. In the car, the developers changed the front bumper, slightly enlarged the air intake, and also changed the appearance of the niches for the fog lights. They did a good job on the interior too. New functionality has been added; the seats and sides in luxury trim levels are covered with more wear-resistant leatherette. The mirror covers of the Lada Granta were also replaced. They are manually adjusted in this car. Granta is available in three trim levels:
Although it is made on the basis of Kalina, it still has its own individuality. Nevertheless, Lada Granta owners often think about various modifications.
Tuning Lada Granta: purpose of linings
The process of changing the appearance of a car can take place in different ways. Car owners go to various lengths to make the car stand out among other similar ones. You can change cars beyond recognition. There are special bumpers on sale; you can do airbrushing on the entire body. You can change the interior of the cabin or make changes to the design of the engines. And that is not all.
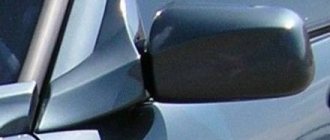
The Granta in its simplest configuration is equipped with mirrors, the lining of which has a different color from the body. You can simply replace the mirror covers with others. The store offers a wide range of these accessories. Grant's model won't be hindered by new linings. These simple elements can change not only the color, but also the shape or functionality of the side rear view mirrors.
The side mirror cover can significantly improve the car's aerodynamic capabilities. When the speed is more than 80 km/h, mirrors with overlays will not whistle, since their shape is more streamlined. Another benefit of these accessories is improved appearance. You can experiment with different trims without damaging the body.
You can buy trims with the option of an LED turn signal repeater. This allows for additional safety while operating the machine. The turn signal repeater on the side mirror improves the visibility of the flashing light. This will avoid accidents and other problems. You can buy pads with electrical adjustment and heating. Most side mirror covers are made in Togliatti.
It all depends on the colors, shapes, and fastening capabilities. Overlays that are not painted in any color can be purchased for pennies. Analogues that are made in China can be purchased for 100 rubles. However, they are unreliable. Overlays with a repeater option, adjustment, and heating cost about 2,000 rubles. Mirror covers are one of the simplest, but very noticeable types of tuning!
Installing mirror covers
As for installation, anyone can handle it. However, in case of even minimal doubts, it is better to contact the nearest car service center. This way you can avoid the risk of damaging the paintwork of the body or trim. Usually the linings are equipped with everything necessary for convenient mounting on a car. Using an example, we will describe the installation of an overlay using hermetic glue or silicone.
First you need to thoroughly clean the outside of the mirror from dust and dirt, then wipe it dry. The inside of the lining must be coated with sealant. Its layer should be small, but as even as possible. Then you need to place the pad on the cleaned surface of the mirror and press it firmly for several minutes. Next, you need to wipe off the excess glue and then leave the parts to dry.
In most cases, glue can be replaced without any problems with construction double-sided tape. If you use tape, then you need to stick it in several strips, as close as possible to the outside of the cover or directly to the mirror. There is no need to put tape on the edge. The gluing technology is the same as when using sealant.
If your trim comes with mounting hardware, then it's even easier. Just install it and snap it in the right places. It will hold tight.
Connection
Connector pinout
Connecting the central lock
. We use a circuit of two relays so as not to go under the panel to the central locking unit:
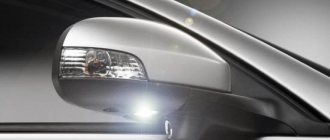
Connecting heated mirrors
(to the wiring harness under the driver's threshold)
thin gray wire
Connecting mirror turn signals
- Option 1: Pull the wire from the direction indicator on the fender.
- Option 2: To the wiring harness under the driver's threshold (blue - left turn signal; blue-white - right).
We transfer the wires from the power windows from the standard buttons to a new block with a joystick.
For Lada Kalina and Granta with heated and electric side mirrors (without direction indicators):
The new mirror has a chip with six wires, but the old one has only five. We pull the sixth contact, which is used to operate the turn signals.
The process of installing exterior mirrors from a liftback on a Lada Granta sedan is also shown in the video:
Are you considering replacing old mirrors with new ones with turn signals?
Let us remind you that we previously talked about how to make lights in the rear-view mirrors on a LADA.
Keywords: side mirrors Lada Kalina | side mirrors of Lada Granta | Lada Granta accessories | Lada Kalina accessories | turn signals Lada Kalina | turn signals Lada Granta | heating for Lada Granta | heating Lada Kalina
6
2
Found an error? Select it and press Ctrl+Enter..
AvtoVAZ continues to hire specialists for its engineering service in 2022
Video review of the new Lada Granta and its configurations
Video review of how the standard Lada Vesta audio system works
Diagnostics, checking the rear suspension of Lada XRAY