02/04/2022 3,455 Light and sound devices
Author: Ivan Baranov
The turn signal on the mirror is a rather interesting decoration for the car and an original tuning step. Read below to find out what this device is, its characteristics, operating principle, as well as installation instructions.
[Hide]
We install turn signals in mirrors ourselves in a garage
The turn signal on the mirror is a rather interesting decoration for the car and an original tuning step. Read below to find out what this device is, its characteristics, operating principle, as well as installation instructions.
Device characteristics
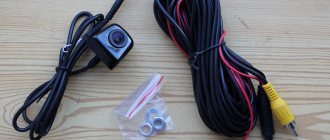
Repeaters can be attached to absolutely any vehicle. This is a fairly universal device, which is a plate equipped with LEDs.
LED turn signal for a car
Purpose and principle of operation
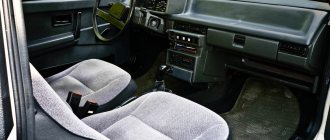
The repeater is installed on the side windows, which are responsible for moving backwards. They can be said to exchange information with the original turn signals. This is done in such a way that when the driver turns on the turn signal, both devices - both the standard one and the repeater - will show similar data. Seeing duplicated values on the car will also add some flair.
On the automotive market you can easily find ready-made models that require manual installation, however, by the way, the device can be made with your own hands. It is not difficult to make turn signals for mirrors with your own hands; it will require only minimal skills and desire on the part of the driver or mechanic (author - Tver Garage).
Installation instructions
Installing turn signals in mirrors requires some tools and skills. Read more about this case below.
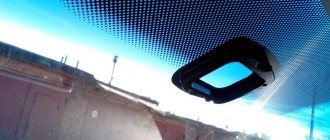
LED repeater
Tools and materials
To install the device you will need:
- repeaters;
- file;
- 10mm wrench and Phillips screwdriver;
- glue;
- steel wire.
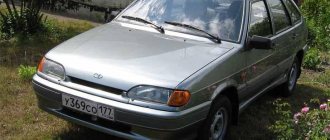
Turn signal repeater on car
Stages
Repeaters are installed in mirrors as follows step by step:
- First you need to dismantle the car mirror, that is, disconnect the fasteners and remove the mirror surface.
- Next, detach the plate from the plastic fastening. If the mirror is in a plastic frame, you can remove it with a hairdryer if you heat the surface of the desired point for a while. If it is glued hermetically, then to remove the mirror surface it is necessary to simultaneously heat it on both sides for about 5 minutes. Afterwards it can be removed. If it is attached with double-sided tape, then you need to heat both the mirror and the mounting frame.
- If the mirror has automatic heating, then you need to carefully separate it to make some space for the repeater LEDs.
- Next, you need to create arrows where the LEDs will be attached. For marking, a regular notebook sheet is used, where the future figure is drawn with dots. About nine LEDs can be installed on one mirror.
- After marking, you need to duplicate the design on the tape with a marker. And stick the LEDs on the tape, taking into account the polarity. The LEDs are attached to the sticky side of the tape.
- After this, you need to take the wire, strip it and separate the five wires, which must be twisted together and soldered between the soldered LEDs and thin wires. The resistance when soldering the negative wire should be 180 Ohms.
- Next, you should remove the mirror for mounting the LEDs, immediately after the previous point has been checked for serviceability when power is applied. Now you need to make a hole in the amalgam so that the LEDs that match the markings are better visible through the mirror element.
- You need to take a hacksaw and remove sharp holes from the mirror surface. This is done to clean the glass.
- If the mirror is made of plastic, you can lower the resistance to 140 ohms. Thus, the LEDs will break through the plastic and there will be no difference as such.
- At this stage you can begin assembly. Due to the LEDs installed on the mirrors, difficulties may arise with the tightness of the rear panel. To solve this problem, it is enough to heat the problem area where the LEDs come into contact with a technical hairdryer. Important: fasteners and latches must not be heated to avoid deformation.
- As soon as the plastic is heated to the desired temperature, it must be pressed firmly to the surface of the glass. In this form, you need to hold the mirror a little so that it “sits.”
- The final step is to connect the wires. The negative wire must be connected to the car body, and the positive wire to the vehicle. After this, the useful device will work properly, duplicating the meaning of the turn signals, and your car will become even more interesting and individual.
Car repeater
Price issue
You can see what these original devices look like below in the photographs provided. In addition to the fact that they differ from each other in appearance, they also differ in price.
Video “Installation of turn signal indicators”
The author of the video, Artem Karagodin, will tell you how to install this interesting device in a mirror.
Device characteristics
Repeaters can be attached to absolutely any vehicle. This is a fairly universal device, which is a plate equipped with LEDs.
LED turn signal for a car
Purpose and principle of operation
The repeater is installed on the side windows, which are responsible for moving backwards. They can be said to exchange information with the original turn signals. This is done in such a way that when the driver turns on the turn signal, both devices - both the standard one and the repeater - will show similar data. Seeing duplicated values on the car will also add some flair.
On the automotive market you can easily find ready-made models that require manual installation, however, by the way, the device can be made with your own hands. It is not difficult to make turn signals for mirrors with your own hands; it will require only minimal skills and desire on the part of the driver or mechanic (author - Tver Garage).
Installing turn signal indicators on mirrors
- Installing turn signal indicators on mirrors
- Why install turn signals on mirrors?
- What is needed to install turn signals on mirrors?
- The process of installing turn signals on mirrors
LED turn signals mounted in side-view mirrors are a unique type of tuning that, due to their versatility, can be mounted on any car. The turn signal is a solid textolite base with bright LED lights. Installation of turn signals on mirrors is carried out on the side and connected to the factory repeaters. When any turn signal is turned on, the LED indicator will repeat the signal of the main turn signal. This additional signal duplicates the main one and gives an unusual style to your car.
Why install turn signals on mirrors?
Many car owners have probably already seen turn signals installed on mirrors that duplicate the main signal, and will agree that it looks stylish and very impressive! And someone was lucky to become the owner of such tuning on their vehicle. The main thing is that it is very informative! For example, when driving with another car half a car away, it is not always possible to see the turn signal located on the wing, while the mirror is clearly visible.
Such turn signals will help avoid near-emergency situations or common misunderstandings.
What is needed to install turn signals on mirrors?
In order to make and install turn signals on mirrors yourself, you will need several elements. So, what do you need to install turn signals on your mirrors? Let's list:
– SMD LEDs in the amount of 18 pieces;
– 2 resistance elements of 0.5 W and 180 Ohm;
– thin wire 20 cm long;
– black marker for marking (preferably the thinnest one you can find);
– blade for cutting metal;
– diamond drill with a diameter of 2 mm;
– soldering iron and all accessories;
The process of installing turn signals on mirrors
1. Removing a car mirror
Remove the mirror surface by unclipping the fasteners behind it.
2. Disassembling the mirror element
To begin the process of installing the turn signals, you need to separate the mirror element from the plastic mount. Typically, factory assembly of mirrors takes place in three ways:
• The mirror is inserted into a thick plastic frame. To remove it, you need to heat the entire surface around the perimeter with a technical hairdryer for about five minutes, after which you can safely remove the element.
• The surface is glued with thermal sealant. To separate it, the mirror needs to be heated evenly on both sides for about five minutes. Carefully separate the mirror element from the plastic.
• Attached with double-sided tape. We use a technical hair dryer again and heat up the entire mirror, as well as the frame. Intensive heating should be carried out for at least seven minutes. Then separate any of the corners without creating stress on the surface of the mirror. After it has succumbed, we warm it up further and remove it.
3. If the mirrors have a built-in heating system, then you need to carefully separate it from the mirror, thereby freeing up space for marking the LEDs.
4. Marking
To create the correct markings for the arrow, take graph paper or a regular notebook sheet in a square, and then mark the future figure with dots at regular intervals with a marker. Nine LEDs per mirror should be enough. Place the adhesive side of the tape over the finished markings on the paper. Then use a marker to duplicate the markings onto the tape. Glue LEDs onto the dots, matching them by polarity. With the glowing side, attach the LEDs to the sticky side of the tape.
Next, take a thin wire. Strip it and separate the five veins. Twist them together and tin them. Connect all LEDs in parallel. After soldering the LEDs, solder the thin wires. Solder a resistance of 180 ohms in series to the negative wire. Now you can connect the power and check. If everything works well, then move on to the next step.
5. Removing the mirror coating at the LED installation site
The process of installing turn signals in the mirror continues. Once the arrow has been checked for functionality and matches the markings on the mirror element, make a hole in the amalgam so that the LEDs are more clearly visible through the mirror. Take a hacksaw and apply the part with the small hole to the mirror surface and scratch along the diameter.
Remember that not all mirrors are glass! There are also those made of plastic. In this case, you don’t have to scratch, but simply lower the resistance to 140 Ohms. The LEDs will glow brighter, showing through the thin plastic. Next, we glue the heating in place, if there is one. Don’t worry that now it doesn’t fit as tightly as before, its effectiveness will remain the same!
6. Reassembly
Everything is ready for reassembly, but now the LEDs do not allow the back panel to be tightly pressed to the mirror element. To do this, separately heat the plastic of the rear part with a technical hairdryer in the place where the LEDs touch. Remember that heating fasteners and latches is strictly prohibited! They may be deformed. Watch this closely. Once the plastic is heated to the required state, press it firmly against the glass. It will bend, and the mirror surface will fit tightly into the base. Keep the assembled mirror in this state until it cools completely. Next you can do the wiring.
7. Wiring
This process will not be difficult. Throw the minus on the body, and take the plus out of the door and connect it to the on-board network.
Subscribe to our feeds on social networks such as Facebook, Vkontakte, Instagram, Pinterest, Yandex Zen, Twitter and Telegram: all the most interesting automotive events collected in one place.
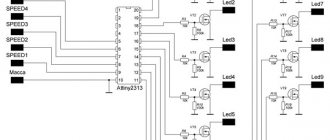
Connection
Old style mirrors (without direction indicators) have two connectors (3 and 2 wires):
The mirrors of the new SE model have 1 block of 6 wires:
We cut off the wires from the SE mirror block and solder it according to the diagram:
The process of installing and connecting mirrors of the new SE model is also shown in the video:
Found an error? Select it and press Ctrl+Enter..
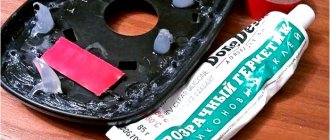
Because The trim doesn't match the color of my car, so I decided to cover it with a matte film while it's cold outside, and paint it in the summer.
I was looking on the Internet for how to connect mirror wiring, everyone writes that it’s nothing complicated, but until you start and see for yourself, it doesn’t seem easy at all, but still there’s nothing complicated, my old mirrors have 5 wires and 2 connectors:
1) one block for controlling mirrors, there are 3 wires. - the red wire of the mirror went to the red-blue wire of the car wiring, - the blue went to the blue-black, - the green went to the green-black.
2) the second block for heating mirrors, there are 2 wires - gray (+) went to the blue-red wire (on the right mirror the positive wire was not blue-red, but black-red) - black (-) went to black.
I looked for a compact 6-pin connector and couldn’t find one, so I decided to keep the old connectors and bought a connector with one wire, it’s (+) for the turn signal.
How to connect: There are 6 wires on the SE mirror
- red is connected to red-blue, - green to green-black, - blue to blue-black,
— brown with blue-red — black with black (it is also a minus for heating and for turn signals)
— white and red with any of your choice
I made the pinout of the SE mirrors on the Priora with photos
The main thing is not to confuse the red-blue and blue-red wires, they are almost the same, if anything, you can check them with a tester by connecting the minus of the tester to the body or to the black wire, turn on the heated mirrors and on which the plus appears, we connect it to the brown wire of the mirror.
I’ll note one interesting point: when the heating block for the mirrors was disconnected, the car started for the first time, but the second time I couldn’t start, the immobilizer icon was blinking on the dashboard, then as soon as I connected the heating block, the car started and an error appeared on the multitronics “ ECU power supply interruption.”
Theme Options
Search by topic
Installing turn signal indicators yourself on a car
Driving safety always remains a priority for every driver. He is responsible not only for himself, but also for his passengers. “Turn signals” were developed specifically for this purpose. These sensors are capable of indicating the direction in which the vehicle is turning to optimize the movement of vehicles. One of the innovations of the “Chinese craftsmen” is a mirror turn repeater. We'll talk about installing it today.
The turn signal on the mirror duplicates the signal indicating the direction of travel
Device base
Installing such equipment is an original way of tuning and a worthy decoration for a car. Due to its versatility, the repeater can be attached to any vehicle. The turning device is a small plate-shaped device. This textile base is quite durable and equipped with LEDs. There are some model options: mounting in a reflective surface or installing a flexible “signal” on the corners of the mirror. They are inexpensive, but you can make them yourself.
Principle of operation
The repeater is attached to the side mirror, which is responsible for the rear view. They connect to the original turn signals to produce similar information. When the driver turns on the turn signal, the factory and installed devices will display the same data. Signal duplication will also add originality to the appearance of the car.
There are ready-made models on the market that require only manual installation. But you can make turn signals in the mirrors yourself - this is a fairly easy process that will require:
- LEDs or ready-made “turns”;
- scotch;
- 2 elements causing a resistance of 180 Ohms and 0.5 W;
- wire 20 cm long;
- marker for marking;
- hair dryer;
- soldering iron
Installation process: detaching
If you are interested in how to install turn signals in mirrors, first you need to dismantle the reflection elements. To detach the reflective surface from the mirror, carefully snap off the fasteners. After this, you need to disassemble this element and the plastic base. Usually the mirror is inserted into a special frame and secured with glue or tape. To do this, you need to heat the surface with a technical hairdryer for five minutes, then the elements should be freely removed.
Marking and power supply
When assembling the device yourself, it is important to correctly indicate the mounting locations for the LEDs. Installation of repeaters in mirrors is done using a marker, which is used to draw a figure of nine circles on the back side of the reflective surface. This number of light bulbs is quite enough to ensure comfortable visibility. After this, the shape is glued to the mirror with tape, and the LEDs are installed. It is important that they are matched in polarity. They need to be attached with the luminous side.
The next step is to solder the wires. To begin with, they are stripped and divided into five veins. Then they need to be twisted together. A resistance of 180 m is soldered one by one to the negative wire. Now it is checked whether there is power.
Cleaning the mirror
In order for the arrow to be visible through the reflective surface, it must be cleaned of excess material. When the entire structure has been checked for functionality, and the markings coincide with the location of the light bulbs, you need to make small holes in the amalgam. LEDs must be clearly visible through the reflective surface. Next, you need to clean the holes with a hacksaw to remove sharp edges. It is important to remember that not all mirrors are made of glass. If the model is made of plastic, it will be enough to lower the resistance to 140 Ohms. In this case, the brightness of the bulbs will be able to pass through the plastic.
Putting it back together
Many people notice that installing turn signals in mirrors creates a loose fit for the LEDs. To do this, you need to warm up the back panel in the places where the light bulbs are located with a hairdryer. But under no circumstances should you heat the fasteners! After sufficient heating, press the structure against the glass - it will bend a little and connect tightly. After a couple of minutes, you can move on to the last stage.
Wiring
In this process, it is enough to transfer the “minus” to the body, and the “plus” needs to be taken out from the door and connected to the on-board network. After this, the device will give the same signals as the rear turn signals.
Such manipulations are available to every motorist. By spending a small amount of time, you can get high-quality mirrors with repeaters. This method is completely safe and only requires attention to the stages of work. This way, you will be able to increase your safety on the road yourself, because it is not always possible to notice rear turns. In the case of mirrors, they will always be clearly visible to drivers from behind.
From personal experience, I would like to say that a repeater is a useful trick. It is unusual for our places, so it is always noticeable, and, therefore, effective.
Device base
Installing such equipment is an original way of tuning and a worthy decoration for a car. Due to its versatility, the repeater can be attached to any vehicle. The turning device is a small plate-shaped device. This textile base is quite durable and equipped with LEDs. There are some model options: mounting in a reflective surface or installing a flexible “signal” on the corners of the mirror. They are inexpensive, but you can make them yourself.
Installing turn signals in mirrors
Hi all! I had this operation done a long time ago, but I only got around to it now. It was decided to move closer to the “Lux” and move the turn signal repeaters from the wings to the mirrors. I purchased LED turn signals worth 600 rubles per pair.
Well, accordingly, to replace the old turn signals in the wings, I bought SE plugs, costing 300 rubles per pair.
I also didn’t forget to take two female connectors, identical to those located in the turn signals in the wings. We disassemble the mirrors, or rather, for convenience, I removed them from the car. We remove the plastic plug from the mirror, and this picture opens before us.
Using an ordinary mounting knife, I carefully cut off the plastic strip, in place of which the turn signal will soon appear. This plastic is very easy to cut, the main thing is to be careful and not bend the line. Basically, there is a strip along which you need to make a cut. And by the way! I forgot about the most important thing that you need to pay attention to when disassembling the mirror housing!
I installed the turn signals in the mirrors, they installed very easily, they are held on by latches. You need to insert repeaters until a certain click is heard. Not finding the necessary connector that should fit onto the cable coming out of the mirror, I soldered the wires and heat-shrink them. Will!) The mirrors are collected.
Next, I put the mirrors in their rightful places and started wiring. I decided to hook up the now extra wires from the repeaters in the wings. I brought the wires out through the holes in the doors, ran them down the door, and threaded them through the rubber corrugation from the door into the salon.
Next we need to get to the wiring to the repeaters in the wings. To do this, we twist our way from bottom to top on both sides. On the left, the plug is located behind the hood opening handle, or rather above it - further in the photo.
And it’s purely mirror-like on the passenger side - further in the photo.
We also extract the wires from these rubber seals into the interior. We install chips on the repeater wires leading out of the doors. We connect the necessary wires with male and female connectors to each other, and everything works))) For those who are too lazy to pull out the wires, there is another option, make an insert into the wiring of the rear turn signals. But you need to know the colors of the wires. I'm telling you, the wires go along the thresholds in the cabin. Black wire is ground. But the turn signal wire is blue. But I would recommend doing everything using chips, as it’s somehow more reliable and beautiful. Well, here’s a photo of the installed mirrors)) thanks to everyone) and good luck on the roads!)
Where to start?
It looks much better with a turn signal, you will see that for yourself. You need to understand that there are several ways to implement your plan:
- installing LEDs directly on the mirror;
- installing a repeater in the rear view mirror housing.
The first option is simple, but quite effective. The second one is suitable for those who want to install a turn signal on the mirror of a specific car. Let's consider both options. But first, I would like to say that such tuning is needed not only for beauty, but also for increased safety while driving the car. A striking example is rearranging from row to row. A neighboring car, which is half a car away from you, may not see the rear turn signal, and this increases the accident rate. The repeater on the mirror is clearly visible.
Report: Installing heating and turn signal indicators in mirrors on Ipsum SXM (EVGEN902)
Theme Options
Search by topic
Report: Installing heating and turn signal indicators in mirrors on Ipsum SXM (EVGEN902)
In general, they gave me 3M heated mirrors. The price of the issue is unknown, since one does not look a gift horse in the mouth.
I figured it out on the mirror, in principle it would fit, so I’ll implement it. The most frightening thing was the moment of removing the mirror (the glass itself). In reality, everything turned out to be a little simpler.
It was not possible to remove the mirror together with the frame from the latches. Therefore, I did it differently, heated the mirror and pulled it out of the frame, and then removed the frame itself from the latches.
As you can see in the photo, in addition to the latches, the frame itself is also held on by mastic, and if you don’t warm it with a hair dryer, it will be problematic to remove it from the latches.
Paper is glued to the mirror element itself on the inside. Mastic is applied over the paper. He heated it and scraped it off for further use.
The paper can be easily removed from the mirror, but some kind of glue remains, which can be washed off with alcohol.
Heated mirrors are glued to the mirror like tape.
Since the heating is slightly smaller in size than the mirror, I glued it on top with metallized tape for more uniform heating. On top of the metallic tape I applied the mastic that I scraped off earlier.
In order to run the wires and just clean everything, I took everything out of the case. He pushed the wires into the tube using steel wire, pushed them through the tube, wound the wires to the wire, lubricated Ferry and pulled them through.
Last edited by EVGEN902; 01/13/2013 at 22:41.
In one instance, the flange of the mirror folding mechanism was splashed with WD-40 liquid. Before this, the driver's mirror sometimes jammed when folding, but now it folds and unfolds without problems.
We lay the tube with wires, screw all the mechanisms. We heat the mirror with the applied mastic and the frame with the mastic and connect them together. Then we heat the frame with the mirror again, insert it into the guides and snap it into place.
Due to the fact that since I started installing the heating, I decided to install turn signal indicators on them. There are no repeaters on my car, I have no desire to make holes in the fenders at all, so I decided that the ones on the mirrors would be just right. Searches in bazaars and shops yielded no results. The Chinese silicone junk with diodes did not inspire confidence. Therefore, I decided to collectively farm homemade repeaters. Plexiglas was chosen as the material. But even here some difficulties arose. According to the advertisements, only 10mm plexiglass was sold, but I wanted a thickness of 15-20mm. I had to take ten and glue it with dichloroethane. In order to correctly cut out the bend of the future turn signal, I made this “comb” (I don’t remember what it’s called correctly).
We take a handful of nails, cut off the heads, clamp them between two plates, having previously glued a strip of foam rubber to one of them. We stick masking tape on the mirror body in the place where the repeater is supposed to be installed and press the “comb”. The nails slide along the relief of the body.
We tighten the nuts on the “comb” so that the relief does not get lost, transfer the bend to the cardboard, cut it out and compare it with the body again, we get a template. From the template we apply the design onto plexiglass and cut it out.
The fact that the plexiglass is glued together is practically not noticeable. And then: he sawed, turned, sharpened, sharpened and polished, the photo shows what came out of it.
We make identical recesses with a drill, then using a Dremel we bore the recess (groove) for the diodes or LED strip.
Then we shape it using a Dremel, sand it with different sandpapers one at a time (dipping it in water) and sand it with polishing paste until all the scratches and irregularities disappear. I made the groove semicircular, without corners, to make it easier to grind and polish.
Replacement process
Tip: disconnect the air filter - this will make it easier to get to the left headlight unit, and the removed windshield washer reservoir will provide access to the headlight unit located on the right.
Replacing the left low beam lamp in a Lada Kalina occurs as follows:
- Prepare the vehicle for the list of work to be carried out by placing it in first gear, applying the handbrake, and placing a shoe under the wheel.
- Remove the negative terminal from the battery, or, as a last resort, turn off the outside lighting.
- Remove the rubber plug from the low beam section.
- Remove from the lamp terminal.
- Pull the ends of the spring clip out of the grooves to remove the latter.
- Remove the damaged lamp from the socket.
- Replace it with a new one, following the reverse order of work.
Ford Fusion Connoisseurs Site
Everything you wanted to know about the Ford Fusion but didn't know where to ask
You too can become our partner
Installing turn signal indicators in rear view mirrors
If your car, in the absence of an option for electric folding mirrors, still has the appropriate wiring, then consider yourself lucky! But, more on that later.
Installation
To install the turn signal in the mirror housing, you will need the repeater itself, an overlay for the mirror, some tools and some free time.
I decided to go with the turn signal from the Volga-Siber car.
To begin, mark on the mirror housing trim the space for the cutout for the repeater. Then, using a hacksaw blade and a knife, cut out the excess.
This work requires some painstakingness, because the overall appearance of the structure will depend on the accuracy of the fit. At the same time, it is necessary to disassemble the turn signal itself.
. and set aside for now.
Next, we begin preparing the body lining. I note that the material of the lining is easy to process and paint - which is what we proceed to. We protect the repeater glass with insulating tape.
. insert into the cut hole.
and use a hot glue gun to attach the “glass” in several places.
Important: Just fix it – no need to glue it completely! We apply the prepared plastic putty to the trim, especially carefully pressing it with a spatula in the places where the turn signal glass abuts.
We wait for complete drying, about 5-6 hours, and then, cutting off the glue in the previously stuck places, we remove the “glass” from the lining.
. the end of the edge should be perfect, exactly repeating the shape of the turn signal. Next comes the sanding procedure.
and painting followed by application of varnish.
Here you go. The pads are ready! Now it’s time to refine the repeaters themselves.
It is better to carry out processing using electric emery.
. in such a way as to reduce the protrusion of the turn signal into the trim because the space in the mirror body does not have sufficient capacity.
Together with the glass, the reflector is processed and pushed. Let's look at it in more detail! Since the reflector amalgam is quite fragile, special care is required when cutting it and removing excess material.
Having finally made sure that the “glass” and the reflector fit exactly, we proceed to assembling the repeater. To do this, I used the same hot melt glue, simply pouring it onto the board with LEDs as a compound.
After drying (quite quickly), I trimmed off the excess layer.
. inserted the assembled repeater into the cover plate.
. and finally filled it around the entire perimeter.
We carry out a mandatory procedure for checking the functionality of the assembled turn signal. To do this, I simply connected it to the battery.
Let me remind you that LEDs require strict adherence to polarity - otherwise they will not glow!
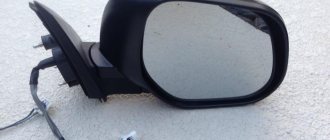
Next, we remove the mirrors from the doors and install our overlays with repeaters instead of the standard ones.
To do this, you will need to make some fun of the inner wall of the mirror housing. In order for the overlay to sit clearly in place, it is necessary to make a cutout, almost the same as in the overlay itself.
This will not affect the reliability of the fastening of the rotating mechanism and the electric drive.
We drag the wires from the repeater through the tube in the rotating mechanism.
. and take it outside.
Installing mirrors on the door
Connection
We connect the wires from the repeater to the mirror connector using twisting and heat shrinking.
Remove the inner mirror trim from inside the cabin.
We open the plastic trim of the thresholds to get to the wiring harness.
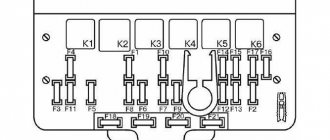
We free up space to get to the GEM module connectors.
Our task is to find contacts for left and right turns.
According to the scheme:
- Connector C1, pin 2 goes to the left turn (blue with a red stripe, 0.75),
- Connector C1, pin 1 goes to the right turn (blue, 0.75).
The total mass is attached to the body in any convenient place.
Important! If you are an expert in the field of car electrical wiring, then it will not be difficult for you to understand the connection diagram. Otherwise, I recommend turning to familiar masters of this business!
Here's what the result looks like from the outside.
YouTube Video
Finalization
Since the lemon color of the turn signals did not match the “orange” of other external LED indicators, I decided to modify the repeaters by installing LEDs of an adequate color in them.
I drilled additional holes in the reflector to install more LEDs.
With the help of a friend bzfox
assembled the structure.
I installed new turn signals in the newly prepared linings.
Do you need to rush before the exam starts?
This issue is rarely given due attention, but in practice it makes sense to hurry to the race track. And the point is this:
As a rule, the examiner (traffic police inspector) arrives at the site after the driver candidates. Those. You have to wait for a police officer and the wait for the exam to begin can last for half an hour or more. This time can be spent usefully.
In this case, you need to agree with the instructor so that he will allow you to drive a circuit around the race track before the exam. Competent instructors themselves offer driver candidates to practice. If they don’t offer it, then don’t be shy and ask. If your instructor is not available, ask anyone else. Immediately before the exam, it can be useful to “refresh” your knowledge and skills.
Low beam lamp “Kalina”: causes of malfunctions
Lamp burnout is the most common malfunction. Sometimes this begins to happen too often, which indicates the occurrence of an additional factor that causes the breakdown.
Important: when installing halogen lamps, it is necessary to monitor the cleanliness of the bulb and prevent contamination. Therefore, even contact of the skin of your fingers with the glass of the flask is unacceptable.
Reasons why the low beam lamp “Kalina” does not light:
- Failure of the fuse protecting the lamp power circuit.
- Depressurization of the headlight housing and dirt and dust getting inside. The bulb and reflector of the lamp become dirty, which leads to its overheating and failure of the filament.
- Unstable operation of the generator voltage regulator. Voltage surges in the on-board network greatly accelerate the failure of halogen lamps.
- Malfunction of the power supply circuit of external lighting devices, for example, oxidation and poor contact of lamp plugs, wire breakage.
During assembly, LADA “Kalina” cars are equipped with 55-watt low-beam lamps from the German company OSRAM, designed to operate at a voltage of 12 volts. Instead, you can install H7 modification lamps, for example, Phillips Extreme Vision, GE SportLight. These brands are unpleasantly surprising with the price of the lamps, but they are very pleasing with their service life and, most importantly, the power of the luminous flux.
The last factor has a decisive influence on the safety of night driving. You can save a little by installing lamps from Russian manufacturers on your Kalina. Among them, the products of the Mayak plant stand out. The low-beam lamp “Kalina” from this company, at a very affordable price, is practically not inferior to its foreign analogues.
Advice: do not get too carried away with saving money when choosing low beam lamps. Too cheap lamps from unknown manufacturers require frequent replacement, which covers up the savings. But the quality of the head account will be noticeably worse.
Work progress
Dismantling
First of all, you need to remove and disassemble the side rear view mirror itself.
First, remove the plastic trim from the front pillar inside the car. It is held in place by 3 clamps. The top one must be snapped off, and then the remaining two fasteners at the bottom must be disengaged.
Afterwards, the wiring plugs are disconnected and the mirror itself, which is secured with 3 screws, is unscrewed. They can be unscrewed with either a 10 mm socket or a TorxT20 bit.
Next, the process of disassembling the mirror begins. First, the mirror component must be rotated to the side.
This creates an opening through which the mirror component can be snapped off and removed from the mirror housing. Everything is done with a flat-head screwdriver, but you need to work carefully.
The cover itself is made of plastic. It is held in place by latches, and therefore can be removed simply by prying it with a screwdriver or knife, without dismantling the mirror component.
Everything is clearly shown in the video.
Working with a mirror
Next, independently replacing the LEDs in the Lada Vesta mirror turn signal means working directly with the turn signal.
The LED turn signal must be removed - it simply snaps off from the body.
Next, the glass is dismantled. To do this, you need to heat it with a technical hair dryer so that the sealant softens.
When disassembly is complete, you need to remove the factory LEDs and install the LED strip in their place, securing it with a heat gun.
Already in place, the tape should be opened with several layers of varnish.
Assembly and installation of the mirror is carried out in the reverse order.
This completes the independent replacement of LEDs in the Lada Vesta mirror turn signal.
Which low beam lamps to choose for viburnum
As we already indicated above, H7 lamps are installed in the low beam. Today a large number of lamps of varying quality are offered with this type of base. We recommend installing only high-quality and proven light bulbs that have already proven themselves.
- PHILIPS H7-12-55 LONGLIFE ECO VISION (4x lifespan) lamp price from 400 rubles (lamp installed from the factory)
- PHILIPS H7-12-55 30% Vision lamp price from 300 rubles (with increased brightness)
- PHILIPS H7-12-55 130% X-TREME VISION 3700K set price from 1500 (considered one of the brightest halogen lamps)
- OSRAM H7-12-55 Ultra Life (3x resource) price from 400 rubles (just like Philips was sometimes installed from the factory)
- OSRAM H7-12-55 30% Super lamp price from 300 rubles (lamp with 30% increased brightness, similar to philips)
- OSRAM H7-12-55 110% NIGHT BREAKER UNLIMITED kit price from 1500 rubles (110% more light than a regular lamp)
- BOSCH H7-12-55 Pure Light lamp price from 250 rub.
- MAYAK H7-12- 55 price per lamp from 90 rubles (inexpensive Chinese equivalent)
- GE H7-12-55 (PX26d) (General Electric) price per lamp from 180 rub.
If you want your low beam bulbs to last as long as possible, you should choose the following models:
- PHILIPS H7-12-55 LONGLIFE ECO VISION
- OSRAM H7-12-55 Ultra Life
These lamps have an extended service life, so they will last longer than regular lamps. However, we note that some owners do not have enough light in a car with these lamps.
If there is not enough light, you can install lamps with increased brightness of 30% or 110, 130% - but you must be prepared for the fact that they burn out faster than ordinary ones. We do not recommend using them as DRLs.
- OSRAM H7-12-55 110% NIGHT BREAKER UNLIMITED
- PHILIPS H7-12-55 130% X-TREME VISION 3700K
When installing such lamps, it is better to use running lights and drive on them during the day, so as not to “burn out” expensive lamps with increased brightness.
We buy everything you need for tuning
The number of elements that we will install is not that large, and therefore they will cost you little. The main thing is not to forget anything and buy everything you might need. This list includes:
- 18 SMD LEDs;
- transparent high-quality tape;
- resistance elements (180 Ohm and 0.5 W);
- technical hair dryer;
- small soldering iron;
- 20 centimeters of wire and a thin marker.
Having the above tools is essential, so buy them all. For example, it is not necessary to purchase a soldering iron. Most car enthusiasts already have it. You can also ask a neighbor for a hairdryer or rent it for a couple of days. Everything else isn't that expensive. Well, now let's move on directly to the installation process.
Setting the interior and side mirrors
- Salon. Everything is very simple. Find the center point of the rearview mirror. Align it with the center line of the rear window.
- Lateral. Adjust the driver's seat to suit you. Lean to the left, almost touching the side window. Place the left mirror in such a position that you can see the rear fender of the car. When sitting normally, it should disappear from your field of vision. Lean to the right so that your head is in the central part of the cabin (between the driver's seat and the front passenger seat). The rear fender should also be visible in the right mirror. To check the correct adjustment of the 3 car mirrors as a single rearview system, enlist the help of a passenger. Ask them to walk around the car slowly. At this moment, it is necessary to monitor his movements in the rearview mirrors. If a person disappears from one car mirror and immediately appears in another (with short pauses), then the number of “blind spots” is minimal. The side mirror is adjusted correctly.