Two schemes (simple and complex)
First of all, before connecting the alarm, you need to study the instructions included with it. The main unit always has relays installed: one of them closes when the locks are locked, the second acts on opening. The connector to which the relay contacts are connected usually has 6 pins. There is nothing complicated here.
In the first case, we will use only this connector. The second circuit uses another contact, called “signal output for 2-step lock opening”. Find it on the main unit.
We connect the alarm in a simple way
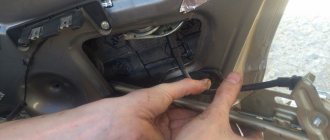
A push-button module is installed in the driver's door of the Lada Priora. The door trim must be removed and the connector for this module must be found:
We will need a brown cord from the connector. It is a signal, and the alarm relay is connected to its break:
Two wires connected to each side of the cut cord will have to be pulled to the main unit. The common contacts of the relay are connected to one of the wires.
It must be remembered that when carrying out any installation work, first disconnect the negative terminal of the battery.
All wiring in the considered circuit is signal, but this does not mean that the connection points need not be isolated. Wires should not touch metal parts of the car. If contact occurs, it is necessary to use additional protection: electrical tape, heat-resistant tube, etc.
The best option for connecting to the central locking system
Having made the connection, as discussed above, you can notice the following: all locks are activated from the key fob for closing, and only one, the driver’s, is activated for unlocking. This defect can be eliminated 100%, which will require 2 or 3 additional relays. First, let's look at where the connection points are:
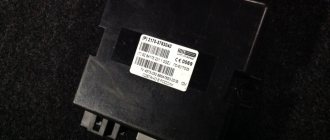
The block that is visible in the photo is designated BUS-2170. It is equipped with three connectors, but we need one (three-row).
Find three wires in connector X1:
- Sixth (red-black). The cord goes to the actuators and is the power one.
- Thirteenth (green-black). Front right power window control cable.
- Eleventh. Same as “13”, but for the rear window lifter.
How to connect an alarm system to the central locking of a Priora Lux? Three wires are broken (all indicated), and the cables from the break points are pulled to the signaling unit. If you don't have rear power windows, the last cord will be missing. And if there are no power windows at all, cables 3 and 2 do not break (they are still missing).
The BUS unit will be installed behind the dashboard, near the gas pedal. To remove it, dismantle the side panels and unscrew two 10mm nuts. These nuts secure the block on both sides. From each of the break points, a cable is laid to the signaling system, which also applies to the brown cord coming from the door block:
Here we use additional relays (K1-K3), a 15 Ampere fuse and nothing more.
Installing rear door lifts
Electric windows are a necessary element of comfort. But with Priora everything is not so simple. Standard wiring (unless, of course, you have a luxury version) is not enough to install lifts in the rear doors. And the first thing you have to do is stretch the necessary wires from the control unit to the doors. Moreover, this is not the only difficulty. On some versions without rear ESPs, relays for them are installed, and the control unit has only 2 buttons. Thus, in order to install the lifts back, you need to change the control unit to a four-button one.
When replacing the unit, problems may arise with the immobilizer of the standard anti-theft system. It must either be deactivated or reprogrammed. It depends on whether you want a factory alarm. In general, the procedure, which in itself is not too complicated, becomes more and more complicated in Priora trim levels other than the luxury one.
In order to install electric windows on a Priora, you will need a set of keys, the lifts themselves and a screwdriver. Time spent from 15 minutes on the door without taking into account fiddling with the immobilizer. In some cases, up to five hours of work will be required.
But even a seemingly correct installation does not guarantee that the Priora’s power windows will immediately begin to work . The Priora has a rather complex wiring diagram, especially for those who have not done any manipulations with it before. And if there are no relays in the rear doors yet, you will have to purchase and install them.
By the way, it’s easy to check their presence: when you use the window regulator on the front door, quiet clicks will be heard in the rear ones. These are working rear relays, quite suitable for installing non-standard ESPs compatible with your car. There is some information on this issue on car forums.
You also need to know how to remove the lift to replace or repair it. Everything is simpler here, we take out the glass, disconnect the electric motor connector, use a ten key to unscrew the fasteners and pull out the mechanism itself through a specially provided hole. And so with every door. The casing must be removed before starting work.
The window regulator on the Priora in the Norma configuration is installed in its regular place. Next, you need to connect the rear door buttons, taking into account that each of the buttons has 3 contacts (for power, ground and common wire). The wires from contacts 1 and 3 must be led independently to the control unit under the dashboard. The common wire is connected to one of the wires coming from the controller. After these operations, we connect each Priora lift with an electric motor.
To connect an electric drive to the lift, you first need to remove the power connector from the controller. There are just two empty nests in it. You just need to remove the clamp to easily connect the wires necessary for the operation of the lifts. You also need to run the wires into the corresponding connectors of the rear doors (their colors are red and black). The easiest way to stretch them is along the original wiring of the VAZ Priora. The blog drive2.ru has detailed instructions on this point with photographs. In general, Priora window regulators are quite simple to install and dismantle.
Actually, this completes the installation of electric window lifts on the rear doors of a Priora car. But in this case, the standard alarm will not work until the immobilizer is flashed. Here you either need to install a new anti-theft system, or use the second method, how to install a window regulator on a Priora.
Installation of rear windows on Lada Priora. Complete instructions
Car owners of the model of the same name would do well to know what it means to install rear windows on a Lada Priora
– more precisely, to have at least general information about the complex of works united by this concept. We will try to clearly describe the process, noting some related points that will undoubtedly bring practical benefits to domestic motorists.
Installing rear windows on a Priora has a number of specific features. But first things first.
Window closer on Priora and operation of power windows without turning on the ignition
Have you ever been annoyed by the moment when you are late, turn off the ignition and when you are ready to run, you notice or remember about the open windows... You have to put the key back into the ignition and press the power window buttons. This is not so bad, but sometimes in your haste you simply forget about the open windows and leave the car to plow open. This happened to me a couple of times.
Remembering how convenient it was with power window closers on my previous car, I immediately included the installation of power window closers on the Priora in my plans.
Lada Priora Sedan Quartz (Pegasus) › Logbook › Connection diagram for the rear ESPs on the Priora.
Due to numerous requests, I am posting a diagram for connecting the rear electric windows on a Priora
.
If anyone is interested in how I connected the rear ESP on my baby, you can open the post by clicking on this link.
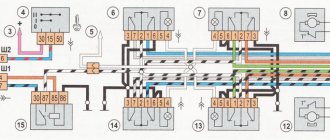
We connect strictly according to the diagram. The first diagram is the rear wiring harness diagram, also known as the floor wiring diagram
.
The second diagram is a diagram of the wires in the doors
.
Next is the pinout of the connectors of the electrical package unit
.
Well, just in case, to make the connection process easier, here are a couple of diagrams, namely:
Well, I think that's enough. If anyone has any questions, please contact PM.
Product categories
You can make purchases in our store without mandatory registration. But by registering, you will be able to do it faster and more conveniently, in addition, you will be able to monitor the fulfillment of orders and view the history of your orders. After registration, you will not have to enter your data each subsequent time for delivery of the purchased goods; it will be enough to simply log into the store using your personal data.
| cart is empty |
LLC “S-Auto” Dimitrovgrad, st. Pobeda, 9-47 TIN 7302036687 OGRN 1077302000929
Call us: 8-909-360-09-33 Mon-Sat 8:00-18:00 (Moscow time)
So my torment with mirrors began)))) so we have: mirrors from Priora with heating and electrical adjustment, a VAZ 2110 mirror control unit (standard) and wires 10 meters of triple and 10 meters of double wire, 20 pieces of female (small). There aren’t that many connection diagrams on the Internet, but I’ll try to break this whole topic down to its atoms! We take the mirrors and screw them into a standard place, while taking the wires out.
Next, we remove the door trim and start running and jumping around them, trying to pull the wires through the small and thin corrugation connecting the door and the car interior;)
All methods are good here)))) I would prefer to first insert a wire or a thin but strong wire, tie it with the bundle of wires that need to be pulled through and with a slight movement of the hand (you may need the help of a second hand) pull it all out from the other end)))) ) So, the most difficult part of the work is done, and all that remains is to stretch the wires to the mirror control unit. For this we need a Phillips screwdriver 1 pc. We turn this crap away near the feet of the driver and passenger
Instead of introducing
Window lifters (or, to use a more familiar word, “window lifters”), as the name suggests, are designed to raise/lower windows.
The option under consideration refers to the electric window lifter
(although in a number of models only mechanical ones are provided for rear windows), i.e. manipulations with the side windows are carried out using electrical energy.
It is convenient and practical, creating additional comfort for the driver and passengers. It is pleasant to note that domestic manufacturers have paid due attention to this indicator.
Design features
The actions described below are focused on the removal/installation of electric lifts, which does not exclude the use of this text as:
- manuals for mechanical joint ventures;
- The mechanism is placed inside the door (there are, however, modifications with special subframes, as well as mounts on the car body).
The window regulator consists of:
- a drive comprising a unit consisting of an electric motor, a gear and a worm gear;
- mechanical regulator for raising/lowering windows;
- control unit.
Raising or lowering the glass is done by pressing the corresponding key.
Note that on the Lada Priora, three types of electric windows (hereinafter referred to as ESP) are used: rack and pinion, cable, and strip. Various configurations are used - this applies to both a specific design solution and electric motors. The latter vary over a fairly wide range - a number of models use various imported electric motors. The noise depends on the quality of this part
, produced by the device, the speed of raising/lowering the glass, resistance to external influences.
Installation of rear ESP
The need to replace the ESP may arise for a number of reasons. The most common ones are:
- the corresponding fuse has blown;
- poor-quality connection of wires and, as a result, lack of contact;
- failure of the electric motor.
In any of the above cases, replacement (or repair) of the mechanism is necessary. Let’s make a reservation right away - for most amateurs, self-repair is a difficult task, so it will not be considered here. We will simply describe the process of removing the mechanism - accordingly, installation is carried out in the reverse order.
At the first stage
We get access to the ESP. To do this, you need to remove the decorative edge. The process is quite simple and does not require additional description. Let us remind you that the windows must be pre-fixed in the “closed” position.
Next stage:
unscrewing the mounting bolts. We use a 10mm socket. Then we turn out the elements with which the ESP is attached to the door. Here you will have to deal with three bolts (we use an “8” head). Armed again with a “10” socket, we unscrew the nuts securing the ESP guide.
This completes the dismantling. As already mentioned, installation is done in reverse order.
As you can see, installing rear window regulators on a Priora is not difficult: you just need to unscrew the corresponding bolts. Please remember that this process requires care.
, proportionate application of force - to avoid the danger of the heads falling off. As for the unit being replaced, specialists will have to deal with it.
VAZ 2170 | Power windows
Power windows
The operating mode of the power windows is determined not only by the switches, but also by the power window control unit on the support with additional relays on the left under the dashboard.
Operation: When the ignition is on, the window in the driver's or passenger's door next to the driver slides up or down until it stops by briefly pressing or releasing the switch. In this case, the movement of the glass stops if you briefly press the key in the opposite direction.
For safety reasons, this convenient method of activation in the rear doors only exists for lowering the windows.
When the ignition is turned off, when you press the button, all windows move all the way down only. The glass only moves up when the power window button is pressed.
Child protection: The electric windows in the rear doors are locked by a central switch in the driver's door armrest.
Anti-theft device: If the driver's door is opened and closed again while the engine is off, all power windows are disabled.
Convenient closing: In all vehicles with power windows, they can be closed simultaneously when the driver's door and the passenger door next to the driver are closed. To do this, you need to hold the key in the “closed” position a little longer. If there is an electric sliding roof, it also closes at the same time.
Protection against jamming: If the glass encounters an obstacle when lifting upward, it immediately begins to move in the opposite direction and drops a few centimeters.
|
Table of measuring values for window regulators
The table shows the nominal values using the driver's door window regulator as an example (vehicles with four power windows).
On rear windows and in cars with two power windows, wires of different colors are partially laid (see footnotes).
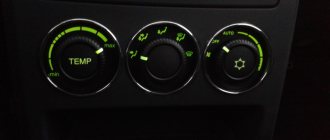
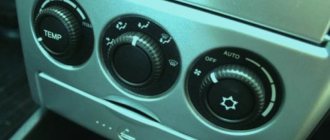
The control panel is located on the interior handle
The window regulator on the Priora is used to raise or lower the windows in the car. The mechanism is installed inside the car doors either in a special subframe or by attaching it to the car body.
The design of the window regulator includes:
- drive (combined electric motor unit, worm, gear);
- window lifting mechanism;
- Control block.
Wiring diagram of power windows Lada Priora
Left front door wiring harness diagram : 1 - block to the rear wiring harness; 2 - to the speaker; 3 — window lift electric motor; 4 — switch block; 5 — door lock; 6 — rear view mirror;
Wiring harness diagram for the right front door : 1 - block to the rear wiring harness; 2 - to the speaker; 3 — electric window lift motor; 4 — switch block; 5 — door lock; 6 — rear view mirror; 7 — block to the rear wiring harness;
Overview of General Concepts
Installing rear power windows on a Priora is clearly not within the capabilities of every driver who decides to install it themselves or replace a failed device with their own hands. Before installing these devices in a car, you need to have at least approximate knowledge of the operating procedure and the principle of operation of the device itself. Without this, proper repair of the window regulator is impossible. The electric window mechanism is installed inside the doors. Priora's window regulators consist of an electric motor, a drive and an electronic control unit.
EPS type
In some configurations of the Lada Priora, factory rear ESPs are installed, which does not eliminate the need for knowledge about their design. Replacing a window regulator is a problem that comes up unexpectedly, so it's best to be prepared for it in advance.
As some car owners have found out, in order to install power windows, you need to be able to understand electrical wiring and have a lot of patience. In particular, in the 2008 Priora, it was discovered that the rear door wiring was not completely routed, which seriously complicates the work. In addition, the operation of standard ESPs with the ignition off is impossible, even if you insert a jumper into the desired relay.
There are many sets of rear lifts on sale that are compatible with the VAZ-2110, Granta and Priora. The cost of the kit can reach 3,500 rubles, depending on the type of design and manufacturer. Installation of equipment at the service will cost approximately the same amount. Many VAZ 2170 Priora owners sooner or later face the problem of failure of standard power windows. There are two common reasons:
- Broken cable.
- Electric drive failure.
The work of standard window closers also causes criticism, due to which the car is often left wide open. They also resort to replacing them quite often.
Types of compatible window regulators
One of the most common models on the aftermarket is the window regulator for the Priora Forward. This model of electric lift is made in a combined arrangement of the drive and the actual rack-and-pinion lifting mechanism, compactly combined with the glass guide. Lifts of this model are characterized by increased reliability and ease of installation on Priora.
Garnet is the second most popular system. Under this name there is not even a single model, but a whole family, each modification of which is intended for a specific car. The mechanism is also rack and pinion type and has earned many good reviews from car enthusiasts. This type of lifts is characterized by uninterrupted operation, fast speed of raising/lowering the glass, and low noise.
It has already been said above about glass closers. In the luxury package they are available on all doors, but their performance leaves much to be desired. It is necessary to resort to replacement with other similar devices. One of the available alternatives is the Master system. It allows you to automatically raise the windows when the anti-theft system is turned on, and even control them within half an hour from the moment the ignition is turned off. The device itself looks like an electronic board with connectors connected to the standard Priora wiring.
The master is not very expensive (from 700 rubles), and its installation does not affect the door trim in any way. The whole procedure consists of removing the rear door sill trims, bending the sound insulation and connecting the door closer to the connector.
For the front doors, the Master will by default raise and lower the windows without ignition, and for the rear doors you need to install a slightly different version, called Master Plus. There are no differences in installation, the main thing is not to forget to disconnect the negative battery before starting work. The wizard has many other useful functions, for example, it automatically turns off the radio when the car is armed.
How to disarm the electrical package unit of LADA PRIORA
What to do if Priora is not removed from the standard alarm!
The hazard warning light blinks, the car does not respond to the ignition key buttons. As a rule, several units are involved here that are synchronized with each other.
- Ignition
- Radio channel module (Located in the driver's door)
- Electrical package block (Comfort block)
- Engine ECU
New blocks come with non-activated codes inside and can be installed on any car without problems, but once you register (train) the keys, a special code is written into all these blocks, which is synchronized with each other and serves as a standard alarm system. (Immobilizer) As soon as you turn the ignition key, within five seconds there is a poll between the key and the units, if the code matches everywhere, then the engine ECU gives permission to start, if the code of at least one device is not recognized, the engine ECU is blocked and the car does not start.
Training a working key is done using a special red training key. I will not describe the procedure for training keys; there is plenty of information on the Internet. In fact, the main key is a red training key; it stores a code that, after training, is written into the working key and other blocks.
I'll try to explain in more detail how it all works:
- The radio channel code that we use to open doors using the key's remote control buttons is written into the driver's door module, where the power window buttons are located. If you replace the comfort unit or engine ECU, the buttons on the key will still work.
- The IMMO (Immobilizer) code has a connection only with the ignition key, the electrical package unit and the ECU unit. If you disconnect the driver's door module, the car will still start.
How to determine whether the keys are trained or not:
- The IMMO lamp on the instrument panel goes out after 5 seconds - the keys are trained.
- The IMMO lamp goes out after 30 seconds - the keys are not trained. (The car will start with any blank)
Options for disabling IMMO:
Write an untrained eeprom dump to the engine ECU. All functions will remain working as normal, key buttons, etc., only the car will start with any blank.
If the vehicle cannot be disarmed using the remote control:
- Here the situation is a little more complicated, this is why this article was written. Suddenly, for some reason, the car remained on guard, the hazard lights blink, the car beeps, etc. Of course, you will open the car mechanically using the keyhole in the door, but at the same time constantly The hazard warning lights blink and the comfort functions do not work, and the car does not start. The reason could be a breakdown of the remote control key or the driver's door module. However, the electrical package unit remained armed.
- There are two ways to disarm the electrical package unit: 1) Install the driver's door module from another car and open it remotely from the key of the same car. In this way, you can disarm the comfort unit. 2) Disassemble the electrical package unit and use the programmer to clean the M95080 memory chip.
Comfort unit, disarming. This instruction applies only to unlocking the electrical package unit. If you need to unblock the engine starting, it is enough to write an unlearned eprom dump into the engine ECU.
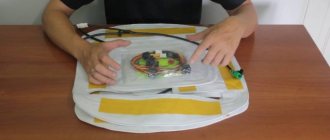
We disassemble the block and find the memory chip eeprm M95080. It is enough to insert this chip into the programmer and completely clean it, or replace it with a new one if there is no programmer. When re-learning the keys, all the necessary data will be written into it again.
After cleaning the microcircuit, the electrical package unit will disarm.
A few more photos on the topic and video.
Pinout of the comfort block for connection on the table.
Electric package controller connection diagram.
Features and diagram of electric lifts
The electrical circuit of the ESP Priora differs from the circuit of previous VAZ models. This vehicle does not have a power window unit. The controller controls the mechanism. When using the device, you do not need to hold the button for a long time to completely open or close the glass. The button is a sensor for the electrical unit, which receives information about the operation of the ESP.
We can also talk about the specifics of supplying power to the electrode in the electrical circuit. The multifunctional wire takes part in the transmission of heating energy and at the same time in controlling the mirrors. This wire acts as a “plus” or “minus” depending on what function it performs. The electrical package controller controls all the values of this wire.
Most often, damage occurs in the electrical unit itself, for example, the control microcircuits of the unit burn out. The reason for this is the shortcomings of the work of the manufacturer’s specialists, the imperfection of the electrical unit system, and its manufacturing shortcomings. The problem is indicated by intermittent operation of the power windows.
You can start troubleshooting by checking the quality of operation of the rear or front door lock. If the lock is not working, you need to check for the presence of a “minus”. Having connected the control lamp to the car body, turn on the window regulator. Connect the same light bulb to the positive wire and repeat everything you did earlier. All conclusions must be verified using this method. If the testing was successful and the light comes on, then the electric window control unit itself is working properly. You need to look for the cause in the wiring: a broken wire on the door or a faulty electric drive is possible. The test will consist of connecting a control lamp between the electric drive bundles.
After turning on the lift, you need to make sure that the lamp lights up - this means there is a malfunction in the electric drive. If the light does not light, there is a broken wire. If it turns out that the electrical unit is faulty, then you need to look for the reason when checking the wires: whether there is a short circuit between the wires or to the housing. Otherwise it is a factory defect.
Some experts recommend installing a power window closer on the Lada Priora, and you can do this yourself.
Procedure when the window regulator does not work
The design of the Priora's window regulators differs from the usual ones, which use a relay and a window regulator fuse. AVTOVAZ made the glass control using an electrical package control controller (TSBKE), which is located near the ECU.
1. Check the TsBKE fuse in the mounting block (F31, 30A).
2. Remove the door trim and check the voltage at the power window motor terminals using a multimeter or a 12V test lamp.
If there is no voltage, then check the serviceability:
- window control unit (buttons in doors)
- wiring (connector connection)
- electrical package control unit, which is located above the ECU unit (more on this below)
If current flows to the electric motor, but the glass does not move, then we check:
- malfunction of the window lift motor (for example, the drive motor brushes are stuck/sticking, the plastic gear in the gearbox is worn out)
- The window lift cable is frayed
- glass is jammed (distorted)
The most common problems with power windows are:
- Faulty double-glazed window control unit (GCU)
- Window lift motor malfunction
- Skewed, broken power window cable
- Poor contact
Where can I buy?
The first problems begin with the purchase of the device. It is not easy to buy original power windows for the rear doors of Lada Vesta.
The easiest way to purchase original products is through a dealership. They are sold by article number:
- Rear right – 8450007860 – 3000 rub. and more;
- Rear left – 8450007861 – 3000 rub. and more.
- ECU for 4 ESP – 8450006933 – 1100 rub. and higher.
As you can see, the price is far from the lowest, and therefore the cost of original components from the dealer will be significant.
You can also try to purchase products at disassembly sites. But there is a problem. At the moment, there are not so many Vests at auto wrecking yards, in addition, the power windows of the rear doors of the Lada Vesta “go away” almost in the first place, so you have to constantly monitor the situation, but even in this case there is no guarantee.
Buy cable window lifts from Lada Priora. At the same time, as reviews from owners show, there is no reason to buy new ones, since they will still have to be modified. Therefore, it is easier to buy a used one in good condition. The price in this case will be about 1,500 rubles per pair, and there will be no problems with the purchase.
Rear electric window Lada Priora
Another option is to buy ESP rear doors of Lada Vesta from.
You can find them in various online stores.
| Online store | Price, rub.) |
| steklopodem.ru | 3 450 |
| max-autohelp.ru | 3 150 |
| 33sport.ru | 3 450 |
The manufacturer is UralAvto Component LLC. Production facilities are located in Sarapul.
ESP kit for rear doors of Lada Vesta “Granat”:
- Two electric windows;
- Two switches from VAZ-2109;
- Wiring;
- Plastic plugs.
The price of the set is 3450 rubles, excluding delivery. You can also buy at a promotion with a small discount of 100-150 rubles. In addition, the set comes with an 18-month warranty.
More information about window lifters "Granat"
And also about their design
As you can see, the most realistic options are products from and purchasing devices from Priora.