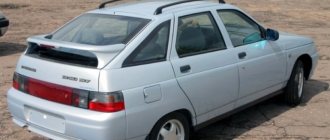
Lada Priora Sedan › Logbook › Rear esp
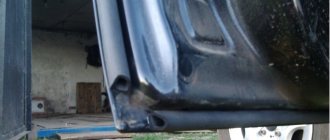
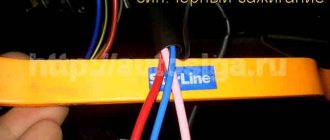
I’ve been wanting rear ESPs for a long time, but now I have the opportunity to order new ones for only 1400, I decided to take it, I’ll finally get rid of the spontaneous lowering. We will need: — 2 assembled lifts; — driver’s door block; — 2 buttons for passengers; — wires; 1. I got the driver's door block for free, I exchanged it with a friend, he doesn't need it anyway) we remove the old block and install a new one, if necessary we overexpose it, there is no need to pull any wires to it! 2. Replacing the mechanism.
unscrew the 5 nuts, then unscrew the glass from the trapezoid, ask someone to hold it, or fix it.
Next, take a new lift and perform the installation in reverse order
we screw everything into place, the only thing is that the old nuts for screwing the motor will not fit, they were turnkey for 8 and now they are 10, you will have to add 6 new nuts.3. Wiring: Right door we will have 5 wires in total
3 from the button: we hook the central wire of the button to ground, I hooked it right next to it, because it doesn’t carry a load, it just controls the relay, here it has enough ground. We pull 2 wires of the button to the electrical package unit in the cabin
2 from the motor: we attach one wire right there to the central locking wire, red with a black stripe (it is common throughout the entire board, so you connect to it near the passenger door in the feet, there is no difference, and there is no need to pull the extra wire. If after connecting the motor goes in the opposite direction, swap the wires in the motor chip and that’s it.
on the left side the situation is slightly different, there you will need to pull 2 wires from the motor, one to the driver’s feet, there in the driver’s door bundle connect to the red-blue wire, and the second also to the electrical package unit.
Next, we connect to the blockout, we will need 2 terminals from the car radio connector, 2 terminals from the same connector of the floppy drive, we will keep them. Don’t forget to remove the connection lock before installing the terminals in the connector:
We connect one wire from the buttons to the pink wire, it is common for them
To be honest, I don’t remember exactly which is which, well, if you confuse left with right, it’s not difficult to change. Well, lastly, we put plugs in the doors
I hope I made it clear, if you have any questions please ask.
Flashing the immobilizer
As a rule, Priora is equipped with a standard APS-6 immobilizer. This, as already said, is an optional procedure, but if the budget does not allow you to invest in a security system, you will inevitably have to deal with all this electronic “stuffing”. In addition to the power windows, the immobilizer controls several other systems of the car, even the rear lights. But the main problem is precisely that in the Priora car the immobilizer is structurally combined with the glass unit controller.
Priora lends itself well to tuning. A solution was also found for the immobilizer. During learning, the immobilizer writes its code to a non-volatile area of the ECU memory, which is stored in a disabled state. To disable the immobilizer, you need to clear this memory cell in the ECU.
To do this, you need to disconnect the original wiring connector from the immobilizer. Next, you need to determine the type of ECU. The flashing method will depend on this. If it is a Bosch M1.5.4, you need to open it and install a specially prepared chip with a program for cleaning the ECU EEPROM in place of the standard one and turn on the ignition for a few seconds. For some ECUs, you need to download special programmers from the Internet.
You can order flashing from specialists at reasonable prices
By the way, the Priora immobilizer itself is often prone to malfunctions, and therefore you need to interfere with its operation with extreme caution. On some types of ECUs, you cannot do without desoldering the chip and you cannot completely erase the EEPROM
We end here. Good luck!
Serial connection - diagram
We connect the output of additional button 1 in the driver's door to input 6, and output 7 to input 3 of the main button on the passenger door. We cut the wires in the block connecting contacts 5-6 and 6-3. The minus of contact 5 now goes only to the backlight, and contacts 6 and 3 now take output from additional buttons 1 and 7 of the driver's door. Installation in parallel will result in short-circuiting during lifting and lowering. Power wires are highlighted in bold.
When using trigger buttons, connect all ESP motors only through a relay. When using a conventional door closer, relays are also needed, since they are not in the long-press closer block and all the current flows through the buttons and wires from them.
general characteristics
Electric windows are used to raise and lower the windows. To lower the window, you need to press the module button in the driver's door until it clicks. When closing the windows, the button must be raised. The rear doors of the Priora car are equipped with handles for lowering and raising the windows. The rear windows in the car do not roll down all the way - this is how this model is designed. You need to remember this, otherwise you may break the window handle.
There are three types of ESP:
Rack and pinion ones are more reliable and of better quality. Installation is carried out in existing holes.
The motor can be domestic or imported. Naturally, the quality of the ESP will depend on the manufacturer:
- noise level;
- lifting and lowering speed;
- performance in different climatic conditions.
Electric lifts are purchased at car dealerships or markets.
The Priora has electric windows, which the driver controls when the ignition is on and for a short time after it is turned off. This method of connecting an ESP is not always rational. Many car enthusiasts modify power windows to work without ignition.
Replacement of the electric window regulator of the front right LADA Priora. Illustrated report
This illustrated report on the installation of a front right electric window on a LADA Priora was prepared by our buyer Ivan Igorevich Fokin from Moscow, as part of participation in our promotion.
There was a problem in our Priora, specifically - the glass of the front right door stopped opening. All that was left was the sound of the motor running. It was decided to order a new window regulator and replace the old assembly.
Let's start step by step:
LADA Priora
Window lifter-donor JSC "Lepse" for VAZ-2110 front right.
Tools and more: shaped screwdriver, star screwdriver, 10mm head, plastic tool, tape, electrical tape, scissors.
We unscrew the screws according to the numbering - black arrow. Take a tool for plastic and also according to the numbering - red arrow.
Using tools, pry the sockets and door lights in the direction of the same arrow, turn off the chips, and put them aside. Again, use this tool to remove the door panel, starting from the lower right corner, moving in a counterclockwise direction, unfasten the panel clips - the blue arrow is where the clips are.
Unfasten the panel with clips and lift it up. The panel has been removed.
Unscrew the two screws and remove the handle.
We connect the donor to the chip and check the operation of the window regulator.
We remove all the insulation so that it does not interfere. Unscrew the nuts.
We lower the glass a little in order to remove the rail from the door body mounted on the bolt.
Raise the glass to its highest position and secure it with tape.
We remove the engine bolts and racks from their mounted places and pull out the window regulator through the upper right corner.
Don’t forget to remove the engine holder from the original and place it on the donor.
In the reverse order, we insert the window regulator (donor) and, first of all, install the engine onto the bolts with the nuts.
Perform subsequent manipulations strictly in reverse order.
Thank you, Ivan Igorevich, for the prepared photo report. We will transfer the promised prize to your mobile phone account.
Buy
steklopodem.ru
Spare parts from Priora
They first need to be modified, as one of the Drayvovites did, named Evgeniy, known in the automotive community under the nickname gps-nav. The fact is that the gearmotors of Vesta and Priora are identical, as are their fixation points to the door. But there are also significant differences:
- Cable length;
- Rail length;
- Slat fixation points to the door.
Therefore, modifications are necessary in order to fit the fasteners of the Prior element to Vesta’s door. For this reason, it is necessary to create 2 fixation points, and the distance between them should be 39.2 cm.
The first step is to disassemble the window regulator itself - remove the cables and carriage.
Then, using a chisel, you need to remove the upper fasteners from the Priora slats. Under it there is a cable roller (bypass). This roller needs to be drilled, and then a 6/20 bolt must be installed there. This will become the top fixation point.
To create a lower mount, you must make your own bracket according to the diagram below.
The best option would be to make it from duralumin, and when the mount is ready, all that remains is to install it directly on the rail.
In addition, one of the bolts screwed into the rail will become a window stop in the lowest position.
At this point, the modification is completed and you can proceed directly to installing rear electric windows on the Lada Vesta.
You should not immediately drill a hole in a homemade bracket, so as not to make a mistake. It is better to do this on site after installation.
The place where you will need to drill the hole
Window regulators ready for installation
Installation
The picture shows the fixing points for the window regulator in the rear door of the Lada Vesta.
The following components are indicated by numbers:
- Glass guide fixing nut;
- Glass holder bolt;
- Nut for fixing the window lift mechanism.
As for removal and installation, for this you need:
- Remove the spacer from the window lifter handle axis;
- Loosen the glass clamp to the slider by 3 turns;
- The glass must be raised to its highest position and secured with tape so as not to break during operation;
- Unscrew the 2 nuts fixing the window lifter guide;
- Unscrew the 3 nuts of the window lift mechanism clamp to the door itself, and then remove it;
- Install a new window regulator.
The door is assembled in the reverse order.
Connection
There are no wires with the lifts from Priora, and therefore you will have to lay them yourself. However, before connecting, you need to check the correct operation of the mechanism using wires and a battery.
First, you need to remove the wires from the driver's door, then either drill holes with a drill, or buy female terminals separately.
Afterwards, the wire harnesses are pulled under the sill trim to the left rear door, and then, under the sofa cushion, to the right rear door.
The next step is to install a new ECU and power window keys.
General diagram for connecting ESP rear doors of Lada Vesta
And this is a wiring diagram for the driver's door power window ECU using 6 LIRA 2.8 terminals
Short videos demonstrate the result of self-installation of rear window lifters from Priora on Lada Vesta
Diagram of window regulators on a VAZ-2107
On the automotive goods market for old mechanical VAZ models there are sets of electric windows from different manufacturers, the most popular of which are “GRANAT” and “FORWARD” rack-and-pinion type. The window lifter rack is a housing in which the glass movement device is located - a toothed chain drive. A stationary electric motor is already attached to the rack, driving the entire mechanism to work.
To connect power windows, you need to determine the place where you will get the power from. In the VAZ-2107, this is most conveniently done from the cigarette lighter. If this option is not suitable, then the electrical wiring will have to be done from the battery.
If the power window buttons do not work
If the right or left window lifter does not work on the Prado 95, then first of all we check the quality of the contact in the button or on the terminals of the motor that performs this action. To do this, we sequentially pull out the buttons from the dashboard console and the door panel. And in each of them we inspect the condition of the wire connection points. To test, you need to disconnect/connect several times.
There are cases when the glass stopped moving due to a blown fuse. To check, open the mounting block and make sure that the insert on the device responsible for the operation of the window regulators . If a faulty element is detected, it is replaced with a new one, having first checked its functionality.
Another reason is a malfunction in the power supply circuits. This happens quite rarely, but for insurance purposes it is recommended to check the most dangerous place in this regard: the body/door transition.
READ Installing an armrest on KIA RIO 4
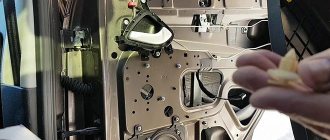
How to remove the front window lift mechanism assembly
The first step is to perform the following procedure: After this, unscrew the two bolts securing the glass to the bracket on the lift. The bolts will only be accessible when the glass is raised up. This is clearly shown in the photo below.
To prevent the glass from falling down during this repair, it is necessary to fix it by placing something between it and the inside of the door. Next, you can unscrew all the power window mounting nuts.
This mechanism is attached in several places:
- from above, in the place where the glass is fixed, and also a little higher in the very corner of the structure
- below also in the corner
- and closer to the center of the door where the motor is installed - there are three nuts
Then disconnect the plug with the power wires by simply pulling both ends to the sides with a little force.
It is through this that the entire structure should be removed from the door, which will be clearly shown in the photo.
And we remove it completely out so that further manipulations can be carried out.
Removing a standard window regulator
If you plan to install rear electric windows on the car, you will have to disassemble all the doors. Therefore, at the first stage, remove the trim from all the doors, and then begin disassembling the mechanisms. Having opened access to the cable mechanism and glass fasteners, you can begin dismantling. First, push the glass all the way up and secure it with tape.
After this, unscrew all the fastening bolts that are on the glass carriages. Moreover, you need to unscrew them both on the mechanism and on the glass. After this, you can pull the entire mechanism out of the door and begin installing the electrical one.
In a Priora car, the relays in this block have the following tasks:
K1 – turning on the electric radiator fan of the engine cooling system K2 – turning on the heated rear window K3 – starting the starter
K4 – additional relay K5 – reserve K6 – activation of the windshield washer and wiper;
K7 – turning on the high beam headlights; K8 – turn on the sound signal; K9 – alarm signal activation; K10-12 – reserve;
In the question of how to remove the fuse box, Priora does not require contacting service. The process of replacing it is not difficult. To begin with, remove the terminal and de-energize the unit. Otherwise, a short circuit may occur during dismantling.
This rule also applies to other blocks. Next, unscrew the bolt holding the block in place. Then you need to release the block from holding the latches. Next we remove the fuses and relays. Then comes the turn of the wire terminals included in the block.
For convenience, it is better to mark all the wires and their locations. Any mistake and sad consequences cannot be avoided. Using these simple tips, questions related to how to remove the fuse box on a Priora will not cause you any difficulties.
A variety of seemingly complex breakdowns in the electrical equipment of your car can be hidden simply under the cover of the fuse box. These include stuck or non-operating relays, blown fuses or tracks. We recommend starting any work to eliminate breakdowns in the Priora’s electrical system from here.
The Priora mounting block is located in the instrument panel on the left driver's side at the bottom and is closed with a lid - in the photo its location is highlighted with a blue frame:
To gain access directly to the fuses and relays themselves, you need to unscrew the three latches that hold the cover, highlighted in red in the photo:
Removing the cover, we see the block itself:
Before replacing a blown fuse, find out the cause of its blown and eliminate it. When troubleshooting, it is recommended to look at the circuits that are protected by this fuse.
What are the fuses responsible for in the mounting block of VAZ 2170, 2171, 2172 (Lada Priora).
| Fuse number in the mounting block (Priora) | Current strength, Ampere | Protected circuit |
| F1 | 25 | Electric fan of the engine cooling system (Priora) |
| F2 | 25 | Heated rear window (Priora) |
| F3 | 10 | High beam (right side) (Priora) |
| F4 | 10 | High beam (left side) (Priora) |
| F5 | 10 | Sound signal (Priora) |
| F6 | 7.5 | Low beam (left side) (Priora) |
| F7 | 7.5 | Low beam (right side) (Priora) |
| F8 | 10 | Alarm signal (Priora) |
| F9 | 25 | Heater fan (Priora) |
| F10 | 7.5 | Instrument cluster, interior lighting, brake light Priora |
| F11 | 20 | Windshield wiper, heated rear window Priora |
| F12 | 10 | Conclusion No. 15 from devices (Priora) |
| F13 | 15 | Cigarette lighter Priora |
| F14 | 5 | Side light (left side), Priora |
| F15 | 5 | Side light (right side), Priora |
| F16 | 10 | Conclusion No. 15 of the Priora ABS system |
| F17 | 10 | Priors left |
| F18 | 10 | Priors right |
| F19 | 15 | Heated seats Priora |
| F20 | 5 | Priora immobilizer control unit |
| F21 | 7.5 | Rear fog light Priora |
| F22-30 | – | Reserve place for fuses in Priora |
| F31 | 30 | Priora car electrical package control unit |
| F32 | – | Reserve location for fuse in Priora |
Location of relays and fuses in the mounting block:
1, 2 – tweezers; K1 – relay for turning on the electric radiator fan of the engine cooling system; K2 – relay for turning on the heated rear window; K3 – starter activation relay; K4 – additional relay (ignition relay); K5 – place for backup relay; K6 – relay for turning on the windshield washer and wiper; K7 – headlight high beam relay; K8 – horn activation relay; K9 – alarm signal activation relay; K10, K11, K12 – places for backup relay; F1–F32 – fuses (circuits protected by pin-type fuses are listed in Table 10.
Electrical equipment that consumes a large current during operation is connected through relays that protect the switch contacts from burning.
To replace relays and pin fuses, special plastic tweezers are provided in the mounting block
Common faults
Malfunctions of the mechanism that raises the windows can be electrical or mechanical in nature. Regardless of the nature of the breakdown, you can do the repair yourself (video author: Xie Dan).
Mechanical failures can be detected without ignition.
The following are typical mechanical problems:
- wear of the teeth on the device gear;
- sunken shield;
- a defective cable mechanism can stretch or deteriorate, and later during operation it will come off the guide rollers;
- jamming of mechanisms due to oxidation of moving parts;
- gearbox bearing wear.
Mechanical defects of the device
Among the electrical reasons why the power window on a Priora does not work are the following:
- If all four power windows do not work, the first thing you should check is fuse number F31. It is located in the power management mounting block. If the element burns out as a result of a short circuit, it should be replaced. In this case, it is advisable to check all wiring.
- Sticking or sticking of the brushes of the electric drive motor. This happens due to overheating of the graphite brushes, which melts the plastic nest in which they are located. Thus, the brushes stick to their nest and lose mobility.
- No voltage at the motor terminals. The cause may be an open circuit. The fault must be looked for in the relay or control unit. In addition, the contacts should be cleaned.
Fuse block
If the mechanism itself that raises the windows is faulty, then it needs to be replaced.
What does the functional diagram of window regulators look like?
Window regulators in the Lada Priora may be faulty if there are defects in the operation of the relay or the fuse is blown. Then the window lifters jam on the rear doors or on the side of the seat located on the right. It is also considered incorrect operation of devices when the glass moves jerkily. This option is present in the Lada Priora of the first years of production. A little later, the shortcomings were corrected, and those who purchased the car in the first rows have to tinker with it themselves.
By the way, according to experts, it is not necessary to start replacing the control unit. Simple testing will help determine the real reason:
- See if the lock that controls how the power window control unit works in the Lada Priora is functioning correctly. If the lock is acting up, you need to check the plus or minus on the wire.
- It would be a good idea to check the condition of the fuse. To do this, connect the adjustment bulb to the body of the Lada Priora and see how the windows move in different directions. The same actions are carried out with a positively charged wire, and then with wiring numbers 1, 5, 11, 13. If the light always lights up, the fault is not in the unit. Most likely, some wire has been crushed or the electric drive has failed.
Independent production and installation of heating systems for car seats
The heating element can be a special cable or nichrome wire with a diameter of 500 microns. The wire is sewn into thick fabric and attached to places that require heating.
- Prepare two pieces of nichrome wire 1.5 m each;
- Sew each of the pieces (on the seat and back) in a zigzag fashion to thick material, for example, old jeans;
- Connect the ends of the wire to the 12 V terminals of the power supply.
If the operating temperature of the heating element is exceeded and to avoid ignition, you should connect a thermostat or any other device that performs similar functions.
To eliminate the risk of fire in case of insufficient experience, the manufacture of heating elements should be entrusted to professionals.
In another option, a homemade spiral of nichrome wire 10 m long can be used. Such spirals are made by winding the wire around nails driven into a wooden beam.
4 manufactured spirals connected in parallel, at a distance of 4 cm, are fixed to the fabric and connected to the terminals of the power supply through a thermal relay.
Types of compatible window regulators
One of the most common models on the aftermarket is the window regulator for the Priora Forward. This model of electric lift is made in a combined arrangement of the drive and the actual rack-and-pinion lifting mechanism, compactly combined with the glass guide. Lifts of this model are characterized by increased reliability and ease of installation on Priora.
Garnet is the second most popular system. Under this name there is not even a single model, but a whole family, each modification of which is intended for a specific car. The mechanism is also rack and pinion type and has earned many good reviews from car enthusiasts. This type of lifts is characterized by uninterrupted operation, fast speed of raising/lowering the glass, and low noise.
It has already been said above about glass closers. In the luxury package they are available on all doors, but their performance leaves much to be desired. It is necessary to resort to replacement with other similar devices. One of the available alternatives is the Master system. It allows you to automatically raise the windows when the anti-theft system is turned on, and even control them within half an hour from the moment the ignition is turned off. The device itself looks like an electronic board with connectors connected to the standard Priora wiring.
The master is not very expensive (from 700 rubles), and its installation does not affect the door trim in any way. The whole procedure consists of removing the rear door sill trims, bending the sound insulation and connecting the door closer to the connector.
For the front doors, the Master will by default raise and lower the windows without ignition, and for the rear doors you need to install a slightly different version, called Master Plus. There are no differences in installation, the main thing is not to forget to disconnect the negative battery before starting work. The wizard has many other useful functions, for example, it automatically turns off the radio when the car is armed.
Types of heated seats
External heating system
- Wire coated with Teflon;
- Nichrome coated with polyvinyl chloride;
- Synthetic insulating fiber Fiber Thermetics;
- Carbon fiber.
With a power of 40-100 W, the current consumption of the heating device will be from 4 to 8A, and is most often connected to the car cigarette lighter.
The simplest type is “Cape”
Heating elements are built into the dense rubberized fabric. They are secured to the chair with Velcro or hooks on elastic bands and connected to the cigarette lighter.
Disadvantages of the "Cape":
- It is impossible to connect any other device to the cigarette lighter;
- The lack of temperature controls in many models leads to excessive heating;
- Heated rear seats are not available by design.
- Insufficient rigid fixation of the heater during its operation causes slipping, which interferes with driving;
- The appearance is not aesthetic enough.
Cases
Made from leather, fabric, leatherette or eco-leather. They can be used to cover all the seats in the cabin without exception, keeping the interior of the cabin at a high level.
Installing a cover for heating the front seats yourself is much easier than installing covers, since to control them you need to embed the heating control panel into the interior trim.
Priora window lift diagram
Window lift diagram for Lada Priora
Despite the fact that the principle of controlling the window lifters is carried out exactly the same as in other models, the Lada Priora car uses a slightly different scheme of window lifters. The main difference from other models is the absence of a power window unit. They are controlled by an integrated electrical package controller. The designers made this design to ensure ease of control. To fully open and close the window, the driver does not need to hold down the control button. All that is required in such a situation is to hold down the button for a certain time. If you do not meet the specified time period by releasing the key too early, the window regulator will stop raising or lowering the window. In this case, the buttons do not cause network switching, as on a number of other models. They perform the function of a sensor, transmitting information to the electronic unit.
In addition to the use of electronic units, the operation circuit of the Lada Priora 2014 car windows supplies power to the electric drive in a specific way. One of the wires available in the system is multifunctional. It can control the mirrors, supply power, and also control the door lock solenoid. Consequently, this wire can change polarity, depending on the characteristics of the switched-on consumer. The wires on the left and right sides are connected separately to connector X1. In this case, pins 4 and 6 are used. This property is very useful when locating potential circuit faults.
You may also need advice about Lada Priora error codes, which will help you identify a malfunction in your car.
How to look for faults in the current circuit of a Lada Priora car if the passenger door windows stop working? All power windows are unlikely to break at once. If you had to encounter such a breakdown in practice, most likely the problem lies in the electronic control unit for the electrical package. It is worth noting that the breakdown of a single window regulator is very common in practice, especially on cars of the first production. The reason, again, is a malfunction of the unit, when the circuits responsible for controlling the electric windows completely or partially burn out. This is due to shortcomings in the circuits by the manufacturer. The same reason could cause the window regulators to operate jerkily. As a result, the block manufacturer completely eliminated the problem, but this did not improve the situation, since older models still suffer from this “disease.” But you shouldn’t hope that all the problems are just a (to put it bluntly) unstable block. Moreover, you should not believe that replacing the control module will correct the situation. There are a number of other reasons why malfunctions may occur.
Wiring diagram of power windows of Lada Priora
The search for the problem should begin by checking the correct operation of the door lock, inside which the lift has stopped working. If the lock also refuses to work, you need to check whether there is a minus or power from the glass unit control module, connector X1, pin 4 and (or) 6, depending on the malfunction of the board. Connect the warning lamp to the car body while simultaneously pressing any button on the power window. Repeat the operation again, but with the positive wire. Make sure that pins 1, 13, 5 and 11 are working correctly. If the control lamp lights up in all cases, it means there are no problems with the operation of the control unit. Most likely, there is a problem in the electric drive, or a break in the wiring. After removing the casing, connect the control ramp between the two wires that go to the electric drive. If the lamp starts to light when the up/down button is turned on, this means that there is a problem with the electric drive. Otherwise, you are dealing with a broken wire.
Compared to the passenger windows, the driver's window uses a slightly different scheme. This is due to the fact that the driver can control all modules in the cabin at once. Without using diagnostic equipment, the driver can check the short or continuity to ground of the wire that supplies the signal, as well as power to the driver's door module.
pol-z.ru
Operation of electric windows without ignition
Normally, the electric windows (ESP) do not work until you turn on the ignition and this is not entirely convenient. It happens that the driver enters the store, but the passenger cannot open the window at this time because there is no key. You can connect an ESP without ignition in various ways, let's try to understand each of them.
The first method to make the power windows work not from the ignition is to connect the two contacts of the ESP relay. The power window relay is mounted, and is located on the left or in the center of the mounting block. Despite the fact that this method does not look safe and can hardly be called aesthetic, it is the most popular.
The second method is no different in meaning from the first. We also close two contacts of the power window relay, but inside it. That is, a slight modification of the ESP relay is obtained. The last method is to connect the ESP from the cigarette lighter.
- We remove the lower dashboard valve on the passenger side and find the wires from the cigarette lighter.
- Connect the wire to the '+' of the cigarette lighter.
- We stretch it to the ESP buttons.
- We connect to the white-black wire, you can use any wire, because plus for power windows is common.
As a result, we no longer need the power window fuse (A5), and replace the cigarette lighter fuse (F6) with a 30A one.
It is worth remembering that such modifications to connecting the power windows can easily drain the battery, because Motors consume a lot of energy. But if you don’t abuse them without the ignition on and have a good battery under the hood, then everything will be fine.
Installing rear door lifts
Electric windows are a necessary element of comfort. But with Priora everything is not so simple. Standard wiring (unless, of course, you have a luxury version) is not enough to install lifts in the rear doors. And the first thing you have to do is stretch the necessary wires from the control unit to the doors. Moreover, this is not the only difficulty. On some versions without rear ESPs, relays for them are installed, and the control unit has only 2 buttons. Thus, in order to install the lifts back, you need to change the control unit to a four-button one.
When replacing the unit, problems may arise with the immobilizer of the standard anti-theft system. It must either be deactivated or reprogrammed. It depends on whether you want a factory alarm. In general, the procedure, which in itself is not too complicated, becomes more and more complicated in Priora trim levels other than the luxury one.
In order to install electric windows on a Priora, you will need a set of keys, the lifts themselves and a screwdriver. Time spent from 15 minutes on the door without taking into account fiddling with the immobilizer. In some cases, up to five hours of work will be required.
But even a seemingly correct installation does not guarantee that the Priora’s power windows will immediately begin to work. The Priora has a rather complex wiring diagram, especially for those who have not done any manipulations with it before. And if there are no relays in the rear doors yet, you will have to purchase and install them.
By the way, it’s easy to check their presence: when you use the window regulator on the front door, quiet clicks will be heard in the rear ones. These are working rear relays, quite suitable for installing non-standard ESPs compatible with your car. There is some information on this issue on car forums.
You also need to know how to remove the lift to replace or repair it. Everything is simpler here, we take out the glass, disconnect the electric motor connector, use a ten key to unscrew the fasteners and pull out the mechanism itself through a specially provided hole. And so with every door. The casing must be removed before starting work.
The window regulator on the Priora in the Norma configuration is installed in its regular place. Next, you need to connect the rear door buttons, taking into account that each of the buttons has 3 contacts (for power, ground and common wire). The wires from contacts 1 and 3 must be led independently to the control unit under the dashboard. The common wire is connected to one of the wires coming from the controller. After these operations, we connect each Priora lift with an electric motor.
To connect an electric drive to the lift, you first need to remove the power connector from the controller. There are just two empty nests in it. You just need to remove the clamp to easily connect the wires necessary for the operation of the lifts. You also need to run the wires into the corresponding connectors of the rear doors (their colors are red and black). The easiest way to stretch them is along the original wiring of the VAZ Priora. The blog drive2.ru has detailed instructions on this point with photographs. In general, Priora window regulators are quite simple to install and dismantle.
Actually, this completes the installation of electric window lifts on the rear doors of a Priora car. But in this case, the standard alarm will not work until the immobilizer is flashed. Here you either need to install a new anti-theft system, or use the second method, how to install a window regulator on a Priora.
Overview of General Concepts
Installing rear power windows on a Priora is clearly not within the capabilities of every driver who decides to install it themselves or replace a failed device with their own hands. Before installing these devices in a car, you need to have at least approximate knowledge of the operating procedure and the principle of operation of the device itself. Without this, proper repair of the window regulator is impossible. The electric window mechanism is installed inside the doors. Priora's window regulators consist of an electric motor, a drive and an electronic control unit.
| № | EPS type |
| 1 | Wire rope |
| 2 | Plank |
| 3 | Rack and pinion |
In some configurations of the Lada Priora, factory rear ESPs are installed, which does not eliminate the need for knowledge about their design. Replacing a window regulator is a problem that comes up unexpectedly, so it's best to be prepared for it in advance.
As some car owners have found out, in order to install power windows, you need to be able to understand electrical wiring and have a lot of patience. In particular, in the 2008 Priora, it was discovered that the rear door wiring was not completely routed, which seriously complicates the work. In addition, the operation of standard ESPs with the ignition off is impossible, even if you insert a jumper into the desired relay.
There are many sets of rear lifts on sale that are compatible with the VAZ-2110, Granta and Priora. The cost of the kit can reach 3,500 rubles, depending on the type of design and manufacturer. Installation of equipment at the service will cost approximately the same amount. Many VAZ 2170 Priora owners sooner or later face the problem of failure of standard power windows. There are two common reasons:
- Broken cable.
- Electric drive failure.
The work of standard window closers also causes criticism, due to which the car is often left wide open. They also resort to replacing them quite often.
Procedure for removing rear power windows
First of all, you need to figure out how to remove the trim from the car doors and do it. Also prepare keys with heads “10” and “8”. Now you can begin the process of disassembling the rear windows.
- Fix the rear door glass and gain access to the glass mounting bolts. Using a 10mm wrench, remove these bolts.
- Using a key with an “8” head, unscrew the three elements securing the ESP to the door.
- Using a “10” wrench, unscrew the two nuts securing the window lifter guide.
- Remove the ESP itself.
Installation of the rear window regulators is carried out strictly in the reverse order.
Mechanisms for rear windows
When reassembling, it is necessary to take into account that when placing rivets on the door trim, you need to ensure its reliability and protection. The dust and moisture protective film should not have folds or tears. Everything that is installed must be in perfect condition. The ground wire must be connected to the battery. After this, the electronic system should be fully initiated.
Installing or replacing a window regulator is not difficult for any Priora car owner, but to install this unit correctly, you need to be patient and prepare the required set of keys.
The ESP kit always has a manual available, which describes in detail the sequence of work for installing the device.
It is important to know how to remove the terminals from the battery. The existing set of wires must be assembled into a common harness to connect to the machine’s network
On the back of the fuse box, find the standard hole and insert the wiring harness block into it. Then everything goes according to plan.
Electrical work
Remember that using a power window fuse can protect all important components from short circuits.
The electrical setup procedure looks something like this:
- The electric motor must be supplied with voltage directly from the battery. In this case, the rotor should rotate and the entire mechanism should rise up. And you need to wait for the moment when the holes in the fasteners of the mechanism are aligned with those located on the glass carriages. Only after this can the glass be fixed.
- If there is no wiring (the installation of ESP is not provided for by the manufacturer), then it must be laid through the technological holes that are located in the door and body. You need to run wires to the instrument panel.
- You can place the control buttons in any convenient place, but it is best to place them in the door handle. But on domestic cars they are more often installed in the cigarette lighter area or near the handbrake.
- All moving parts of the electric drive must be lubricated - a CV joint type compound is suitable.
- Apply voltage to the entire system through the power window fuse and check operation.
- If there are no faults, you can install the casing and recheck.
The article shows a wiring diagram for the power window button. It is recommended to switch all power circuits using relays to maintain the integrity of the buttons.
Tips for installing ESP
- Electric lifts are produced by many companies; there are various designs. But you should not buy parts from unknown manufacturers, and you should keep in mind that cable power windows quickly fail. The most reliable ESPs are plank and rack type. On average, sets of lifts consist of 2 pieces. VAZ cars cost approximately 2500 to 3000 rubles, too low a price should be alarming.
- In order for the mechanism to reliably raise and lower the glass, it is necessary to lubricate the guides in the doorways with silicone grease.
- Universal electric windows are always inferior in quality to those parts that are specifically designed for a particular model. It is better not to purchase universal ESPs - they usually do not last long.
- Many drivers install ESP buttons on the instrument panel or next to the gearshift lever, but there is a small disadvantage - you have to pull the wires. It is more convenient to mount the buttons on the door armrest - there is no need to get confused in the electrical wiring, installation of lifts takes less time, and it is convenient for the driver to raise and lower the window.