Side rear view mirrors are an integral element of the design of any vehicle. They allow better control of the road situation, promote traffic safety, and optimize the aerodynamics of the body.
Some mirrors are additionally equipped with direction indicators (read the instructions for how to replace them), this statement also applies to the popular domestic car Lada Granta. The need to remove mirrors may be due to the following factors:
- Mechanical impact that caused the destruction of the housing.
- A crack or other defect on the mirror element. (Instructions for replacing the mirror element)
- Burnt spiral of heated mirrors or other damage to the electrical part.
In general, the operation of removing a mirror does not present any particular difficulties; it can be done on your own with minimal waste of time, so there is no need to turn to professionals.
How to remove the trim and the side mirrors themselves of a VAZ 2190
- Remove the mirror element. To do this, carefully bend it with your fingers so that you can see the latches that are located along the entire contour of the mirror. You need to bend 5 pieces.
- Remove the mirror covers. To do this, we snap off the latches that are visible from the side of the removed mirror; another latch is visible when bending the mirror towards the stack.
Adjusting the mirrors
Now let's move directly to the question of how to properly adjust the mirrors in a car. The procedure for adjusting the reflective elements is as follows:
- First of all, you need to adjust the driver's seat and find a comfortable position for yourself. There is no point in adjusting the mirrors before the chair is adjusted, otherwise everything will have to be adjusted again later.
- Now that the chair is in the correct position, you need to adjust the left mirror. To do this, you need to tilt your head to your left shoulder and touch your head to the glass. In this position, the rear wing of the car should be visible in the mirror. If it is not visible, then it is necessary to adjust the mirror so that the wing appears in the visibility zone. Once you are in the correct position, in the mirror you will only be able to see the edge of the rear wing of the car. That's how it should be.
- The level of the reflective surface must be adjusted so that the horizon line of the panorama is parallel to the horizontal axis of the mirror itself or even slightly higher. That is, in the mirror the driver should see most of the road surface, and not the sky and treetops.
- To adjust the right mirror you need to do approximately the same operations. In particular, you need to tilt your head to the right and set the reflective sheet in a position where the right wing will be visible. In a comfortable position on the seat, only the outermost part of the rear fender will be visible in the right mirror - you need to be guided by it when parking the car. The horizon line should be the same as on the left mirror - slightly above the middle.
If you install the side mirrors in this way, the visibility of the situation behind the rear of the car will be optimal. The blind spot will still remain, but it will be minimal. There will be no reminder that these elements need to be adjusted only in a car that is not in motion. Some drivers, noticing that the side mirror has a blind spot, try to correct it while driving. This is very distracting and increases the risk of accidents. If the reflection is really incorrect, then the car needs to be stopped on the side of the road and the mirror adjusted. So, now you know how to properly adjust your car mirrors. A photo of what the driver should see in the reflection is attached.
How to remove Lada Granta mirrors
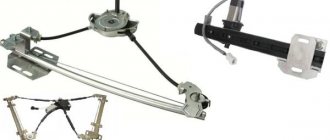
You will need : flat-blade and Phillips-blade screwdrivers, pliers and remove the door trim.
Depending on the Grant configuration, rear view mirrors can be installed with a mechanical or electric drive.
Removing power mirrors:
- Remove the mirror adjuster retaining bracket.
- Remove the 3 screws securing the mirror to the door frame.
- Remove the mirror.
- The photo shows the Granta side mirror assembled.
Installation of mirrors is carried out in reverse order.
Removing power mirrors : First you need to disconnect the negative terminal of the battery, and then:
- Disconnect the connector from the power mirror wires.
- Remove the 3 screws securing the mirror to the door frame.
- Remove the exterior mirror Grant assembly.
By the way, do you know how to paint the mirror caps in the body color and install heated mirrors?
Other options
For some users, a more acceptable option is to use a separate toggle switch. In this case, you should make sure that the current limit through the switch, which is usually marked on the housing, exceeds the current consumed by the heating system.
For those who want to install electric adjustment at the same time as heating, the best option would be to use mirrors from the Lada Kalina. Grant's original glass is large and clear. Electric mirrors from Kalina are slightly smaller, so this method is a good option for those car enthusiasts who do not like enlarged mirrors. Other drivers should be reminded that their smaller size makes up for their much greater operating comfort.
The first step is to remove the old mirrors. They are secured with 3 screws, which can be accessed after removing the decorative trim. Next, new parts are installed and wires are pulled, as described above. A wiring diagram is included with the set of new electric mirrors. The control unit should be mounted above the buttons of the power window control module.
All connections are made taking into account the algorithm described above, as well as instructions for new parts. The result is a Granta with the required option - electric drive and heated exterior mirrors.
Replacing the mirror element on Grant
Many drivers, out of ignorance, change the entire mirror assembly, although in most cases only the mirror element is damaged. And it would be quite ridiculous to pay about 1000 rubles for a complete mirror if you can get by with 300 rubles per element.
The design of the rear view mirrors on Grant, meaning external ones, is the same as on Kalina. That is why the entire process of this repair will be identical. Let's look at the main reasons why this part may be damaged:
- side impact in an accident
- hitting the mirrors when driving on a too narrow section of the road
- other damage not related to the operation of the car
Important nuances
Let's start with him. They serve to provide the motorist with a panoramic view while in the driver's seat. Moreover, this is true for cars with left and right-hand drive. Only the recommendations should be applied slightly differently.
If you have a left-hand drive, follow these instructions very carefully. If the car is right-hand drive, then the advice on the left side mirror is applied based on the right mirror. And vice versa. I think you've got this point figured out. But in general, right-hand drive cars are a separate topic for discussion, since they are not adapted to our traffic regulations. Too many problems arise. Especially when trying to overtake another car. But let's leave these conversations for another thematic material.
First, keep in mind that cars can be equipped with 2 types of mirrors. Moreover, they can use an electric drive or a mechanical type of drive, where a special lever or joystick is responsible for the settings. Here you need to work manually. I think each of you will understand, using your own car as an example, what to press and where.
Electric ones are more convenient, but are not found on all cars. But everywhere there is the possibility of adjusting the position.
When operating a car, consider what type of mirror is located on the sides of the car.
- With a spherical surface. Their characteristic feature is the ability to distance objects. That is, they create the impression that the car is further away from you than it actually is. It creates a deceptive effect, distorting the reality of what is happening. Not the best option. And if you have similar mirrors on your Polo or other car, many advise replacing them;
- With flat glass surface. Such designs are the most optimal for learning to look and adjust mirrors without distorting reality. They are considered the most suitable for car use, since they can cover the entire road.
Having decided on these questions, you can proceed directly to the settings.
How to remove an old mirror element
Everything here is done, although not complicated, but quite neatly. If you rush and make excessive efforts, you can damage the internal fasteners of the element, and then you will definitely have to buy the entire part assembled.
First, we remove the mirror assembly from the car, and only after that can we begin the repair. Then we move one side of the mirror element as far as possible to the side so that you can get inside this structure with a screwdriver.
Now, using a screwdriver or by hand, if you were able to insert it there, we move the element latches to the side, as is clearly shown in the photo below.
The latches are located along the entire circumference, so you need to unlatch them from all sides. After which this part can be easily removed with minimal effort on your part.
To see what the design of this fastener looks like, look at the picture below.
In addition to the hooks (clamps, latches), there are 4 more guides that must match the holes in the case when installing a new element. The new one is somewhat easier to install than it is to remove, so there shouldn’t be any special problems with installation. The main thing is not to use excessive force when fixing the element, and try to press the element itself as evenly as possible so that it does not break.
The price of a new such part for Grant is about 300 rubles, and as mentioned above, it is much cheaper than buying an assembled mirror. There are a few more points that relate to replacing the mirror element:
- the design can be electrically driven
- the element may be heated
Due to this, certain issues may arise that have not been described here. This article examined the simplest type of mirror element.
Detailed and universal method
Universal method
In the car interior, you need to unclip the plastic cover that covers the mirror mounting screws. After removing the cover, unscrew the three screws that hold the mirror in place and remove it. After this, you need to carefully remove the rubber gaskets -
If the rubber gaskets are damaged, it will be very difficult to buy new ones; they are rarely sold separately.
Now you need to unscrew the two screws securing the mirror adjustment joystick. Disassembling the joysticks themselves is a simple procedure; you just need to carefully remember the position of the cables and the color, since different colors are responsible for their adjustment. Next, you need to remove the three screws that are located on the lower plastic corner - it is most susceptible to damage during vehicle operation. After that you need to remove it too. How to remove the mirror element has already been described above. After removing the mirror element, you need to unscrew the four screws and remove everything else.
Place on silicone glue
The easiest way, of course, is to ask a mechanic you know or send the car to a car service center if you need to replace the mirror or paint it. But most owners are accustomed to repairing their car themselves - after all, this is a significant saving of money.
How to remove the side mirror of a Lada Granta
Side rear view mirrors are an integral element of the design of any vehicle. They allow better control of the road situation, promote traffic safety, and optimize the aerodynamics of the body.
Some mirrors are additionally equipped with direction indicators (read the instructions for how to replace them), this statement also applies to the popular domestic car Lada Granta. The need to remove mirrors may be due to the following factors:
- Mechanical impact that caused the destruction of the housing.
- A crack or other defect on the mirror element. (Instructions for replacing the mirror element)
- Burnt spiral of heated mirrors or other damage to the electrical part.
In general, the operation of removing a mirror does not present any particular difficulties; it can be done on your own with minimal waste of time, so there is no need to turn to professionals.
To watch online, click on the video ⤵
Lexus mirror repeaters Grants are the BOMB! More details
Painting mirrors Lada Kalina. More details
Lada Granta - installation of mirror covers. More details
Mirror Lada Granta VAZ 2191. Replacing the cladding and mirror element on mirror 2191 electrician. More details
Replacing the mirror element on the exterior rear view mirror of Kalina, Granta and Priora Read more
GRANTA FL — WE INSTALL A NEW STEERING STEERING, MIRROR COVERS, SPACERS (lada granta FL/granta 2019) More details
Replacing the side rear view mirror for the Lada Granta (Granta) 2017 Read more
Mirrors Lada GRANT VAZ 2191 cable. Review 3. Install the turn signal, change the trim. More details
Mirrors Kalina, Granta, Datsun Model range of exterior rear view mirrors VAZ 1118, VAZ 2191. Read more
Lada Kalina. Luxury mirrors with repeaters from Liftback. Refinement of wiring Read more
Lada Kalina replacing the glass in the side mirror. More details
How to install SE mirrors on a Lada Granta WITH YOUR OWN HANDS More details
Granta Liftback mirrors with full power accessories. Unboxing, first look Read more
How to properly remove the mirror trims (cladding) of the Priora, Granta. We disassemble mirrors Read more
INSTALLING HEATED MIRRORS ON THE LADA GRANT BY YOURSELF Read more
Solution to the problem of whistling mirrors Granta Liftback for 5 rubles and rear window seals from Kalina Read more
Granta Liftback - (2-part). Installing repeaters in mirrors without repeaters. More details
Mirrors VAZ 2191 GRANT cable drive. Review 2. Replacement of cladding and mirror element. More details
Heated mirrors Lada Granta detailed installation Read more
Removing the door trim
To gain access to the elements that fix the mirror, you first need to remove the door trim.
The sequence of actions is as follows:
- Removing the key blocking the lock.
- Removing the plugs.
- Sequentially unscrew the screws and screws holding the upholstery.
- To remove the upholstery, you need to insert a flat-head screwdriver wrapped in electrical tape into the groove between the upholstery and the door panel ( but it’s better to use a special device ). The clamps provide some resistance, but significant force during dismantling is unacceptable.
- The rods of the locking mechanism are removed, the upholstery is moved back to a distance limited by the length of the wires supplying the lifts.
- The wiring is carefully removed, after which the door trim is also dismantled.
Disassembly procedure
Once the structure has been removed, disassembly can begin. If it is required, of course. Perhaps you have found a new mirror whose price suits you completely. Then you can skip this point.
If it is necessary to disassemble an element, we start from whether it is internal or external.
The interior mirror is disassembled as follows:
- there is a place where the glass and the body are connected;
- spin is inserted;
- pressed with little force;
- a gap appears;
- use a mediator to pass along the entire length of the gap;
- the body is divided into 2 parts;
- the mirror is removed;
- everything else is located underneath it;
- We carry out the necessary work.
You may also need to disassemble your car side mirror.
It doesn't matter whether left or right
- Using a hairdryer, the area between the case and the glass is heated;
- Do not heat to high temperature. Use a household hair dryer on medium power;
- Use a flat-head screwdriver to separate the body into 2 parts;
- Sometimes it is necessary to bend the terminals;
- If you are afraid of damaging the mirror, wrap the instrument with electrical tape;
- On some cars you need to slightly press the mirror to the center and move it to the side;
- The glass is carefully removed;
- Remove the screw from the plastic frame, if there is one;
- Under the frame we see the entire mechanism;
- Use a screwdriver to remove the broken structure and replace it with a new one.
That's it, the work is almost completed. But since we disassembled everything and changed the necessary components, now we need to assemble the structure and install it back on the car.
Removing the mirror
The procedure after removing the upholstery is as follows:
- Using pliers, carefully remove the locking bracket, which limits the mobility of the hinge.
- Using a Phillips screwdriver, remove the screws that secure the mirror to the door structure.
- The mirror is removed, all cables and hinge mechanisms are routed through a hole located in the outer door panel.
If we are talking about a mechanically controlled mirror, with automatic control, then it may additionally be necessary to remove the wires that provide the drive with electrical energy.
These wires are fixed in blocks, so disconnecting them is not difficult.
Installing a new mirror occurs in the reverse order of installing door trim.
The main thing is to control the correct connection of the wires in order to maintain the functionality of all electronic systems of the vehicle, direction indicators and heating
Wiring
The next step is wiring. To install the wiring, you will need to remove the front door trim.
When the door is disassembled, the wires are pushed into the door through the fastening hole, and the interface block is disassembled. Through it and the corrugation, the electrical wiring is pulled into the housing. In order to simplify the task, you can drill an unoccupied contact in the block, and thus thread the plus and minus. To pull the wiring through the door corrugation, it is more convenient to use wire
Important (!) - for your own convenience, it is better to throw in extra wires
By analogy, the same work is done with the right door of the car.
To power the heated mirrors in Grant, it is recommended to use the most common way - connect to the heated rear window. This solution is used on most modern cars. The order is:
- The two negative wires from the heating are screwed onto a ground screw above the fuse block. It is not recommended to connect to ground inside the door, since electrical contact in door hinges and other moving connections is not always reliable.
- The two positives are soldered to the fuse holder (15A) and connected to the gray wire in the harness on the floor. There are 2 gray ones. The required one is found using a tester when the load is applied to the rear window heating.
Thus, Granta's heated mirrors are connected via a relay and 2 fuses. All that remains is to connect the mirror elements to the terminals and evaluate the performance of the circuit. After this, the wires should be hidden under the casing.
How to remove an old mirror element
Everything here is done, although not complicated, but quite neatly. If you rush and make excessive efforts, you can damage the internal fasteners of the element, and then you will definitely have to buy the entire part assembled.
First, we remove the mirror assembly from the car, and only after that can we begin the repair. Then we move one side of the mirror element as far as possible to the side so that you can get inside this structure with a screwdriver.
Now, using a screwdriver or by hand, if you were able to insert it there, we move the element latches to the side, as is clearly shown in the photo below.
The latches are located along the entire circumference, so you need to unlatch them from all sides. After which this part can be easily removed with minimal effort on your part.
To see what the design of this fastener looks like, look at the picture below.
In addition to the hooks (clamps, latches), there are 4 more guides that must match the holes in the case when installing a new element. The new one is somewhat easier to install than it is to remove, so there shouldn’t be any special problems with installation. The main thing is not to use excessive force when fixing the element, and try to press the element itself as evenly as possible so that it does not break.
The price of a new such part for Grant is about 300 rubles, and as mentioned above, it is much cheaper than buying an assembled mirror. There are a few more points that relate to replacing the mirror element:
- the design can be electrically driven
- the element may be heated
Due to this, certain issues may arise that have not been described here. This article examined the simplest type of mirror element.
What happens if you make the wrong choice?
If you install unsuitable or low-quality spark plugs in your car, the following troubles may arise:
- deterioration of engine ignition. When starting the engine, the owner will have to crank the starter for a long time, and this can reduce the functionality of the battery. In some situations it will be impossible to start the vehicle;
- excess fuel consumption;
- Once started, the engine will be much noisier and the sounds will subsequently increase in volume. This is especially noticeable during the process of warming up the car;
- the production of harmful substances in exhaust gases will increase. The analysis can be carried out using special equipment;
- the power and dynamics of the motor will decrease. This will be noticeably felt as you climb the hill.
In order to avoid such problems with your car, we recommend buying only high-quality spark plugs from trusted manufacturers.
In this article we discussed how to change spark plugs and the principles of choosing the right part for the full functioning of the power unit
It is necessary to pay due attention to the choice of spark plugs, since they play a major role in the vehicle operating system
Wiring diagram Grants
Wiring diagram of the front wiring harness of Lada Granta (VAZ 2190) This article provides information on connecting electrical equipment located in the front of the car. (lights, sound signal, connection of generator and starter, washer motor, cooling system fan, etc.) The harness is connected through plugs 9,10,11 to the instrument panel harness - 1,2.
Fig. 1 Electrical diagram of the front wiring harness of Lada Granta 2190 In the diagram, each wire is marked. The first number indicates which element the wire goes to, the second to which contact. Names of elements for the electrical circuit according to Fig. 1: 1.3 - car headlights; 2 — washer motor; 4 - starter; 5 - battery; 6 - power fuse block (located in the engine compartment - see item 10 in the article “Underhood of Lada Granta”); 7 - generator; 8 — sound signal; 9,10,11 - to the instrument panel block (see article “Instrument panel wiring diagram”); 12 — reverse lamp switch; 3 - electric fan of the cooling system (installed on the radiator in the engine compartment) Electrical diagram of the rear wiring harness of the Lada Granta VAZ 2190 (tail lights, license plate lights, fuel pump, etc.) The article provides an electrical diagram of the rear wiring harness, which is responsible for the equipment located on the sides and in the back of a Lada Granta car. These include lighting devices, light switches and a fuel pump module. The wiring harness is connected to the door harnesses and the instrument panel harness.
Fig. 1 Diagram of the rear wiring harness of the Lada Granta. The diagram has wire markings. The first symbol in the marking indicates which element the wire goes to, the second symbol, separated by a fraction, indicates which contact of the element. The following is the name of the circuit elements: 1,2 - rear wiring harness block to the instrument panel wiring harness block; 3 — right side direction indicator; 4 — left side direction indicator; 5 — handbrake lever position sensor; 6 — rear window heating element; 7 — interior lamp; 8 — switch in the driver’s seat belt; 9 — lighting in the trunk; 10 — electric fuel pump module; 11 — right lamp; 12 — electric motor for opening the trunk; 13 — interior lamp switch; 14 — additional LED brake light; 15 — left lamp; 16 — block of the rear wiring harness to the block of the wiring harness of the rear left door (wires for the speaker - brown-blue and blue-white); 17 — block of the rear wiring harness to the block of the wiring harness of the rear right door (wires for the speaker - green-black and yellow-green); 18 — block of the rear wiring harness to the block of the wiring harness of the front right door (wires for the speaker - yellow-white and green-white); 19 — block of the rear wiring harness to the block of the wiring harness of the front left door (wires for the speaker - gray-red and green-red); 20 — airbag control unit; 21 - block of the rear wiring harness to the block of the wiring harness of the state registration number lamps. Wiring diagram of the ignition system of the Lada Grant (VAZ 2190) The article shows the connection of the controller to all sensors, injectors, generator, spark plugs, everything that ensures the correct supply of the air-gasoline mixture to the engine, as well as its timely ignition.
Rice. 1 Diagram of ignition and connection of engine sensors to the controller on a Lada Granta car. The marking of the wires indicates which element the wire goes to and, through a fraction, (/) to which contact of the element. The ignition system diagram is shown for the VAZ 2114 engine. The following is the name of the circuit elements, according to the marked numbers: 1 - engine oil pressure warning lamp sensor; 2 - generator; 3 — throttle pipe with electric drive; 4 — coolant temperature sensor; 5 — block of the ignition system wiring harness to the block of the instrument panel harness; 6 — solenoid valve for purge of the adsorber; 7 — speed reading sensor; 8 — mass air flow sensor; 9 — crankshaft position sensor (the only sensor, if it breaks, the car will not start. If other sensors fail, there will be deviations in engine operation, but the engine will start and run); 10 — oxygen concentration sensor; 11 — car controller; 12 — diagnostic oxygen concentration sensor; 13 — ignition coil; 14 — spark plugs; 15 — nozzles; 16 — blocks of the wiring harness of the ignition system and the wiring harness of the injectors; 17 - engine knock sensor Electrical diagram of the Lada Granta instrument panel (VAZ 2190) This article provides a schematic electrical diagram for connecting the Lada Granta instrument panel. The diagram shows the connection of the mounting block (assignment of fuses and relays), instrument clusters, connection of lighting controls, electric power steering, interior heater, etc.
Rice. 1 Diagram of the VAZ-2190 instrument panel (Click on the picture to view it in full size) Each wire is marked, it indicates which element it is stretched to, and through the fraction to which contact of this element. Below is a description of the elements, according to the diagram below: 1,2 - panel wiring harness block to the front wiring harness; 3.4 — panel wiring harness block to the rear wiring harness; 5 — vehicle lighting control module (dimensions, low beam, hazard warning lights); 6 — ignition switch (mechanical); 7 — on-board computer mode switch (located on the steering column switches); 8 — windshield wiper switch; 9 — instrument cluster; 10 — light signaling switch; 11 — trunk lock drive switch; 12 — diagnostic block (for connecting diagnostic equipment, clearing error codes); 13 — block of the wiring harness of the instrument panel to the block of the wiring harness of the air supply box; 14 — rear window heating switch; 15 — alarm switch; 16 — brake light switch (brake light switch); 17 — block of the instrument panel wiring harness to the radio (acoustic wires to the speaker installation location); 18 — block of the instrument panel wiring harness to the radio (radio power supply); 19 — device rotating on the steering wheel; 20 — driver airbag module; 22 — mounting block; 23 — electric power steering; 24 — cigarette lighter; 25 — backlight lamp for the heater control panel; 26 — lighting lamp; 27 — block of the instrument panel wiring harness to the block of the ignition system wiring harness; 28 — Lada Granta controller is used from Lada Kalina (model 11186-1411020-22); 29 — clutch pedal position signal switch (the car will not start without the clutch depressed); 30 — electronic gas pedal; 31 — additional resistor (to select the speed of the heater fan); 32 — electric motor of the stove; 33 — heater motor switch; 34 - control unit for the door lock system. Application and designation of the relay on the Lada Granta K1 car - relay for the electric fan of the engine cooling system; K2 - door lock relay; K3 - additional starter relay; K4 - additional relay; K5 - relay-interrupter for direction indicators and hazard warning lights; K6 - windshield wiper relay; K7 - headlight high beam relay; K8 - sound signal relay; K9 - relay for low beam headlights; K10 — relay for turning on the heated rear window; K11 - main relay (ignition relay); K12 - fuel pump (gasoline pump) relay. Additional electrical circuits of the Lada Granta (doors, lights, air supply duct) This article provides electrical circuits for: car doors, state registration plate lighting, air supply duct. Electrical circuits for the rear doors (left and right are similar). The wires of the electrical circuits are marked. The first digit indicates which element the wire goes to, the second (through a fraction) to which contact.
Heated mirrors
Autumn and winter will bring both rain and snow, or even better, both at the same time, mirrors and our
visibility will suffer. Therefore, in wet weather, in snow or when the mirrors are icy, the “mirror heating” function is indispensable, because it will literally warm them up in 4-5 minutes and dry them, just while the car is warming up.
We buy special mirrors
Installation:
1. Remove the rear mirror trim and the mirror element - this is the most difficult and important thing.
2. Next, unscrew the 3 bolts from the interior and disconnect the mirror from the bracket.
3. Now you need to pull the wires through the special holes where the adjustment cables pass.
4. Assemble the mirrors in reverse order.
A special feature of the Lada Granta Liftback is a new modification of the side-view mirrors. By default, they are included as standard, unlike the Lada Granta Sedan, Priora, VAZ 2109, 2108, 21099.
Due to various reasons, such as an accident, collision, impact, reflectors are damaged. The replacement process is not at all complicated; every car enthusiast can do it.
In order to provide methodological assistance to inexperienced owners of the Lada Granta Liftback, we recommend following the instructions below.
How to remove an old mirror element
Everything here is done, although not complicated, but quite neatly. If you rush and make excessive efforts, you can damage the internal fasteners of the element, and then you will definitely have to buy the entire part assembled.
First, we remove the mirror assembly from the car, and only after that can we begin the repair. Then we move one side of the mirror element as far as possible to the side so that you can get inside this structure with a screwdriver.
Now, using a screwdriver or by hand, if you were able to insert it there, we move the element latches to the side, as is clearly shown in the photo below.
The latches are located along the entire circumference, so you need to unlatch them from all sides. After which this part can be easily removed with minimal effort on your part.
To see what the design of this fastener looks like, look at the picture below.
In addition to the hooks (clamps, latches), there are 4 more guides that must match the holes in the case when installing a new element. The new one is somewhat easier to install than it is to remove, so there shouldn’t be any special problems with installation. The main thing is not to use excessive force when fixing the element, and try to press the element itself as evenly as possible so that it does not break.
The price of a new such part for Grant is about 300 rubles, and as mentioned above, it is much cheaper than buying an assembled mirror. There are a few more points that relate to replacing the mirror element:
- the design can be electrically driven
- the element may be heated
Installing mirror covers
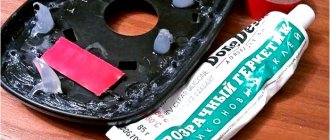
As for installation, anyone can handle it. However, in case of even minimal doubts, it is better to contact the nearest car service center. This way you can avoid the risk of damaging the paintwork of the body or trim. Usually the linings are equipped with everything necessary for convenient mounting on a car. Using an example, we will describe the installation of an overlay using hermetic glue or silicone.
First you need to thoroughly clean the outside of the mirror from dust and dirt, then wipe it dry. The inside of the lining must be coated with sealant. Its layer should be small, but as even as possible. Then you need to place the pad on the cleaned surface of the mirror and press it firmly for several minutes. Next, you need to wipe off the excess glue and then leave the parts to dry.
If your trim comes with mounting hardware, then it's even easier. Just install it and snap it in the right places. It will hold tight.
Procedure
Now you can begin installing the heater. First, remove the holder with the mirror from the case. On most cars, it is enough to pry it with a screwdriver or something flat from below and pull it towards you.
Based on the characteristics of the holder, we choose the method of fastening the wire. If the inner surface of the holder is smooth (as in the photo), then stick double-sided tape on it.
Then we lay a piece of wire on this surface. This can be done arbitrarily, for example, in a zigzag or something else. The main thing is to place it so that the thread covers as much of the surface of the holder as possible. In this case, the wire should not intersect anywhere. Scotch tape will hold the nichrome thread well.
If the inner surface of the holder has any protrusions or fastening elements, then it will not be possible to stick the tape. In this case, a soldering iron will help to secure the wire. Everything is simple here - we apply a nichrome thread to the surface and press it with a heated soldering iron. The plastic will begin to melt and the wire will sink into it. Once cooled, the plastic will become hard and it will hold the thread
But here it is important not to overdo it with heating the plastic, so as not to “push” it to the mirror. It is enough just to “drown” the wire in it a little and that’s it.
In this way, we fasten the wire along the accessible surface of the holder without touching the fasteners.
When laying the wire, its ends should be placed towards the side of the holder that is closer to the door, and so that they do not touch each other. To these ends we solder terminals for connecting to the wiring or simply the ends of prepared wires. Then the resulting connections need to be insulated.