In the first copies of the Lada Vesta, when the ignition was activated and the engine was started, the dashboard backlight did not light up. The reason was in the software, this function was not active by default.
When driving in sunny weather, during the daytime, it was difficult for drivers to read the readings of sensors, instruments, and indicators. For this reason, the owners did not notice the temperature rise, oil pressure warning lamp signals, etc.
After numerous requests to the manufacturer - AvtoVAZ, engineers developed and released new versions of firmware for the dashboard.
Changes:
- when the ignition is activated, the instrument panel lights come on;
- green cruise control indicator, located in the right corner of the central well;
- actual mileage and fuel consumption are displayed online at the bottom of the central well.
On the first firmware of the Lada Vesta under the index “026” the indicated options were not available. The dashboard lights were activated together with the daytime running lights (DRLs), which was not always the case and there was no need for DRLs. In general, the “innovation” is positively approved by the owners of Lada Vesta. Now it has become much easier to read data and indicators from the instrument panel without distraction from driving the machine.
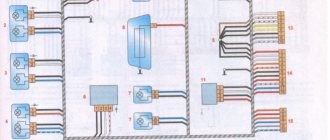
Sequence of actions during dismantling
- In the engine compartment, remove the terminal from the battery to avoid a short circuit in the wiring.
- At the top of the shield, unscrew two screws (a cross-shaped bit).
- We pull the PP towards us and remove the body from the plastic latches.
- Disconnect the block with wires from the reverse side.
We dismantle the plastic mask (wells) and move the latches to the side. We remove the tachometer and speedometer arrows from the base of the dashboard. Unscrew in a counterclockwise direction, pull towards yourself
It is important not to damage the gear stop. Otherwise, buy a new module. Remove the cover from the back side and unclip the plastic clips. We remove the instrument board from the housing. Remove the PP cover. We disconnect the contact connector and remove the on-board computer.
Read more: Kia Sorento Prime 2022 in a new body photo configuration and prices technical specifications reviews Done. The Lada Vesta instrument panel has been disassembled.
Dismantling (rear view)
- Using a soldering iron and solder, we solder three contacts together. They are located immediately below the central plug. For strength, we use stranded copper wire 4–5 cm long.
- We assemble the structure in reverse order.
Now, after starting the DRL, the dashboard is automatically illuminated. Very convenient, practical, and most importantly, informative for the driver.
Reduced fuel consumption
We often hear from service station technicians that an upgrade helps reduce fuel consumption. This is not entirely true.
Each car owner must choose: a significant increase in power or a decrease in fuel consumption. It is impossible to keep up with “two birds with one stone” at the same time.
Inexperienced service specialists insist on the opposite. Inexperienced drivers willingly believe what is said.
Reducing consumption
Video - night controls
Idea:
When driving at night, the backlight should barely glow; when driving during the day, it should be bright, and all this should be automatic. Those. it should change smoothly depending on the range of illumination.
1. Observations and tests
This idea was prompted by the fact that Sonic cars have such an adjustment, only it is manual.
Removed the light switch in the car
I took it apart and see unused sliding contacts on the right side of the board.
This is where the backlight control should be located in the form of a rocker, like on the steering wheel - control for switching songs
Having connected the board without the box, I tried to close the sliding contacts...
And lo and behold, when one pair is short-circuited, the backlight goes out, while the other pair is short-circuited, it glows brighter. (If you wish, you can simply display two buttons)
Well, the contacts have been found, all that remains is to solder the wires to them and solder a board that would receive light from the sensor and switch these pairs of wires.
2. Board layout and board cost
I take the wires and solder them...))
The circuit and sketch for Arduino are described by me in the article bigbarrel.ru/?p=332 The total cost of the board is approximately 150 rubles
The board is ready, I connect the device, and immediately encounter a problem. The controller on the board turns on before our backlight and the adjustment goes nowhere. As a result, nothing works as it should (((
At first I wanted to receive a signal directly from the LEDs, but the currents on them are pulsed, which means it’s confusing.
Finally I found a wire whose voltage is reset to zero when the backlight is turned on. I started using it - everything works great.
3. Assembling the light control unit
Soldered the wires to the contacts
I used a Dremel to trim the board so that the wires would not get caught. I used a drill to drill holes in the box for the wires.
I pushed the wires through the holes and secured them to the board.
I filled the wires with glue so they wouldn't come off)))
I assembled the block and wrapped the wires with resin-impregnated electrical tape.
Why is this even needed?
What components does tuning consist of?
If you have a persistent desire to transform the appearance of the car, improve its technical and aerodynamic qualities, then you should work hard on the body, replace parts of the chassis and engine parts, and replace components and assemblies.
First of all, you should think about the overall style of the car. You need to understand that additional “body kits” must not only be in perfect harmony with each other, but also generally correspond to the technical parameters of the vehicle. However, today this is not a problem. Because modern stores sell entire kits for a specific make and model of car. And tuning of such well-known brands as Mercedes, Mitsubishi, Honda can be carried out in specialized car dealerships. Fully formed kits are already offered here, that is, in a complex.
Usually the first phase of tuning is upgrading the wheels. If low-profile tires and wide wheels are not suitable, then the arches can be easily trimmed using improvised means, such as a grinder. It is also better to apply special pads to the side parts - they will increase the aerodynamic properties and visually expand the side parts of the body to accommodate the artificially increased radius of the wheels.
Lighting and airbrushing are other possibilities for tuning the car. It should be noted that headlights are also often modified.
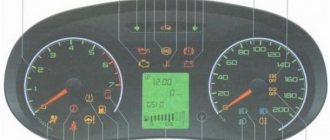
Functions and features of the Vesta panel device
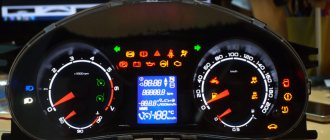
The instrument cluster on the Lada Vesta is completely different from those used on the Priora, Grant and Kalina. It is now a completely redesigned multifunctional device.
The speedometer is located in the central well - this is the main element of any “tidy” in a production car. The scale implies acceleration to 200 km/h, although in fact the stated maximum speed of Vesta with the current engine is no more than 185 km/h. Next to the speedometer there is a small on-board computer display, on which the driver can see all the necessary information about the operation of the engine and other vehicle systems.
Inside the speedometer scale there are various indicators that inform the driver about different parameters: the hazard warning lights are on and the direction indicators are on, the brake pads are critically worn, the engine is malfunctioning and the engine oil level is low. On the left is the tachometer well, the scale of which is marked from 1 to 7 (1000-7000 rpm). The engine allows you to “spin” up to 5500 rpm - this way there is no harm to the motor. After this mark there is a red zone; prolonged operation of the power unit at such high speeds is not recommended. The tachometer also contains information indicators.
On the right side there is a well in which there are two indicators. One of them informs about the engine temperature, and the second – about the fuel level in the tank
In Grant, the temperature indicator was removed to reduce the cost of the car, but in the climatic conditions of Russia and the CIS countries, it is extremely important for the driver to know the current temperature of the engine oil in order to prevent possible overheating due to various malfunctions
The fuel tank indicator shows a scale of “full tank”, “half tank” and “empty”. You can see an arrow near the gas pump icon; it is needed to indicate to the driver which side the fuel filler neck is located (the indicator points to the right). There are also warning lights in the right well.
In general, the instrument panel has an attractive design; the scales are backlit in green and orange with white numbers. The only drawback is the poor design of the arrow indicators. The intermediate divisions of the scales are not informative, and you need to get used to them. With a quick glance while moving, it will not be easy to read the readings.
Advantages and disadvantages of flashing
In addition to increasing truck power
With the help of chip tuning, you can achieve a number of improvements:
- reduction in acceleration time as a result of increased torque;
- ensuring smooth traction;
- reduction in fuel consumption;
- eliminating bugs and firmware errors;
- reduction of gas pedal reaction time;
- increasing the maximum speed by increasing engine power;
- disappearance of turbos in turbodiesel trucks.
Chip tuning is a subtle process of changing a program. If mistakes are made, the losses for the truck can be significant. The rich mixture in it can cause the valves to burn out. The engine may overheat due to excessive injection, especially in hot weather. The temperature of the exhaust gases also rises to a critical level, causing the catalyst to melt.
Don't forget about detonation. Often the sensor for this indicator is simply turned off when flashing. This leads to loss of control over the process and destruction of the engine.
Excessive torque settings can lead to transmission failure.
Find out the firmware number
If you are faced with the problem of the lack of backlight on the Lada Vesta dashboard during the day, first you need to find out the current firmware number. This can be done in one of 2 ways:
- Display the current software directly on the on-board computer display. To do this, during testing, you need to press the up button on the right steering column paddle.
- Dismantle the entire shield and look at the label that is glued to the back. The software version is also indicated on it.
The video clearly demonstrates the first method. You don't have to unscrew or remove anything to do this.
As you can see, the issue of the lack of backlighting on the Lada Vesta tidy is resolved quite simply. However, for those who live far from the dealership, it is easier to wait for the next maintenance and replace the firmware on it.
Chip tuning for Vesta from Paulus
Well-known in the CIS and Russian Federation, the Paulus service station specializes in chip tuning of technical equipment, including Lada Vesta.
The operating principle is based on:
- replacing standard parts with customized ones, so-called hard tuning;
- correction of ECU data;
- catalyst removal;
- changing the ignition angle.
As a result of the upgrade, the driver receives increased acceleration dynamics, increased traction at mid-range speeds, and pickup of power from the bottom.
Chip tuning from Paulus
Lada Vesta, self-adjustable brightness via ELM, dashboard lights
We copy the APK file from the archive to any place on your phone, the ecu.zip archive, without unpacking, we copy it to the root of the phone’s internal or external memory. Run the APK file on the phone (provide installation rights if necessary) - the software will be installed. We launch the installed Ecu Tweaker program (after launch it will detect the archive that we placed in the root of the memory and install it) and connect to our ELM scanner.
Click the “Meter Cluster” button:
On the screen, the fields are empty, since the application is not connected to the Lada Vesta, they will be filled in with values.
In this window, we adjust the brightness of the backlight to suit you. In the right columns we enter the values (indicated in percentages) opposite the desired parameter (LCD, scale or arrow). Then press the record button, depending on the parameter being edited, the record buttons will differ; Daybacklight_CF - when adjusting brightness in day mode and Nightbacklight_CF in night mode.
In the same window, you can completely turn off (or turn on if you have it turned off) the instrument panel backlight in daytime mode. We remind you that these instructions are relevant for updated instrument panels (with an orange scale); they have not been tested on previous versions.
Source
Which engine control unit is better?
We advise you to rely on personal preferences when choosing a car. But the car with the H4M engine type and the EMS3125 control unit looks slightly more advantageous. It is better protected from theft, and its software is more reliable.
In addition, H4M engines are made by the Renault-Nissan concern. So, for the same money you will get a more reliable car with an engine from Renault-Nissan and a control unit from Siemens.
Lada is a very popular car. And the more they buy, the more they steal. Therefore, it is better to take measures to further protect your car from theft.
With us you can install an anti-theft system, for example, Starline S96. Or any mechanical anti-theft devices - for example, an ECU protection safe or a Garant steering shaft lock. After such tuning, the car will be reliably protected from the vast majority of car thieves.
List of firmware for Lada Vesta instrument panel
Previous firmware versions are not compatible with subsequent ones. This must be remembered when upgrading yourself. Incorrect selection of the version will damage the electronic engine control unit (ECU) and on-board computer.
| Software version | Gearbox type | Transmission |
| Lada Vesta 026 | 8450007022 | Manual transmission |
| 028 | 8450007022 | Manual transmission |
| 035 | 8450007022 | AMT |
| 036 | 8450007022 | Manual transmission |
| 019 | 8450030825 | Manual transmission |
| 022 | 8450030825 | AMT |
| 027 | 8450030825 | Manual transmission |
As of March 2022, the firmware of the instrument panel on the Lada Vesta and the activation of the backlight in DRL mode are not carried out due to identified errors in the software.
Conclusion
Installing new generation firmware is extremely important for monitoring instrument performance, monitoring engine temperature, and reducing eye strain.
During the flashing process, be extremely careful not to break the sequence of actions. Remember about the compatibility of new generation firmware. If you encounter any difficulties during the upgrade, contact a service station specialist for help.
Reviews
| № | Positive |
| 1. | Nikolay , 28 years old (drive2.ru), Sverdlovsk: I was one of the first to buy a car, the dashboard firmware was stock 026. I felt the lack of backlighting in the daytime catastrophically. On the advice of my comrades, I independently updated to version 036. The backlight has become adaptive; when the DRL is activated, the brightness decreases, which was so lacking before. |
| 2. | Mikhali , 33 years old (prom.ua), Samara: I have factory firmware with code 028. The problem with the backlight has already been fixed, but the cruise control indicator does not work stably and periodically gives an error. I plan to upgrade to version 036. |
| 3. | Alexander , 36 years old (autotoday.com), Krasnodar: I’ve been actively using Lada Vesta for four years now, code 026 is preinstalled. Of course, the problem with the backlight and DRL is familiar to me, but this does not prevent me from driving the car. |
| 4. | Valery , 47 years old (rozetka.ua), Rostov-on-Don: I didn’t know about the possibility of flashing before, my garage mates advised me. I drove with constant discomfort for two years, now I know how to fix the backlight “bug”. |
| 5. | Kirill , 45 years old, Kursk (avtoflit.com): when driving in sunny weather, the lack of illumination of the visor is obvious. Fuel level and consumption are not visible online. I heard that you can reflash the control unit with a new code. I'll contact the specialists at the service station. |
| 6. | Sergey , 43 years old, Saratov (autotoday.com): I didn’t update the program code myself, I turned to the workshop specialists for help. The guys did everything in 20 - 25 minutes in total. I am satisfied with the quality, there are no complaints about the operation of the electronic control unit. |
| 7. | Anatoly , 46 years old, Stavropol (drive2.ru): bought a car second-hand, one of the first models. I knew about the problem with the firmware, so the service station updated the code to version 036. Now the dashboard is brightly backlit; when the daytime running lights are activated, the brightness automatically decreases, which is very comfortable for the eyes. |
| Negative | |
| 8. | Vasily , 38 years old (prom.ua), Uralsk: I have negative experience of upgrading software code. The first time I flashed it myself, the installation went wrong. I went to the service station because the car couldn’t even start and had to be towed. |
| 9. | Nikiforovich , 44 years old, Moscow (avtoflit.com): even after updating to the latest current firmware version, the backlight randomly changes brightness. I don’t know what caused this. I contacted the service station after diagnostics and they recommended reinstalling the program code. |
| 10. | Vasily , 36 years old, St. Petersburg (drive2.ru): I updated to version 028 for the first time, the operation of the dashboard was unstable. On the recommendation of my comrades, I decided to re-flash it to 036, since now the equipment is working normally, without any breakdowns. |
| 11. | Gennady , 46 years old, Pskov (autotoday.com): even after updating to version 036, my backlight did not become adaptive. When activated, the DRL does not change brightness. Obviously, the problem is in the program code. |
Improvement of the backlight of the Lada Vesta instrument panel (switching on with the ignition)
The Vesta instrument cluster has a unique design and modern lighting, which is based on LEDs. To prevent the sun from interfering with reading readings, all indicators are hidden in three large wells. On the other hand, in cloudy weather they may, on the contrary, leave some areas in the shade. In this case, a backlight is needed, but during the day it does not work with DRLs. What to do?
If the Vesta dashboard lights turn on only together with the low beam headlights and do not work during the day along with the DRLs, then reading the readings may be difficult. You can change the way the backlight works in several ways:
Attention! Tampering with the car's electrical system on your own will void the warranty. The author is not responsible, you do all actions at your own peril and risk
You will need to disassemble the shield. Next, we find SMD LEDs, which are responsible for illuminating the on-board computer (they light up when the ignition is turned on), they have constant power, and are controlled by ground. Next to them there is another SMD diode, which is responsible for illuminating all scales. Our task is to connect the contacts of these LEDs with a jumper (a piece of wire, as shown in the photo). If you solder it on the back side of the board, then you do not need to completely disassemble the panel (remove arrows, etc.)
A short jumper is responsible for illuminating the scales in the wells. The longer jumper is for illuminating the hands, an idea borrowed from user Atom308.
Such upgrades are not uncommon for LADA car owners. It is also necessary to solder jumpers in the case of hardware improvements to the Priora instrument cluster with navigation.
Refinement process on video (author):
According to the Lada.Online website’s own information, there are several types of instrument panels for Vesta. Some are distinguished by brighter backlighting, others have a modified backlight operating pattern (it turns on together with the ignition and DRL). Currently they are not mass produced.
Attention! Since the beginning of July 2022, LADA dealers have received firmware for the instrument panel, which allows the backlight to turn on along with the DRLs. Are you satisfied with the Vesta instrument cluster? Let's remember that we previously looked at how to increase the brightness of the panel yourself, as well as change its backlight color
Are you satisfied with the Vesta instrument cluster? Let's remember that we previously looked at how to increase the brightness of the panel yourself, as well as change its backlight color.
Source
An effective way to adjust the backlight
The problem with the first modifications of the Lada Vesta is insufficient lighting of the dashboard. In sunny weather, the driver cannot see the readings of sensors and instruments. Excessive distraction on the “visor” provoked accidents, crashes, and collisions with oncoming traffic.
In order to eliminate the defect, engineers developed and made publicly available on-board computer firmware with an increased brightness coefficient. However, the program code did not always work correctly, and malfunctions occurred from time to time.
Self-taught people worked together with the official VAZ developers and came up with a much better method - installing a 2-channel PWM controller.
The cost of a set of equipment is from 650 rubles in online catalogues, perhaps it will be cheaper in the car market. There is no catalog article, look for the production name: “KIT, PWM power regulator set, 12-50V 30A, 20kHz.”
Experts' opinions
In the first copies of the Lada Vesta, when the ignition was activated and the engine was started, the dashboard backlight did not light up. The reason was in the software, this function was not active by default.
When driving in sunny weather, during the daytime, it was difficult for drivers to read the readings of sensors, instruments, and indicators. For this reason, the owners did not notice the temperature rise, oil pressure warning lamp signals, etc.
After numerous requests to the manufacturer - AvtoVAZ, engineers developed and released new versions of firmware for the dashboard.
- when the ignition is activated, the instrument panel lights come on;
- green cruise control indicator, located in the right corner of the central well;
- actual mileage and fuel consumption are displayed online at the bottom of the central well.
On the first firmware of the Lada Vesta under the index “026” the indicated options were not available. The dashboard lights were activated together with the daytime running lights (DRLs), which was not always the case and there was no need for DRLs. In general, the “innovation” is positively approved by the owners of Lada Vesta. Now it has become much easier to read data and indicators from the instrument panel without distraction from driving the machine.
Do-it-yourself firmware
You need to be aware that all actions are performed at your own peril and risk. No one can guarantee that after installing the firmware yourself, the device will work correctly. To prevent this outcome, it is recommended to update the panel either at an authorized dealer or at specialized service stations.
There is no need to confuse the panel firmware with the multimedia firmware - these are different devices.
The cost of such a service varies from 1,500 to 2,500 thousand rubles. This is much cheaper than buying a new shield to replace a damaged one yourself. For dismantling and reflashing, the warranty may be revoked if the procedure is not carried out by an authorized dealer. If you decide to update the software yourself, you will need to make a backup copy of the standard firmware, then prepare the necessary tools:
- A device for flashing Usbdm OSBDM V4.95 - can be ordered on AliExpress, the cost is approximately 600-700 rubles.
- Install drivers and software for Windows from the disk included with the programmer.
- Dismantle the instrument panel, peel off the factory seal, and remove the cover from the back.
- Open the programmer and move the checkbox to the 3.3V position - at this voltage you will not need an external power source.
- Connect to the dashboard and PC.
- On a computer or laptop, open the HCS12 Programmer program, select and click on the “Detected” item.
- Go to the “Target” item and select the folder with the location of the firmware, check the box next to the “Auto Reload” item, then click on “Detect Chip”. The programmer will determine the chip type automatically.
- Go to the “Security” tab and check the “Unsecure” box.
- In the “Advanced” tab, check the “Enable” box.
- In the “Device Operations” section on the “Target” tab, select the “Erase Selective” item - only the firmware will be replaced, the immobilizer data and mileage will be saved.
Now you can click on the “Program Flash” button - the firmware process will start. This will last a few seconds. After completion, when prompted by the program to connect the dashboard, click “No”. The flashing device can be turned off and the instrument panel replaced.
Instrument panel features
The dashboard of the Lada Vesta contains measuring and control components:
- Fuel level sensor.
- Tachometer.
- Motor heating indicator.
- Speedometer.
The area directly above the steering wheel was selected for their placement.
The main device is the speedometer (from 0 to 200 km/h). Lada Vesta SV Cross vehicles do not accelerate to the maximum value. The engine type does not affect the speed limit. The following indicators and sensors are concentrated directly on the speedometer, which signal certain processes:
- The luggage compartment is not closed.
- Open hood.
- Open door designs.
- Climate control system.
- Turn sensors.
- Speed limiters.
- Emergency alarm.
- Turn indicator.
The on-board computer monitor on the Lada Vesta dashboard is concentrated under the speed scale. The following data is displayed on the screen:
- Total mileage and mileage per trip.
- Viewing time and the time the driver is on the road.
- Medium speed.
- Fuel costs.
- Checkpoint performance.
- Temperature conditions in the cabin.
- Voltage.
- Features of the climate control system.
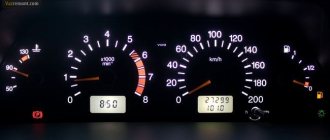
On the left side there is a tachometer, the scale of which has 7 units. If the “red section” lights up, this indicates that the engine is producing more than 5,000 rpm.
There are also indicators that signal certain aspects:
- Problems with the motor.
- Power supply performance.
- Brake system failure.
- The functionality of adjusting pedals, seat belts and airbags.
- Climate control adjustment.
- Condition of transmission, electric power steering.
On the right side there is a fuel scale and an engine temperature scale. For additional control, the following indicators are located on the instrument panel:
- Fuel level.
- The functioning of lighting devices, their brightness.
- Immibilizer performance.
This Vesta dashboard has a modern design. The presence of backlight makes the operation process easier.
Ways to increase car engine power
Over time, many drivers begin to think about how to increase the engine power of their car. There are a lot of options and possibilities for this, from the simplest and least expensive to the most effective.
Engine power is determined by the amount of fuel burned, as well as combustion efficiency. Fully burned fuel ensures maximum engine efficiency.
Atmospheric engines are too constrained in terms of seriously increasing power, due to the inability to push a lot of air into the cylinders. The problem was solved by installing a turbine, which made it possible to extract 1.5-2 times more power from the engine with an equal cylinder volume than that of an aspirated engine.
Designation of light bulbs and sensors on the tidy
Designation of lamps and devices on the Vesta dashboard
First, let's take a look at the location and description of the components of the dashboard in the Lada Vesta:
Tachometer. Thanks to this device, the driver knows what the crankshaft operating frequency is, that is, at what speed the engine operates. Do not allow the instrument needle to move into the red zone, as this may lead to damage to the power unit. If you press the gas pedal to the floor, while the speed exceeds 6200 rpm, the fuel supply will be limited. Experts also recommend not allowing the engine to operate in a dangerous mode, when the speed is less than 800 per minute. "Pedal adjustment" indicator. The seat belt icon is always on if the driver or passenger is not fastened. Indicator. If it appears for no reason, the problem may be a failure of the airbag sensor or its poor contact with the electrical network. A backup light bulb can be connected when installing additional devices or systems. Brake failure indicator; when it appears, you should stop the car and check that the brakes are working properly. The trunk door is unlocked icon; when it appears, you should check the trunk. Unlocked hood symbol. If it starts to light up on the dashboard, while the hood is normally closed, you need to check the functionality of the sensor. Speedometer
This device is considered one of the main ones, since the driver pays attention to it more often than others. The device is used to demonstrate the speed of movement. The hazard warning light icon always flashes when the hazard lights are activated. Unlocked doors symbol
If the car starts moving with one or more doors open, a corresponding light will appear on the dashboard. Cruise control system indicator. The speed limiter indicator appears if the driver exceeds the permissible speed. This device indicates the temperature of the antifreeze in the cooling system. If the indicator fails, the vehicle cannot be operated as it reports the engine temperature. If this value exceeds the permissible value of 115 degrees, the light will light red without interruption, and the buzzer should also sound briefly. At high temperatures, the engine may simply fail. Icon of the standard anti-theft system - immobilizer. Icon for turning on side lighting. Symbol for switching on low beam. LED high beam activation icon. The indicator for turning on the front PTFs always appears when they are activated. The icon for turning on rear-mounted foglights is similar. ESC light - electronic stability control system. The ESC OFF symbol indicates that the system is turned off. The fuel level sensor in the tank is used by the driver to guide him when he needs to refuel the car. The reserve fuel volume activation icon appears when there is little gasoline left in the tank. LCD display with main parameters and options. The right turn signal icon stops flashing after the maneuver is completed. Left turn signal activation symbol. ABS system activation lamp.
The battery icon may always appear when the ignition is turned on, but should disappear after starting the engine. If the indicator remains on, this indicates the need to charge the battery or diagnose the generator unit. The light indicator for emergency low tire pressure receives data from the corresponding sensors installed in the wheels. Symbol of problems with the gearbox. Icon of faults detected in the operation of the motor. There can be many reasons; when a symbol appears, more detailed diagnostics are required. Electric power steering controller. Symbol of emergency low oil pressure in the internal combustion engine. It also always appears when the ignition is turned on and disappears after the engine starts (the author of the video is Yuri T*********O).
What do tuners promise?
Subject to a professional approach to solving the problem, the car owner receives:
- increasing the actual power of the machine by 10 - 30% of the stock;
- elasticity, smooth operation of the motor;
- reducing fuel consumption, provided that this is the goal;
- opportunity to save on maintenance.
Lada Vesta dashboard malfunctions
If the instrument panel is faulty, it is immediately noticeable; the following signs may indicate a problem:
- The contact of the instrument panel with the on-board electrical network is broken. The reason may be a broken wiring or damaged connectors or contacts.
- Sensor malfunction. The dashboard displays incorrect information if the crankshaft position sensor, speed sensor, or fuel level have failed.
- Mechanical damage, for example, exposure to constant vibrations or a strong impact in an accident.
- Faults related to the electronic microcircuit.
- Burnt-out indicator lights - in this case, the backlight disappears.
These malfunctions are obvious, but there are also those whose causes are not easy to understand.
Arrow indicators do not work
If the arrows on the instruments do not work, this may indicate a failure of the sensors responsible for these readings:
- The tachometer does not work. If the tachometer needle does not move, the cause of the malfunction is the device itself. If the crankshaft position sensor or electronic control unit fails, the engine cannot be started.
- The speedometer does not work. If the device is working but does not indicate speed, the cause is a faulty speed sensor. This will also be indicated by the ABS warning light.
- There is no antifreeze temperature reading. The temperature sensor is faulty and transmits incorrect readings to the control unit, which are displayed on the instrument panel.
- No fuel level readings. The unit with the fuel pump is faulty, the ECU does not receive a signal.
You can remove the instrument panel to check the functionality of the elements only after testing all sensors for malfunctions.
Burnt out warning lights
Often the reason for the lack of readings of one or another indicator is burnt-out backlight bulbs. There is a special test to check their performance. When you turn the ignition key, the ECU should start all the instruments and light up all the warning lights in test mode. At this time, you should make sure that the red lamps are working properly (they indicate major problems in the operation of the systems):
- signal indicator of the hand brake and the serviceability of the brake system;
- power steering failure indicator;
- lack of battery charge;
- low oil pressure indicator;
- indicator of security system problems.
Interior in various trim levels
Different versions of the car will have both fabric trim and leather interior. In some photos caught in the frame, the interior equipment resembles black leather, with carbon inserts; in other versions, the seat upholstery looks like fabric with sidewalls made of leatherette or its analogues. The Lada Vesta instrument panel in the photo fits perfectly into the interior and looks quite impressive in this solution. The pricing policy, previously announced by the manufacturer, brings the car to a very competitive level. The initial cost with a robotic gearbox will be 600,000 rubles.
It is too early to talk about more specific advantages and disadvantages of the new product, since there are not even final results of city testing. We can only hope that cooperation with European colleagues helped the domestic automaker move forward.
List of firmware for the instrument panel
You can send your Vesta instrument panel firmware via the feedback form, we will add it to the table. Help has already been provided by val9001tlt and RUPARADOX.
| Software version | Gearbox type | Transmission | SX format | BIN format | Note |
| 026 | s/o (8450007022) |
028 manual transmission To download files you need to log in to the site To download files you need to log in to the site
— Indication of KK and OS — Two modes of KK illumination. Bright illumination in DRL mode. In the dimensions mode, low/high beam, the backlight is slightly dimmed— Displays the actual temperature of the internal combustion engine (and not instantly)
AMT To download files you need to log in to the site To download files you need to log in to the site
035
036 manual transmission To download files you need to log in to the website - Gearbox illumination in DRL mode - Display of the actual temperature of the internal combustion engine
011 n/a (orange, 8450030825)
019 Manual transmission To download files you need to log in to the website To download files you need to log in to the website - Indication of CC and OS - Two modes of gearbox illumination. Bright illumination in DRL mode. In the dimensions mode, low/high beam, the backlight is slightly dimmed—Display of the internal combustion engine temperature is always 90° within the internal combustion engine temperature range of 55° - 105°
022
Display of engine temperature is always 90° within the engine temperature range of 55° - 105°
027 manual transmission To download files you need to log in to the website To download files you need to log in to the website - Indication of CC and OS - Gearbox backlight in DRL mode - Display of internal combustion engine temperature is always 90° within internal combustion engine temperature 55° - 105°
126 read protection via USBDM
226
Attention! The firmware should be installed only on the instrument panel for which it is intended. That is, the firmware from the old panel will not work for the new one and vice versa
The VIN number in the firmware has been erased.
Determine which software version
on your instrument panel, you can follow these instructions
Results
As you understand, there are many ways that can increase engine power, but easy methods will not give good results, and refinement methods that give good results require complex work and additional improvements. You must understand that all parts of the car are calculated approximately for its entire components. That is, the gearbox and suspension are able to withstand all the data and most often have a small margin, but the manufacturer will not do this for a 100 hp engine. A gearbox capable of withstanding 1000 hp does not make sense. Therefore, if you decide to seriously tune your power plant and achieve high performance, then your task, firstly, is not to stop at one method, but to use everything, and secondly, to improve the stability of the gearbox, suspension and engage in engine cooling.
In this article we have listed the most basic and most popular methods of engine tuning, and we hope that we have answered your question in sufficient detail. Of course, there are still different ways to modify the motor, but they are rarely used for certain reasons. If you think that we have missed some method, then write to us by email and we will add this method to the article, also share the article with your friends and love your cars.
What can be changed in the firmware
For panels with white scales 8450007022, software - 26, 28, 35, 36:
- Activation of backlight during DRL.
- Activation of cruise control and speed limiter.
For panels with orange scales 8450030825, software - 11, 19, 22, 27:
- Activation of backlight during DRL.
- Display of REAL engine temperature.
- Activation of cruise control and speed limiter.
- Disabling the seat belt warning light.
For LADA VESTA CROSS with panels 8450032207, software - 126; 8450032268, software - 301; 8450032284, software - 501:
- Display of REAL engine temperature.
- Disabling the seat belt warning light.
For LADA VESTA SPORT with panel 8450032556, software - 226:
- Display of REAL engine temperature.
- Disabling the seat belt warning light.
Dashboard firmware
During the firmware process, the instrument cluster may fail; the author of the article does not bear responsibility. In addition, by disassembling the instrument panel you lose the warranty.
- Usbdm OSBDM V4.95 programmer (price about 700 rubles, available in the Aliexpress product catalog).
- Install the driver and program that comes with the programmer on the PC (HCS12 Programmer and USBDM driver X86 or X64).
- Remove the dashboard and remove the back cover (unstick the seal using a hairdryer).
Proven programmers for flashing the instrument panel:
The programmer with which it was not possible to flash the instrument panel:
Before the firmware, the instrument panel software version was 0.26
- Open the programmer case and set the jumper to 3.3V (in this position there is no need to connect external power).
- Connect the programmer to the instrument cluster and computer (see photo).
- Launch the HCS12 Programmer
and click on the
“Detect”
. - Go to the "Target"
.
Select the firmware (there should not be Cyrillic in the path to the file), check the “Auto Reload”
.
Click on the “Detect Chip”
.
The programmer will detect the chip automatically (in this case, the wrong chip was selected, I had to select the correct one manually, as in the photo). In the “Security”
set
“Unsecure”
.
Go to the “Advanced”
, check the
“Enable”
, replace
E
with
F.- Go to the “Target”
, in the
“Device Operations”
select
“EraseSelective”
. This means that only the firmware will be replaced, but all data about the immobilizer and mileage will be saved). We did not experiment with EraseMass. - Click on the “Program Flash”
, the firmware process will begin and will be completed in a few seconds. The program will offer to connect the following instrument panel (click NO). We turn off the programmer and install the instrument cluster on the car.
Let us remind you that we previously told you how to tune Vesta’s instrument panel (change the backlight, paint the wells).
Dashboard firmware
After the not entirely successful first “tidy” of Vesta, an updated one was released, with the defects corrected. The question arises - what should the owners of the first generation Lada Vesta do? In order for the backlight to work in the daytime without turning on the headlights, you can reflash the “tidy”. If the car is equipped with cruise control not at the factory, but by the owner, the corresponding indication on the old panel without firmware will not light up.
Without the skills and knowledge, installing software yourself can do more harm than good. The tailoring must be used strictly for the specific dashboard. It is not allowed to install updated software from a new device to an old one and vice versa.
Improving the elasticity of the power unit
The elasticity of the motor is an adjustable indicator that affects the “strength”. Many service station specialists practice setting the elasticity coefficient in the middle range, without reaching the maximum value.
It is in the “golden mean” that you can achieve maximum growth. Inexperienced specialists, not knowing the subtleties, set the “maximum speed”, thereby dooming the engine to premature wear.
The acceleration dynamics of the car will change in a fraction of a second, the accelerator pedal will become informative, the engine will start running smoothly, and delays when picking up speed will disappear.
Functions and features of the Vesta panel device
The instrument cluster on the Lada Vesta is completely different from those used on the Priora, Grant and Kalina. It is now a completely redesigned multifunctional device.
The speedometer is located in the central well - this is the main element of any “tidy” in a production car. The scale implies acceleration to 200 km/h, although in fact the stated maximum speed of Vesta with the current engine is no more than 185 km/h. Next to the speedometer there is a small on-board computer display, on which the driver can see all the necessary information about the operation of the engine and other vehicle systems.
Inside the speedometer scale there are various indicators that inform the driver about different parameters: the hazard warning lights are on and the direction indicators are on, the brake pads are critically worn, the engine is malfunctioning and the engine oil level is low. On the left is the tachometer well, the scale of which is marked from 1 to 7 (1000-7000 rpm). The engine allows you to “spin” up to 5500 rpm - this way there is no harm to the motor. After this mark there is a red zone; prolonged operation of the power unit at such high speeds is not recommended. The tachometer also contains information indicators.
On the right side there is a well in which there are two indicators. One of them informs about the engine temperature, and the second – about the fuel level in the tank
In Grant, the temperature indicator was removed to reduce the cost of the car, but in the climatic conditions of Russia and the CIS countries, it is extremely important for the driver to know the current temperature of the engine oil in order to prevent possible overheating due to various malfunctions
In general, the instrument panel has an attractive design; the scales are backlit in green and orange with white numbers. The only drawback is the poor design of the arrow indicators. The intermediate divisions of the scales are not informative, and you need to get used to them. With a quick glance while moving, it will not be easy to read the readings.
Increase in working volume
It is this indicator that small car owners are embarrassed to cite when they are asked about the car’s characteristics. Well, increasing the volume of the combustion chamber is perhaps the most radical way to make your car more responsive and dynamic.
It is known that the concept of “engine displacement” includes several interrelated characteristics: how much the piston moves, what is the number and diameter of the cylinders. But since it is structurally impossible to change the number of cylinders even theoretically, the impact on the other two above-mentioned parameters remains.
Increasing the diameter of the cylinders is, in principle, possible, but since they move in chambers designed specifically for factory dimensions, boring the cylinder block to the appropriate size will be required. If the BC is made of cast iron, new larger pistons must undergo additional processing, which consists of applying microroughness to the piston walls, which serves to retain the oil film. Needless to say, it is almost impossible to carry out such work in a garage environment.
If the cylinder block is made of aluminum and equipped with wet insert liners, the task is much simpler. In this case, boring is not required - just replace the liners with products of the required diameter, purchasing them at any auto store.
The second way to achieve the required results is to change the piston stroke upward. Structurally, this can be done by using a crankshaft with a different geometry (the crank radius increased by a certain amount). Choosing a suitable crankshaft will not cause problems either - there are a considerable number of products on sale designed for installation on different types and modifications of power units, including forced ones.
Of course, the increase in engine power when using such a radical method will be quite noticeable. But do not forget that this characteristic of the car is closely related to other parameters (in particular, torque and crankshaft speed). In fact, an increase in piston stroke means that the greatest amount of torque is developed at a minimum value of crankshaft rotation speed.
If we talk about specific numbers, an increase in the piston stroke/cylinder diameter provides an increase in power of about 10%, while engine operation in all modes will become noticeably smoother.
Among the disadvantages of this method, it is worth noting the following:
- increased fuel consumption (by about the same percentage);
- the high cost of the procedure itself;
- in some cases, it becomes necessary to change the design of the clutch; for correct operation of the ECU, a corresponding flashing will be required;
- in such cases, the use of low-quality oil and fuel is extremely undesirable;
- The engine life will decrease due to a decrease in the thickness of the cylinder walls.