Dismantling the secondary VAZ gearbox VAZ 2109
Defective parts of the secondary shaft of the VAZ 21083
Secondary shaft assembly
Gear selection mechanism VAZ 21083
The procedure for disassembling the VAZ 2109 gearbox is the same as for other modifications of these boxes and is described here. At the VAZ 2109 gearbox, a secondary shaft is installed under the number 21083-1701105. This shaft is considered the most reliable of all those used on VAZ gearboxes. This is what is used for tuning when installing sports series. Photo of VAZ 21083 shaft:
There are three types of this shaft: with 15, 16 and 17 teeth. With 15 teeth (main pair 4.1) they were installed at the very beginning of the production of eights and are now almost impossible to find on regular boxes. They are placed to order when tuning the gearbox. 16 teeth (main pair 3.9) are sometimes found on old boxes. If the gearbox is without a dipstick, the likelihood that there is a 3.9 pair is quite high. Later, almost all gearboxes began to be equipped exclusively with a 3.7 main pair, a shaft with 17 teeth.
Dismantling the VAZ 21083 shaft
We fix the shaft in a vice, press the bearing using two screwdrivers:
Under the bearing there is a thin washer and a 4th gear gear. Let's take them off:
Next, you need to remove the hub assembly with the 3rd-4th gear clutch. To do this, use two screwdrivers to push the 3rd gear gear up, trying to remove the hub along with the gear and the 4th gear bearing sleeve. Here, if you're lucky, you might be able to remove it with screwdrivers. And sometimes the hub is set in such a way that not everyone will take a puller, let alone a screwdriver. The matter is complicated by the fact that you need a special puller, long and with thin arms that need to be hooked onto the 3rd gear gear. Do not remove the clutch and apply force to the hub. The cast iron hub will crack immediately. Place the puller arms only on the gear!
Under the 3rd gear gear there is a retaining ring made of the ring itself and two half rings with a ball:
Having removed them, we get to the 2nd gear gear, remove it together with the synchronizer blocking ring, and underneath it is the hub with the 1st-2nd gear clutch. To remove the hub, you must remove the retaining ring:
Then we dismantle the hub assembly:
Step-by-step instructions for disassembling the gearbox:
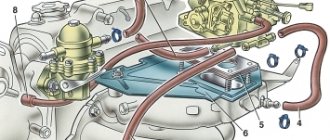
1. Remove the gearbox from the machine, clean it of various contaminants and wash it from the outside.
2. The indicator that shows the oil level must be removed from the gearbox.
3. Place the gearbox in a vertical position on the clutch housing and unscrew bolt number 1 with a flat washer, and two nuts number 3 with a spring washer, which secure the clutch cable bracket. Remove this bracket from the gearbox after unscrewing all the bolts.
4. On the cover located at the back, unscrew all the remaining fastening bolts (there are four of them).
5. Remove this cover. To do this, use a screwdriver to lift the boss located on the lid.
6. The bolt with spring washer that holds the fifth gear fork should be unscrewed.
7. Then you need to prevent the transmission shafts from spinning. To do this, they need to be fixed: move the synchronizer clutch and fork down in fifth gear so that the gear and splines of the clutch are connected, then engage third or fourth gear by moving the gear selection rod.
Defective parts.
First of all, we carefully examine the shaft itself. The bearing journals should be smooth and shiny without the slightest signs of pitting, grooves, or cavities. If the reason for disassembling the gearbox was the destruction of the front bearing of the secondary shaft, most likely the shaft will have to be thrown away. In such cases, the teeth of the drive shaft gear are most often damaged:
In the photo, the arrow shows the place of greatest wear of the teeth; if such a shaft is installed, the gearbox will make a loud noise. One of the most common malfunctions is clogged ring gear teeth and hub failure. This leads to the transmission being knocked out:
Usually the coupling also suffers:
It is also necessary to carefully inspect the hub. If it’s broken, it’s immediately obvious, but it often happens when the hub is still intact, but the cracks have already started. This will not last long, it definitely needs to be changed. The arrows in the photo show the place where cracks appear:
In addition, there is often a lot of wear at the ends of the hub, in places of contact with the gear.
Gearbox disassembly and repair
Detailed step-by-step instructions for disassembling and assembling the gearbox of a VAZ 2110 car and its repair. Watch video and photographs of the procedure.
When starting to disassemble the gearbox, it should be noted that if one of the parts in the gearbox, when it was repaired, was replaced: bearings or differential housing, clutch housing, then it is necessary to replace the differential bearing adjusting ring. And then start disassembling the box itself.
We dismantled and repaired the gearbox of a VAZ 2110 car.
Shaft assembly
Reassemble the secondary shaft in the reverse order. Pay attention to some points; two locking rings are installed on the shaft to secure the 1st-2nd gear hub:
The ring shown by the arrow is installed at the very beginning, the second after installing the hub. There are two types of synchronizer locking rings:
What is in the photo under the first number of the increased diameter should be installed on the corresponding gear. The gap between the ring and the gear must be at least 0.6 mm. But keep in mind that the 2nd gear ring is the most loaded, so when repairing it is better to install the second synchronizer with a new one, or the best one available. During installation, the protrusions of the first ring are located opposite the crackers in the hub. The second ring, lower protrusions opposite the crackers:
You can also navigate by the grooves in the coupling; opposite the holes in the coupling there are higher and wider protrusions of the synchronizer. If you mix up the gear, it will not shift, so after assembling the shaft, you must manually move it and change gears. If you removed the couplings, do not confuse the balls with the ball that is in the retaining ring, which fits into the hole in the shaft. The ball in the couplings is 6 mm, in the ring 5.5 mm.
Gearbox ratio of VAZ 2109
Gear ratios of the gearboxes of these machines: 1 - 3.636; 2 - 1.95; 3 - 1.357; 4 - 0.941; 5 - 0.784; reverse gear - 3.53. Main gears: 2108 and 2109 - 3.9; 21081 and 21091 - 4.13; 21083 and 21093 and 21099 - 3.7 or 3.9.
Replacing the main pair (secondary shaft and differential main gear) in the five-speed gearbox of the VAZ 2108-2112 family, with a gear ratio of 3.7 or 3.94 (standard) to 4.13 for the once produced “chisels” with 1100 engines and a 5-speed gearbox The gearbox opens up the opportunity to improve the dynamics of your car without resorting to boosting the engine.
In the city, fuel consumption will not change, on the highway it is possible to increase by 3% when driving at maximum speed, which is not significant, but the dynamics will noticeably improve, it will be easier for the engine to reach maximum speed, fifth gear will become more efficient, smooth pickup will appear in all gears, it will become It’s easier to get moving, climb steep hills, and you’ll have to change gears less often when driving quietly or when driving in city traffic.
It is important! VAZ dealers have received a circular that actually announces the start of a recall of all VAZ cars equipped with the 2110 gearbox and manufactured before May 2000. The reason is a design defect in the gearbox, or rather a hollow secondary shaft inside of which there is a through channel. A flat snap ring on the output shaft can break the shaft in half. The defect is dangerous: debris gets caught in the gears and the gearbox jams. There have been cases when fragments of the secondary shaft pierced the gearbox housing (the so-called “hand of friendship”). After additional tests, VAZ changed the shape of the retaining ring, which, according to plant representatives, resolved the problem. In fact, the problem was not fundamentally solved, because... only replacing a hollow 2110 gearbox secondary shaft with a solid 21083 can give a 100% guarantee. Unfortunately, the output shafts continue to break. That is why I recommend switching to a 4.13 GP with a solid secondary shaft, I emphasize once again - with a solid one, maybe. There are cheaper options on the market for the 4.13 GP with a hollow secondary shaft 2110. Please do not try to save money; in the end, replacing the gearbox housing with all the stuffing will be significantly more expensive.
PS Why 4.13?! 1. does not require the installation of a rather expensive and loaded 6th row. 2. acceleration dynamics are really improved, without increasing fuel consumption 3. speed at maximum speed will increase by only 500 rpm 4. maximum speed is achieved precisely from 4.13 to 5th and it will in no case be less than standard gearbox, on the contrary, the pair will allow you to turn the engine to maximum speed and accordingly increase the maximum speed. If you repeat the mistakes of “smart mechanics” who recommend installing a pair of 4.3 on a standard row, then you will really lose the maximum speed, due to the fact that the engine speed at maximum speed will increase by about 1000 rpm and the engine will simply “spin.” The gears will be shortened so much that you can start in 2nd, and the first one will turn into a super low-speed gear, like on a good SUV. This option is especially recommended for those wishing to use the machine as a tractor for the development of virgin lands.
To achieve maximum acceleration dynamics on 1.5 liter engines. and above, it is recommended to install an 18-row gearbox with a 3.9 main pair. Thanks to this, you will get 1st long (on it you can accelerate to 60 km/h, which is very convenient in the city, traffic light racing and street racing - this significantly saves time on switching and allows you to significantly get ahead of your opponent) and 2,3,4,5 close shortened gears. This will allow you to keep the engine in the optimal operating range (not lower than the maximum torque speed) and when switching, lose a minimum number of revolutions due to closer gears. Owners of front-wheel drive cars with standard. The gearbox probably knows that even if the engine is cranked hard in 1st gear, when switching to 2nd gear the speed drops significantly and the acceleration dynamics are reduced. The reason for this is that the gap between the gear ratios is too large. The 18th row of the gearbox is designed in such a way as to ensure confident, uniform acceleration in all gears (1st and 2nd are taken as an example, in fact all gears are close together. Since the gears are close together, the load on the synchronizers is significantly reduced (and this one of the most loaded, capricious and fragile elements of the gearbox) and the service life of the gearbox is significantly increased. Suffice it to recall the standard defect of the gearbox 2108-2112: problems with engaging the 2nd gear, since the gear ratios of the 1st and 2nd gears are very distant from each other, and a large the load on the 2nd gear synchronizer is what first of all “kills" it. When a worn synchronizer fails to cope with its duties, it makes an unpleasant noise and when shifting gears a characteristic click is heard, and sometimes a crackling sound, because the ring cannot equalize speed of the shaft and gear. When operating a gearbox with such synchronizers, the gearbox gears very quickly fail because the teeth and splines are chipped. The gearbox begins to hum and howl and subsequently jams. The 18th row is also good because it allows you to save on the main pair , because The GP on which it is installed is 3.9, which is standard for most gearboxes. ...All about transmission in tuning
IT would seem that everything is simple: if you want dynamics, “charge” the engine, increase the maximum power it develops. Here, any more or less savvy tuner will lay out a whole bunch of recipes for you. You can “cut” the cylinders and increase the piston stroke - the working volume will increase. Filling can be improved by refining the shape of the intake and exhaust channels and selecting optimal valve timing. In the end, you can equip the engine with supercharging or the notorious nitros...
But there is one point here that may disappoint many. The fact is that maximum power (the same figure that manufacturers proudly indicate in the technical data of a car) has the least impact on its dynamic characteristics! Why? Because the engine produces its “maximum” under a strictly defined combination of external conditions. Firstly, it must operate at very specific speeds. Therefore, when talking about power, they must indicate the rotation speed at which the engine produces it: if the passport says that the engine develops, for example, 333 hp. at 6000 rpm, then at 5800 or 6200 rpm it will be less.
The second important condition, which is not always met during normal driving, is full load, that is, the throttle valve is fully open. Accelerating with the throttle wide open is no problem. But achieving a combination of both conditions (which means getting maximum power from the engine) is possible only during one almost elusive moment, when the tachometer needle is opposite the cherished number.
“Of course, power during acceleration is not the main thing,” some will think. “Maximum torque is much more important here.” Not at all. The highest torque, like peak power, is achieved only at strictly defined speeds, and during acceleration this mode turns out to be just as short-lived. So, in order for a car to be playful, not just high power and torque are needed. It is also desirable that the engine output remains high throughout the entire speed range. And the main problem is that with internal combustion engines, especially highly accelerated ones, this is incredibly difficult to achieve. And it turns out that a truly dynamic car often turns out to be one that, although not the most powerful, has an engine that operates most of the time in the most favorable modes.
What kind of modes are these? Looking ahead, let's remember the so-called external speed characteristic of the engine - the one that is taken on the stand with the throttle fully open. In principle, it quite accurately reflects the operation of the engine during intense acceleration with the pedal to the floor. At first, as the speed increases, the torque and power gradually increase. Further, at a certain rotation speed (for an “average” engine this is 3500-4500 rpm), the torque reaches its maximum and begins to gradually fall. But the power (it is proportional to the product of the current torque and the rotation speed) continues to increase - the speed is growing! Ultimately, their growth ceases to compensate for the drop in torque, and the power also begins to decrease - you can still “turn” the engine further (the limiter will work a little later), but it is useless.
The practical benefit of knowing the nature of a particular motor is this. It turns out that if the driver manages to constantly keep the tachometer needle in the interval from the maximum torque revolutions to the maximum power revolutions, then the acceleration will be the most intense. And why, having mentioned the external speed characteristic, did I make a reservation? that we are a little ahead of the curve - doesn't it have something to do with dynamics? It has, and what else. But about engines and methods for increasing their power - a little later. And today we will remember the units that allow this power to be used correctly. That is, about the transmission.
ORDINARY ARITHMETICS
So, for the best acceleration dynamics, the transmission should allow the engine to operate in the “right” zone of the tachometer scale for as long as possible. In principle, this is not difficult to achieve: you just need to ensure that the gear ratios of each gear are close to each other. Then, when shifting “up,” the revolutions will not drop much, the engine will again be “in the moment” and will be able to quickly accelerate the car. The “close” gearbox steps will also help when shifting “down”: even at a relatively high speed, if necessary, you can safely engage a lower gear and make acceleration more intense, without risking jumping into the red zone on the tachometer.
Of course, production car designers know this as well as you and I. But the rows of gear ratios of standard gearboxes often have huge “holes” between adjacent steps. For example, the most characteristic defect in the gearbox of VAZ “nines” and “tens” is wear of the second gear synchronizer. And it arises, among other things, because there is a large difference between the gear ratios of the first and second stages, and the synchronizer has to equalize the sharply different angular velocities of the primary and secondary shafts. The driver also gets it: in order to provide the car with any acceptable reserve of traction after switching to second gear, you need to “unscrew” it thoroughly while still in first, listening to the roar of the engine.
It is clear that VAZ engineers selected such a series neither out of malice nor out of good life. After all, a “civilian” car must not only have acceptable dynamics, but also satisfy many other requirements. Firstly, he must confidently develop the maximum speed available for a motor of a given power. To do this, the gear in which he reaches it must be quite “long”, with a small gear ratio. Secondly, the car must confidently move away on a steep climb with a full load, and this requires “short” low gears.
The requirements for the efficiency and environmental friendliness of machines make life very difficult for designers. Back in the seventies, during the oil crisis, step-up “upper” stages in boxes came into fashion. The idea was this: maximum speed should be achieved, for example, in fourth gear, and fifth would be, as it were, “super-high” - for leisurely, economical movement without sudden acceleration. We still feel the echoes of this decision, which is completely unacceptable for modern cars with small and “inflexible” engines. For example, fifth gear on the same VAZ cars turns out to be absolutely useless: in it the car is completely deprived of the traction reserve necessary for overtaking and changing lanes. The savings turned out to be illusory, but the dynamics suffered greatly.
Indeed, on low-power vans, a number of gear ratios are already “stretched” beyond measure (for confident starting with a load, a “short” first gear is required here), and the “extra” gear, vitally necessary for bringing the stages closer together, turned out to be unused.
How to deal with this? There is only one way out: while preserving the box body (remaking it is too expensive), re-manufacture the original shafts and gears. This work is extremely labor-intensive and therefore expensive. Somewhere in America, a person who wanted to change the gear ratios of the standard transmission of his Mercedes would be looked at as if he were crazy. And for owners of domestic cars there is one very pleasant circumstance: in our country, experience in this kind of alterations has been accumulated, and considerable. Here, as usual, motorsportsmen were in the vanguard: a huge number of different series and main pairs were developed for rally, cross-country and “ring” - primarily for front-wheel drive Tolyatti cars.
A little later, the art of creating unique units became popular - numerous options for tuning transmissions for “eights”, “nines” and “tens”, developed using sports experience, appeared on the market. There are many different rows now offered: “fifth”, “sixth”, “seventh”, “eighth”, “eleventh”, “eighteenth”... They differ, naturally, in their gear ratios, and therefore in the character they impart to the car. For example, the “eighth” and “twelfth” rows are close to the serial ones and, together with serial or slightly boosted engines, are well suited for relatively leisurely driving. The “sixth” and “seventh” are a completely different matter. Both have six stages, are perfectly matched with the most “charged” engines and allow you not only to drive dynamically, but also to compete.
Despite the differences, all tuning series are built, in general, according to the same principle. The lower gears here are significantly “longer,” that is, faster than those of serial gearboxes. And the higher ones, on the contrary, are “shorter” and closer to each other. This selection of gear ratios slightly complicates the process of starting from a stop, but then the behavior of the car changes in a simply fabulous way: already in first or second, having “twisted” the engine to the cutoff, you can accelerate to a speed where fourth, fifth and even sixth gears would be quite appropriate! Fast driving becomes no less interesting. For example, even if fifth gear is already “in good shape” and the speed is quite high, you can easily switch not even to fourth, but immediately to third gear and make acceleration even more intense.
When installing a new “filling” into the box, you just need to remember that not every row will be able to “get along” with the standard final drive. However, a lot of options have also been developed here: tuning “pairs” with a gear ratio of 4.33 can be installed in a standard crankcase; 4.5; 4.7; 5.0, and even 5.125. You can also install a so-called short “slide”, which changes the gear ratio of the shift drive. It’s not expensive, but it will be much easier to operate the box.
Are there options even more extreme than simply replacing a row? It turns out that the Russian market, like Greece, has everything. For a separate and quite considerable fee (about $3,000), those interested will be able to assemble a real racing cam “six-speed.” This box allows riders to shift without pressing the clutch and significantly reduces acceleration time. But to ride a “cam”, money alone is not enough, you also need to know how to use it. And such a transmission makes a lot of noise - about the same as a serial one without oil. However, there are cam boxes that do not require special “racing” skills (though, unfortunately, they are not installed on domestic cars).
A similar system under the brand name SGSM was developed by the Moscow company Sportmobile specifically for Mitsubishi Lanсer Evolution cars. It was created on the basis of the Hewland sequential gearbox, which is often installed on all-wheel drive rally cars. And the salt of the Moscow design is in the cleverly organized engine control: the Motec microprocessor “brain” regulates the engine speed during gear changes, independently of the driver. Moreover, it does this in such a way that the engagement of the claw clutches in the box, despite the “closed” clutch, occurs without any shocks or impacts. By the way, until now we haven’t said anything about clutch. Are there really no problems with it when tuning transmissions? If we are talking about domestic cars, “charged” without the use of supercharging, then we can say that no - 150-170 Nm of torque, developed by the best tuning engines in VAZ cars, is easily digested by the standard mechanism.
We can only recommend using a high-quality “basket” and driven disk from a reliable company - for example, Valeo. But what problems really happen with are differentials...
NO SLIPPING
It would seem, what problems could there be with them? After all, most ordinary cars drive just fine with ordinary conical “differs”. But the beauty of tuning as a process lies in the fact that its fruits - cars are not at all ordinary. And when “eights” with more than 120-horsepower engines appeared, it became obvious that realizing such power through two drive wheels was far from an easy matter.
Of course, the best way out of this situation is all-wheel drive. But its use would entail a complete redesign of the entire car. A solution was found in the use of an albeit not so radical, but long-proven solution - a self-locking cross-axle differential. Unlike a traditional conical wheel, it continues to rotate both wheels even when one of them is on a slippery surface and slips.
Naturally, this decision also came from sports, where the engines are more powerful than “civilian” ones, and the conditions of tire adhesion to the surface are often worse than on public asphalt roads. There are many options for locking, but the most widely used is the Quife type worm mechanism. The principle of its operation resembles that of a conventional differential, but the satellites here are not conical, but cylindrical, and have spiral teeth. When the wheels rotate at very different frequencies, the forces generated on the teeth of the satellites press their ends against the differential housing and prevent them from turning - this reduces wheel slip.
What does this give? First of all, a sharp increase in the traction properties of the car. After all, with a lock in the transmission on a slippery road (and with a powerful engine, even dry asphalt sometimes seems very slippery), not one wheel “rows”, as is the case with a free differential, but both at once. But this effect lies, so to speak, on the surface. But blocking has one more property, which is not so obvious. It turns out that it greatly affects the handling of the car.
Imagine what will happen if you suddenly open the throttle in a fast corner in a powerful front-wheel drive car. That's right, the drive wheels will slip. The nuance is that a conventional bevel differential, having torn off the inner, unloaded wheel, protects the outer wheel from stalling, which “fuels” the car into a turn.
With a lock, the situation is different - the breakdown occurs, albeit later than with a free differential, but it happens much more sharply and on both wheels at once. Naturally, the car strives to go straight - the control forces on the broken wheels tend to zero. This mode of movement is called front axle drift. What if the rear starts to skid? This is where the locking help will come in very handy: when the driver competently “catches” the car by turning the steering wheel in the direction of the skid and increasing the fuel supply, the car with such a differential “rakes away” much more willingly.
In conclusion, I would like to remember this. All the modifications described are not an end in themselves and not a way to stand out from the crowd, but an accurate and subtle tool that allows an active and experienced driver to implement a certain driving style. Are you okay with this? Do you know what you want from a car? Then until the next meeting, when we will talk about methods for modifying engines...
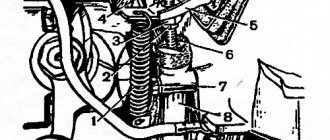
Selection mechanism.
Nine gearboxes are equipped with a steel gear selection mechanism with an integrated reverse gear fuse. The fuse is just a ball with a spring; to engage reverse gear, you need to apply a noticeable force to compress the spring. Another spring serves to fix the gear shift knob in a certain position so that the knob does not dangle freely between 1st-2nd and 3rd-4th gears. The most common malfunction of this switching mechanism is the breakage of this spring:
As a rule, spring breakage does not lead to any special problems, after which you can drive as well. Only occasionally does it happen that the pieces jam very poorly and interfere with normal switching. To replace the mechanism spring, unscrew the rod nut, then use a screwdriver to turn the rod half a turn to recess the spring-loaded ball of the reverse lock:
Then we pull the rod out of the mechanism, take out the remains of the spring with a figured washer. Insert the new spring together with the washer and assemble in reverse order:
Of course, before looking for and changing the spring, you need to carefully examine the selection mechanism; maybe it is so broken that it no longer makes sense to change the spring. To check, you need to rock the two levers with your fingers, which are right in this photo; if they are loose or separated, then you will have to change the mechanism.
Usually the fit is weakened in the place shown by the arrow, and it can get to the point where the levers move so far apart that the fifth gear rod falls into this gap and jams. Then the gears will stop shifting.
Disassembling the gearbox
In the situations described above, a simple gearbox adjustment will be sufficient. This is much better than repairing the VAZ 2110 gearbox, disassembling and assembling the gearbox.
Procedure for disassembling the gearbox:
- Remove the oil indicator from the gearbox. Unscrew the bolts that hold the clutch cable.
- Unscrew the bolts that hold the back cover. The lid is hermetically sealed, so when removing it, you can use a hammer.
- To prevent the shafts from turning while disassembling the gearbox, turn on the third or fourth speed. Then unscrew the bolt that secures the fifth gear.
- Remove the fifth gear and fork together.
- Afterwards, remove the gear from the secondary shaft and the fork. Then remove the plate that protects the bearings.