All the latest models of front-wheel drive cars produced by the car plant located in Tolyatti have a timing belt in the gas distribution mechanism. Lada Granta fully applies to these models.
The machine is equipped with several modifications of engines, which can have 8 or 16 valves in the cylinder head. Many owners service and repair this model themselves, so it will be useful for them to learn how to change the timing belt on a Lada Granta with 8 valves.
Lada Granta engines with 8 valves in the cylinder head are indexed 11183 and 11186. The first of them began to be produced in 2004, the second later, namely in 2011. The power of the “83” unit is 82 horses, with 87 hp for the “86” modification. Motor 11186 is an improved engine of the “83” model. It uses a lightweight connecting rod and piston group. It was possible to achieve a reduction in the mass of the piston group by almost 30%. The cylinder head is subjected to specific heat treatment, which increases its strength and wear resistance.
The cooling system of the power unit also received some changes. The skirts of lightweight pistons are coated with graphite lubricant, this avoids the appearance of scuffing on the cylinders of a cold engine. The compression ratio of the “86” engine became 10.5 versus 9.6 for the “83” modification. The cylinder head gasket of the new engine is now thinner, it is 0.43 mm versus 1.2 on the old model. The diameter of the intake valves was increased, which improved the filling of the cylinders with the air-fuel mixture.
Does the valve bend?
Unfortunately, this problem exists for the Lada Grant. It appeared from the moment the production of the first cars with front-wheel drive, the VAZ 2108, began. Subsequently, the working volume of the power unit of this model was increased, it became equal to 1.5 liters. The engine index became 21083, in which the pistons have a recess in the head. This made it possible to prevent the pistons from meeting the valves if the timing belt in the timing drive breaks or is installed incorrectly. This particular power unit was taken as the basis for the engine for the Granta, so there were no valve bends.
Upgrading this engine to model 11186 involves installing lightweight parts of the connecting rod and piston group. The pistons have become shorter in height, which does not allow making recesses in the head to prevent them from meeting the valve. Therefore, a toothed belt break is always accompanied by damage to the valves on an 8-valve Grant, sometimes to connecting rods and pistons. This problem accompanies all subsequent modifications of engines for the Lada Grant.
Replacement procedure
Many owners of this car prefer to carry out this operation in specialized workshops, but some do it themselves. There is nothing overly complicated in this procedure; there is no need to purchase special equipment or devices. You can replace the timing belt yourself in the garage. You will need to prepare a set of wrenches, a mounting shovel, a jack, a stand for the body, wheel chocks, gloves, and rags. Round nose pliers with curved ends are suitable as a key for adjusting the tension roller.
Replacing the timing belt on a Lada Grante is performed in approximately the following sequence:
- The car is placed above the inspection hole or on a flat surface, the handbrake cable is tightened, and wheel chocks are installed under the rear wheels.
- Open the engine compartment hood and disconnect the terminals from the battery.
- The generator set drive belt will interfere with work, so it is removed.
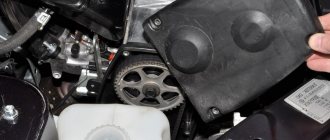
- Now, using the hex number “5”, remove the four screws that secure the front protective cover of the gas distribution mechanism drive.
- To avoid accidentally damaging the crankshaft position sensor, it should be removed from the cylinder head and set aside. Do not allow metal filings to come into contact with the sensor; they may further distort its readings.
- Next, you need to set the piston of the first cylinder to the top dead center position.
- Removal of the toothed belt is hampered by the generator drive pulley on the crankshaft, which must be removed. To do this, tear off the wheel bolts of the right front wheel and raise the body with a car jack.
- A stand is installed under the body, the wheel is removed, and the protective shield is on the mudguard.
- An assistant is needed to remove the crankshaft pulley. Ask him to engage fifth gear and press the brake pedal hard. Some experts insert a powerful screwdriver into the hatch on the transmission housing between the teeth of the flywheel.
- Applying some force to the head “17”, unscrew the bolt and remove the pulley from the crankshaft.
- You will again need the fifth hexagon number, with which you need to unscrew the three screws of the lower protective casing of the timing mechanism, after which you can remove the protection.
- Now you need to loosen the tension roller fixing bolt; a 15 mm spanner is best suited for this. After this, the roller will rotate and release the tension of the drive belt, which is easily removed from the gears and taken out of the engine compartment.
Important! After this, you cannot turn the engine crankshaft to prevent the pistons from meeting the valves.
Typically, the belt is replaced together with the tension roller and coolant pump, so they must be removed from the cylinder block. There is an adjusting washer under the roller, which is installed back during assembly. When removing the pump, pour a certain amount of antifreeze into a previously prepared container. Installation of a new timing belt is carried out in the reverse order. Please note that you need to check the position of all installation marks on the crankshaft and camshaft, cylinder block and timing belt guard.
Setting marks
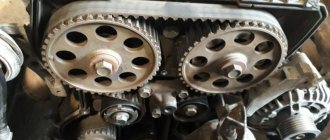
This is an important procedure when replacing the timing belt, so it must be taken seriously. This engine has four timing marks in the timing drive. Two on the crankshaft and camshaft gears, one on the cylinder block in the crankshaft area, the last one is on the metal protective casing. Two more marks are located on the flywheel and gearbox housing. They will be clearly visible when the rubber plug is removed. It is the marks of the flywheel and the box casing that will indicate the position of the piston of the first cylinder at top dead center.
Turn the crankshaft with a key to “19” clockwise until all the marks of the mechanism coincide. The camshaft pulley mark in the form of a conical recess or boss will be in a horizontal position and coincide with the protrusion on the protective casing. The mark on the crankshaft pulley will look strictly vertical and coincide with the mark on the cylinder block.
Tension
The installed new timing belt must be tensioned to the required parameters. Before doing this, be sure to check the position of the installation marks again; if everything is in order with them, you can tension the drive. To do this, you need to turn the tension roller counterclockwise until the marks on it match. There is one mark in the form of a cutout on the outer frame, the second on the inner one in the form of a protrusion. You can turn the tension roller with a special wrench or pliers.
Some craftsmen insert drills of suitable diameter into the holes on the moving part of the roller. Use a screwdriver between them as a lever and turn the clip until the marks match. After this, you can tighten the screw securing the tension roller. After all the work is done, you need to manually turn the crankshaft a few revolutions, making sure that the marks have not moved. After this, you can install the protective cover.
Reassembling the mechanism
The assembly process is carried out in reverse order, only at the very beginning you need to make sure that the marks set earlier are in place. Then a new tension roller is installed and a new timing belt is put on the gears, starting from the bottom, from the crankshaft. Holding the belt in a slight tension with your hand, put it on the camshaft gear so that all the teeth match, and then tighten it with a tension roller.
There are 2 holes in its body into which you can insert a special fork or pliers and use them to tighten it. After this, tighten the roller bolt with medium force. In order to ensure correct installation and tension of the belt, you need to make a couple of full revolutions of the crankshaft, preferably not with the starter, but with the help of a key. Then align the marks and check again the position of the marks in the flywheel inspection window.
There is one caveat: the mark on the camshaft gear may deviate a couple of mm in one direction or another from the mark on the body, this is quite acceptable. If the belt is installed incorrectly, the discrepancy will be 1 cm, this is immediately noticeable. You need to loosen its tension again and move the belt one tooth to the right or left, and then repeat the operation. Once the new belt has been successfully installed and tensioned, the assembly can be reassembled.
When installing the generator drive belt, remember that the VAZ 2190 does not have a tensioning mechanism. Therefore, the body of the unit is moved as close as possible to the cylinder block, the belt is put on its pulley completely, and partially on the crankshaft, after which it will need to be turned half a turn for the consumable to fall into place. Further assembly is not a problem, after which you can start the motor. The operation for such a replacement for a Lada Granta engine with 16 valves is distinguished by the following details.
- There are two camshafts, the marks will need to be aligned, and then checked on two gears.
- You need to change 2 rollers: tension and bypass.
- The new belt will need to be carefully put on the two upper gears, passing it past the deflection roller, the process is somewhat more painstaking.
When performing replacement work, it is recommended to pay attention to the cleanliness inside the timing mechanism space. As a rule, dust, dirt, products from the old belt in the form of black powder, and so on accumulate there. It is a good idea to thoroughly wipe the inside of the engine housing, gears and guard.
The whole procedure is quite simple. Knowing how long it takes to change the consumables of the timing mechanism and having a minimum set of devices, it is quite possible for anyone to do it on their own.
The process of replacing the fuel filter on a Lada Granta List of maintenance works 2 and their cost for a Lada Granta car
All the latest models of front-wheel drive cars produced by the car plant located in Tolyatti have a timing belt in the gas distribution mechanism. Lada Granta fully applies to these models.
The machine is equipped with several modifications of engines, which can have 8 or 16 valves in the cylinder head. Many owners service and repair this model themselves, so it will be useful for them to learn how to change the timing belt on a Lada Granta with 8 valves.
Lada Granta engines with 8 valves in the cylinder head are indexed 11183 and 11186. The first of them began to be produced in 2004, the second later, namely in 2011. The power of the “83” unit is 82 horses, with 87 hp for the “86” modification. Motor 11186 is an improved engine of the “83” model. It uses a lightweight connecting rod and piston group. It was possible to achieve a reduction in the mass of the piston group by almost 30%. The cylinder head is subjected to specific heat treatment, which increases its strength and wear resistance.
The cooling system of the power unit also received some changes. The skirts of lightweight pistons are coated with graphite lubricant, this avoids the appearance of scuffing on the cylinders of a cold engine. The compression ratio of the “86” engine became 10.5 versus 9.6 for the “83” modification. The cylinder head gasket of the new engine is now thinner, it is 0.43 mm versus 1.2 on the old model. The diameter of the intake valves was increased, which improved the filling of the cylinders with the air-fuel mixture.
Does the valve bend?
Unfortunately, this problem exists for the Lada Grant. It appeared from the moment the production of the first cars with front-wheel drive, the VAZ 2108, began. Subsequently, the working volume of the power unit of this model was increased, it became equal to 1.5 liters. The engine index became 21083, in which the pistons have a recess in the head. This made it possible to prevent the pistons from meeting the valves if the timing belt in the timing drive breaks or is installed incorrectly. This particular power unit was taken as the basis for the engine for the Granta, so there were no valve bends.
Upgrading this engine to model 11186 involves installing lightweight parts of the connecting rod and piston group. The pistons have become shorter in height, which does not allow making recesses in the head to prevent them from meeting the valve. Therefore, a toothed belt break is always accompanied by damage to the valves on an 8-valve Grant, sometimes to connecting rods and pistons. This problem accompanies all subsequent modifications of engines for the Lada Grant.
How long does it take to replace it?
The factory operating instructions for the vehicle recommend replacing the timing belt after a mileage of 75 thousand km. This standard is not always followed by owners, and there are good reasons for this. How long the drive lasts before replacement depends on many factors. This is the quality of the parts used, the operating conditions of the vehicle, and the technical condition of the engine. During each maintenance, the tension and condition of the timing drive should be checked. If cracks, peeling, or other damage appears, the belt should be replaced.
With a high mileage of the car, natural wear of the crankshaft and camshaft pulleys occurs, this significantly reduces the service life of the entire timing drive. The drive is also afraid of engine oil getting into the belt operating area. It softens its structure, the teeth are easily cut off. If the car has been sitting idle for a long time, it is also better to replace the drive due to its aging. Most owners and experts recommend changing the belt after a mileage of 50 thousand km.
Reviews
| № | Positive |
| 1. | Alexander: in two years of using the car I have never changed anything. I carry out prevention systematically, as prescribed by the instructions. I believe that a moderate driving style, high-quality oil, and original parts can work wonders. |
| 2. | Kirill: at 65,000 km I tightened one rod because it started to click when it was “cold”. I haven't changed anything until now. Everything is original installed. |
| 3. | Vasily: I replaced the timing belt in a year and a half. I thought it would be difficult, but it turned out to be the opposite. I recommend that motorists carry out preventive maintenance on their own. |
| 4. | Gennady: adjusting the valve clearances on Grant is not easy, but I was able to do it myself, without outside help. Instructions and video tutorials on the Internet are always at hand. |
| 5. | Ignat: after a year of using the car, the valves began to knock. At the service station the technician said that there was no need to change it, they limited themselves to tightening it. I still ride, no complaints. |
| 6. | Vladislav: for three years of using the car, I installed all the spare parts myself and did not contact the service center. Which is what I recommend to other Grantmakers. There were no major breakdowns, they were so insignificant. Fuel and oil filters don't count. |
| Negative | |
| 1. | Victor: My timing belt fell off within the first year after purchase, which turned out to be unexpected. I installed the new one myself, the process is not complicated. |
| 2. | Ivan: at 45,000 the valves began to knock, so I took it to the service station. The master said that the second and third valves were defective. Replaced with new ones. Buy Lada Granta in 16 cl. |
| 3. | Vasily: at the second service, I replaced the timing belt at the service center. Three teeth suddenly broke off, the quality is poor. |
Which kit to buy
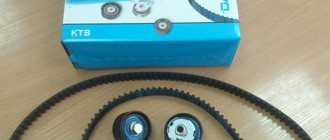
In addition to the toothed belt, a tension roller and a coolant pump are purchased. The main supplier of rubber products is the RTI plant in Balakovo. Products from GATES, BOSCH, DAYCO, CONTITECH have proven themselves well. If the pump in the engine cooling system is replaced, antifreeze will be needed to top it up.
Yesterday one of our regular customers came to us with a recently purchased second-generation Kalina to replace the timing belt, roller and pump, plus all the fluids, but more on that in another article. This engine was also installed on the Grant, so this article will be relevant for it as well. The speedometer shows 60,000 and I believe that for this engine this is the optimal replacement interval, even though all reference books say about 75,000.
Let’s make a reservation right away that when the timing belt breaks on this car, the valves bend. It is recommended to check the condition of the belt every 15,000 kilometers.
To work, we will need a set of keys and sockets, as well as a 5-point hex and a key for the tension roller. The entire procedure takes approximately one and a half hours.
The engine is similar to the eighth.
First, remove the protection, drain the antifreeze, and for convenience you can remove the right front wheel. Next, loosen the locknut of the generator belt tensioning mechanism. Using a 10mm socket, unscrew the tensioner pin and remove the belt.
We unscrew the four bolts with a 5mm hexagon and remove the upper protective cover of the timing belt.
Set top dead center (TDC). We turn the crankshaft by the pulley mounting bolt clockwise until the mark on the camshaft sprocket and the timing belt protective casing coincide.
Unscrew the crankshaft pulley bolt. We block the wheels with stops, tighten the handbrake, engage fifth gear and, with a slight movement of the wrench and a one and a half meter pipe extension, unscrew this bolt.
Remove the protective washer.
The marks on the crankshaft sprockets should be aligned with the oil pump casting.
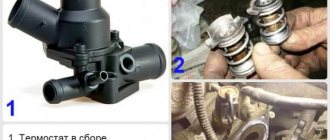
Praise be to the designers of AvtoVAZ, finally rollers with a tension indicator appeared on the engines, now you don’t need to tighten them by eye and check the tension by twisting the belt, not even thirty years have passed since the invention of such a design. We unscrew the tension roller bolt and dismantle the latter; we also remove the old timing belt. The photo shows that the belt has stretched out because the tension marks have diverged; when checking the condition of the timing belt, if you see this, you will just need to tighten it.
To replace the pump, we need to remove the camshaft sprocket, and also unscrew several bolts of the inner casing and remove it.
Three bolts out and the pump replaced. The green arrow indicates the hole for the tension roller bolt.
Having replaced the water pump, we proceed to install a new timing belt.
We put the casing and camshaft sprocket in place. We check that all the marks match, as discussed above. We install the tension roller, but do not tighten the bolt. We put on a new belt, observing the direction of rotation, first on the crankshaft sprocket, camshaft, tension roller and pump, the latter can be swapped. We tighten the timing belt. Use a special key to turn the roller counterclockwise, as indicated on its body...
...until the marks on it coincide and tighten the bolt.
We turn the crankshaft two turns and again check the alignment of the marks and the belt tension.
We install all the parts in the reverse order of removal, fill in antifreeze and start it. It couldn't be simpler. Good luck on the roads. No nail, no rod!
Replacing the timing belt of Lada Granta 8 valves is required once every 75 thousand kilometers. If you ignore the scheduled replacement of the belt, tension roller and sometimes the pump (coolant pump), you may end up with serious repairs to the Lada Granta engine. After all, a broken timing belt almost always leads to damage to valves, valve seats and even pistons. Therefore, the timing drive must be treated very carefully. Every 15 thousand it is necessary to inspect the belt for breaks, cracks, peeling or oiling.
The advice applies to VAZ, 11186 and 21116 engines. All of them are 8-valve and are installed in Grant cars. Let's consider replacement steps.
First, remember a simple rule: the 11183 engine cannot bend its valves, so you can rotate the crankshaft and camshaft pulley separately. For motors 11186 and 21116 this would be unacceptable!
Detailed timing drive diagram of Lada Granta
1
- crankshaft toothed pulley
2
- coolant pump toothed pulley
3
- tension roller
4
- rear protective cover
5
- camshaft toothed pulley
6
- timing belt
A
- boss on the rear protective cover
B
- mark on the camshaft pulley
C
- mark on the oil pump cover
D
- mark on the crankshaft pulley.
Before carrying out any work, disconnect the battery terminal (key 10), as well as the DPKV sensor. But first you need to remove the protective cover. To remove the protection you need: 11186/21116
- using a “5-point hexagon”, unscrew the 4 bolts on the top part, which is then removed.
And the lower part is also dismantled; 11183
– use a 10mm wrench to unscrew the 3 fastening bolts. It will not be difficult to cope with what is said above.
The crankshaft position sensor (CPS) is disconnected from the connector (see photo). Then the fastening screw is unscrewed with a “10” wrench. The sensor itself must be removed.
Installation of all shafts according to marks
First check that the gear is in neutral.
There is a rubber cover on the crankcase body closer to the clutch assembly. It needs to be removed. The point is to achieve alignment of the marks on the flywheel and in the scale slot. When this is done, fix the flywheel with a screwdriver.
Of course, it is easier to perform such an operation with two people. Know that the desired position of the shaft corresponds to the alignment of marks AB and CD (see figure).
The crankshaft itself must be rotated to the right using a 17 or 19 key (motor 11183).
The meaning of this is illustrated in the photo. The alternator belt must be removed.
The alternator belt blocks access to the timing drive parts. You will have to loosen the fastening and remove this belt.
Use a 13mm wrench to loosen the lower mounting bolt. Then unscrew the upper fastening nut and remove the bolt. The generator casing is pressed against the engine and the structure is secured with wire. The belt can now be removed. Installation of the alternator belt is carried out in the following sequence:
1
.
Secure the generator; 2
.
Throw the belt over the pulleys, as shown in the photo; 3
. Having engaged 5th gear, roll the car back.
Please be aware that reusing the alternator belt is a last resort. It would be better to buy a new part.
Replacing the timing belt
Make sure the engine flywheel has been correctly installed and secured (see above).
Then, using a “17” or “19” wrench (ICE 11183), unscrew the screw holding the generator drive pulley. The pulley itself and the protective washer are then removed. The pulley should not interfere
Now you need to weaken the downforce in the tension roller: 11186/21116 - using a “15” round key, unscrew the fastening bolt 2-3 turns. The roller will “release” the belt automatically;
The automation will work to loosen
11183
- use a “17” wrench to loosen the fastening nut. Then the roller itself is rotated clockwise. All that remains is to replace it: a new part is installed in place of the old timing belt, and that’s it. Installation of the remaining parts is carried out in the reverse order.
Basic replacement operation
To increase downforce, the outer roller assembly is rotated counterclockwise. For engines 11186/21116, an additional requirement must be met: the two rectangular marks must coincide.
Mandatory requirement for motors 11186/21116
Upon completion of installation, the marks AB and CD should also match. The drawing for them is given above.
Tightening torques
To perform installation correctly, you need a wrench with a force regulator. The value on it is set depending on the type of part: Tension roller mounting screw (11186/21116) – 17-27 N*m; Roller fastening nut (11183) – 30–36 N*m; Generator pulley fastening – 105–110 N*m. First, the tension is adjusted on the roller, and then the fastening nut or bolt is tightened. Parts from the VAZ catalog
Let's immediately look at the list of VAZ components and special tools: Tensioner roller for internal combustion engine 11183 - 2108-1006120, nut for it - 00001-0021647-21; Timing belt (11183) – 2108-1006040-10; Automatic tension roller – 21116-1006226; Timing belt (11186/21116) – 21116-1006040; Key for automatic roller – 67.7812.9573-01; Key for roller VAZ-11183 – 67.7834.9525. The tension roller of the "2108" family has two slots on one side. These slots should look “up”, that is, away from the engine.
The slots were made for special tools. It is designated by the numbers “67.7834.9525” (see list). And for automatic rollers, the key is designated differently - “67.7812.9573”. What it looks like is shown below.
The automatic roller can also be adjusted
It remains to list how the fastening bolts, washers, and so on are designated: Three bolts for the VAZ-11183 cover - 00001-0009024-11, washers - 00001-0026406-01; Timing drive cover (11183) – 21080-1006146-10; Bolts for VAZ-21116 covers – 2108-1003286-00, spring washers – 00001-0011977-73; Top cover – 21116-1006226-00, bottom cover – 21116-1006218-00. We hope no questions arise here. Imported analogues
To replace the “2108-1006040-10” belts, different components are suitable: GATES – 5521 or 5521XS; BOSCH – 1 987 949 095; DAYCO – 94089; CONTITECH – CT527; Finwhale - 2108-1006040. The timing belt “21116-1006040” can be replaced with another part: GATES – 5670XS; CONTITECH – CT1164; QUARTZ (Germany) – QZ-5670XS. Usually the choice is made in favor of GATES products. The letters "XS" in its catalog mean "reinforced".
Attention! Components from GATES (England) are most often counterfeited! From the photo you can understand what the main difference is. Beware of fakes.
Review of Manufacturer Prices
| Catalog items | Price, rub.) |
| Tensioner roller for internal combustion engines 1006120 0021647 | From 550 |
| Timing belt 1006040-10 | From 1500 |
| Automatic tension roller 1006226 | From 800 |
| Timing belt 1006040 | From 1500 |
| Roller key – 67.7812.9573 | From 350 |
| 67.7834.9525 | —/— |
| Timing belt GATES 5521 | From 1100 – 1400 |
| BOSCH 1987949095 | —/— |
| DAYCO 94089 | —/— |
| CONTITECH CT527 | —/— |
| Finwhale 1006040 | —/— |
| GATES 5670XS | —/— |
| CONTITECH CT1164 | —/— |
| QUARTZ QZ-5670XS | —/— |
*prices are current as of October 23, 2018.
Checking the timing belt
According to the documents that come with the car, the belt synchronizing the movement of the shafts has a service life of 45 thousand kilometers. However, it may fail even earlier due to increased load or insufficient attention to the car engine.
A performance check should be performed every 15 thousand kilometers. To do this, you need to remove the cover from the timing belt drive.
- First of all, check the belt tension adjustment tab: the cutout of the inner roller disk should coincide with the tab located on its rectangular plug. Even if the differences are minor, this consumable must be replaced.
- Then inspect the external part of this Lada Grant component. Make sure there are no signs of wear, oil, sludge, threads.
- At the end, the belt must be integral, without any separation into layers and fibers.
The Lada Granta has an eight-valve engine with 87 horsepower installed in the elevator housing. When the timing belt is damaged on this engine, the valves on the pistons are bent, putting you at risk for difficult engine repairs.
When purchasing the component, please note that Grant uses a 113 tooth belt that is 17 millimeters wide. Replacement
a faulty component with the proper selection won't be needed anytime soon, so examine the new part carefully before purchasing.
Automotive enthusiasts recommend purchasing Gates spare parts from the USA. The good thing is that official support can tell you the address of the nearest store where they sell high-quality spare parts. The price of a repair kit (belt and roller) is about 3,000 rubles. At the same time, you will receive a high-quality product, the resource of which is approximately twice as long as that of stock one (about 80 thousand kilometers).
Conclusion
Despite the simplicity of the algorithm for replacing the timing mechanism on an eight-valve engine, it is still better to contact a service station for professional installation. The timing belt is not a mechanism that you can skimp on the quality of tuning.
Subject to the manufacturer's recommendations and moderate driving style, the timing service life is more than 80,000 km.
Frequent breakdowns that occur are due to the fault of the owners of the technical equipment, as a result of violation of the rules for using the machine.