The engine cooling system on the Lada Kalina is quite reliable. But sooner or later, breakdowns and malfunctions in the cooling system occur. There are times when the car begins to overheat or, on the contrary, does not reach the desired engine temperature. These problems can lead to serious problems for the engine if repairs are not carried out in time. The culprit of such problems is most often the thermostat.
In this article we will talk about the thermostat for the Lada Kalina car. Below we describe the signs of its breakdown, which thermostat is best to choose and how to replace it yourself without much effort.
What is a thermostat?
A thermostat is a component of a vehicle's cooling system that maintains the recommended coolant temperature.
The main component is the valve.
Depending on the position of this valve, the liquid will flow in a large or small circle. With the help of a thermostat, the engine will not overheat as a result of constant operation over a long period of time.
In the case of winter cold, the device significantly saves the fuel needed to operate the engine. Plus, the time spent warming up the vehicle engine to the optimal temperature will be reduced. On a car such as the Lada Kalina, replacing the thermostat is necessary if, in the temperature range of +85...+100 degrees Celsius, its valve does not open.
The principle of operation is to comply with the normal laws of physics. The solid heat-sensitive element melts during the heating process, due to which the damper opens independently. The degree of openness depends, first of all, on how much the heat-sensitive element has melted. As the device operates, it determines the further path of coolant flow.
Let us remember that it can flow either in a small or in a large circle.
Optimal dimensions of length, width and weight of a trailer for a passenger car
In fact, you need to remove the thermostat in a situation where it is definitely faulty and requires replacement.
Trying to repair this unit is almost pointless. It’s easier to buy a new one, probably working, suitable specifically for your car.
Symptoms and consequences
Like any other mechanism, the thermostat can break down instantly. If this happens, the main thing is to detect the breakdown in time. Most often, a faulty mechanism can be detected when:
- increasing the amount of time required to fully warm up the power unit;
- the presence of elevated temperature in the power unit or even overheating.
The worst consequence of driving a car with a faulty thermostat is an overheated engine. There is no need to remind you once again about the consequences that overheating can cause. Therefore, we suggest that you familiarize yourself with the issue of replacing a problematic thermostat on a Lada Kalina car.
Replacement Tools
First of all, you will need a working thermostat for your Lada Kalina car. During the work, you will have to drain the coolant. In order not to look for a suitable container already in the process, we recommend taking a simple five-liter container with you. In this case, even an ordinary five-liter bottle into which artesian mineral water is poured is suitable.
Just like in the case of other cars in which the thermostat is replaced, the 8-valve Viburnum will require two socket wrenches that secure the device. In this model, the nuts have two sizes - 12 and 13. Cleaning the seat is impossible without the use of sealant. To properly install the new thermostat, take with you a special silicone-based sealant; it will work fine. Plus, you will have to take a Phillips screwdriver. Finally, the main thing you can’t do without is one and a half to two hours of free time.
Management
We bring to your attention detailed instructions for completely replacing the thermostat with a new one. Even if you don’t understand how to replace the thermostat on a viburnum, the video will help clarify the situation.
1. Disconnect the sensor from the air filter housing and remove the air filter. As a rule, it will take no more than ten minutes to dismantle it. This is done correctly like this:
- completely unscrew the 2 screws located on top, as well as the nut located on the side of the engine compartment. We recommend leaving these parts in one place so that later you don’t have to look for them separately on the market;
- remove the connector installed on the recirculation valve (it, in turn, is based on the filter housing);
- lift the valve up, and then, without disconnecting the tubes, move it all to the free side;
- by unplugging the plug from the air sensor, remove the air hose by loosening the clamp;
- Having slightly loosened and turned the air filter housing, it should come out.
3. Take a 8mm socket wrench and a screwdriver. Use it to loosen the clamps , and then remove the four hoses.
A well-pumped system will not allow liquid to spill in large quantities.
4. Take a 12mm wrench and remove the wire by unscrewing the top nut on the thermostat.
5. Now take the key for 13. There is a nut and a stud on the thermostat - you will find the first in the upper part of the housing, the second at the bottom. Try to remove the thermostat by gently loosening it.
Helpful advice: loosen the thermostat carefully, sometimes helping yourself with a screwdriver.
These actions must be performed because during operation, high temperatures literally “solder” the thermostat, causing the housing to stick. Help with a screwdriver will solve this problem.
Short scheme of actions
A simple way to check the thermostat without removing it from the car is to monitor the temperature of the radiator pipe whose inlet or outlet is blocked by the mechanism. Whether it is an upper or a lower hose will become clear after studying the design of the cooling system of a particular car. As the engine warms up, it should be cold, and when the engine reaches operating temperature, it should heat up sharply. If the tube heats up immediately or is cold even when the power plant is warm, the thermostat is faulty.
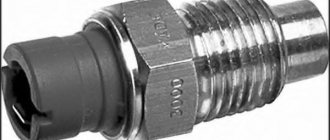
When purchasing a new thermal switch, blow into the connector directly from the seller. A complete test for suitability for installation is carried out in a pan. The part is lowered into cold water, the liquid is heated and the fact of the opening of the large and closing of the small circle at a certain temperature is established.
Sometimes the car's cooling system fails. The engine temperature arrow on the dashboard goes off scale after a few minutes of warming up. And sometimes the opposite happens - the temperature, especially while driving, does not reach the operating value of 90 degrees.
These are all sure signs that it's time to check the important device that controls coolant flow. Many people know that this completely closed assembly consists of a valve and a heat-sensitive substance. The latter, when heated, opens a large circuit - the radiator - through the coolant valve.
But how to check the thermostat, because that’s what we’re talking about, on your car? And most of all, car enthusiasts are interested in how to check the thermostat without removing it from the car? Let's try to give some advice on this matter.
Without dismantling the device, this is the only way to correctly diagnose it.
- Start the engine, then wait two minutes.
- Touch the hose directed from the device being tested to the radiator.
- If the hose is hot, the device is faulty; most likely, the valve never closes.
- If the hose remains cold even after 5 - 10 minutes of warming up, and the temperature on the panel is already more than 90 degrees, the unit is also faulty. Most likely, the valve, on the contrary, does not open.
Video about replacing the thermostat and bleeding the cooling system
The thermostat is a small but important element of the car, which allows the driver to save on engine maintenance and fuel. Essentially, the thermostat is a temperature regulator in the cooling system. Due to it, the engine warm-up speed increases, and the car maintains the desired thermal conditions during operation.
The main task facing the thermostat in a car is to prevent the circulation of coolant through a large cooling circle until the engine warms up after starting. After starting the engine, the antifreeze begins to circulate in a small circle until it reaches an operating temperature of approximately 90 degrees Celsius. Having warmed up, the coolant enters a large circulation circle and circulates through it until it cools down again (due to various reasons). Through its actions, the thermostat maintains the operating temperature in the engine, preventing it from overheating or excessively cooling.
Adjustment
Ideal operation is when the valve cover opens at a temperature of 95 degrees, but it happens that it opens at 70, 80, 85 degrees. In this case, the car moves on an internal combustion engine that is not fully warmed up. Of course, you can purchase a new device, but you can adjust it yourself. To do this, you need to grind off the stem, but this must be done with extreme caution. You need to grind down the rod a few millimeters at a time and try to start the engine. After this, check at what temperature the valve will open. Once the temperature reaches 95 degrees and the valve opens, the adjustment will be successful.
Symptoms of a faulty car thermostat
Considering the small number of functions assigned to the thermostat, it is quite easy to determine its malfunction. The fact that the car’s thermostat is completely out of order or partially fails to cope with the tasks assigned to it is indicated by the following:
The car engine slowly warms up to operating temperature or often overheats;
- After starting a cold engine, the lower radiator pipe becomes warm in 2-3 minutes or even faster;
- At the moment of acceleration, the engine temperature needle drops sharply, and at the moment the engine stops and runs at idle speed, it rises again;
- The engine is warmed up, but the lower pipe remains cold, and the engine begins to boil.
Based on the above, we can conclude that if there are problems with engine cooling, you must first pay attention to the correct operation of the thermostat.
Where is it located
There are many options for what will happen if the thermostat is constantly open on a large or small circle. This will lead to overheating, antifreeze may be released from the expansion tank, the normal pressure in the cooling system will change, and more.
This unit cannot be allowed to malfunction. It is used on all machines:
- on Kalina;
- on Priora;
- VAZ 2114;
- VAZ Classic;
- Ford Focus;
- VAZ 2110;
- Chevrolet Aveo;
- Gazelle Next;
- VAZ 2107;
- Lada Granta;
- Renault Logan, etc.
To check the serviceability of this element on a car, as well as to detect signs of a dying thermostat, you need to at least roughly understand where it is located.
I can't say it's difficult to do.
It is objectively correct to immediately look at the instruction manual. In the section where the cooling system is described, the location of the required element must be indicated.
At the same time, there is a fairly universal search method that is relevant for almost all domestic cars and many foreign cars.
To find a thermostat you need to do the following:
- open the hood;
- find the thickest pipe;
- this will be the radiator hose;
- it goes from the radiator to the engine;
- the second end of this pipe is connected to the thermostat;
- get to the second end;
- determine the location of the thermostat housing;
- start removing it.
Although I still advise you to first look at the manual, and only then start searching, dismantling and repair work.
Basic thermostat malfunctions
The thermostat is a fairly simple device that rarely fails. If you have problems with your thermostat, they are most often associated with the following reasons:
The thermostat is not expensive, but it is not to blame for all problems with engine cooling. That is why, before replacing the thermostat, you need to make sure that it is faulty.
Before replacing the thermostat, check it (without dismantling, with dismantling)
Check without dismantling
The first option is the simplest. We start the engine, wait for the coolant temperature sensor needle to start moving (the engine starts to warm up), look under the hood (do not forget about precautions: remove long hair, scarves and other hanging clothing items so that they do not get into the moving elements of the engine) and Gently touch the radiator pipes with your hand, upper and lower.
If the lower pipe becomes warm in a short time after starting the engine (less than 2 minutes at a temperature of plus 20 degrees Celsius), this means that the thermostat is stuck in the open position - the coolant immediately flows through the large circuit. The coolant will take a long time to heat up, but the stove will not heat up.
If the thermostat remains in the closed position , the needle will quickly, in just a few minutes in the summer, go up to 90 degrees. The coolant circulates along a small circuit - inside the engine cooling jacket and through the heat exchanger of the stove. The engine will overheat very quickly.
With dismantling
But first of all, about safety: before dismantling the thermostat, you are strongly recommended to wear safety glasses and gloves. Now here's what else you'll need:
- Remove the thermostat (read below for how to do this);
- Find the temperature marking on the thermostat housing at which it should begin to open. Remember this temperature;
- Take a thermometer that can measure the temperature in boiling water;
- Then fill the pan with cold water. Place the thermometer in the pan and place it on the stove;
- Place the thermostat in a pan of cold water and turn on the stove;
- If the thermostat is working properly, then when the water reaches the temperature indicated on the thermostat body, it will begin to open. If this does not happen or the thermostat starts to come off when the water temperature reaches a higher temperature, then you will have to replace it with a new one.
Purpose and principle of operation of the thermostat
The thermostat in the engine cooling system acts as a temperature regulator, accelerating its warming up and maintaining optimal operating mode. When the power unit warms up, the antifreeze flow circulates in a small circle, bypassing the radiator. Thanks to this, heating occurs faster, and wear and harmful emissions are reduced. When the temperature reaches about 95 o C, the thermostat opens, allowing coolant to flow through the radiator.
The main part of the thermostat is a mechanical valve, which operates thanks to a simple and precise mechanism. It is located in a small cylinder located on the engine side, inside of which artificial wax is placed, having a melting point of 82 o C. The use of this material is due to its ability to expand greatly and at a certain temperature to transform from a solid to a liquid state.
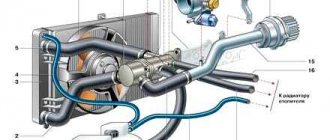
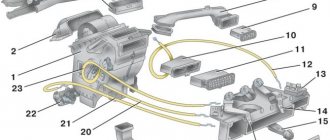
The device is part of the engine cooling system and can be located in different places under the hood depending on the model of the power unit. Its installation location is also influenced by design features and the method of implementing the cooling system. Most often, the thermostat is placed near the coolant outlet from the engine or the inlet of a centrifugal pump (pump).
Characteristics of the Lada Kalina thermostat
The thermostat is an important engine cooling system; it occupies a place between the radiator and the cylinder block of the power unit. By design, this is a housing with an automatic valve, which, when the coolant is heated to a certain temperature, opens a large circulation circuit through the main cooling radiator. By closing the large circuit when the engine is cool, the car warms up much faster when circulating through the small circuit. The wear of its moving parts is reduced, overheating is eliminated, and the volume of harmful substances released into the environment is reduced.
A working thermostat allows you to warm up the engine to operating temperature, which for Kalina is 90-95 degrees. Over time, the valve wears out, and the heater maintains a temperature of no higher than 80 degrees. A working device helps the engine quickly warm up even in severe frost. Thanks to this device, the stove on Kalina is considered one of the warmest on VAZ cars. According to experts and car enthusiasts, the best price-quality ratio is the standard thermostat produced by DAAZ. It's all about a special screw, with which you can independently adjust the valve opening temperature. It is impossible not to take into account the reliability of factory products, which in this regard are superior to most analogues.
The same thermostats are used for 8- and 16-valve engines.
Device
A car thermostat is made of non-corrosive metals - copper, brass, aluminum, or plastic. Its main element is a valve that regulates the flow of coolant. It is connected to a pin connected to a cylinder containing wax. Based on the type of housing, the following types of thermostats are distinguished:
1. Case-based, which are devices placed inside a case that has 2 or more pins, or is equipped with a two-level circuit.
When to change: signs of thermal switch failure
Abstract symptoms can indicate the nature of the disease that has befallen the thermostat:
- It is impossible to close a large circle tightly, while the rod moves and the full opening occurs. There is no wedge. This is prevented by deposits accumulated as a result of untimely change of antifreeze, mixing coolant of different classes (for example, on a Hyundai Solaris, antifreeze can only be mixed with G11), and the use of cheap or counterfeit fluids. The fact can be revealed in warm weather only through tubes. In winter, pollution will be indicated by a reluctant rise in temperature from 70°C to 90-95°C when driving on the highway, but in the city there will be no problems with warming up. Seeing such a picture, those who like to cover the radiator grille with cardboard often persuade the owner to insulate the front end. This is definitely useful in cold weather.
Types of thermostats
A car engine can be equipped with various types of thermostats, differing in the following versions:
1. Single valve. It is distinguished by its reliability and simplicity of the device, which is why it is installed on most car models.
2. Two-stage. Refers to a type of thermostat with one valve. Installed in those cooling systems where high coolant pressure is created, which is difficult for the valve to overcome. This design provides for the presence of 2 valve plates - large and small. The small one is the first to operate, as it opens easier, and when opened, it pulls the larger one, which in turn completely opens the channel for the passage of coolant.
3. Two-valve. It has two separate valves located in one body. The first is the main one, designed to cut off the circulation of antifreeze in a large circle. The second is a bypass and controls circulation in a small circle. Their operation is synchronized in such a way that when one of them blocks the circulation of coolant, the other opens the desired circuit. A similar thermostat design is widely used in cars manufactured in the CIS.
4. Electronically controlled. It features efficient and accurate operation due to the use of electronic control, but is quite complex in design. The main advantage of this type of thermostat is the provision of different temperature indicators for optimal engine operation in various operating modes. By design, this is a single-valve device with an additional heating resistance, which is controlled by the ECU. Such a thermostat maintains operating temperatures that are optimal for all operating modes of the power unit with an amplitude from 85 to 110 o C. At the same time, a decrease in fuel consumption and a slight increase in power are observed.
Common causes of thermostat failure
Knowing them, the driver will be able to prevent more serious malfunctions in a timely manner.
- The power unit heats up for too long, even in summer. At the same time, tripping and general unstable operation of the engine are observed. This will cause the antifreeze temperature regulator valve to vibrate - after a while the seat may be damaged and the wax will leak out. This disrupts the operation of the device; the valve either does not close normally or does not open.
- Antifreeze got inside the thermostat. The overall volume of the regulator internals will increase, causing the valve to open prematurely.
- A special filler that reacts to temperature changes has leaked. As a result, the regulator will operate with a time delay.
And of course, various mechanical damage that occurs over time. In this case, the valve will also not open completely, and little antifreeze will flow into the radiator, which will lead to overheating of the internal combustion engine.
Thus, it will be possible to diagnose the condition of the thermostat using the above methods. It is not difficult to carry them out, but if any difficulty arises, contact professional mechanics at the service station.
Installing and replacing the thermostat
The specificity of the thermostat design for each specific car model makes it possible to replace a failed part only with an original one, with the exception of some models that are similar and interchangeable. To replace the thermostat, you will need a screwdriver, appropriate keys and sealant, as well as a container into which the coolant is drained before dismantling the part. Work is carried out on a completely cooled engine in the following order:
- Providing access to the thermostat by dismantling individual elements of the engine compartment (air duct, battery, air filter).
- Loosening the clamps and disconnecting the supply hose from the radiator side, the pump tube and the inlet pipe from the thermostat.
- Removing the thermostat.
Installation of the product is carried out in the reverse order. If necessary, apply sealant to the joints with pipes or under external gaskets. Before installation, it is checked by immersing it in water with a temperature of about 80 o C, in which the valve should open, which indicates that the thermostat is working.
Let's get started
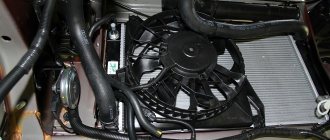
We provide ourselves with access to the thermostat; on Kalina, this may be prevented by the air filter, which we dismantle. The liquid is drained by connecting a special compressor, which pumps it through the pipe. First, of course, you need to unscrew it and remove it (the clamp). Don't forget to drain the liquid
it is also necessary to have a large circulation circle.
The thermostat is secured with a size 13 nut; the unit can also be attached to the pipes with dried sealant; it is convenient to pry it off with a screwdriver. After removing the old thermostat, clean the seat and pipes from dirt and sealant. A thin layer of sealant must be applied to the pipes; some craftsmen use a paper gasket.
Next, we install the thermostat in its place in the reverse order of disassembly. In general, the main problem in replacing this unit is the correct filling of antifreeze to avoid air locks. Therefore, after filling a small circle with antifreeze, start the engine, this will allow the fluid to pump through, at this moment add it to the required level.
As you can see, replacing the thermostat on Kalina is not such a difficult operation. It requires very little skill, an understanding of how the system works as a whole, and a couple of hours of free time.
Signs of a bad thermostat
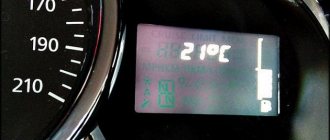
Malfunctions in the operation of the cooling system are manifested in deviations in temperature readings from normal on the sensor located in the dashboard. At an outside temperature of about 0 o C, after starting the engine reaches operating temperature under load in 5-10 minutes. If the liquid level in the expansion tank is normal, the tightness and performance of other elements of the cooling system are not impaired, then temperature deviations are due to the operation of the thermostat, which is expressed in the following symptoms:
- Long engine warm-up and rapid overheating.
- It is not possible to reach operating temperature under load, but when stopped it rises quickly.
- The air in the heater does not warm up.
- Constant overheating of the engine at any outside temperature, while the lower pipe remains cold.
- Periodic manifestation and disappearance of these symptoms.
All of the above signs indicate that the thermostat valve is stuck in the upper or lower position, as well as its incomplete closing or opening. In case of such malfunctions, the failed spare part is replaced. In some cases, you can fix thermostat problems without replacing them by removing obstructing debris or deposits from the moving parts of the device. The described symptoms allow you to diagnose a malfunction of the thermostat of all VAZ models: 2101, 2102, 2103, 2104, 2105, 2106, 2107, 2108, 2109, 21099, 2110, 2111, 2112, 2113, 2114, Niva, Priora, Kalina, Granta, Vesta and most foreign cars.
How can you modify the heater?
The new models Lada Kalina 2 and Lada Granta use a cooling system operating scheme with parallel connection of the heater radiator. Because of this, the operating temperature is reduced to 85 degrees, which is slightly lower than on previous models of the VAZ family. Many car owners seriously believe that this temperature cannot be normal - there is increased fuel consumption, as well as a decrease in the service life of moving engine parts due to premature wear. But according to experts, there is no connection between the reduced operating temperature and engine life.
The cooling system of the Lada Kalina works more efficiently thanks to a single-circuit design. Such a modernization only benefited the engine; it made it possible to change the ignition timing, resulting in fuel savings. The inertia of the thermostat is also reduced. The downside was the mediocre heating of the cabin at sub-zero temperatures. The way out of the situation is to independently modify the thermostat. Modification involves two main methods:
- shorten the rod of the solid-state temperature-sensitive element;
- replace the thermocouple.
For cars with a cable gas pedal, a heated throttle assembly from the cooling system is used. In this case, an additional circulation circle is added.
Adjusting the thermocouple rod
Shortening the end of the thermosensitive element rod will allow you to adjust the operating temperature to 90-95 degrees. Trimming is carried out sequentially in increments of no more than one millimeter. The metal is soft, so the procedure must be carried out carefully. It is advisable to reinstall the thermostat after each millimeter cut and check how much the operating temperature rises while driving.
If the result does not meet expectations, you can adjust the rod further until the arrow on the instrument panel shows 95 degrees and the air in the cabin begins to warm up faster. The method is simple but effective. Among the disadvantages, there is a slight increase in wear of SOD parts due to operation at high temperatures. If you overdo it with shortening, you can ruin the device.
Replacing the temperature sensor
The thermocouple can be replaced entirely. The Wahler brand thermostat insert is suitable for Lada Kalina: 3017.87 D (at 87° C) or 3091.92 B (at 90° C). The thermoelement is replaced as an assembly with a spring, and the device will have to be cut with a hacksaw to remove the insert. A more convenient option is to buy a thermostat from BEHR - you don’t have to cut or adjust anything
You can also use analogues from Daewoo Nexia or Renault Logan cars. Logan's thermal insert requires adjustment.
If a LUZAR thermostat is installed on Grant, then replacing the temperature-sensitive element is not possible.
Judging by the reviews of car owners who have made such modifications, fuel consumption while warming up the engine has decreased slightly.
Throttle body heating
Another way to upgrade the heater is to create an additional throttle valve heating circuit. Some drivers are trying to prevent the unit from freezing in winter in this way. The method is clearly not for beginners. It consists of drilling a hole in the cover of the device and welding an additional fitting to it, through which heated antifreeze will be discharged. The thermostat mounting studs will also have to be lengthened. The process is labor-intensive and ultimately impractical. Freezing of the throttle assembly is the exception rather than the rule, so there is no point in carrying out such an upgrade.
Repairing a stuck thermostat
Malfunctions in the operation of the thermostat may not be caused by a breakdown of its moving parts, but by debris getting under the valves, scale deposits, or failure of the o-ring. In this case, you can do without replacing the part by removing it from the car and treating it with a conventional means for removing deposits on household water heaters, similar to “anti-scaling”, boiling it for 15 minutes. If the device is working, this will be noticeable by the valve opening in boiling water. Before installing the “reanimated” thermostat, the internal sealing ring is replaced and the cooling system is flushed with special means intended for this purpose.
Check without dismantling
In fact, you need to remove the thermostat in a situation where it is definitely faulty and requires replacement.
Trying to repair this unit is almost pointless. It’s easier to buy a new one, probably working, suitable specifically for your car.
Checking without dismantling is very simple:
- First start the engine at idle;
- let it work for about 2 minutes;
- move to the engine compartment;
- feel the hose that goes from the radiator to the thermostat;
- until the sensor operates, this pipe will be cold;
- after the engine has warmed up to operating temperature, the thermostat should work;
- After this, the pipe will begin to heat up.
It is worth looking at the operating manual in advance to find out the exact temperature of the sensor response specifically on your car. The indicators are different for different machines.
If, after warming up, the large circulation pipe remains cold, the valve did not work, the device is jammed. There is also a problem if the hose begins to heat up immediately after starting.
At the same time, check the newly purchased unit. To do this, you can do without a professional tool and a remote thermometer. But you need a temperature meter designed for the heating temperature of the internal combustion engine.
The essence of the test is extremely simple. You need to take cold water into a container and completely immerse the part in it. Then begin gradual heating. Make sure that when the water reaches the thermostat response temperature, the element operates and the valve changes its position. If this does not happen, the part must be returned to the seller.
It is extremely important to choose a thermostat with a response temperature that is specified by the characteristics of your engine.
The cooling system element in question may fail for various reasons. These are factory defects, natural wear and tear, existing problems in the cooling system, incorrectly selected or old antifreeze, and much more.
Have you ever encountered similar problems? How easy or difficult was it to fix them yourself? Share your stories and opinions.
Subscribe, leave comments, tell your friends about us and ask us questions!
(
4 ratings, average: 4.75 out of 5)