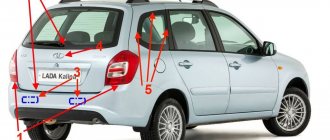
Lada Priora Station Wagon SQ › Logbook › [Solved] Leaking under the passenger mat
Detecting the Problem
I was cleaning up the car, removing the floor mats, and discovered that the front passenger floor mat was wet on the bottom. I washed the rug, waited for the carpet to dry (
15 hours), began to monitor the humidity. After the next rain it got wet again.
Finding a solution
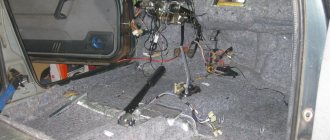
I took off the glove compartment, pulled back the carpet, everything was wet there. I broke the clips and removed the threshold (it turns out that you need to unscrew it and move it to the side so that the hinges come off the clips).
I know that the typical leak location (in the upper right corner in relation to the passenger's feet) is securely sealed with sealant, and there is little information on the Internet about what else may be leaking (I have not yet registered with drive2). Someone said that there were holes in the floor with low-quality rubber plugs, but even rolling through puddles, so much water would not have leaked into them. Let's go look!
The moisture appeared after rain, which means you need to imitate rain. I took a 1.5 liter bottle, poured boiling water so that I could feel where the water was flowing and evenly poured it over the grille between the hood and the windshield. After a while I saw where the water was flowing from in a thin, almost imperceptible stream.
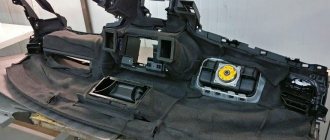
Seal from the inside is not an option. Water can accumulate and, sooner or later, flood everything in the cabin. Many scary thoughts appeared: stove? air conditioner? Do I need to disassemble everything? Hopelessness forced me to try everything, just not to remove the stove: I took the sprayer, turned it to direct jet mode, poured hot water and began to pour water purposefully on different areas under the hood. After a while I discovered that if you pour water on the connection (photo below), the water begins to flow into the cabin.
Thanks to the moisture, the gap through which water flows became visible to the naked eye. When everything around dries out, the area with the gap remains moist.
I bought the simplest white sealant and automotive degreaser, washed everything around the crack, degreased it, and carefully spread the sealant. The next day I took the sprayer again and poured water on that place in jet mode - the interior was dry.
Solution
1. Remove the carpet in the damp area. Release the metal so that you can see where the water is flowing from2. Using a water sprayer in jet mode, spray different places on the wall between the hood and the passenger seat on the hood side. See if there is a leak inside the cabin3. When the hood wall dries, look at which places take the longest to dry, and examine them for cracks4. If you find a gap, wash everything around it, treat it with a degreaser, cover it with sealant (preferably matching the color of the car), and let it dry according to the instructions for the sealant. I usually leave it to dry longer just in case5. After the sealant has dried, pour plenty of water over the sealed area again6. If there is not a drop in the interior, dry the interior using newspapers and collect
Inventory, consumables
— Screwdriver— Sealant (
160r)— Rubber spatula (15r)— Spray head with jet mode (I had it in stock, in the store about 25r)— 1.5 liter bottle (simple, from under water for 20r)— Newspapers
Tuning VAZ → Accumulates under the left rear mat!
I can’t even imagine what it could be! At first I thought I had spilled something.
I wiped it...after 3 days I looked and there was also water. What is this? You may also be interested in: * the speed drops when the low beam is turned on https://tuning-vaz.org/blog/tuning-vaz/93881.html * I turn off the car with the key from 1 to 0, but nothing happens, the engine and the instruments work! https://tuning-vaz.org/blog/tuning-vaz/93882.html * report from Novosibirsk to St. Petersburg and back, I did it https://tuning-vaz.org/blog/tuning-vaz/93883.html * the speedometer is moving. https://tuning-vaz.org/blog/tuning-vaz/93884.html * What is the moisture under the rug? https://tuning-vaz.org/blog/tuning-vaz/93885.html
- Jei_Akatov
- 04 March 2014, 04:34
- Yanka_Smirnova
- 04 March 2014, 04:39
- v
- Jei_Akatov
- 04 March 2014, 04:40
- v
- Laric_Busigin
- 05 March 2014, 04:14
- v
- Yanka_Smirnova
- 05 March 2014, 04:37
- v
- Laric_Pantyushkin
- 05 March 2014, 04:39
- v
Still, just to be on the safe side, lift up the front carpets and look, maybe there’s a puddle there too. I kept thinking that it was dry here, for fun I lifted the front carpet, and there was the sea - the ocean and everything was rotten.
The problem with water tormented me greatly and here is what I found on the net: • windshield frame; • thresholds; • internal arches in front List of leak locations in Samara In Samara, liquid can get into the cabin in the following ways. Before reading further, check to see if the reason for the appearance of water in the cabin is simple condensation. All of the following assumes that there is enough water in the cabin for small-scale fish farming. Water in the front part (up to the feet of the rear passengers) Front window seal (usually water enters from the lower corners of the glass): • if the glass seal has become hard; • the glass seal has ruptures; • drainage holes in the glass seal and windshield frame are clogged - 2 pcs. at a distance of about 5-7 cm from the lower corners of the seal; • the side of the windshield frame in the area of the drainage holes has rotted; • the frame under the glass seal has rotted; • the glass has incorrect geometric dimensions; • just such a seal. I had to deal with the last reason after replacing the windshield seal. For a couple of months after replacing the seal, there was no water in the cabin. With the beginning of autumn, after each rain we had to remove the plugs from the floor and drain the water. The location of the leak could not be found. I drove it with ice in the cabin all winter. And only in the spring, after removing the torpedo and dancing with a tambourine for two hours, I found the location of the leak - at a distance of 6 cm from the lower corner of the glass. I had to change the seal again. Everything is fine now. At the service station they said that 9 out of 10 Samaras leak in this place. Nobody knows the reason. Heater, motor shield: • the joint “stove body - motor shield” is not coated with non-hardening sealant; • two self-tapping screws of the water-reflective casing of the stove are not seated on the sealant; • “floods” the stove when the drainage holes in the swamp are clogged; • the fan casing seal is missing, torn, “stubby” or has incorrect dimensions; • rubber plugs in the motor shield (coat the wires passing through the motor shield with non-hardening sealant); • rotted or torn out studs in the engine shield; • necessarily d.b. a rubber valve is installed in the drainage hole to the left of the ball, otherwise water gets onto the speedometer cable plug and further into the cabin. Holes in the floor: • there are no rubber plugs in the bottom; • torn covers of the gearshift lever and handbrake cable; • rotten or torn out studs for securing the converter casing; • hidden “threshold-hump” holes - when driving through deep puddles; • holes in the upper part of the sill and under the trim of the rear seat sidewalls on the VAZ-2108 when driving through deep puddles. Antifreeze: • heater tap — throw it out and replace it with two pipes (I did this and don’t regret it); • heater radiator; • clamps and pipes in the passenger compartment (install NORMA clamps and tighten “hot” with a 7 wrench). Water from the rear window washer pipe. The rear window washer tube (for hatchbacks) runs in the upper right corner of the dashboard, through the engine shield and inside the right pillar up to the ceiling, inside the right roof side member. To get to it you need to (under the dashboard) either “bend” the right side of the dashboard or lie on your back at the front passenger’s feet and bend the sound insulation. It is advisable to remove the roof lining. If it is left in a “hanging” position, it can break in the middle: the line connecting the middle fastenings of the handrails is the most flimsy place. Doors: • tightness of the door, integrity and elasticity of the seal; • wires for antennas, taxi lights, etc. passing through the door seal; • drainage holes in the door; • presence of “aprons” inside the door; • integrity and softness of velvet glass; • fastenings of side rear-view mirrors; collapse branch
Lada Priora sedan › Logbook › Water got into the cabin. Consequences and solutions.
An unpleasant situation with water getting into the interior of a Priora happens to every second Priora driver, so this situation did not bypass me. I noticed this problem when I lifted the front passenger's rubber mat, it turned out to be wet on the bottom side. Pressing my finger on the carpet, I saw that it was wet. I removed the plastic door sill trim, lifted the carpet, the factory sound insulation was wet. Started drying. I dried it with a conventional heater, squeezing water out of the factory Shumka. A wet carpet with noise is half the trouble, there was also this problem:
It was decided to urgently eliminate the rust and water leaks. I bought epoxy primer, a rust deactivator “Tsinkar”, an attachment for a drill and a grinder. (I only used the attachment for a drill, it turned out to be a waste of money). I cleaned the problem area from rust, then treated it with zincar (I did 3 treatments).
After the zinc has dried, wipe the treated area with a soft cloth to remove any remaining product. Then I coated it with several layers of epoxy primer. After the primer had dried, I applied several layers of paint. Ultimately, the result of the work carried out is as follows:
Well, water flowed through the door and got inside the door at the glass seal near the mirror. I removed the door trim, instead of the factory black film, cut a new film over the entire door, removed the inner glass seal and pressed the new film with it. I tucked the film inside the door and made cuts in the film in the places where the window lifter was installed. I've been driving for 2 months now, it's dry))))) When it rains, water now flows along the film to the bottom of the door as it should and flows out of the drainage holes, as intended by the factory))). Who has the same problem, make a new film, and everything will be ok)))
Manufacturing of trunk lid casing for Lada Priora
We will talk about the luggage compartment lid, or rather about the bare metal surface of the inner side of the lid, open stiffening ribs, the opening lock mechanism and the actual solution to this flaw of AvtoVAZ. For a long time I had my eye on the same Kalina in a sedan body, which for some reason had a lid trim, or rather a casing, to hide all the unimpressive insides, but they didn’t do this on the Priora. So I decided to put it this way and eliminate it. I needed: 1. A roll of Isocom (in my case, but you can do anything...), or in other words, a pad for floor insulation, I took 1m*1m, this was quite enough, the thickness was 5mm;
This is what my base looks like
I took the average thickness - 5mm, in principle it could be thicker.
2. A roll of acoustic carpet (again, it’s up to everyone to re-tighten the future workpiece); 3. Scissors; 4. Glue (either 88 or moment - optional; in my version, moment); 5. Door clips, or, as in my version, double-sided tape M2. Work progress: 1. Place the base on the lid, use a marker to draw the future lines and outlines of the cutting shape; 2. Cut out the shape, try it on a couple more times for a more precise fit;
the resulting template is also the base.
3. Place it on the carpet (or the material you want to use) and cut it according to the template with reserves to make bends;
ready-made template on a roll of carpet.
4. Apply glue, glue everything onto the carpet, tighten it, dry it;
re-tightened finished casing.
5. After drying, we try it on, if everything fits (and it should fit everything), then I glued it with tape. If the clips, which I think are better, then you will have to drill small holes for the clips and place the device on them. After installation, my expectations were met. Here's what came out of it and what it looks like:
There are a couple of places where it turned out a little rough; it could have been rounded off a little, but, in principle, I am pleased with the work done. The look, in my opinion, has become complementary, like in foreign cars.
Repair of rear window heating threads of Lada Priora
I bought a car with one rear window heating track that was not working. It was stressful, of course, but I put up with it and went
Harm from dry cleaning
Often, after wet cleaning of the interior, an increased amount of water remains in it, which must be removed before it penetrates into the seals and heat-sound-insulating layers. You should use thick towels and plenty of napkins to remove all unnecessary condensation. The lining of the internal parts should be thoroughly squeezed and wiped with towels. Armchairs and other interior parts need to be squeezed vigorously and any water that comes out must be collected. You can use heavy tool boxes as a press. As a last resort, you can sit on a wet chair and collect the water protruding from the sides.
Some small and hard-to-reach interior items can be freed from water using a hairdryer and devices powered by a cigarette lighter. We direct a targeted flow of warm air from the devices and evaporate the moisture accumulated there.
To speed up the process of drying the car interior, you can use a vacuum cleaner. By turning it to maximum, it will effectively draw water, for example, from rugs or seats. Of course, you cannot achieve a perfectly dry surface using this method, but you can significantly reduce the level of water contained in the products.
And so that for sure
Drying without disassembling the interior does not guarantee 100% results. The fact is that soundproofing material has properties different from carpet. It resists getting wet, but when wet, it is reluctant to give up moisture, as ordinary fabrics and carpets do.
Drying the Shumka separately from the car repeatedly confirms this fact. Thus, the duration of drying a “sandwich” using fan heaters is about four days. However, the result is obvious: the material becomes completely dry, which is what is needed.
In summary, we emphasize that the best way to dry the car interior from water is to completely dismantle the carpet and sound insulation, followed by active drying with heaters. This is how you can guarantee the drying of the “sandwich”, that is, avoid the appearance of pockets of corrosion inside the machine.
What to do if there is little moisture
Of course, it is better to prevent the appearance of moisture in the car interior than to deal with it later
Motorists who pay attention to car care to avoid unpleasant consequences are no less concerned about maintaining dryness than replacing consumables
In summer, you can easily provide conditions for quickly removing moisture; to do this, simply open the windows or doors so that warm air flows circulate well. If the car is equipped with a climate control system, then in any bad weather you can organize a suitable microclimate in the cabin. The “Window Defrosting” option will help get rid of excess humidity. Of course, you should not only brush snow off your clothes and shoes when getting into the car, but also use the right mats so that moisture doesn’t have a chance in the first place. In winter, you should not use textile car mats; rubber ones are better for this period, since they are easy to remove water from. By leaving your car in a heated garage with good ventilation, you don’t have to worry about the accumulation of moisture in the cabin. Drying will not be difficult even in winter if the room is well ventilated, since the water evaporating from the heat will not settle as condensation. So, if you leave the windows or car doors open in such a garage, the problem will be solved spontaneously.
It is not always possible to provide ideal conditions for car maintenance, and this is where many car owners are faced with the accumulation of moisture in the interior, subsequently wondering how to dry the car interior under the mats. A little moisture is not as big a problem as serious wetting of the upholstery and flooring, which requires special efforts to eliminate. First of all, you should get rid of the main water by blotting the accumulation areas with any of the moisture-absorbing materials, for which dry rags, newspapers, disposable towels, diapers and other similar things that are not difficult to find are suitable. Car mats should be removed, washed and dried thoroughly. Those who have already dried rugs in winter know firsthand that the process takes much more time than in the warm season, so it is necessary to provide appropriate conditions for drying; in the cold it will not be possible to complete the task properly. Next, the carpet is raised, and most of the moisture is removed from it and the bottom using absorbent agents to facilitate subsequent, more thorough drying. Rugs or carpeting that have contained antifreeze or other chemicals require careful removal of the composition from the surface.
Motorists often use silica gel or ordinary salt to dry the interior under the mats. When choosing this option, you should not forget about the subsequent cleaning of granules and particles, for which you will need a powerful vacuum cleaner. In addition, toilet paper is often used, which also absorbs moisture well, for which it is laid out on a wet surface and changed as it gets wet. If the car is not so critically wet and there are no puddles under the rugs, drying it will not take much time and effort. In dry weather in the summer, the simplest solution is to remove the car mats and leave the car with the windows and doors open in the sun. In a few hours the problem will be resolved without your further participation. In winter, warmth and ventilation should be provided. An effective option is to use a heat gun or hair dryer
You should act carefully so as not to get burned or cause a fire. The stove and air conditioner, used in tandem with each other, will also cope with the task adequately
Having turned on the heater to blow the feet and the air conditioner to recirculate, the car doors should be closed. When the interior heats up, the water will begin to evaporate, and the vapors will not settle due to air ventilation.
How to remove the trunk trim on a Prior hatchback
You can disconnect the battery terminal, but this will reset the radio settings and LCD display information (average consumption, daily mileage, clock, etc.). It is much more convenient to do everything as follows: under the hood, in the main fuse block, pull out fuse F1 in the yellow housing (30A), after 10 seconds, install the fuse back. The “check” goes out, but the settings remain.
Do not forget that in any case (you pull out the above-mentioned fuse for 10 seconds or remove the battery terminal), a record will be made in the controller’s memory that the controller’s power is turned off. If the car is under warranty and there are questions during maintenance, explain that you removed the terminal from the battery to inflate the wheels (in accordance with safety requirements).
How to get rid of the knocking sound of the rear air stops in the trunk of a Priora hatchback
Cover the part of the pneumatic support shown in the photo with 2-3 layers of electrical tape, the knocking will stop
How to remove the seat back position adjuster on Priors
Improving the pistons of the Priora door trim
Priora generator belt tensioner
If your alternator belt whistles, it is best to tighten it quickly, otherwise you may damage the battery. The easiest way to do this is using the key below (dimensions are indicated)
Which expansion tank cap to install on a Priora
How to close the screws securing the license plate on a Priora
How to make trunk lighting for Priors, regardless of size
There are 2 wires on the standard trunk light connector:
- yellow “+”, which appears when the dimensions are on
- yellow-red “-“, constant mass
Is the glass on the door difficult to lift?
Eliminating trunk squeaks on Priora sedan
In the indicated place, coat it well with machine oil, the squeak will disappear.
For a long time I noticed various kinds of sounds and creaks coming from the trunk, which became more and more annoying over time. Over time, I did everything possible: I installed an acoustic shelf instead of the standard one (later I’ll make a short note about this) and taped the trunk cavity itself with vibration and noise insulation (I’ll also post a photo later). Now I got my hands all the way to the trunk lid... And by the way, I didn’t like that rear wiper and the presence of nameplates)))
Surely every owner of a Priora hatchback has noticed how the trunk lid rattles when you drive on a rough road)) I think it’s due to the fact that the lid itself is large and has few support points, to which it also does not fit tightly))) We’re talking about these rubber pads))
I took off these pads and cut out gaskets from ordinary wheel tubes according to their shape (at a tire shop there are plenty of them, you just have to stop by and ask))) The effect was impressive: the lid stopped rattling, but the crickets and squeaks did not go away ((.
Now about gluing and small changes)) To remove the plastic cover of the lid, you need to slip a knife under it and unclip the pistons from the lock to the sides - 4 pieces, the rest will do the same)) Next we observe a healthy wiper mechanism, which is put on 3 studs and secured with nuts. It was not difficult to unhook the wire block and remove it (the twin itself is secured from the outside with a nut). Here's what we have:
If you are the owner of a VAZ 2170, then the question of trunk soundproofing has probably never arisen in your mind. But if you have a VAZ 2171 or 2172, then soundproofing the Priora’s trunk is simply necessary for a comfortable ride and spending time in the car’s interior.
It’s worth saying right away what points you need to pay special attention to when installing sound insulation. The stages of the technological process for soundproofing the trunk in all cars, regardless of their model and type, are approximately similar. But in order for sound insulation to be carried out efficiently, each specific case should be approached individually.
ATTENTION! A completely simple way to reduce fuel consumption has been found! Don't believe me? An auto mechanic with 15 years of experience also didn’t believe it until he tried it. And now he saves 35,000 rubles a year on gasoline! Read more"
Soundproofing the trunk of a Priora hatchback begins with removing the trim inside the trunk itself. In addition, the side and center shelves must be removed. The trunk roof trim is also removed. After this, you should thoroughly wipe the entire working area, for example, with White Spirit, degreasing and cleaning the surface from dust and excess debris.
The most optimal and simplest option for installing sound insulation is considered to be the option in which sound insulation is made using layers. Soundproofing the Priora with your own hands will thus take you no more than 10 hours of work. The necessary materials will be the following:
First vibration-isolating layer
Following the standard trunk noise insulation scheme, the first layer means covering the surface inside the trunk with vibration material. The highest quality vibration-absorbing materials are considered to be materials from STP and Shumoff.
First, you need to cut several sheets of a certain size and shape from a single sheet of vibration-isolating material, and then slightly warm up the bitumen side using a technical hair dryer.
Then the heated sheets of vibromaterial are carefully laid on the cleaned and degreased trunk frame and carefully rolled out with a hard roller made of iron or plastic.
After the first sheets fill most of the trunk area, the next sheets of vibration material should be prepared in the same way. They must be overlapped.
As a result of the manipulations performed, the metal surface of the body should be covered by 55-100%, depending on the material used.
Second soundproofing layer
The second layer of sound insulation is designed to suppress unnecessary sounds and retain heat, depending on the material used.
The basic principle of operation at this stage is to glue sound-absorbing Accent and heat-insulating Splen on top of the vibration-insulating material. Both materials have a self-adhesive base, so their installation does not require significant effort and special knowledge in the field of sound insulation. It is necessary to cover the surface with soundproofing material 100%. The only exceptions are technological openings, namely ventilation openings. Only in this case will it be possible to achieve the greatest effect.
The final stage of soundproofing the trunk
In order for the soundproofing of the trunk to be most effective, at the final stage of the technological process it is also necessary to soundproof the plastic in the trunk. Following the algorithm described above, the trunk roof lining is made heavier, which is subsequently covered with bitoplast. Then all wiring is wrapped in Anti-creak. And to avoid unnecessary squeaks, the side shelves and plastic linings of the window mullions are also glued with modelin.
Do not forget that the sound insulation of the Priora will be effective only if the sound insulation was carried out not in one of the components of the car, but in the entire car as a whole. If you soundproof one trunk, you will certainly notice a certain difference. But things will be completely different if your iron “horse” is soundproofed in all parts of the car.
It is necessary to purchase materials and acquire tools in advance.
Materials for sound insulation
Vibration insulation, sealant. A special material that needs to be heated before use.
Sound Absorber
Sound wave display. Displays sound waves in their original direction.
Anti-creak
Used to eliminate squeaks that occur between body elements, trim, suspension parts, etc.
It is better to start the process of finalizing the standard sound absorption system of the Priors with simple elements - the hood, for example.
How to soundproof doors
To perform soundproofing of Lada car doors, you need to remove the handles and trim material. Eliminate the stock version. Then clean the surface from dirt and degrease. Before use, warm up with a hair dryer. It is applied to the surface in separate elements. Make sure all wires fit freely into the holes. Next, you can apply vibration insulation and sealant to them. A noise absorber must be placed on top. Glue anti-creaking on the border of the material. Reinstall the trim and handles. Start soundproofing the Priors from the front doors, then the rear ones. The anti-corrosion coating should not be damaged.
Layer sound insulation technology
There are several execution methods. The most popular method is to perform the procedure in layers. The implementation technology is carried out in several stages. To carry out this you will need several types of materials. The vibration material is attached to the inner surface using an adhesive. Before this, the base is cleaned, degreased, and free of corrosion damage. The standard upholstery is dismantled.
First layer of vibration isolation
It is necessary to prepare the surface. Determine the required sheet size. The larger it is, the fewer joints you will end up with. Before use, the material is heated with a construction hair dryer on the side where it is treated with bitumen. Then the layer is applied to the base, fixed and straightened using a roller. To obtain a better result, it is recommended to use another layer. Lay it out overlapping. Depending on the quality of the chosen substance, the area that needs to be covered depends. On average it is 50-100%.
Second layer of sound insulation
At this stage of sound insulation, the inside of the element is lined with materials that have the ability to absorb and reflect sound waves. The first layer “absorbs” the noise, the second reflects it and returns it to its original position. Splen and Accent cope well with this task. They have an adhesive base with which they are fixed. Quickly applied, no need for base preparation or surface treatment with a solvent. The entire surface is completely covered.
The final stage of sound insulation
Owners of Lada Priora and other models of domestic vehicles often ignore this stage. In AvtoVAZ cars, window lifters often get stuck and break. To repair them, you will need to completely remove the installed sound insulation.
Mechanics recommend that before upgrading or modifying the sound absorption system, you need to contact the studio to diagnose and fix problems that cause extraneous sounds.
Materials
The set for Priora to eliminate unnecessary sounds depends on the amount of work. To complete all three steps you need:
- vibration isolation 3-4 sheets;
- splen 6-7 sheets;
- bitoplast about 3 liters;
- modelin 2-3 liters.
Tools
- Before work, prepare the necessary tools.
- stationery knife, scissors;
- roller;
- construction hair dryer;
- Screwdriver Set;
- a set of keys;
- sandpaper;
- cleaning agent, water, rags;
- degreaser, solvent.
Roof
The roof and hood of the Lada Priora are the easiest elements to start working with. The standard sound insulation of the ceiling of a Lada Priora car consists only of upholstery. The work begins with preparing the base by dismantling the factory cladding. One can be removed through the rear door or through the luggage compartment. The adjacent plastic covers are also removed. The surface is cleaned of dirt, dust, and treated with a solvent or degreaser. Allow the surface to dry. Prepare a piece of insulating material of the required length, a hair dryer, a knife, and a roller. Try to minimize the number of segments. Preheat the sheets with a hairdryer. When the surface warms up and becomes sticky, fix it on the ceiling. Roll with a roller. Next, apply a layer of material that absorbs sound waves. Splen is most often used. It retains heat well and has an adhesive backing. It is not difficult to fix it on the ceiling of the priors. Splen is applied to the entire surface. To consolidate the insulating effect, you can supplement the cladding with a layer of bitoplast.
After finishing, the upholstery is installed in the reverse order. Keep in mind that the thickness of the layers of noise-absorbing material of the Prior should not be too bulky. Otherwise, the bolt holes for the passenger handles will not line up. In general, for a prior you will need 2 sheets of splen, 2-3 sheets of bitoplast, 2.5-3 sheets of insulating material.
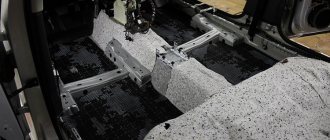
Cabin floor
The sound insulation of the floor is most noticeable. It is carried out in several stages. Before starting, make sure that the car is in a bright, warm room. When dismantling interior elements, to avoid confusion, place all fixing bolts and nuts in the appropriate sequence. This will help restore them without unnecessary problems.
Soundproofing stages
The front and rear row of seats are removed. The central tunnel is being removed. Remove plastic trim and floor covering. Clean the surface from dirt and treat the interior with solvent. The first layer is a heated vibration-isolating layer. Roll over the top. The next layer of material is overlapped. Instead of this material, mastic made from bitumen is suitable. There is no need to cover technical recesses in the floor. Application of splen or bitoplast. They are applied to the entire surface of the floor by priors. To avoid rattling, it is recommended to weigh down plastic elements with pieces of noise-absorbing composition. Cover the joint area with anti-squeak. Install factory sound insulation on the Prior floor.
Sound insulation of Priora arches begins with the removal of the fender liner. Thoroughly wash away dust and dirt with a stream of water, and wash with a rag soaked in a solution of detergents. The splash guard and surrounding area need to be cleaned. Prepare a solution based on mastic. Carefully apply with a spatula to the surface at a room temperature of +15 to +35. The method is considered more effective for this part of the Lada Priora car. Mechanics recommend insulating arches on both sides - outer and inner.
Trunk
Particularly relevant for Priora hatchbacks and station wagons. Soundproofing the trunk begins with removing the flooring of the interior space and the trunk lid. The surface of the body is cleaned, washed, treated with a degreaser and solvent. Soundproofing of the Lada Priora trunk is carried out according to the standard scheme. A vibration-insulating base is applied in two layers, which is preheated to a sticky state. Then splen and bitoplast are laid. The layers are rolled with a roller.
It is especially important to perform high-quality sound insulation of the luggage compartment arches. It is worth paying attention to plastic elements. The holes must be left open. The wires are insulated with anti-creaking, and the plastic parts are made heavier.
Hood and engine
Sound insulation of the engine compartment of the Lada Priora
Sound insulation of the hood
In addition to the standard set of materials and tools, you will need factory insulation with clamps. Clean the surface, treat with solvent, and dry. The first vibration-isolating layer, preheated. Roll it out with a roller, then lay the splen. The next layer is standard insulation.
Water in the trunk of a Priora
If earlier climatic conditions were more stable, now the weather never ceases to “delight” us with its changes. Either the heat is unbearable, or the rain does not stop for weeks, which often leads to various floods. The rains are so long and heavy that city streets turn into seething streams.
And real rivers become so overflowing due to heavy rainfall that they overflow their banks, flooding everything in their path. Not only people suffer, but also their property. Quite often, such rains affect cars; water can be unexpectedly found both inside the car and in its trunk.
Russian cars are not highly sealed, so dust, dirt, and water in the trunk of a Priora are a fairly common occurrence. There may be several reasons for this.
— The gap between the trunk and the lid exceeds the permissible standards. This may be due to the cover being displaced or deformed. By eliminating this gap, you will achieve a sealed trunk.
If the cover is displaced, then simply adjust its position through special holes. If deformation occurs, straightening will be required. The result of your actions should be a reduction in the gap and a smooth, unhindered lifting of the luggage compartment.
— The rubber seal on the lid is cracked and unusable. In this case, simply remove it and install a new one.
If water is still found in the trunk of the Priora sedan, then first of all you need to immediately remove the mat and dry it thoroughly, and then find and eliminate the cause of its appearance. In a Priora hatchback, water may be observed in the trunk due to leaky built-in ventilation under the lights. This reason can be eliminated by securing the plastic rectangles with sealant.
If the problem was not limited to a simple puddle in the trunk, and contact with water was closer and longer, then the result may be disappointing. Often the car is simply scrapped, but if the car was partially submerged in water and the water was more or less clean and fresh, then you can try to save it.
You should not try to start the engine until all contaminants are completely removed and the car is dry, as this can only worsen the situation.
First, determine where the water was able to reach. If there is water in the trunk and interior of the Priora, then proceed to drying and cleaning as quickly as possible so that the parts do not become deformed from high humidity and mold and mildew do not develop. For faster results, remove all floor mats and, if necessary, remove seats.
The biggest problems will come from contact of water with electronics. It is very sensitive to moisture, even a small amount of water can cause irreparable damage. Most will have to be completely replaced, but even this does not guarantee that after some time the problem with the electrical system will not arise again.
What to do if water gets into the engine?
Let's start with what not to do. Definitely forget about trying to start the engine before inspecting it. If water gets into the cylinders and you try to start the engine, a water hammer will occur. And this is an almost 100% guarantee that your budget will decrease by a decent amount due to the need to purchase a new “heart” for your vehicle. After all, the consequences of water hammer are:
- the piston group requires complete replacement (optimistic outcome);
- The cylinder block is damaged (engine repair is not advisable from the point of view of material costs).
The water hammer itself occurs at the moment when, during operation, the piston rests against a “water plug” on the compression stroke (due to the fact that water itself is incompressible). At the same time, the pressure in the cylinder increases multiple times. The crankshaft continues to rotate, breaks the piston fingers, and bends the connecting rods. By the way, the cylinders may also not be able to withstand excessive pressure and rupture.
And if for gasoline engines there is still an option to get away with only replacing half of the parts, then a diesel engine will most likely have to be replaced completely (diesel engines initially have a higher compression ratio and a smaller combustion chamber compared to their gasoline counterparts)
Checking the engine for water
Of course, if the car spent some time under water, then water got into the engine with a 99.9% probability. If you don’t take this apocalyptic option, then to check:
- Check the air filter. If it is wet, you need to disassemble the intake system and remove water from all its elements. It may be necessary to remove the intake manifold and sometimes the cylinder head.
- Look at the oil dipstick. If there are traces of water on it, then it is necessary to change the engine oil. If this measure is neglected, the friction surfaces may suffer significant damage, even causing the motor to jam.
- If possible, turn the engine by hand using a wrench. If there is water left in it, then the arm strength will not be enough to break anything, unlike the starter.
- You can make sure that the crankshaft is turning in another way - for example, roll the car for a couple of meters with second gear engaged. If the car is rolling, you can breathe a sigh of relief - engine replacement is postponed (cylinders and pistons are in order).
Once you have done this initial check of the engine for the presence of water in it, and if everything is normal, then we move on to the next stage of the engine performance test after swimming.
Checking the ignition system
If you wet a match, it will not light or will spark before producing an even fire. The same can happen with the ignition system in a car. Therefore, carefully inspect all parts of the system and remove moisture.
Relationship between weather outside and water inside the car
During the wet season, water constantly gets into the car interior along with shoes and clothes. After some time, the water flows onto the floor of the car and begins to slowly evaporate. At the same time, a layer of condensation and an unpleasant odor form on the glass.
To speed up the process of water evaporation in this case, you will need to turn on the heating devices to maximum when getting into the car. They must be kept in this state for several minutes, and sometimes for about an hour. Heating devices include anything that will emit an increased amount of heat, and this includes, in addition to the stove, various heated windows and seats. To increase drying efficiency, you should wipe the glass with a dry cloth after a while.
To minimize damage from condensation in wet weather, it is worth limiting the flow of air from the street through ventilation devices.
It is worth noting that a bag of special salt can effectively combat moisture introduced with clothing. By placing such an item in the cabin, it will begin to intensively absorb excess condensation. However, you should not forget about it, and after some time it will need to be replaced or dried on a warm radiator.
A folk remedy for dealing with water from shoes is:
- laying out newspapers,
- towels,
- installation of special rubber mats on the car floor.
They significantly reduce the content of condensation in the cabin by absorbing water. However, you should remember to periodically throw wet objects out of the car. It is best to do this in a warm garage, since if you go out into the cold, the water will quickly freeze and the paper will most likely stick firmly to the carpets.
Sound insulation of LADA Priora trunk
If you are the owner of a VAZ 2170, then the question of trunk soundproofing has probably never arisen in your mind.
But if you have a VAZ 2171 or 2172, then soundproofing the Priora’s trunk is simply necessary for a comfortable ride and spending time in the car’s interior. It’s worth saying right away what points you need to pay special attention to when installing sound insulation. The stages of the technological process for soundproofing the trunk in all cars, regardless of their model and type, are approximately similar. But in order for sound insulation to be carried out efficiently, each specific case should be approached individually.
ATTENTION! Now you can buy a completely new Pioneer MVH X580BT processor radio for only 2990 rubles! Don't believe me? Then follow the link and see for yourself! Read more"
Soundproofing the trunk of a Priora hatchback begins with removing the trim inside the trunk itself. In addition, the side and center shelves must be removed. The trunk roof trim is also removed. After this, you should thoroughly wipe the entire working area, for example, with White Spirit, degreasing and cleaning the surface from dust and excess debris.
The most optimal and simplest option for installing sound insulation is considered to be the option in which sound insulation is made using layers. Soundproofing the Priora with your own hands will thus take you no more than 10 hours of work. The necessary materials will be the following:
First vibration-isolating layer
Following the standard trunk noise insulation scheme, the first layer means covering the surface inside the trunk with vibration material. The highest quality vibration-absorbing materials are considered to be materials from STP and Shumoff.
First, you need to cut several sheets of a certain size and shape from a single sheet of vibration-isolating material, and then slightly warm up the bitumen side using a technical hair dryer.
Then the heated sheets of vibromaterial are carefully laid on the cleaned and degreased trunk frame and carefully rolled out with a hard roller made of iron or plastic.
After the first sheets fill most of the trunk area, the next sheets of vibration material should be prepared in the same way. They must be overlapped.
As a result of the manipulations performed, the metal surface of the body should be covered by 55-100%, depending on the material used.
Second soundproofing layer
The second layer of sound insulation is designed to suppress unnecessary sounds and retain heat, depending on the material used.
The basic principle of operation at this stage is to glue sound-absorbing Accent and heat-insulating Splen on top of the vibration-insulating material. Both materials have a self-adhesive base, so their installation does not require significant effort and special knowledge in the field of sound insulation. It is necessary to cover the surface with soundproofing material 100%. The only exceptions are technological openings, namely ventilation openings. Only in this case will it be possible to achieve the greatest effect.
The final stage of soundproofing the trunk
In order for the soundproofing of the trunk to be most effective, at the final stage of the technological process it is also necessary to soundproof the plastic in the trunk. Following the algorithm described above, the trunk roof lining is made heavier, which is subsequently covered with bitoplast. Then all wiring is wrapped in Anti-creak. And to avoid unnecessary squeaks, the side shelves and plastic linings of the window mullions are also glued with modelin.
Do not forget that the sound insulation of the Priora will be effective only if the sound insulation was carried out not in one of the components of the car, but in the entire car as a whole. If you soundproof one trunk, you will certainly notice a certain difference. But things will be completely different if your iron “horse” is soundproofed in all parts of the car.
One of the best radios in its segment. It is a diskless receiver that rationally uses the manufacturer’s developments in the field of digital audio processing. This is a full-fledged processor device, designed taking into account the needs of modern car enthusiasts. More details at the link.
Where does water get into the car interior, how to remove this water and dry the carpets
The harsh weather of our latitudes inevitably leads to water entering the car interior. In winter, snow constantly gets into the cabin, in spring and autumn water, and in the off-season, completely incomprehensible slurry.
Water can enter the cabin for the following reasons:
- Together with the passengers,
- Through gaps and poor quality rubber seals,
- Remain after wet cleaning of the car interior
- By electrical wiring
- Poorly angled windshield
- Poor waterproofing of door trim
- Poor alarm installation
Due to the large amount of condensation in the car interior, the windows begin to sweat, puddles form underfoot, and an unpleasant musty smell is felt. However, these unpleasant moments are minor compared to the intense processes of corrosion of the car body. Some unpleasant “wet” situations in the cabin can be eliminated at home, but solving others will require qualified help from specialists.
Many car users, during bad weather, and as a result, increased condensation into the interior, are advised to leave the car in a warm garage with the doors open and the rugs pulled out as often as possible. This simple measure will significantly remove water from your car. However, not all car owners have the opportunity to put their iron horse in a warm place.
Thus, in the article we will present the most common causes of water accumulation in the cabin, as well as measures to solve this hated problem.
Advertisements on NN.RU - Auto
Power take-off boxes Kamaz, Maz, Ural, Kraz, Gas, Zil Dispatch on the day of payment. Sending by transport companies. We work as with. Price: 18,500 rub.
Extend the chassis (frame) on Gazelle Next, Gazelle farmer under a body of 4.2 m, 5.1 m and 6.2 m. Extend the frame on Gazelle Next, Gazelle Gas 3302. Price: 25,000 rubles.
A wide selection of hydraulic pumps and hydraulic motors of all series: spline hydraulic pump of right rotation. It is used in road construction and... Price: 1,000 rub.
Lengthen Gas 331043, 331063 Valdai-farmer for installation of a body 5.1/6.5 m. The chassis is lengthened by increasing the wheel size.
Let's dive in
It also happens that the car is seriously filled with water, for example, overcoming deep puddles or ponds, a significant amount of water spilled in the cabin itself, and all sorts of other extreme situations.
In this case, serious disassembly of the interior of the car is required, since the initially accumulated water must be drained, and then the entire sound insulation, which is very reluctant to part with condensate, must be dried.
To drain water, cars have special drain holes, which, as a rule, are located under the feet of all passengers. Their more specific location can be found in the instruction manual.
When disassembling the interior, you should carefully lay out the removed products so that during assembly no questions arise: what is this?
Thus, even after a severe flooding of the car, you can avoid the formation of mold, and as a result, an unpleasant odor inside the car.
Where does water come from?
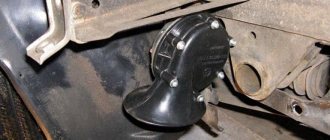
Water can be poured through the stove air intake (depending on the model, it appears both on the left and on the right side of the tunnel at the feet). In such a situation, you need to clean the drain holes in the engine compartment, and then coat the joint of the body and the air duct with sealant . If the liquid is from the side of the stove, then first of all it is worth checking whether it is antifreeze (the faucet often leaks simply through clamps and pipes or the heater radiator). The heater can also leak through the engine.
This is where water can flow into the Hyundai Accent
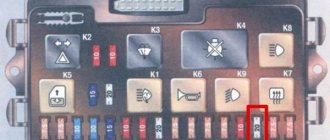
It is possible that water may leak through the gasket in the mounting block and fuse box. Also, in domestic cars, liquid leakage through the windshield frame can occur ( water leaks in the corners ). This situation can arise for several reasons:
- First, the drain holes may be clogged (they need cleaning).
- Secondly, the seal may not adhere tightly to the glass (due to drying out or cracking).
- Thirdly, perhaps the formation of a gap between the glass and the body.
Water under the driver's mat of the Priora
1200 rub. for the photo report
We pay for photo reports on car repairs. Earnings from 10,000 rubles/month.
Write:
Recently, drivers of Priora, and already Kalina (VAZ 1118), have begun to deal with the problem of water penetrating into the cabin, which collects under the driver's seat mat. This problem is not caused by a large defect in the velvet lock. Namely, the velvet lock on the driver's rear view mirror (outside the car) is not fastened. At the factory, the velvet lock was not fully installed on the door and water penetrates through the door trim onto the door seal, where it then collects in large quantities under the mat. This problem can be corrected very easily - use a rubber hammer to drive the velvet lock into place.
Hello everyone! In general, my struggle with water in the cabin has been going on for a long time and every time I find new places!
1st Wet floor - Cause:
The lack of curtains in the doors caused it to flow through the clips through the door.
— Solution:
I cut out “curtains” from polycarbonate and put them in place - it helped!
2nd Wet floor - Cause:
The plugs on the bottom, apparently a little tired and began to leak a lot
- Solution:
All the plugs were sealed
3rd Wet floor - Cause:
The clutch cable was leaking through a torn boot
- Solution:
I covered the plug with silicone sealant And so I thought I had won this a sad problem, because I’m just tired of blowing up the interior every time.
But!
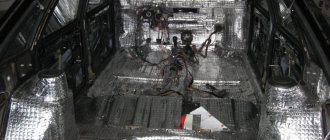
Recently, I discovered that there was a ton of water under the rug again, and I dismantled the interior again; the floor insulation was no longer feasible to dry; it was rotten and went to waste.
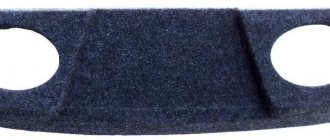
A friend suggested that such a problem was caused by the front arch plug
supposedly water gets in there and flows through the seams, I took it apart and looked, in fact they were barely holding on and there was dirt inside the cavity, I washed it, bought new plugs, put them on sealant + covered them with several layers of mastic on top!
I decided not to collect the floor yet, it will probably come out somewhere else... The current state of the roads, one might even say rivers, not roads, helped me! I took a ride and looked and found leaks again in the same place! I don’t know what this part is called correctly, either the front arch or some kind of arch cavity. In general, you can see it in the photo! Now the actual question!
Where can water get into this cavity if the hole is tightly sealed?
Or is it flowing from the top where the frill is? Because You are not logged in. To come in.
Because you are not a trusted user (phone number is not verified). Enter and confirm your phone number. Read more about trusts.
Because The topic is archived.
Damp carpet in the back of a Priora
Yes, nothing gets wet after washing. when there is heavy rain in the car there is a flood
Not enough information ! what was done to find where the water comes from
priora 050, August 5, 2011, 11:34 pm
Yes, nothing gets wet after washing. when there is heavy rain in the car there is a flood
sedan or hatchback in general?
pgs42, August 5, 2011, 11:28 pm
I took apart the plastic in this place
pgs42, August 5, 2011, 11:40 pm
Not enough information ! what was done to find where the water comes from
Like I filled my mouth with water.
Koss, August 6, 2011, 08:43
Well, of course, brew it, and then roll it with bitumen and paint it on top in 5 layers with a roller, and thicker. Everyone does this, especially on new Priors.
In general, you need to disassemble all the plastic from the side, it’s better to remove the seat so that nothing gets in the way, look at everything, if it doesn’t work visually, although there should at least be some smudges. Then put a hose with water on the roof and sit there pretending to be heavy rain, maybe somewhere it really is rotten or poorly welded, or the seals don’t hold. It would be nice to see the bottom too.
In short, you need to watch it, and it’s better not to be alone.
ps: on my 21090 there was a leak in the trunk, I removed the plastic, sat in the trunk with the seats unfolded, and a friend methodically doused the car with a hose, it turned out that there were a couple of cracks near the headlights, a little sealant, and everything was fixed.
priora 050, August 5, 2011, 10:06 pm
Tell me what to do when it rains, the carpet on the passenger side gets wet. and seat belts. Lada Priora
This is the norm for VAZ. Forget it and live with it.
priora 050, August 5, 2011, 11:34 pm
Yes, nothing gets wet after washing. when there is heavy rain in the car there is a flood
Can't be! I do not trust you.
Lada is completely waterproof!
there are nylon plugs under the bottom and water gets in through them
Tail Gunner, August 6, 2011, 3:47 pm
This is the norm for VAZ. Forget it and live with it.
Well, I don’t know... in Kalina I have dry wood. maybe that's it for now.
Tell me what to do when it rains, the carpet on the passenger side gets wet. and seat belts. Lada Priora
under warranty, a repair engineer came to the salon and showed how loosely the upper part of the door fits against the arch seal and said that this happens to every tenth person (so we are both “lucky”) and the only way out is to bend and press the door or it’s easier (but more inconvenient) to stick another cut seal along the edge of the door itself like this
Actually, it's a marriage. They must replace the MACHINE if they cannot fix it. I would look for a lawyer, not the source of the flood. And he would have bent over the engineer right at his workplace.
Are you missing Bunny?
No, morally. So I’m not interested in guarantee providers in this regard.
There are several reasons and they are all at the door:
1. It leaks from above, then water can be seen on the rugs, seats, and door trim.
You need to move the top hinge of the door closer to the body.
2. This option is more common.
Water gets inside the door onto the upholstery, then onto the rubber seal (it is pressed against the door, there is nowhere to stick) from it under the plastic threshold under the rug and carpet and it is not visible. Although, if you opened the door and saw a little water on the rubber seal at the bottom (the rest of the water is already in the cabin), that’s it.
I put it in the place where I added it and put it inside the door because the seal is below the door trim. Now get hurt
By the way, on foreign cars the doors are completely sealed with cellophane to prevent water and dust.
Thank you in advance for your detailed answers.
| Sergio | 11.07.2013 14:42 |
| TER | 11.07.2013 15:11 |
| Sergio | 11.07.2013 15:16 |
| moydodyr | 11.07.2013 15:24 |
| Vitalek_93 | 11.07.2013 15:30 |
| Vovan the Harsh | 15.07.2013 17:07 |
Patriot, not worth selling, just needs to be disassembled and dried! Take off the seats and carpet and just dry it, at the same time you’ll spill Movil on the sills and underbody, you’ll need two cans! If there is no Shumka, then at the same time you will glue vibration and noise insulation, instead of the cotton wool that is there, it is better to put splen because The cotton wool that stands there serves like a sponge after winter, it absorbs moisture and as a result the floor rots, it’s better to get rid of it!
Good luck with your drying!
| Sergio | 15.07.2013 17:25 |
| Vovan the Harsh | 15.07.2013 18:11 |
| Vitalek_93 | 15.07.2013 18:16 |
How many years does it take to do something to a car for the floor to rot? But all this crap, thoroughly spilled, carpet, upholstery, etc. Spilled with who knows what, sushi or not sushi, it will still begin to mold and rot, with a corresponding smell.
By the way, is another important point the headlights are flooded?
| Vovan the Harsh | 15.07.2013 18:31 |
How many years does it take to do something to a car for the floor to rot? But all this crap, thoroughly spilled, carpet, upholstery, etc. Spilled with who knows what, sushi or not sushi, it will still begin to mold and rot, with a corresponding smell.
By the way, is another important point the headlights are flooded?
| Vitalek_93 | 15.07.2013 18:41 |
| Vovan the Harsh | 15.07.2013 19:02 |
| Vitalek_93 | 15.07.2013 19:06 |
| Vovan the Harsh | 15.07.2013 19:09 |
| YURII.N | 15.07.2013 23:55 |
| Jenek62 | 16.07.2013 00:12 |
Patriot, not worth selling, just needs to be disassembled and dried! Take off the seats and carpet and just dry it, at the same time you’ll spill Movil on the sills and underbody, you’ll need two cans! If there is no Shumka, then at the same time you will glue vibration and noise insulation, instead of the cotton wool that is there, it is better to put splen because The cotton wool that stands there serves like a sponge after winter, it absorbs moisture and as a result the floor rots, it’s better to get rid of it!
Good luck with your drying!
| Vovan the Harsh | 16.07.2013 01:00 |
| 0_Mikhail_0 | 14.04.2015 00:05 |
| Current time: 18:46. Time zone GMT +4. |
Hi all. Where could water be coming from under the rear left carpet?
Will the forged disk 15×6 fit normally?
by Adminrive · Published 04/16/2013
Which companies should I buy a melted filter from?
by Adminrive · Published 04/03/2015
Has anyone encountered this problem?
by Adminrive · Published 06/04/2017
42 comments
- Comments 42
- Pingbacks 0
the plug in the bottom probably fell out or dried out
The same crap, most likely through holes in the floor, there are plugs there. There is water under both, who knows how to dry it out
Alexey, I’ve been in the wind for two days with the doors open
Yes, it seems to me that we need to take it apart, there seems to be a Shumka (rag) lying under the carpet, it will dry out like hell, but the smell is not pleasant
Alexey, the whole interior will have to be dismantled (((
Pavel, the bitches made holes in the body
There’s a lot of water, even if you think logically, that much water won’t get through the ventilation hole, the seal is most likely leaking somewhere
it'll rot like hell. I have less under my driver's license after winter. just kind of wet. newspapers put absorb moisture
Ilya, the mat itself is dry, there are no smudges
Artemy, I have both under the driver and under the rear passenger
Alexey, that’s for sure, there’s water there and it’s also blowing through the belt
damn the same crap(((I dried it for 2 days(and got wet again(((
Pavel, damn, there’s a lot here, it’s impossible to push so much through the hole
Ilya, Idk, I think I looked at everything
Pavel, you have to do whatever you like, start with less, remove the back seat, fold the carpet as far as possible, maybe something will become clearer)
Ilya, I’ll do it at work tomorrow
Here from the plug, I’ll put it on the sealant for the hell of it
Denis, are there any plugs on the front?
Pavel, my front is dry
Pavel, I put the gun on, I’ll dry everything and get to work
Denis, it’s right under my front seat. It may have spread
fucking even worse, I'll have to take everything apart
Pavel, or try putting a sealant plug on the bottom
Denis, thanks, I'll try it
Pavel, but if you put it on the bottom, the plug will fit onto the black piece of garbage, I cut it out where the plug is so that it fits snugly
Tags: water on the mat, Priora, through the trim
Comments 38
I actually got it from a weld seam, there is a blog entry, I was tired of looking for a leak, I didn’t even expect this.
Water penetrates through the velvet panels, enters through the technological holes onto the door trim and along it into the interior. I had the same problem, it was solved by soundproofing the doors.
maybe the holes at the bottom of the door are clogged
No, everything is fine there, the water flows down the casing
For me, this problem was solved only by installing additional seals. When I removed the sheathed oilcloths for the first time, they were all in place and well glued, and there was a puddle on the right front carpet.
Additional ones that fit on the bottom of the door?
Inter-door Chinese, d-shaped in different sizes in the openings. Another goal was to remove unnecessary noise.
Water gets on the glass, drips onto the trim, and onto it from the interior. This happened today. All due to the fact that there is no factory cellophane in the door.
Yes, the fact of the matter is that I’ve already glued everything in place) I’ll disassemble the door, and I’ll ask my brother to pour water on top)
Change the rubber seals on the doors and at the top of the roof
Water gets in through the door, it’s unlikely that the seals are to blame
Then, as they wrote, take apart the casings, and let someone pour water, and you look))) that’s the only way you’ll find out
What the hell is this with cellophane? Out of 4 of my cars, only one has these films; before this, not a single car had them, and nothing stuck (both classics, and Nine and Ten)
on the classic and on the nine, the doors have a slightly different shape, but here the door is convex. On the 099, I also have no maple and everything is fine, the rain doesn’t get in.
2110 was also without film
on the classic and on the nine, the doors have a slightly different shape, but here the door is convex. On the 099, I also have no maple and everything is fine, the rain doesn’t get in.
Well, on 10 it didn’t work for me, and there was no film
Well, I think there’s also a different door seal, it’s cut. And on the Prior it is solid.
Well, it’s different for everyone, even on exactly the same cars, for example, for me, nothing leaks through the valve vent at the back, everything in the drain is not sealed, who is he struggling with this again?
AviaTor-KU is absolutely right 100% I also had a lot of trouble from these oilcloths. I glued it properly and forgot about it for several years.
Yes, I also glued it a week ago, but the problem did not go away. It looks like we need to take it apart again and look, maybe there is an obvious leak somewhere.
tucked inside the pockets? if they just weigh it vertically on the outside, it won’t do any good
That's the thing, it seems like I did everything right ((
Then you were advised correctly here, remove the trim and pour water on the roof so that it runs along the doors and you will see where it is oozing from
Yes, I also glued it a week ago, but the problem did not go away. It looks like we need to take it apart again and look, maybe there is an obvious leak somewhere.
That year, when the interior floor was noisy, I also noticed that water was getting through the rear door seal onto the mat. I cured it by removing the entire seal and reinstalling it, while properly pressing the seal to the rear edge of the door opening - the problem disappeared
Why is there wet carpet on Prior?
Navigation
| Community Links |
| Users |
| Search the forum |
| Search by tag |
| Advanced Search |
| To the page. |
Senior Member
Senior Member
Hello, Priora 2008, dampness under the carpet, in the front passenger's feet, why and how to get rid of it!?
Senior Member
Senior Member
The stove is leaking
Senior Member
Senior Member
There was such a problem, they tinted the front glass and didn’t properly glue it, it flowed down the counter in a thin small stream (it wasn’t visible under the plastic) right onto the carpet
the same nonsense I opened the plugs in the floor I won’t look for where it’s leaking from
Senior Member
Senior Member
the stove and pipes are located under the hood and antifreeze that on the Prior and 10 will not get into the cabin
the Priora has no pipes in the cabin, they are under the hood, it’s not a four
I had the same problem, then I noticed that the mats on the sink were not wiped well on the side where they came into contact with the carpet, and the water could not dry under the mat! I also thought at first that it could be, and then when I brought this to the attention of the washers, the problem went away!
Water under passenger's carpet
VAZ (Lada) Priora 2007 - present
Water under the front passenger's rug in a Priora. Where does it come from?
- The windshield fogs up on a VAZ Priora - 4 answers
- Water in the cabin of Lada Priora – 3 answers
- The shelf on the VAZ Priora is rattling, what should I do? – 3 answers
- Is it possible to install speakers in the rear doors yourself? – 3 answers
- The power window button on a Priora gets stuck - 2 answers
First of all, you should check all the plugs on the bottom, then the cabin filter, also known as the stove filter, water can also get through it. If everything is in order there, then there are two more options, the first is through the gap between the glass and the seal (often found) or the place where the wiring enters the interior. The last option happens most often, for example, one of these cases:
- What does the TPMS icon mean in a Honda Element? – 1 answer
- Is the analog timing chain SAT TK HA 022 suitable for the K24a engine? – 1 answer
- Is it possible to find out the engine brand, Honda Element, by the part number? – 1 answer
- What is the difference between the cylinder head k24a4 and k24a1? – 2 answers
- Which timing chain kit fits the Honda Element? – 4 answers
- How to connect automatic activation of fog lights on a Honda Element? – 3 answers
- Replacing the fuel filter - 1 answer
Subscribe
to our channel in Yandex.Zen
Even more useful tips in a convenient format
How to remove the trunk lid trim
This article will consider an example of a repair involving a Lada Priora hatchback. In general, the procedure for removing the trunk lid trim (upholstery) may be needed in the following cases:
- Repair or replacement of rear window wiper motor
- Soundproofing the rear door
- Repair or replacement of locking elements or the trunk lock itself
Removing and installing tailgate trim on Priora Hatchback
This procedure is clearly shown in the photo below.
Now we pry up the upholstery from one side and slightly move it to the side, carefully tearing it off the fastening clips, which is clearly shown in the photo below.
And finally remove the trunk lid trim.
The final result of this simple repair is shown in the photo below.
The price of new upholstery on a Priora hatchback is about 700-800 rubles. Installation occurs in reverse order. It is worth noting that the clips can be damaged even when removed for the first time, so it is possible that you will have to buy new ones, which is best done in advance.
General tips for preventing interior humidity
Sometimes it happens that there are long rains in Russia. Therefore, you should use the following recommendations to help improve the microclimate in your car.
- The air filter needs to be changed periodically. Because mold can accumulate in it.
- Do not forget wet things inside the vehicle. Regular rags for car care should be replaced with paper napkins. And they need to be thrown into the trash after use.
- If there is slush or rain outside the window, you can lay cardboard instead of rugs. It is also necessary to change it from time to time.
- It is necessary to promptly get rid of leaves and plant debris that fall on the car. Because this can lead to rain washing them into the drainage hole.