- What to do if the battery does not turn
- What to do if the battery is completely discharged
- What's wrong?
- What to do if the battery in the Lada West is dead
- Why does the battery discharge by itself? dealing with leakage current
- Akom efb 6ct-60.1 pp 12v 60ah 560a - almost complete analogue
- In the niche behind the glove box
- Removing the glove box
- Replacing the battery on a Lada Vesta
- How to charge the battery?
- How to prevent battery self-discharge?
- On the steering column
- What do the numbers say?
- Little by little
- How to charge a very low battery
- Independent actions
- Current vs multimeter
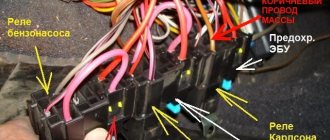
- Electrical wiring and battery
What to do if the battery does not turn
A good battery lasts 3-5 years. And if the battery in your Lada Vesta is dead, then don’t rush to run to the battery market. AvtoVAZ technologies require that the battery supplied with the new car be of high quality, and the problem is often not in the battery itself, but in the fact that it is discharging. Think about saving money by using additional lights, speakers, and other equipment, including attachments.
You need to figure out why the battery died. You can charge it yourself by purchasing a cigarette lighter (a pair of clips) and asking a neighbor to start the engine. In this case, the main thing is to purchase high-quality clamps and monitor the polarity of the connected terminals yourself.
You can start your engine only after the second car is started. Of course, you must connect the terminals with the ignition of both cars turned off. Don't overdo it when trying to start your engine! It may not start for completely different reasons - lack of gasoline, clogged filter and other problems.
A more reliable means of charging a dead battery is a charger. It is important that the battery does not boil while charging. You can check this by bending down and listening to the battery. If gurgling is heard, the charging current is too high. A proper charger should measure the battery voltage itself, first giving a large charge current, and then less and less.
Powertrains and transmission
Vehicle power unit Today, Lada Vesta is equipped with two four-cylinder 16-valve gasoline engines:
- the base 1.6-liter power unit has a capacity of 106 “horses”;
- a more powerful 122-horsepower engine of 1.8 liters in volume.
Vehicle performance depends on many factors, including the selected transmission.
| 106 hp, 1.6 l, manual transmission | 106 hp, 1.6 l, robot | 122 hp, 1.8 l, robot | |
| Acceleration 0-100 km/h (s) | 11.2 | 14.1 | 12.1 |
| Maximum speed (km/h) | 175 | 178 | 186 |
| Average fuel consumption per 100 km (l) | 6.9 | 6.6 | 7.2 |
In 2022, it will be possible to equip more powerful 122-horsepower engines with manual transmission. The new Lada Vesta will accelerate to hundreds in 10.2 seconds, and its top speed will increase to 188. Average fuel consumption in the combined cycle will be 7.5 liters per hundred kilometers.
What to do if the battery is completely discharged
Before you start taking any measures to start the battery, it is worth checking its performance. The fact is that if it is completely discharged, then no measures will revive it on the spot. It is quite easy to determine its complete discharge if the car battery is of a modern type and there are charge indicators on it.
If the battery does not have a special indicator, you will have to check it manually. This can be done using the following methods:
- Check the voltage at the terminal using a voltmeter, multimeter or load plug. A working battery should have readings in the range of 12.6-12.9 V, while a simply discharged battery should have readings that are one less. If the numbers obtained are even lower, then the battery has been deeply discharged.
- Afterwards, you need to measure the level and density of the electrolyte in the battery. This is only possible if the battery is serviceable. The density of the liquid should be between 1.25 and 1.29 g per cm3. The electrolyte level should not be below the minimum risk. If there are no such marks, the main thing is to ensure that the battery plates are covered with electrolyte by 1-2 cm. You can also add distilled water to the battery to the required mark.
Advice! If the battery shows no signs of life at all, then you should not try to restore its functionality on the spot. This procedure is possible, but requires a lot of time.
If the battery is completely discharged, the car will not be able to start. No amount of effort will make the battery work without proper preparation.
Rules of service
A good battery lasts at least three years. Therefore, if the battery is discharged before this period, you should not immediately run to the store to buy it. It is recommended to check the charge level first. Batteries often lose capacity due to improper maintenance, temperature fluctuations and other factors.
Proper maintenance involves checking the catholyte level, its volume and operating temperature. This is best done using a hydrometer. If the density of the liquid is below normal - in winter 1.25 g/cm3, in summer - 1.29 g/cm3, distillate is added to the batteries being serviced.
A load fork can help. It should be connected for 5-6 seconds, and if the voltage shows more than 9 volts, then everything is fine with the battery. Such a device is either purchased ready-made or made independently from 6 lamps with a power of 55 watts.
What's wrong?
In general, this is where the leakage current check ends. But it would be wrong not to say one more thing. What to do if the leak could not be found, but the battery is still dead in the morning?
First of all, you will have to check the operation of the generator. It is likely that there is no excessive leakage, and the reason for the battery running low lies in its usual undercharging. In addition, there are usually no fuses in the generator circuit, so measuring the leakage current will not give anything in this case.
Therefore, we switch the multimeter to voltmeter mode, measure the voltage at the battery terminals, then look at the voltage at the terminals after starting the engine. If the same dull 12-13 volts remain with the engine running and no consumers turned on, it’s time to repair the generator.
True, if its diode bridge is close to the end, without load it can show normal voltage, but under load it sag significantly. But diagnosing a generator using a multimeter is a completely different story. Boring, simple and chewed a thousand times.
What to do if the battery in the Lada West is dead
The service life of the battery depends on operating conditions. High intensity of travel, use of the car in severe frosts, poor performance of the generator, wear and tear of the electrical system are the reasons for the rapid failure of the battery.
The uninterrupted operation of the electrical system of the Lada Vesta car depends on the quality of the battery. Loss of the battery performance characteristics provided by the manufacturer will lead to difficulties in starting the engine and failures in the operation of energy-intensive components.
On-board computer control algorithm
1. Selection of on-board computer functions (carried out using the keys on the right steering column switch).
2. Selecting trip meters and switching between clock and temperature.
3. Enter parameter setting mode, select parameter.
3.1. Setting the time.
When you exit the time setting mode, the seconds counter is reset to zero (reset without rounding). If there are no button presses within 60 seconds, the time setting mode will exit automatically.
4. Display mode of parameters of the “Cruise control” or “Speed limiter” functions.
In the mode of displaying the parameters of the “Cruise control” or “Speed limiter” functions, it is possible to switch the displayed function of the on-board computer (point 1) and the total and daily mileage counters (point 2), the indication of outside air temperature and time is not available, parameter setting modes (point 3 ) are not available.
- “short” – press for less than 1.5 seconds, triggered when released.
- “long” – press for more than 1.5 seconds, triggered by time.
- yellow color – the segment is blinking (square wave, 1 Hz).
- When resetting the route parameters (clause 3(d)), the following parameters are reset to zero: average fuel consumption, fuel consumed, travel time, average speed.
Bookmaker settings are also shown in the video:
To change the sound of the turn signals, you need to go to the secret menu (it does not work on the instrument cluster). To do this, press two BC buttons at the same time. More detailed instructions in the video:
Are you satisfied with the functions of the Lada Vesta on-board computer? Let us remind you that other operating instructions for this vehicle can be found in this section.
It is difficult to imagine a modern car without an on-board computer (alternative names: “BC”, “carputer”, “onborder”), which allows you to increase engine efficiency, reduce gasoline consumption, optimize the operation of the gas distribution system and synchronize the interaction of all units. In addition to the above, BC reduces the concentration of harmful emissions. The onborder performs the functions of cruise control, climate control, and displays the information necessary for the driver, allowing him to make the right decisions on transport management and optimal movement along the chosen route. That is why all modern Lada Vesta models are equipped with BCs that successfully perform the functions assigned to them.
Why does the battery discharge by itself? dealing with leakage current
Many people are familiar with this situation: a car sits on the street for two or three days without moving, and when you try to get into it and drive it somewhere, instead of the vigorous sound of the starter rotating, you hear only the clicks of the overrunning clutch or nothing at all. The battery is dead. Why?
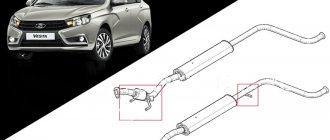
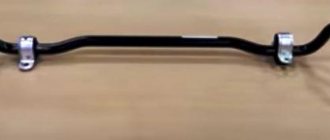
Akom efb 6ct-60.1 pp 12v 60ah 560a - almost complete analogue
This car battery from the Russian company AKOM replicates the device originally installed on the car in almost all respects.
- Capacity - 60 A/h;
- Polarity is straight;
- Current output class - terminals;
- Overall dimensions - 242x175x190 mm.
The only difference is the cold cranking current. Here this figure at -18°C is 560 A. The battery is more resistant to the climatic conditions of Russia. You can buy a Lada Vesta battery for 4,200 rubles.
↑ Lux Multimedia
The additional “Multimedia” package is no different from what is included in the “Comfort” package. The cost of Lada Vesta when adding this package increases by 24 thousand rubles. The most expensive equipment will cost the buyer more than 700 thousand rubles.
AvtoVAZ has released the new Lada Vesta 2022, an exclusive “anniversary” Lux series, which has a two-tone body paint, a leather steering wheel, designer alloy wheels, original upholstery, and metal pedals. You could purchase such a model for 735 thousand rubles.
Almost all Lada Vesta cars are purchased from official dealers. They cooperate with AvtoVAZ, so they have a warranty limited to 3 months or 100 thousand kilometers.
In the niche behind the glove box
After removing the box, access to the EMM unit fixed on the engine panel will open.
Also visible is the VCM unit, which is located higher, in front of the passenger airbag.
The block is fixed with a mount and a bolt with a nut of 8 on the reverse side.
The VSM unit must be removed, and then the black block S1 must be disconnected, as indicated in the information letter.
From the removed block you need to remove contact No. 37, which is marked in pink and green.
The wire must be carefully insulated, and then put the block in place.
Then the EMM block is taken, from which the gray block S2 is removed.
In the block it is necessary to swap the third and fourth contacts, which are indicated in the photo in black-blue and yellow, respectively.
As for removing the wires, everything is quite simple.
Each block is equipped with a white plate and white latches on the sides. First, use a thin knife to pry off the plate, and then the clamps.
Next, you need to arm yourself with some thin object (for this Vladislav used a spring) and insert it into a small hole, which is slightly above the contact. They need to bend the contact retainer and remove the wire.
In the end, everything is assembled in reverse order.
Removing the glove box
To gain access to the necessary elements, you must first disassemble the glove box. This is not difficult to do. It is necessary to open the glove compartment lid, and then press the latches located at the top.
It's better to start from the glove compartment area
When this is done, you need to pull the cover towards you, and you will feel the resistance of the 3 latches below. Next, you need to unscrew the 5 screws that secure the box body to the dashboard.
Then you should unsnap the side panel plug from the right end, grab the drawer handle, which is located at the top center, and pull it towards you. It is also necessary to disconnect the limit switch from the terminal and disconnect the lamp plug.
The photo shows the attachment points, as well as 3 lower fasteners
By the way, not everyone removes the glove compartment cover first during the dismantling process. This is done for greater convenience, but you can do without this step.
The whole process is clearly demonstrated in the video.
Next, we begin to directly eliminate the problem due to which the battery on the Lada Vesta is discharged.
Options for comfort
The equipment of the Lada Vesta sedan and those who value convenience more than driving characteristics are very pleased. The configuration of the Lada Vesta in a hatchback body will most likely be composed in a similar way (for now only a sedan is being produced - other types of bodies are still under development). The manufacturers really tried to make sure that the name of their virtuoso assembly really spoke.
Among the pleasant nuances that are not available in a cheaper assembly, it is worth noting the presence of heated front seats in addition to the standard air conditioning. Driving in winter will be more enjoyable for connoisseurs of the domestic automobile industry. Also, the equipment of the new Lada Vesta includes stability systems ABS and ESC - and they are also available in the basic version. Another really important difference between the average set of options and the basic one will be the presence of parking sensors: contrary to popular belief, this control element is useful not only for novice drivers.
I wonder what else is included in the Lada Vesta “Comfort” package? This is a full-fledged audio system that replaces the standard radio with the ability to play a variety of storage media - from disks to flash cards. There is also the option of connecting the audio system via Bluetooth to other devices (for example, a mobile phone).
However, the most joyful news for Russian drivers will be the variety of trim levels in their average value. The general director of AvtoVAZ said that at least seven more different sets of options can be added to the Lada Vesta Comfort (for example, Optima - additional equipment for heating the windshield and replacing the wheels with cast ones with a radius of 15 inches).
How to charge the battery?
You can revive the battery or recharge it in several ways:
- from another car - lighting a cigarette;
- using a charger;
- pusher or towing.
The most reliable and correct way is to use a memory. It is extremely important to monitor the charging process - the jars should not boil. Even on a hermetically sealed battery, this chemical process can be easily identified by hissing and gurgling. A high-quality charger automatically controls the state of the electrolyte and voltage, alternating high and low charging current.
How to prevent battery self-discharge?
On some Vesta cars, or rather on all luxury models released before August 2022, the battery tends to discharge spontaneously. This is due to a manufacturing defect, which can be eliminated at a service center using the manufacturer’s warranty.
But what if the problem occurs when the warranty has expired or the driver does not have the opportunity to contact the service? You can modify the wires of the additional electronic unit EMM yourself.
Let's look at this process step by step:
- To gain access to the electronic control units of the body equipment, you need to remove the glove compartment. To do this, you need to unscrew the mounting bolts and carefully remove it from the clamps.
- After the glove box is removed, access to the electronic units BCM and EMM opens. The VSM unit is fixed to a metal bracket, from where it must be removed by unscrewing the nut by 8.
- The black S1 chip is disconnected from the VSM block. From it you need to remove contact No. 37, pink and green, and wrap the wires with electrical tape.
- Next, you need to swap the black-blue and yellow wires in block S2 of the EMM unit. These are wires numbered 3 and 4. To pull out the wire, you need to remove the protective plastic chip using a utility knife, carefully prying it off on both sides.
Problem
Owners of a Russian sedan are sometimes faced with the fact that the Vesta battery spontaneously discharges, and this happens, naturally, at the most inopportune moment. It is worth noting that this problem does not affect everyone - it is typical for owners of Lada Vesta, manufactured before August 21, 2022 and only in the Lux configuration. The fact is that in this version the car is equipped with an additional EMM electronic unit.
On certain versions of Lada Vesta the battery discharges itself
On the steering column
After completing the work in the Vesta glove compartment area, you need to proceed to the steering column area. First of all, the casing is disassembled, for which 2 T20 bolts at the bottom are unscrewed, and then the plastic is snapped off.
You need to lift the top cover and move it towards the dashboard. We are interested in the low/high beam switch, to which the gray block fits.
First, the block itself is removed by pressing on the plastic tab.
In the block you need to swap two wires - the 6th and 7th, marked in white-blue and yellow-red.
But in this case, the layout of the block is slightly different, and therefore you will have to remove the white latch from it, for which you need to pull it towards you.
Afterwards, an awl is inserted into the back of the block and pulled out of the block along with the wire. All that remains is to swap the indicated wires and then reassemble everything in the reverse order.
As a result of the described actions, the Lada Vesta battery should stop discharging.
Brief features of the robot (AMT)
Robot on the Lada Vesta The robotic transmission on the Lada Vesta is domestically produced and widely used, but is created on the basis of foreign components and the extensive experience of French and Japanese colleagues. The advantage of AMT is:
- Actuators from Germany are mounted inside the robotic gearbox, the clutch is from the French company Valeo;
- The robot box is equipped with a system for compensating for wear of parts and clutch failure;
- AMT has less weight than an automatic transmission (automatic transmission), therefore it reduces the cost of gasoline and oil;
- the Lada Vesta robot system eliminates unauthorized switching;
- it is possible to use a lever to change gears;
- built-in option for resetting stages;
- you can move away without pre-warming;
- the robot can operate with a low battery and skid for a long time when entering snowy or sandy terrain;
- repair and operation costs little money;
- Cars are towed without any visible disruptions.
AMT gradually replaced the automatic from the entire Lada model range, as it operates smoothly and relatively quietly. The developers say that such a transmission can last about ten years. A manual gearbox cannot boast such durability due to the fact that it has many components, while an AMT is easy to create.
Immediately after the release of the robotic transmission, rumors appeared about big problems in its operation. There have been complaints that the lever needs to be put in neutral after every braking. They said that the box was setting the gear incorrectly. These misunderstandings were rejected by the headquarters of the Russian manufacturer and did not find sufficient evidence in widespread consumption.
What do the numbers say?
The value of normal leakage current may vary significantly depending on the make and configuration of the vehicle. The more consumers are awake, the greater the current will be. There is no single figure for normal current. I would advise you to adhere to the following order: budget cars - up to 50 mA, an average simple car - up to 70 mA, a car with complex electronics - up to 100 mA.
Let's say the multimeter shows about 40 mA (as it happened in our case). This is an absolutely normal indicator. You can return the terminal to its place, put away the multimeter and continue to sleep peacefully.
If the multimeter shows too much current, you need to look for what is consuming it in the car. To do this, you need to perform just one simple operation: open the fuse box and pull them out one by one, observing the readings of the multimeter. If, with one fuse pulled out, the leakage current is greatly reduced, it means that in the circuit of this fuse there is a spoiler that is eating up the battery charge.
Little by little
Simple times are long gone. Approximately in that bright era when cars acquired electronic devices in the form of radios, immobilizers, security systems, navigators, radar detectors and other things powered by the on-board network. And don’t forget about, for example, electronic control units for the engine, gearbox and other components that also consume current.
The first reason why current consumption becomes too high is because some of these devices are installed incorrectly. The same radio tape recorder can be installed in such a way that it will work, but at the same time something will be shorted somewhere. I generally keep quiet about the alarm system - a lot of trouble can be caused there.
The second reason is simple absent-mindedness. You may forget that, for example, you need to turn off the lights in the cabin or take out the DVR from the cigarette lighter. Not all cars are able to “warn” about the lights not being turned off and turn off the power to the cigarette lighter after turning off the ignition. However, this is not exactly our situation.
Well, the third reason is a malfunction in the device circuit or the device itself. A classic example: the trunk light is on. Everything seems to be working, but after two or three days of inactivity, it may no longer be possible to start the engine: if the battery is not completely fresh, it will be severely discharged during this time.
In addition, in older cars, leakage may increase due to faulty wiring. Somewhere it rubbed, somewhere it melted, somewhere the crooked hands of Uncle Vasya’s electrician slipped off... There are many reasons, but there is only one consequence - an increase in the leakage current and a dead battery. So how do you know if this current is ok on your car and what to do if it is too high?
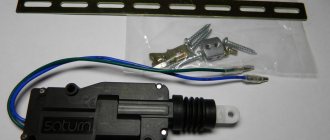
Video - Using a spare key
To lock the door if the remote control, the lock drive is faulty or there is no power, you need to lower the flag located under the lock mechanism down and slam the door.
If the child lock on the door/doors is turned on at the same time and the battery is disconnected (discharged), unlocking the rear door/doors from the outside and inside is impossible! A battery will need to be connected to unlock the door/doors.
Have you noticed that the battery on Vesta quickly ran out? The reason may be in the EMM block (see information letter No. 99-17).
- We are inside the car, squeeze the parking brake, turn off the engine.
- Press and hold the mechanical button for automatic locking of the rear and front passenger doors for 10 seconds. The successful activation of the locks will be indicated by an orange diode on the button.
- We leave the salon and slam the driver's door.
- We find a hole at the base of the driver's door handle, insert the key, and pry off the plastic insert.
- We insert the “rod” into the core, turn it to the right, and lock the driver’s door.
- We put the plastic case on the core.
In modern cars, the ignition key also has buttons. It has its own battery and needs to be changed. One of the Lada Vesta devices is a three-button engine ignition control panel with a flip key. On the Lada Vesta, the key controls the central locking, as well as the locking device of the luggage compartment. Since it is a flip key, it means it needs a special case, read our article in detail about this device!
Open the driver's door; Find on the center console in the cabin a button with a picture of a door and a key (above the interior temperature controls); Press this key for five seconds (a single press will lock the doors for a short period of time due to the fact that the driver's door is open); Make sure that all doors are locked; Leave the car, close the driver's door mechanically. Where can I get a spare key?
This is where the spare tip tag comes in handy. It is by the number engraved on this sticker that your dealership selects the appropriate opening element. Not only will the tip be made, but the remote control itself will be coded according to your system. For Lada Vesta you can choose several different ignition control panels. Therefore, you can order yourself a new DPU without losing your regular one.
How to charge a very low battery
You should not simply charge a battery that is very discharged, much less leave it to recharge overnight. In this case, replenishing the charge must be done according to the rules and nuances. If all aspects of the delicate matter are fully completed, the likelihood that the battery will become operational again will increase.
Immediately before charging, you must open all covers and remove the terminals. Connect the plus and minus, and only then turn on the electricity.
Important! Disabling occurs in the reverse order. Those. First the current supply is removed, then the minus is removed and then the plus.
In conventional lead acid batteries, the charging current is set to 1/10 of the capacity. For example, when charging a battery at 50 A*hour, with a tolerance of only 5 amperes, the charging time will be about 10 hours. It is also important that all caps are removed from the battery during charging.
Independent actions
Of course, the ability to repair a fault under warranty is good. However, not everyone lives near a dealership, and the warranty isn't that simple. Therefore, the question of what to do if the Lada Vesta battery is discharged is very relevant.
If you decide to do everything yourself, instructions compiled by one of the sedan owners, Vladislav Mustafin, will help you.
IMPORTANT! First of all, you need to disconnect the battery!
Review
It is already known that official dealers have received requests from owners of defective cars with questions regarding the recall campaign. However, at the moment, a database with VIN numbers of cars that will be subject to recall has not yet been created.
Therefore, it is worth understanding that the letter does not mean a recall campaign, but simply informs the salon about a malfunction in the event of a client’s request. In addition, there is no exact information about whether a Vesta with a discharged battery will be repaired for free if it is not under warranty.
Despite the letter, repairs at the dealer are not easy
Reviews about the quality of work at dealerships vary - not everything always goes smoothly. For some, after the measures have been implemented, the check light comes on, for others, problems begin with turning on the high beams, etc.
Current vs multimeter
The only tool we need for our work is a multimeter. Moreover, I did not use a top-end instrument at all, but some kind of balalaika for 140 rubles, which is capable of showing numbers on the screen. This probably wouldn’t be suitable for a professional electrician, but it’s just right for us, the crooked ones.
So, our task is to measure the current that the car consumes in “hibernation mode”. To do this, we switch the multimeter to the mode of changing the current, in our case - by 10 A. In our Chinese multimeter, this is the maximum permissible current. If your multimeter is cooler than ours (which, in general, is not difficult), it is better to set it to 20 A.
The fact is that the multimeter must be connected to the circuit, and all the current consumed will pass through it. The leakage current should be small - a maximum of 80-90 mA, but the moment the multimeter is connected to an open circuit, the current of all electrical equipment will pass through it, which will turn on after the circuit is closed.
Therefore, do not listen to those who suggest simply disconnecting the negative terminal and plugging a multimeter into the gap, placing one of its wires on the battery terminal, and the second on the wire removed from the terminal. Of course, according to the diagram, the connection should be like this, but it is better to do it in a slightly different sequence.
In addition, this method allows you to avoid another unpleasant moment: since there is no actual break in the circuit, there is no need to carry out all the operations with the car that are necessary after disconnecting the battery: adjusting the radio, time, operation of the windows and making other adaptations.
The third positive point is that you don’t have to wait until the leakage current indicators “settle down”. If you break the circuit and then plug a multimeter into the gap, the current consumed will be large for the first minutes due to the large number of consumers who come back to life.
The ECU will “wake up”, the capacitors will begin to charge, the climate control may begin to work (at least self-diagnosis or rotate the dampers), and this is where the current will be increased. And then you have to wait until the systems calm down. It can take half an hour for the electronics in complex cars to completely fall asleep. And waiting half an hour is boring.
The ideal thing is to open the hood, connect the multimeter, hold down the hood limit switch, simulating its closing, set the car alarm and wait for what the multimeter shows. In this case, the leakage current will be exactly the same as it is while you are sleeping, and some fault is eating up the battery charge.
But usually it’s enough just to see the numbers that the multimeter will show after a couple of minutes of working in the circuit. And by the way, it is not necessary to connect to the negative terminal. You can connect the multimeter between the positive terminal and its wire, which is what I did: access to the negative terminal is difficult on a particular car.
CBKE schemes
Electrical connection diagram for TsBKE on LADA VESTA: 2 – rechargeable battery; 3 – starter; 4 – rear left outer lamp; 5 – left headlight; 7 – rear window heating relay (K3); 8 – right headlight; 10 – rear outer right lamp; 13 – trunk light; 15 – fuse 60 A (F70); 16 – additional relay (K8); 17 – ignition switch; 26 – alarm switch; 30 – fuse 5 A (F20); 32 – left steering column switch (light alarm switch); 34 – fuse 60 A (F75); 35 – rear window heater; 44 – windshield heating relay 1 (K21); 46 – windshield heater; 47 – lampshade lighting of the glove box; 48 – switch for the glove compartment lamp; 51 – TsBKE (VSM controller); 58 – fuse 30 A (F61); 59 – left threshold lamp (installed on luxury equipment); 60 – right threshold lighting lamp (installed on the “luxury” configuration); 61 – relay of additional consumers (K2); 63 – fuse 10 A (F32); 84 – fuse 3 A (F43); 87 – left outside mirror; 88 – right outside mirror; 120 – additional starter relay (K23); 134 – brake signal switch; 138 – fuse 5 A (F15); 164 – air conditioner control panel (connection diagram for the “comfort” package); 185 – interior lighting unit with ERA-GLONASS interface module; 196 – fuse 5 A (F24); 200 – fuse 15 A (F11); 201 – fuse 15 A (F12); 202 – fuse 10 A (F13); 203 – fuse 10 A (F14); 204 – fuse 5 A (F17); 205 – fuse 5 A (F16); 229 – fuse 3 A (F49); 230 – clutch pedal position signal switch; 231 – windshield heating relay 2 (K22); 233 – fuse 5 A (F80)
_x000D_
- _x000D_
- location of fuses F1-F59 and relays K1-K20 in the interior mounting block; _x000D_
- location of fuses F60-F80 and relays K21-K28 in the motor mounting block _x000D_