Probably every driver has encountered strong noise in the cabin while driving. Most often it comes from the engine and transmission. All this can affect overall comfort. This problem is solvable, and most centers install sound insulation.
Most cars in the premium segment have this addition, but with cheap cars the situation is much worse, and installation must be carried out either in specialized centers or independently. As a rule, the total cost of this service in the Russian Federation does not exceed 30,000 rubles .
Full sound insulation of doors using Shumoff materials. Step by step, material calculation!
Greetings!
The beginning of the epic of treating a car with noise and vibration insulation, again...
I purchased all the material directly from
(Shumoff)
Firstly, what you need to remember is that this is not a competition about who can stick the most vibration and soundproofing materials!
I will describe the process on a specific door
—
front passenger
, because there is no point in inserting photographs of the processing of all doors.
Personally, I used 3 types of material produced by Shumoff:
1).
Vibration-absorbing material Shumoff, Shumoff Joker is a mastic with increased cohesive strength, penetration and adhesive properties.
The manufacturer has achieved high performance by adding carbon-containing components, fiber fiber and a number of other ingredients to the mastic composition. (Self-adhesive material!) Thickness 2 mm Sheet size 370x270 mm Weight 3.1 kg/m² KMP (mechanical loss coefficient)
0.33 Article number
010005
Clarification!
Virus-insulating materials are a sealant, and when installed on a clean, prepared surface,
they act as an anti-corrosion agent
, which is especially important when treating the underbody of a car.
2).
Comfort 6 is
a sound-heat-insulating material
based on black foam rubber with a waterproof adhesive layer.
The material is low flammable and does not absorb water. Thickness 6 mm Sheet size 750x1000 mm Weight 0.6 kg/m² Article 020006
Very light, pliable material, easy to cut with scissors, unlike the same StP Splen
, a light touch to the adhesive base does not grab tightly, but if necessary, allows you to carefully peel off the sheet and re-glue it.
3).
Germeton A15 -
Sound-absorbing and sealing material based on special polyurethane foam, pyramid-shaped relief.
10 times more effective than standard foam rubber (sound absorption in the frequency range 1200 - 10000 Hz up to 95%).
Non-flammable.
Thickness 15 mm Sheet size 750x1000 mm Weight 0.85 kg/m² Article 030003 Many advantages of this material, for example:
Material grade A has the ability to slowly (within 40 minutes) recover after prolonged compression.
This ensures easy installation of two large surfaces between which the Germeton sound absorber is mounted and fills the free space. The Germeton A material is easy to work with - easy to cut, easy to TEAR, takes any shape! Honestly, Germeton is one of the best soundproofing materials on the market!
On the official website of Shumoff
, there is
a CALCULATOR for calculating the material for processing car parts
(body) - the division is based on processing CLASSES, and not by car classes, that is, the door from Priora, or the door from Vesta is not taken into account, I think everyone understands that the difference in dimensions is obvious. BUT, the amount of material used was less than the average calculation on the website.
- Inner side
(the one that is “street”) - I removed the “old” sound insulation in the form of Spleen, degreased it with a solvent and glued as much as possible the entire area of the door with the FIRST layer of Shumoff Joker,
it took 5 sheets
(+/-)!
Be sure to roll it with a roller, where the roller did not fit, I tapped it with a wide screwdriver and pressed it with my fingers. (I recommend not throwing away the leftovers, scraps from the vibra sheet - absolutely EVERYTHING will come in handy!) “Joker”
is a self-adhesive material, HOWEVER,
I still used a hairdryer
, because the temperature outside was 19°C.
Second layer
,
Comfort 6
, this is SOUND INSULATION, that is, this material prevents the spread of noise from the side of the “street”,
0.5 sheets
(+/-) were used for one door.
- Outer side
(the one in the salon),
I glued the “Joker” vibration insulation not over the entire area
, as many do, but first of all I closed the technological holes, And,
using the tapping method
,
I found the places where the metal “strummed”, and glued the vibration material until the “parasitic” » sounds.
3 sheets for the outside of one door.
“Joker”
is an average; most people spend more material on this side than on the inside!
A few words about vibration isolation
—
“The use of vibration isolation ensures a reduction in noise and vibration levels by up to 85%, in the range from 20 to 1000 Hz, i.e.
in the low frequency range. It is important to note that we are talking specifically about vibration absorption, and not about isolation in the generally accepted sense - i.e. the energy of vibrations does not return to the source, but turns into heat.” -
a very good clarification from the website Saitcar.ru
, which is why such an indicator as the ILC, for me personally, did not have a key role in the choice of material!
Well, for those who want to create something like a “subwoofer”
in the door,
gluing both sides with a muffler
- do not forget, an integrated approach is required - the “correct” acoustics, the “correct” wires to obtain the desired result, adding 20 kg of vibration isolation is a so-so solution.
— Door trim
(door “card”) -
gluing the casing with one continuous sheet of sound absorber Germeton A15!
Ideally,
1 door - 1 sheet
, but since the material is, as it were, not particularly budget-friendly, you can consider the option of
3 doors - 3 sheets, and process the 4th door with the remainder!
Total
(
in total
)
it was spent on all doors (almost the maximum possible processing): Shumoff Joker
-
34-35 sheets
(I’m lying, I didn’t glue one door, since the bottom of the door will probably be removed and repainted, but I included it in the final accounting)
Comfort 6
-
3 sheets Germeton A15
-
4 sheets
I didn’t calculate the cost, because prices differ in different stores.
And remember, it is preferable to buy material with a reserve than to miss a couple of sheets during work, because not every store has the opportunity to buy this or that material as a separate sheet!
(for the same reason, surplus material cannot be sold)
I assume everyone is curious, is there any point?
Yes, there is definitely some sense, the “parasitic” noises from the street have decreased, the doors have become heavier, HOWEVER, I can’t measure it with a sound meter BEFORE and AFTER yet, due to the disassembled rear door, as soon as the door is completed, measurements will be taken without fail, and yes, the main ones are not exact dB, and the dynamics change in a positive direction or the same noise level!
How do you like it? Let's spread it, please!
Source
Materials
Let's start, of course, with the materials used in sound insulation:
- Vibration insulation is a material that absorbs vibrations, based on bitumen, mastic or a combination of them, requires warming up before application
- Noise (sound) absorber - a finely porous material in which sounds fade away and are absorbed
- Sound reflector - a material whose structure reflects sound waves in the opposite direction
- Squeak suppressor (anti-creak) - a material used to eliminate friction between the rubbing elements of the interior trim and the dashboard (see Soundproofing a car's dashboard is always necessary)
It makes no sense to go into details about the construction of materials, so let’s get to work. I will list the most common brands - vibration insulation - Vibroblast or Bimast, sound absorber - Accent, sound reflector - Splen, squeak suppressor Madeline or Bitoplast.
You can purchase their analogues if the price of the ones I have given does not suit you, or these particular ones are not on sale.
Lada Priora is completely soundproofed.
Lada Priora. Complete sound insulation. Option Maximum.
More than a dozen cars of this model have passed through our hands, and before the car arrives, we prepare soundproofing material in advance and put it to warm up, which significantly increases not so much the speed of work, but the quality! We are ready to work, the tools and gloves are clean and we are starting full noise insulation.
Roof. We dismantle the ceiling using clean tools. After dismantling all the ceiling supports, the ceiling itself is removed and work on the metal begins. Warm vibration insulation Shumoff M3 is glued over the entire area of the car ceiling and rolled out with special metal rollers. Already at this stage, tapping on the roof from outside is accompanied by a dull sound, and not a ringing sound, as before.
The thick noise insulator Shumoff P8V is also an excellent heat insulator; we also use it to seal all vibration insulation.
The last layer is a powerful sound absorber Germeton A15, it will bring noise insulation to the maximum.
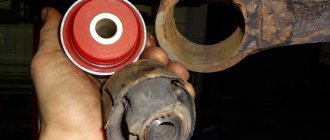
Doors. Disassembling Priora door trims is not a difficult task for us and takes our team about 5 minutes. Then the metal is degreased and dried. We cover the outer wall of the door with Shumoff M3 vibration insulation and carefully roll it to the metal with rollers, ensuring that vibrations are removed from it.
The next layer is the Shumoff P8V sound insulator with a waterproof adhesive base, which protects the material from environmental aggression (moisture, dust, dirt in the door). This material holds even better on a vertical surface and is guaranteed not to fall off.
Let's move on to the inner frame of the door, which also needs vibration isolation. We do this with Shumoff M2 material.
The picture is completed by a layer of sound absorber Germeton A15.
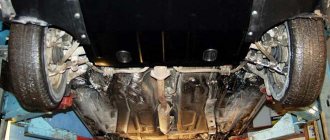
Floor, trunk, arches. Car soundproofing in Omsk is widespread and there are many installation points where this can be done. But we set ourselves apart from the rest by achieving maximum results by installing thick, expensive and efficient materials. We can best demonstrate this on the floor and arches of the car. While most studios diligently treat the floors and arches with M2 vibration insulation, we use the best of all vibration insulation, Shumoff Mix F. And we do this on every car, be it a small hatchback or a huge SUV.
The floor above the feet of the front passengers is one of the most critical areas. We try to climb as high as possible onto the engine shield. If the client wishes, we can remove the dashboard and treat the engine shield even more (and at the same time we will soundproof the dashboard). This service comes at an additional cost.
Now it’s the turn of sound insulation and again we try to do our job as efficiently as possible by laying thick Shumoff P8V sound insulator on the trunk and floor.
The last layer is to lay Germeton A15 on the floor and arches.
Assembly of the interior begins. We guarantee build quality that meets factory standards. The interior of the car is assembled in its original form. All panels are installed in place in accordance with factory requirements. We do not break the casings and pistons during the work, so after completion you will not notice any traces of presence in the car. We wipe down the interior and the car is ready for delivery. The soundproofing of the car is complete. 3 qualified craftsmen worked on the Priora and completed the job in 12 hours.
Source
What affects the cost of the service?
The principle of formation of the final cost is quite easy to explain. It all depends on the number of body elements on which the sheets will be installed. The following elements can be processed
- Bottom - 7,000 rub .
- Ceiling - 6,000 rub .
- Front and rear arches - 5,000 rubles .
- Doors (All 4 pcs.) - 9,000 rub .
- Hood — 2,000 rub .
- Trunk — 8,000 rub .
If the situation requires the installation of a whole set, then most services have the following service packages:
Economy This will include the stub of the following elements.
- Floor.
- Trunk.
- Trunk lid.
- Arches.
- Doors.
Standard. Includes:
- Ceiling treatment.
- Floor.
- Arches.
- Trunk.
- Hood.
- Doors.
Luxury Includes:
- Complete treatment of the bottom.
- All wheel arches.
- Ceiling.
- The trunk and its internal compartments.
- The outside of the trunk.
- Hood.
- Full insulation of all doors.
- Installation of anti-squeaks throughout the body.
Soundproofing of Priora doors. Part 2 Completion!
So we continue to make noise on the doors. It remains to cover the doors with the material about the preparation in the previous blog: Soundproofing Priora doors. Part 1 Preparation! Let's go!
We glue
the first layer
, inside the door, with vibrating squares (I showed the dimensions in the previous blog). I overlapped it a little, so in theory the effect is better.
It is NOT worth going to the trouble of covering 100% of the area. We glue the vibra only where it can be reached with a rolling roller. And believe me, this is not so simple. Extricate yourself, stick your hand in and try to roll it with a strong emphasis... It’s very, very difficult. It’s better to have less vibration, but well-rolled, than a hell of a lot of vibration, barely glued with a second layer
We glue Accent on the inside of the door. I did it here. I cut it into the largest piece that can be pushed into the door. He carefully pushes it in, and once inside, getting rid of it again (how fucking inconvenient), we remove the protective layer of paper and glue it on. Sticks instantly.
I didn’t glue it right into the very corners of the door, I retreated 3-5 cm on the sides. And I left about 5 cm at the bottom. I’ll still process it later with Moville. It’s time to wrap the wiring and rods with Madeleine. Important - we wrap only that part of the wiring and rods that is located outside the door. What is inside the frame is not needed. Because madeleine absorbs moisture.
The next stage is gluing the vibration windows of the door frame to create a closed frame. We still use the same STP AERO.
Windows with rods or wiring are the most problematic. We try to lay the wiring in the very top corner of the window. With rods it is heavier, you have to cut the vibration and adjust it to the place. We make the holes as small and strong as possible (heated the vibration and pressed the cut strips together) The doors are ready. The hardest part is over. ________________________________________________________________________
The last stage is noise-vibration insulation of the door upholstery. We thoroughly degrease the upholstery from the inside and paste over the remaining scraps of vibration isolator
Now we glue Biplast Premium in as large pieces as possible. We try to cover 100% of the surface
We replace old clips with new ones. First, we cut out pieces of madeline into the seats for the clips so that the clips do not dangle
We put the upholstery in place and rejoice at the titanic work done. __________________________________________________________________________
And what? Is there a parish, you ask? There are both pros and cons. Pros:
It became quieter.
Especially noticeable when the windows are completely closed. It was even unusual at first. The doors themselves close with a pleasant sound and easier movements. Cons:
Now I can clearly hear sounds from untreated areas, creaking of the dashboard, rear shelf, etc. Especially from under the wheel arches (we need to look into the issue). Each door became 3 kg heavier (I weighed the material before gluing). There is a risk of the door sagging or hinges becoming loose, but I don’t think you should worry too much
Phew...that seems to be it...by the noise of the doors. Next up is the bottom of the cabin and the torpedo. We are waiting for new posts, friends!
Source
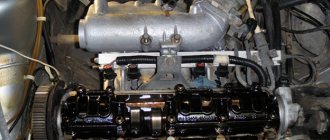
Do-it-yourself soundproofing of the engine shield priors. Shumka VAZ 2170. Gluing
I won’t beat around the bush and start with the fact that the article talks about how to soundproof the engine shield on a Priora.
I bought my Lada Priora in 2012. I try to correct all its factory defects myself. So I decided to do the soundproofing under the instrument panel myself. Fortunately, the sound insulation technology is not much different from other car brands.
The insulation will absorb the noise coming from the car's engine, thereby making the trip a comfortable journey.
I will say right away that the process of installing such sound insulation is very labor-intensive - it takes about two days, but the result is worth it. Before starting work, you need to make sure the room is well lit.
We will need:
- 4 sheets of Vibration Isolation (brand and name of your choice)
- 2 square meters of Accent or SPLEN
- 1 square meter Madeline (for winding wiring)
Installation steps
Removing the panel (dashboard). In order to install sound insulation on any car, you must first clear the space where the Shumka will be installed. This means you have to remove the front panel of the car, and this is a very difficult process.
- When dismantling, the most important thing is not to confuse all the bolts and screws that secure the panel. Therefore, it is better to put them in different bags and sign them. You can draw a schematic plan for the location of the screws.
- We remove the car dashboard very carefully so as not to scratch or break it.
- We remove the factory noise.
- For convenience, it is better to sign all the parts so as not to get confused during the assembly process.
Surface preparation. Before proceeding with the actual installation of sound insulation, it is necessary to completely clear all dust and debris, and also degrease the entire working surface. Then you can get to work.
Installation of vibration insulation. The process of installing sound insulation begins with a vibration-proofing layer (the first layer of sound insulation). To do this, you can use a special self-adhesive material - Vibroplast, Vibrofilter. You can use bitumen-based material Vizomat. It is laid on the surface in medium-sized pieces. This material must first be heated with a hairdryer. Place it on the surface, press it tightly and roll it out with an iron roller. The next sheet is laid in a similar way, only overlapping the first one. This way the entire surface is covered.
Nowadays, a huge number of materials have appeared on the soundproofing market. There are cheaper analogs of Vizomat. Not inferior in quality. For example, SGM products, STP Bombs and many others.
Laying sound insulation (second layer). For Shumka, sound-absorbing materials such as Accent, Vibroton or Spleen are usually used. Laying one of these materials did not take me much time, since the materials have a self-adhesive backing. The entire surface must be covered without exception. The sound insulation layer should not be less than 8 mm.
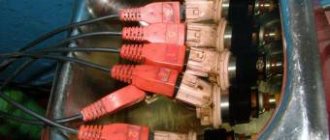
Wire insulation
To complete the soundproofing of the engine shield, you will have to pay attention to the wiring. Although they are tightly attached there, it is still advisable to wrap them with anti-squeak self-adhesive material - Anti-squeak or Madeline
Reinstalling the panel. This is the last step in installing soundproofing, but not the easiest. Now we have to put everything in its place. The wires will take up most of the time; they need to be laid out correctly.
mens-auto.ru
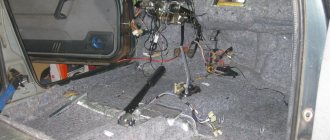
Noise and vibration insulation of front doors
So, having bought 16 Alpine SPG-17CS speakers and before installing them, I decided to glue the doors at the same time. I didn’t want to shoot everything twice, so it was decided to do everything at once. The first step was to remove the door panel, which turned out to be easy. This was all done in the following order: 1) Unscrew two bolts from a small niche in the panel with window lifters
2) Then unscrew the bolt near the handle
Having unscrewed it, pull the handle towards you and pry off this cover on one side. it is fixed with small clips
3) Unscrew the door lock button, this is done very simply, in the end we get:
4) Unscrew three bolts from the bottom of the door
5) The panel remains held on by the clamps (pistons, it seems), so we carefully snap it around the perimeter using a flat screwdriver. There shouldn't be any problems)))
Now that the door has been removed, the following picture has opened before me)) At one time, my father gave 10,000 for a Shumka, but you can see for yourself how it was made. The inside of the door is covered with a layer of STP vibration, which is generously poured with anti-corrosive agent on top. So, my goal is 2 layers of vibration insulation and 2 layers of noise insulation. To do this, I purchased sheets of STP “2” vibration, it is not very thick and not so heavy. I also purchased 1 sheet of Shumka, quite thick, and 2 sheets of Shumka + thermal insulation (with foil on one side, apparently they mixed it up in the store, because I ordered without it). There was already one layer of vibration with anticorrosive, so I started gluing thick sound insulation on top of it, gluing it in small pieces, trying to fit them neatly and quite tightly to each other. By the way, ordinary sound insulation works quite well with anticorrosive and holds up well (after a couple of days on the driver’s door, the layer on top of the anticorrosive fell off and blocked the window lifter, I had to remove the trim and throw out the entire thick layer) only at the bottom, where there is a lot of anticorrosive I didn’t want to get stuck. After some time of painstaking work, we get 1 layer of sight and sound insulation:
Now it's time for the second layer. Here things get a little more complicated. I decided to glue the vibra completely, covering all the holes. It turned out to be not as easy as I wanted. It was necessary to cut out pieces of STP so as not to cover all sorts of different holes for upholstery clips, different window lift nuts, and all sorts of strong bolts and nuts. As a result, the 2nd layer of vibration took quite a lot of time, but I was pleased with the result
It's time for the 2nd layer of sound insulation. It’s a little simpler here - it sticks faster and doesn’t require so much smoothing)
So two layers of insulation are ready. All that remains is to fit the socket and proceed to the other door. The panel is screwed in the reverse order, but I was in no hurry, but began installing the speakers and eliminated a small jamb with the knock of the lock lever
Everything was solved easily and simply by wrapping the rim of the ring with electrical tape))
The result was pretty good noise and vibration isolation. The cabin became a little quieter. When the driver's door was ready, but hadn't started on the passenger door yet, I tinkered a little with the window lifters. The noise of raising and lowering the glass has decreased by 2-3 times. I was pleasantly surprised by this fact. The extra rattle and noise disappeared and it became a little more comfortable. STP chose a thinner one so as not to weigh down the door too much.
Regarding the price and amount of material spent: 1 sheet of thick sound insulation (about a quarter of a sheet left) - approximately 400 rubles 1 sheet of thin sound insulation with foil (remained about the same) - approximately 250-300 rubles 2 sheets of STP “2” vibration (it took 1 .5 sheets; 0.5 left) - approximately 2*200=400
In the end, I want to say that the doors close without problems, because I guessed the thickness successfully; the cabin has become more comfortable; the music began to play differently, louder and more pleasant; There is less rattling and noise)) In the future I plan to make noise in the trunk and rear doors.
I hope you like the article and find it useful!)
Source
Where to start processing
Of course, completely soundproofing a car is a costly undertaking in terms of time and money, so you can do it gradually, starting with the simplest areas, for example the hood:
- The hood (see Soundproofing the hood without problems) does not need to be unscrewed for processing, just open it
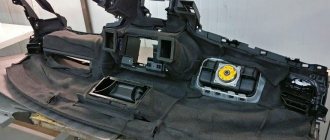
- Remove the factory insulation from the cover and engine shield, if present.
- Then you need to thoroughly wash (with water and detergent) the surfaces to be treated.
- After washing, allow to dry and degrease the surfaces with a solvent.
- After this, cut out the vibrating material according to the shape of the hood cavities and, after pre-heating, apply and roll with a hard roller
The vibrating material is glued only to the recesses, between the stiffening ribs
- Then, on top of the vibration absorber, a noise absorber, or better yet a sound reflector, is glued in a solid piece, covering both the depressions and stiffening ribs
This is how the sound absorber is glued
- Treat the trunk lid in the same way.
- Cover the partition between the engine and the passenger compartment (engine shield) with a continuous layer of vibration insulation, glue a sound absorber on top, or better yet, a sound reflector, the effect will be better
Roof
With the roof (see Soundproofing the roof of a car is part of the package of actions to reduce noise in the cabin), there is more fuss with removing the trim than with processing:
- Removing the interior headliner
- Washing, removing rust and degreasing metal
- Then lay the vibration insulation in large overlapping pieces, photo below
Roof treatment with vibration absorber
- The only inconvenience here will be your arms constantly raised up, which is tiring, so it’s better to work with an assistant
- Glue a sound absorber on top (a sound reflector in the cabin is not suitable, it reduces the sound quality of music)
Important: thin vibration insulation of 2-3 millimeters and a noise absorber of 5 millimeters are used on the ceiling, otherwise the ceiling may sag from the weight.
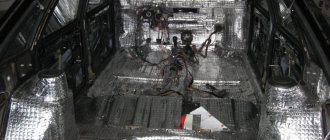
Cabin floor
Lada priora soundproofing the floor in the cabin, the longest procedure:
- You'll have to tinker with disassembling the interior, removing all the seats, mats and upholstery
Tip: When disassembling the interior, write down the disassembly order, collect the fasteners in containers so as not to lose them.
- After disassembly, wash again, remove rust, factory noise, if present, then degrease the surfaces
- Then lay the vibration absorber in overlapping pieces; it is enough to treat 80 percent of the entire surface
- Here a vibration absorber is used that is 5 millimeters or thicker; it is better to insulate the wheel arches in two layers
- But it’s better to cover up to 100 percent with a sound absorber for the best effect.
- Sound absorber applied 10mm
Tip: Leave the mounting holes, bolts, and studs open so that there are no problems during assembly.
- The bottom of the trunk is treated together with the bottom of the passenger compartment so that the spare wheel fits in the niche; it is recommended to soundproof the niche itself with thinner materials
Sound insulation of Priora doors in three layers
Sound insulation of Priora doors
Soundproofing of Priora doors is done in many cases only for the following reason: this car is domestically assembled, which a priori affects the silence of the cabin and silent driving at speed. Knowing how to soundproof doors on a Priora, you can also improve the situation with acoustic systems with your own hands, which will sound completely different after the operation.
How to get rid of noise in the cabin
So, to achieve maximum results, it is better to completely remove the dashboard from the car. This will be relatively easy to do with domestically produced cars and middle-class foreign cars, but with cars from the “Luxury” series, stuffed with a huge number of different electronics, having an “airbag” and other complex elements, everything is much more complicated.
However, in the latter case, you can often do without removal. It follows that the procedure can be organized in two ways:
1. Fragmented noise reduction, when you need to dismantle as many elements as possible.
2. Complete noise reduction with major dismantling and disassembly.
How to “shum” doors
Lada Priora and door sound insulation
Doors remain the most relevant in terms of sound insulation. It is because of their poor insulation that most of the noise from the wheels penetrates into the cabin when driving. In addition, frontal acoustics are often installed on the door - today this is fashionable and justified. If the doors are not “made loud”, the speakers will not play at their full strength.
Note. The process of carrying out noise insulation operations on all cars is the same in almost everything. On the other hand, in each case one should not forget about its subtleties and nuances.
Sound insulation of Lada Priora doors
First of all, the “noise” of the doors begins with the following actions:
Note. Let us note right away that you cannot remove the anticorrosive agent that covers the bottom of the doors!
Advantages and disadvantages
Pros:
- After installation, silence will reign in the car interior, which will significantly increase comfort while driving.
- Improved audio system performance.
- You won't have to raise your voice when talking to a passenger or on the phone.
- Reduced engine warm-up time.
- Improved handling due to lower center of gravity.
Minuses:
- In some cases, loosening of housing parts may occur.
- An increase in the total weight of the vehicle, because a complete set can weigh more than 50 kg.
- Increasing the weight of the trunk will prevent it from opening automatically.
- The manifestation of sounds that were not previously noticeable.
Technology of carrying out “Shumka” in layers
Soundproofing doors priors
“Shumka” is carried out in several ways, but the most popular and relevant method is the layered insulation method. This process will take no more than a day if you know all the rules. In addition, you need to stock up on the following materials:
First layer
Advice. The larger one piece is, the better. Thus, there will be fewer joints, which will have a positive effect on processing.
Sound insulation of Priora front doors
Note. You need to know that covering a certain area of the inside of the door with “vibra” depends on the material itself. Typically, this percentage varies between 55-100 percent of the total area of the inner surface of the door.
Second layer
Acoustics in the front doors of Priora
In this case, the operation algorithm is as follows:
Note. At this stage, it is recommended to use the following materials: Splen, Accent and the like. They are perfect for the job and have a self-adhesive backing. This means that installing them will not require any special skills or a lot of time. The entire surface is already covered 100 percent.
Third layer
This layer is installed at will. The point is that all technological holes in the doors are closed with a special vibration material or similar properties.
Note. Difficulties may arise when applying the third layer of insulation. In particular, during the repair of window regulators, if you suddenly need to do this, you will have to remove the third layer again. But what can you do, if you need to make an effective noise, you have to go for it.
How is sound insulation installed?
It is worth remembering that this is a complex process that should be carried out exclusively by professionals. The entire installation takes place in the following steps:
- Preparatory stage. This includes disassembling some body parts, cleaning them, and degreasing them with special substances and solutions.
- Laying primary layers of vibration-proofing materials. As a rule, they are installed on the doors, floor, ceiling and interior trunk compartment.
- Pasting with soundproofing materials. Stick on top of the primary layer. The details of the process will depend on the characteristics of the car and its brand.
- The final stage. Installation of anti-squeak materials.