During maintenance, you need to remove the front (rear) bumper from its original location. This is easy to do; help from service station workers is not required.
Front bumper Lada Vesta
Stages of removing the Lada Vesta bumper:
- We place the car within the perimeter of the repair area and secure the wheels with boots to prevent arbitrary rollback.
- In the front part of the buffer, unscrew 4 bolts and 2 self-tapping screws.
- We dismantle the side fastenings.
- At the top, unscrew the six screws.
- Under the license plate, unscrew the two screws.
- Removing the sidewalls from the grooves.
We carry out the work carefully, taking into account the fact that all parts are made of polymers - a fragile material. Buffer length - 1764 mm.
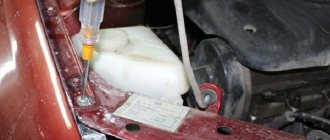
Rear bumper reinforcement
The need to strengthen the rear bumper arose immediately after replacing the absorbing element with a decorative, pitiful semblance. Most likely, the manufacturer decided to do this in order to save money in order to reduce the cost of the technical product.
Rear bumper reinforcement
In auto stores and car markets, amplifier options are presented. They vary in shape, material, and cost.
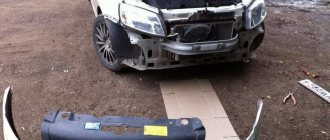
Before installation, we first dismantle the rear bumper. How to do this is written below.
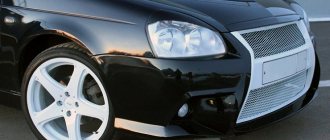
Tuning options
They tune a car if they want to replace stock parts and accessories with new ones, improve technical and aerodynamic characteristics.
The most popular tuning method is installation:
- thresholds;
- spoilers;
- body kits;
- deflectors.
Most often, body kits are painted in the main color of the car. Installation is carried out using double-sided tape.
Door sills, spoilers and bumpers
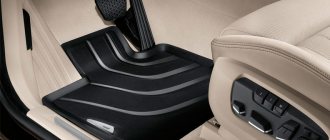
Almost every motorist dreams of changing their car for the better. Lada Vesta is no exception in this sense. The first thing you should pay attention to is the door sills on the Lada Vesta. Stylish and practical modification will ideally fit into the exterior of the car and emphasize its individuality. On the other hand, the overlays will provide reliable protection for the sills from minor damage and keep the appearance of the standard body kit in good condition. Another irreplaceable part is the spoiler for the Lada Vesta. In our catalog you will find several options for this lining, which will make your favorite car special. Just one small detail can transform your car from an ordinary one into a bright and memorable representative that will have no equal on the road. Lada Vesta floor mats can improve comfort in the cabin. Rubber mats are made of high-quality material and have an excellent shape that can retain moisture and prevent water and dirt from entering the interior. All this is especially true during the rainy season and during heavy snowfall. Your salon will be much cleaner thanks to these mats. In addition, the catalog includes wind deflectors, LED lights, organizers and rear bumper covers. Each detail allows you to greatly improve the appearance of the Lada Vesta, as well as its functionality.
Removal and installation technology
Before starting work, it is very advisable to spray all threaded connections with WD 40. This should eliminate problems with soured bolts. If the car has rear fender liners and mudguards, they must be removed first. Having done this, you can begin to unscrew the screws securing it to the car body. In addition to these screws, which are usually located at the bottom, as a rule, there are also upper rear bumper mounting bolts. They may be covered by the trunk sealing rubber. We lift it and unscrew these bolts. In addition, there should be lower bolts. They can usually be located on the underside of the car. You should bend down and feel them with your hand first. If possible, it is better to drive the car onto an overpass or pit. Then these bolts can be seen. We turn them away too.
Now only the bumper mounting bracket prevents removal. More precisely, brackets. Carefully remove the part from engagement with them. We take it by one end and slowly pull it towards ourselves. From this, the end should move slightly to the side. We do the same on the other side. As a rule, there are no problems with this. After completing this procedure, you can remove the bumper, since nothing should hold it anymore. We pull the part towards us, gently rocking it from side to side.
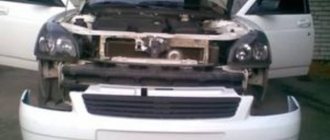
When the bumper is removed, its plastic reinforcement becomes accessible, which is attached to the car. If replacing the bumper became necessary after it was damaged in an accident, then it is likely that this amplifier was also damaged. In this case, it will also have to be removed and replaced with a new one. It is attached to the body with bolts that are visible and accessible. As a rule, there are only three of them. One in the center, and two more on the sides. We turn them away. Then we pull the amplifier towards us and remove it from the car. Installation of parts occurs in reverse order.
As can be seen from the above, replacing a bumper does not require special knowledge and skills, so even those who will be doing it for the first time should not worry. Almost nothing can be damaged or even broken. This takes little time, so there is no need to contact a car service center for help. You can also save money.
Removing the rear bumper
Removing the rear bumper is also quite easy. Before starting work, you need to gain access to the fasteners. The easiest way to do this is in a sedan car. You just need to remove the carpet from the trunk, and access is open. Things are somewhat more complicated with a “station wagon”; in this case, sometimes you have to remove the entire rear trim, and remove the side trim from its mounts and move it to the side. Next, you can begin removing the bumper fasteners.
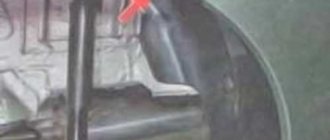
- We find the fixing bolts, insert a socket wrench with a 5-6 cm extension and unscrew all the fasteners one by one.
- We disconnect the clamps connecting the rear bumper and fender liners, which are located on both sides. Usually these are self-tapping bolts.
- We press on the element until it separates from the brackets located on the body, and carefully remove it, while lifting it.
The process of removing both elements is not labor-intensive, and even a beginner can do it. Now the protection element can be replaced with a new one or the planned work can be carried out and the dismantled bumpers can be installed in their original places
The installation of these protective elements must be carried out carefully and slowly, otherwise you risk damaging the wings
If you are an inexperienced motorist and are afraid of doing something wrong, you can always enlist the help of more experienced friends. Everything is not as complicated as it seems at first glance.
Reinstallation
Installing the rear bumper is done in the reverse order. Here it is also worth using the services of an assistant, since the rear bumper is also partially attached to plastic latches. In addition, during such reassembly, it is necessary to change gaskets, washers and other consumables in order to replace worn out accessories with new ones. Also be sure to thoroughly clean the damper mounting points from dirt and rust.
Front bumper - disassembly / assembly
The front bumper of a car in the “CROSS”* design has a more complex design and consists of several elements interconnected by latches and self-tapping screws, Figure 2-1.
1 — radiator trim; 2 – upper radiator grille; 3 – right arched youth bracket; 4 – right fog lamp: 5 – left fog lamp; 6 – left arched tone bracket; 7 – bumper: K lower radiator grille; 9 – upper right front bumper molding; 10 – upper left front bumper molding; 11 lower front bumper trim; 12 right front bumper trim; 13 – left front bumper trim: 14 – lower right front bumper molding: 15 – lower left front bumper molding
Place the bumper on the workbench, unscrew screws 3, Figure 2-2, securing bracket 4 of the arched area to the bumper, remove the bracket.
Unscrew the screws and remove the second bracket on the other side of the bumper (replaceable head Torx T20, knob).
Unscrew the screws 2 securing the bracket 1 of the fog lamp, remove the bracket as an assembly with the fog lamp. Unscrew the screws and remove the second bracket on the other side of the bumper (replaceable head Torx T20, knob).
Unscrew three screws 2, Figure 2-3, securing the lower molding to the bumper (replaceable head Torx T20, knob).
Remove the molding by pressing the locking latches (flat head screwdriver).
Unscrew three screws 1 securing the upper molding to the bumper (replaceable head Torx T20. wrench).
Remove the molding by pressing the locking latches (flat head screwdriver).
Unscrew the twelve screws 2, Figure 2-4, securing the bumper trim 1 to the bumper 3 (replaceable head Torx T20, knob).
Remove the cover by pressing the locking latches (flat-head screwdriver).
Dismantle the moldings and trim on the other side of the bumper in the sequence described above.
Unscrew nine screws 3, Figure 2-5, securing the radiator trim 1 to the bumper 2 (replaceable Torx T20 head, wrench).
Release the latches and remove the trim assembly with the radiator grille (flat-head screwdriver).
Unscrew screws 2, Figure 2-6, securing the upper radiator grille 3 to the lining 1 (replaceable Torx T20 head, knob).
Press the latches and separate the parts (flat screwdriver).
Unscrew screws 2, Figure 2-7, securing the lower bumper trim to the bumper (replaceable head Tbx T20, knob).
Remove the cover by pressing the locking latches (flat-head screwdriver).
Unscrew the eight screws 1, Figure 2-8, securing the lower radiator grille 2 to the bumper 3 (replaceable head Torx T20, knob).
Remove the grille by pressing the locking latches (flat-head screwdriver).
Reassemble the bumper in the reverse order of disassembly.
LADA VESTA. REAR BUMPER - REMOVAL AND INSTALLATION
Place the car on a two-post lift and brake it with the parking brake (electro-hydraulic lift type P 3.2 G).
Disconnect the negative terminal from the battery (spanner 10).
Remove the rear lights in accordance with the requirements of TI 3100.25100.20587.
Raise the car to a height convenient for work.
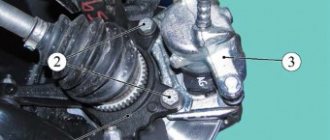
Unscrew two bolts 1, Figure 2-1, of the lower fastening of the bumper to the body and self-tapping screws 2, fastening the mudguard apron 3 to the bumper (replaceable Torx head T30, T20, knob).
Figure 2-1 – Lower bumper mount:
1 – bolt of the lower fastening of the bumper to the body;
2 – self-tapping screw securing the mudguard apron to the bumper;
3 – wheel arch dirt protection apron
Unscrew the self-tapping screw 1, Figure 2-2, on the right and left sides, securing the bumper to the rear fender (replaceable Torx head T20, wrench).
Figure 2-2 – Side mounting of the bumper:
1 – self-tapping screw securing the bumper to the body
Unscrew seven bolts 1, Figure 2-3, of the upper bumper mounting (replaceable Torx T30 head, wrench).
Unscrew the two bolts 3, having previously removed the stop 2 of the trunk lid buffer installed on the bolt head (flat screwdriver, replaceable head 13, knob).
Figure 2-3 – Upper bumper mount:
1, 3 – bolts of the upper fastening of the bumper to the body;
2 – trunk lid buffer stop
Disengage the bumper from the side brackets.
Remove the rear bumper by disconnecting harness 3, Figure 2-4, the bumper wires from the brackets on the bumper, and the wiring harness connectors from the safe parking sensors 1 and the fog light 2.
If it is necessary to dismantle the rear bumper trim, remove the safe parking sensors, unscrew ten self-tapping screws securing the trim to the bumper, remove the trim (flat screwdriver, replaceable Torx T20 head, wrench).
Installation is carried out in the reverse order of removal.
Present the vehicle to the Quality Control Department. The quality control department checks the vehicle for compliance with the requirements of TU 017200-254-0023934 in the scope of work performed.
Figure 2-4 – Bumper attachment
1 – safe parking sensor;
2 – fog lamp;
3 – bumper wiring harness
Video on the topic “LADA VESTA. REAR BUMPER – REMOVAL AND INSTALLATION”
Removing the bumper and installing a towbar on the Lada Vesta SV CROSS
Lada Vesta. Removing the front bumper
Removing the rear bumper on Lada Vesta
Review of Manufacturer Prices
| Name / Catalog article | Price, rub.) |
| 8450006951 Front bumper | From 4500 |
| 8450008641 Front bumper trim (middle) | From 550 |
| —/— 8450008340 | —/— |
| 8450006243 upper grille | From 1000 |
| 8450006025 lower grille | From 950 |
| 8450008755 upper left molding | From 650 |
| 8450008052 upper right molding | From 350 |
| 8450008058 lower molding | From 800 |
| 8450008069 mesh in the bumper | —/— |
| 8450006878 plug | From 250 |
| 8450006601 | —/— |
| 8450008021 overlay | From 350 |
| 8450008669 | —/— |
Related link:
Vesta SW – is it worth paying extra for the Cross console?
*prices are as of 02/01/2019.
Why replacement bumpers are in huge demand
A bumper is an element of a car that has the function of protecting and ensuring the design of the car. The protective function is to provide protection against the entry of various particles of the external environment into the vehicle’s components, as well as to provide a safer collision for all road users during an accident. The function of design is to provide appropriate styling to the vehicle.
Despite the quality of the bumper, this element is constantly exposed to the external environment. This:
- stones;
- curbs;
- ice;
- chemicals;
- small metal objects.
The rear bumper suffers mainly due to accidents, so the purchase and replacement of these elements also occurs frequently.
When is it necessary to register an engine replacement with the traffic police in 2020?
The car owner can change the engine in 2022 for several reasons.
- The old motor is not repairable, or its repair is not feasible from an economic point of view.
- The owner wants to improve the characteristics of the car (for example, power)
In these cases, the car owner has several options.
- Purchase original spare parts.
- Purchase an analog engine made by a certified manufacturer of spare parts.
- Purchase a suitable motor at a disassembly or second hand.
In the first two options everything is quite simple. You receive the spare part with documents, install it in the proper place and go to the traffic police department to register an engine replacement, if it is needed (clause 52 of the Rules, approved by Government Decree No. 1764 of December 21, 2019).
For the third scenario, the situation is somewhat more complicated. The catch is that spare parts purchased secondhand or at a disassembly site do not always have documents. If you decide to save on buying an engine, you can get into big problems, since units from stolen cars are often sold in this way. You can protect yourself during a transaction in 2022 by first contacting the theft department of the traffic police and making a request for the engine number.
Such actions are recommended when installing a spare part identical to the previous one. However, when installing a car engine in 2022 with other parameters, its mandatory registration with the traffic police is required.
Be sure that according to Order of the Ministry of Internal Affairs of Russia N 950, in 2021, when installing a new engine with characteristics different from the previous one, its mandatory registration is required. You should not look for loopholes and try to circumvent the law, otherwise, instead of spending a small amount of time on paperwork at the traffic police, you will have to spend a large amount of money.
Dismantling
It's better to start with the side deflectors. On the driver's side, you first need to remove the plastic cover behind which is the fuse box. To do this, you first need to pull out the plastic clips and then remove the cover itself.
Next you need to move the fuse box to the side. It is secured with three screws, but unscrewing them right away is not very convenient. Before doing this, it is advisable to unscrew the screw with which the dashboard itself is screwed to the amplifier, and also unclip the wall (side) of the dashboard. This will make it much easier to access the three fuse block bolts.
Then you need to unscrew the 2 screws that actually secure the deflector. According to reviews from Vesta owners, it is very inconvenient to unscrew them and it is unlikely that you will be able to do this without a screwdriver with a universal joint.
As for the right deflector, it is removed using the same procedure. The only difference is that the glove box on the passenger side still needs to be removed.
After the bolts on both deflectors are unscrewed, all that remains is to remove them. The algorithm, again, is not the most convenient. The deflector itself must be simultaneously pressed a little inward and snapped off from the pipes, and then removed through the seats in the dashboard.
Regarding other components in the dashboard, in particular, elements near the radio, the easiest way to pry them off is with a thin knife wrapped in cloth or electrical tape. But you should work extremely carefully so as not to break the plastic clips.
The components in the door panels are removed in the same way. Of course, to be extra sure that nothing will break, it is recommended to remove the door cards and remove the inserts from them. However, this is quite labor-intensive and time-consuming, so most people prefer to do without such disassembly of the doors.
This completes the process of removing the air deflectors and other interior plastic of the Lada Vesta.
Radiator hazard
Vesta's radiator grille is distinguished by large slots into which a stone or piece of ice can fly. Such a hit can be critical for the radiator, because the component is not particularly strong. The same applies to the air intake.
Naturally, all this forces many Vesta owners to install protection made of metal mesh, which covers the slots and is able to repel the impact of stones and other debris. In addition, the mesh is fine, which means that insects and other small debris will not settle on the radiator.
An example of what can happen to a radiator if a stone hits it.
The need for overlays
The need for the Vesta overlay is due to the desire of many car enthusiasts to distinguish their car from the “gray mass”. The pad is a beautiful accessory and a useful addition to the buffer. When you put heavy things in the trunk, you can accidentally scratch the paint - the cover will prevent this from happening.
We also note that the cover (bumper reinforcement) will increase the level of car safety. It is installed to protect against minor damage. The amplifier is required to protect against small stones flying from under the wheels. They can scratch the car's paintwork.
How to remove a bumper on a Lada Vesta: front, rear - step-by-step instructions with photos and videos
In the modern world, motorization has gained enormous development. The number of cars is steadily growing, and people want to have not only a means of transportation, but also transport that meets all the requirements of the indicators of prosperity of modern society. Mostly foreign cars are purchased, but the Russian market has already begun to produce high-quality and luxurious cars that satisfy most requests. One of these is Lada Vesta.
But it happens that some body elements wear out over time or become corroded, which significantly spoils the appearance of the vehicle. There is also often a need to repair or tune a car, as well as replace parts with new ones after an accident. In this article we will talk about replacing the front and rear bumpers of a Russian-made Lada Vesta car, which you can do yourself.
Why replacement bumpers are in huge demand
A bumper is an element of a car that has the function of protecting and ensuring the design of the car. The protective function is to provide protection against the entry of various particles of the external environment into the vehicle’s components, as well as to provide a safer collision for all road users during an accident. The function of design is to provide appropriate styling to the vehicle.
Despite the quality of the bumper, this element is constantly exposed to the external environment. This:
- stones;
- curbs;
- ice;
- chemicals;
- small metal objects.
The rear bumper suffers mainly due to accidents, so the purchase and replacement of these elements also occurs frequently.
Bumper Removal Tools
Removing the bumper of this car is necessary for several reasons, since there are quite a few important elements behind it. Installation/disassembly occurs for several reasons:
- radiator grille replacement;
- installation of an alternative signal;
- dismantling head optics;
- if there is a need to access the temperature sensor;
- installation of fog lights.
To carry out installation/dismantling work on the Lada Vesta bumper, you will need the following tools: Torx keys T20 and T30, socket 10, wrench 8.
When working with the Lada Vesta bumper, think about having an assistant - this will make the work easier and faster without the risk of damaging the fasteners.
How to remove the front bumper on Vesta
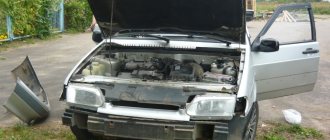
The Lada Vesta bumper is removed together with the radiator grille and fog lights (if equipped), so they should be turned off before starting work. After this, you should start working directly with this body element. You should:
- open the hood;
- remove the license plate;
- unscrew the two air receiver bolts;
- Unscrew the four lower mounting bolts (No. 2 in the picture below);
- Unscrew the four self-tapping screws fastening to the wheel arch liners (No. 1 in the picture below - self-tapping screws of the lower fastening of the wheel arch mud guard);
- unscrew the four screws (two on each side) of the side fastening (No. 2);
- unscrew the six bolts of the upper fastening (No. 1 - bolts fastening to the cross member of the radiator frame);
- unscrew the two fastening bolts to the beam (No. 2 - fastening screws in the beam);
- remove the bumper by carefully pulling it towards you, removing it from the brackets.
Reviews are positive and negative
| № | Positive |
| 1. | Vasily , 32 years old, store consultant: this is the second year I’ve been actively using the car, I’m completely satisfied with it. My friends tuned Vesta, but I don’t need it, I drive the stock version. |
| 2. | Vitaly , 41 years old, repairman: I bought the car second-hand, got it in good condition from the previous owner. He was fond of tuning, I like the modernized appearance of the Lada Vesta, I want to try it myself. |
| 3. | Gennady , 39 years old, manager: a year and a half has passed since the purchase of the car, there are no particular complaints. Build quality is good despite being the basic version. I've heard a lot about modernization and covering with body kits, but for me it's not important. |
| 4. | Ivan , 45 years old, bank employee: I use my car extremely rarely, mainly for traveling to and from work. It does not require capital investments, only payment for scheduled maintenance. I'm not planning to modernize anything, the interior and exterior are quite satisfactory. |
| 5. | Vladimir , 48 years old, taxi service worker: I’ve been actively driving a Lada Vesta for a year, the car is solid, there are no comments. The body shape, aerodynamics, and wheel arches are well thought out and improved, unlike the Lada Granta and other modifications. |
| Negative | |
| 6. | Victor , 29 years old, private entrepreneur: I use the car to visit clients and conclude contracts. On the highway, with the window open, a whistle can be heard from under the wheel arches. Comrades said that this is a disease of the model range, a low aerodynamic coefficient. |
| 7. | Vladislav , 39 years old, insurance company employee: I need a car for work, I often “drive” around the city. In general, there are no comments, but the buffers are too thin and fragile. I have something to compare with, before this there was a Lada Granta, the quality was better there. |
| 8. | Alexander , 28 years old, IT company employee: I’m happy with the machine, the build quality is good, much better than previous models. Tuning accessories are expensive and the quality is low. |
| Video - Removing the front bumper | Video - Removing the rear bumper |
Radiator protection Volkswagen Polo (14-)
Experts agree that the radiator grill very often becomes one of the most vulnerable parts of a car.
Experienced motorists know the damage small stones, dirt, and winter chemicals cause to the grille. A beautiful, sparkling radiator grille can lose its presentation in just a few days, become covered with dents from stones and traces of insects crushed against it.
Even worse, your car's engine or air conditioning may be damaged.
“Standard” protection – the safety of your car is under control
It is attached to special plastic L-shaped latches. To protect the body paint, there is a special rubber edging around the protective grille. Fastening is carried out quickly - the L-shaped elements are simply snapped onto the back side of the bumper, and the stability of the entire structure is given by self-tapping screws.
The edging is made of ABS Plastic.
Don't forget about the winter option!
Don’t forget about the winter version of radiator protection. It is a convenient plastic cover. The use of such a cover perfectly protects important technical components of the car from snow, stones, dirt and chemicals.
5 main reasons to use protection
- The defense really works. Many motorists around the world have already become convinced that radiator protection can protect the car from various types of external threats.
- You can install the mesh yourself without any difficulty. It will take you no more than 20 minutes. No need to remove the bumper, no risk of scratches.
- The mesh will increase safety. Using a net does not interfere with the comfortable operation of your car. You can quickly dismantle it without leaving any traces.
- The mesh will give the car individuality. Installing a mesh to protect the radiator is one of the tuning elements. This will help give your car an original appearance and make it much more noticeable.
- Protection is a profitable investment. The mesh can withstand strong external influences and does not rust. You will receive a 1-year warranty on standard coverage, while premium coverage will last you at least 3 years.
Real benefit for your budget
Still unsure about purchasing a mesh? Then let's just calculate your possible losses from the need to replace the air conditioner or clean the radiator.
On average, replacing a car's air conditioner will cost about 48 thousand rubles, and you will be left without a car for up to two weeks. Even if you regularly clean the radiator grill, then get ready to fork out 14 thousand rubles.
In this case, you will need to wait at least 4 hours, and if the service is heavily loaded, up to two days.
As a result, you have a choice - spend more than 48 thousand on replacing the air conditioner or buy and install a mesh once. For a motorist who thinks and cares about his car and budget, the choice is quite obvious.
Order radiator protection from us
All you have to do is contact us and place an order. Our managers will help you with advice when choosing, and in the catalog you will find high-quality protection for a specific car. It's time to protect your car. This is quite real and available to you!
Pickup
Address: Moscow, Lobnenskaya st., 21, 2nd floor, office 221. To avoid unpleasant situations associated with the lack of the required product in stock, please call in advance and reserve it.
Delivery by courier in Moscow and the Moscow region
- Delivery cost: 300 rubles (from 10,000 rubles - free)
- Delivery cost outside the Moscow Ring Road: 300 rubles + 20 rubles. for 1 km.
Regional delivery
- Delivery by Russian Post (cash on delivery - payment after receipt)
- Postal delivery throughout Russia - from 250 rubles. (The cost and delivery time depend on the region, weight and declared value of the parcel)
- Delivery by transport company
- Delivery cost from 400 rub. (depends on weight, dimensions and declared order value).
- Delivery to transport companies - PEC and Business Lines is free! The cost of delivery to other transport companies is 300 rubles!
Delivery by SDEK service
- Delivery to pick-up point (more than 500 cities)
- Delivery to the address
To calculate the cost of delivery of your order, please contact our manager,
Heat marathon or how to close the radiator grill of a Lada Vesta: a review of handmade solutions
The single resolution of experiments and reasoning is to insulate. Combining the operation with the morning warm-up ceremony is not the best idea: you can’t put the cardboard in a second, there are no cracks. Generally speaking, a sheet of cardboard in front of the grill is impractical advice:
- Installation involves removing the bumper.
- Thick paper gets wet quickly and hardly dries out.
- It is necessary to ensure a gap between the heat exchanger and the insulation.
With an eye to accuracy
Horizontal fins, wide spacing between them, recessed radiator honeycombs – this is not an exemplary platform. Select a material of a nondescript color, cut it into pieces and insert it between the edges - simple and inconspicuous. It is not at all necessary to hide the modification - the tone in the color of the car adds presentability.
Technically, there are no difficulties. Minimum amount of funds:
- An ordinary isolon or travel mat of a suitable color.
- 15-20 plastic clamps of a certain tone.
- Stationery knife.
- A long, straight piece of wood.
The preliminary dimensions of the strips have already been taken and estimated (windows are numbered from top to bottom):
The trapezoidal shape is not typical for all windows. The nameplate extends slightly onto the first and third platforms, and in the fourth opening under the license plate a narrowing is applied over a very long segment. It is not necessary to cut out a stencil for problem areas - careful adjustments on the spot will do. For fastening, 4-5 ties are used per strip.
Limiting air cooling to 100% is acceptable at ambient temperatures less than -25°C. During the thaw, it is recommended to open one of the windows, since in traffic jams the cooling fan may turn on. It is optimal to remove the second strip of two parts: the appearance will not be affected.
Fast and practical
A hastily cut sheet of foiled polypropylene is certainly a quick solution, but not an aesthetically competent one. Another thing is to close the openings in the Vesta radiator grill with Flex tubes. The dimensions are known, cut, cut lengthwise and insert. The exterior is a C grade, but it’s simple, fast and cheap. Pre-painting can increase the beauty index.
Branded plugs are of poor quality and expensive. Who needs cheap shiny plastic for 1,000 rubles, which frankly spoils the pretty expression of the front end. And what will happen to him after meeting with stones from hitchhikers? An almost similar situation with 17 discs on Cross versions: a test of winter tires for the Lada Vesta SV Cross explains the problem in detail and gives a recipe for solving it.
Exclusive
Full-length faux leather covers or raincoat fabrics stitched with decorative stitches are a stylish feature. It’s also practical - make the windows fold down and the weather won’t thaw. There is no way to hide the fasteners. However, you can make them an integral part of the design idea by adding plastic eyelets in the required places.
Brand protection
It is a finished product. This is a set of 4 components for the radiator grille (upper, 2 central and lower), and 2 for the air intake (upper and lower). It is worth noting that these items are sold separately.
The mesh is made of aluminum, which guarantees high strength and excellent ventilation - this is achieved through the optimal cell size. Each component of the Lada Vesta radiator protection has an edging made of ABC plastic.
Branded protection kit.
You can buy protection not only on the automobile market or in a car dealership, but also via the Internet. As for prices, they are the same on almost all portals, but the cost varies slightly depending on the color and coating.
Lada Vesta radiator protection prices:
- For a black radiator grille (top) – 3200 rubles;
- For a chrome radiator grille (top) – 3,300 rubles;
- For the air intake, black (lower) - 2100 rubles;
- For the air intake, chrome plated (lower) - 2200 rubles.
The price tag may fluctuate slightly, but the differences between sites are minor. In addition, you can order the mesh painted white.
List of sites where you can order protection:
- https://strelka11.ru/zashchita-radiatora-standart/lada/zaschita-radiatora-lada-vesta-s-2015g-v-detail
- https://naperedok.ru/product/item/zaschita-radiatora-lada-vesta-2015
- https://zashita-radiatora.ru/collection/zashita-radiatora/lada/zaschita-radiatora-lada-vesta-2015-nv-detail
- https://www.save96.ru/zashhitnaya-setka-radiatora-na-reshetku-Lada-Vesta-2015/
- https://lada-vesta-shop.ru/shop/tyuning/setka-radiatora-lada-vesta-strelka.html
Overall, this option is quite good, and the factory mesh looks very stylish. However, the price for a complete set of Vesta radiator grille protection is depressing - not everyone is ready to pay 5300-5500 rubles.
Tuning the Lada Vesta bumper
To tune this car, you can purchase various accessories that increase the characteristics of the car. Basically this is the installation:
- thresholds;
- spoilers;
- body kits;
- deflectors.
How to install a trim on the rear bumper of a Lada Vesta
To protect your bumper from aggressive external influences, consider purchasing a cover. It will contribute to protection in case of an accident, and will also allow less frequent work to replace or repair the bumper.
This overlay is made from high-quality plastic and is attached to double-sided tape and (or) screws securing the bumper to the body. The installation work is not difficult, so you can handle it yourself.
Plastic trim for rear bumper
Installation is performed in the following order:
- unscrew the bolts securing the rear buffer using a TORX T30 wrench;
- degrease the surface;
- remove dust particles;
- wipe the surface dry;
- remove the protective adhesive film from the lining;
- glue the trim to the bumper;
- screw the screws back in;
- remove the protective layer from the lining, if any;
- all is ready!
This is what the protective trim looks like when the trunk is closed
Recommendations for selection
Buy parts from certified sales outlets. Carefully check the catalog numbers with the data specified in the instruction manual.
Check the packaging for integrity and the application of protective holograms. Ask distributors to provide a quality certificate for their products.
Conclusion
Replacing the front (rear) buffer is simple, but requires care on the part of the repairman. If you follow the recommendations, replacing parts will take no more than 20 minutes.
If any difficulties arise, seek help from service station specialists, watch video tutorials, or get advice from a dealer. How effective and justified the installation of freelance bumpers is, decide individually, based on your needs and requirements.