Replacing the lock cylinder, if there is a practical need for it
VAZ 2110 door lock cylinders
It is necessary to objectively understand that removing the door trim of the car interior is a prerequisite for replacing the car lock cylinder. Often, and in almost the absolute majority of cases, it is necessary to repair or change a car lock as a result of an attempted theft.
A complete algorithm for replacing the lock cylinder with a detailed description
So:
- first you need to very carefully remove the door trim;
- then, using a suitable screwdriver, unscrew the three mounting screws that hold the car door handle on the inside;
Lock cylinders for VAZ 2110
- now you need to disconnect the rod and the car door handle;
- after which, you must again use a screwdriver and release the lock switch from the rod;
- now, it’s time to release the lock cylinder from the bracket using a screwdriver;
Repair of lock cylinders for VAZ 2110
- if all of the above technical manipulations were completed successfully, then removing the car lock from the doorway will not be a practical task;
- now you need to unfasten the door handle, which is located outside, from the rod;
- then, using a figure-eight screwdriver, unscrew the two fastening nuts, which are located on the inside;
- after which, you just need to remove the car door handle;
Replacing door lock cylinders for VAZ 2110
- the time has come to start fixing the lock externally, having first removed the internal one, and for this you will need to unscrew two screws from the outside;
- as soon as the two external fastening screws are unscrewed, it will be practically possible to disconnect the internal component of the lock from the corresponding rod;
- now there are no obstacles left to completely remove the traction;
- after removing the lock rod, it is necessary to remove the rod that controls the shutdown button; to do this, you need to carefully remove the retaining plastic clamp;
- to remove the internal drive rod, you must first remove the stopper washer;
- the door pillar contains a lock latch adjuster, guided by its position;
- the lock regulator must be carefully and efficiently adjusted; to do this, you must first unscrew the three corresponding fastening nuts using a specialized Phillips-shaped screwdriver;
- now there is a practical opportunity to carry out the appropriate adjustment, upon completion of which it is necessary to tighten all the fastening nuts to their original position;
- in order to remove the latch, it will be necessary to unscrew the corresponding screw that holds the latch;
- after which, the screw itself must be removed;
- in the end, there are exactly two bolts left that hold the latch (they need to be unscrewed);
- the final stage is the direct removal of the lock retainer from the door pillar;
- Assembly is carried out strictly in reverse order.
Replacing a lock cylinder is a simple technical manipulation, however, it contains many nuances. Photos and videos - materials will help you understand all the nuances. The DIY replacement instructions are multi-step, but simple in terms of practical application. The cost of replacing the lock cylinder is low, but if you go to a car service center, they will most likely change the entire lock, citing the fact that there was no other way out. Although in fact the goal of such an action is extremely simple and is to increase the repair budget. In any case, by performing the replacement yourself, the car owner does not lose anything, because in case of failure, the opportunity to contact a car service always exists.
Lada Kalina Station Wagon ◄space panther► › Logbook › +21 mm front Lada Kalina 2 (spacers)
Tires 185/70 R 14 for Lada Kalina 2 are good. But I want more ground clearance for affordable money. This desire is associated with the quality of roads in the Leningrad region and St. Petersburg. To increase the front clearance of the Lada Kalina 2, I decided to install 21 mm spacers (Article: 21-15-001/20) between the A-pillar support and the body reinforcement.
Of the main body movements and manipulations (briefly): 1. Remove the wheel
2. Disconnect the steering rod from the shock absorber strut
3. Disconnect the stabilizer link from the lever
4. Disconnect the brake hose from the shock absorber strut
5. Remove two bolts from the steering knuckle and shock absorber strut
6. Unscrew the three nuts of the upper shock absorber support and pull out the shock absorber strut assembly with the spring and upper support 7. Replace the bolts of the upper shock absorber support with the bolts from the kit
8. Install the +21 mm clearance spacer on the upper shock absorber mount
9. Install on spacer
10. Install everything back 11. Tighten all nuts to the required torque. Tighten the upper support nuts when the front of the car is on the front wheels.
12. Adjust the wheel alignment angles
Don't forget to lubricate everything if necessary.
If the bolts (camber bolts, with an eccentric) do not come out of the holes of the steering knuckle and shock absorber strut, then we heat the necessary part of the steering knuckle, not the shock absorber strut, and knock out the bolts.
Everything was installed without a hole in the garage.
For those who like spacers between the “cups,” the height of the new bolts in the upper support of the shock absorber strut will be sufficient.
An additional positive effect of the +21 mm spacer at the front of the Lada Kalina 2 is that less dirt will fly into the engine compartment.
Attention! This type of work can be dangerous to the life and health of you and others.
You take full responsibility for Your actions!
I will count idiots with My idiotic comments!
Reasons for replacing the lock cylinder
Blocking of the internal or external mechanism occurs due to improper operation, burglary or severe frost. Prerequisites for the device to break soon: creaking, difficulty turning the key, the rod has difficulty entering/exiting the core. At such moments, the larva can be saved if you go through it: apply lubricant to individual elements and remove contaminants.
For VAZ 2110, replacing the driver's door lock cylinder will be required when:
- climatic changes;
- failure of the locking ring;
- pin falling out;
- violation of the integrity of the thrust cap;
- wear of columns or teeth.
If individual fragments malfunction, they begin to cling to each other, blocking the rotation function. In winter, moisture often gets into the core and freezes. Because of this, the key turns with difficulty, jams the unlocking mechanism, or becomes blocked. Repairs have to be carried out from the passenger compartment and entered into the car through the back door.
When to change the lock
So, the need to replace the standard factory lock with a modified one arises in the following cases:
If you suspect that someone tried to steal your car. As a rule, inexperienced car thieves can only damage the lock, as evidenced by the following signs: • The front door lock began to dangle, which was not the case before; • The key turns with difficulty, naturally, the doors are not easy to open; • There is visually noticeable damage in the lock area and/or near it; • You cannot open the front door at all with your own key;
You have lost your keys. Even if you have a spare set, this fact should alert you. Maybe the keys were not lost at all, but stolen, and now car theft is a real danger. In this situation (as well as in the case of the “inexplicable” loss of house keys), for most, a replacement is an indispensable condition for sleeping peacefully. By the way, in such a situation, perhaps only the larva will be replaced, which is cheaper and less work. The cylinder is the internal door mechanism, which is actually turned with a key. It is as individual and unique as the key itself. Thus, without disassembling the entire mechanism (which is discussed below), you can carry out this small repair in order to have a completely new lock for opening the front door;
Accidentally, mechanically, you broke something in the front door lock mechanism
For example, changing the upholstery, making careless adjustments, etc. After all, the design of the lock is such that it is not limited to only the visible part, but has locking parts directly under the door trim; You want to make the lock more reliable by increasing its protective properties, for which you carry out repairs and modifications.
Ground clearance of Lada Kalina, increase in ground clearance of Lada Kalina
Ground clearance of the Lada Kalina or ground clearance , as for any other passenger car, is an important factor on our roads. It is the condition of the road surface or its complete absence that makes Russian motorists interested in the ground clearance of the Lada Kalina and the possibility of increasing ground clearance using spacers.
To begin with, it’s worth honestly saying that the real ground clearance of the Lada Kalina may differ significantly from that declared by the manufacturer. The whole secret is in the method of measuring and where to measure ground clearance. Therefore, you can find out the real state of affairs only by arming yourself with a tape measure or ruler. The official ground clearance of the current generation Lada Kalina is 160 mm ; on the version with a 4-speed automatic transmission it is only 145 mm . However, with an empty car you will measure significantly more clearance. There is no contradiction here, the manufacturer simply indicates the ground clearance in a fully loaded car.
Installation of electric door lock drives
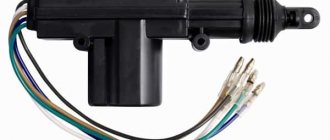
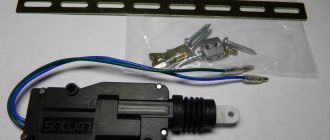
On VAZ 2110 family vehicles, the manufacturer can install a door lock system. It simultaneously locks all doors when the left front door is locked with the key, as well as when the left front door lock button is pressed. Thus, this locking system is a so-called “central locking”, which in its factory version does not allow the car doors to be unlocked and locked remotely. The capabilities of electronic alarm systems allow you to remotely control the door locks and, if you are going to install one of these systems on your car, this function can be easily implemented. If your car does not have a factory locking system (this is the most common configuration option), then in addition to the alarm system you will have to install electric locking drives. The electric locking drive is a gearmotor that combines a DC electric motor with excitation from permanent magnets and a gearbox with a rack-and-pinion type engagement. Geared motors are installed in the car doors, and their rods are connected to the lock lock rods.
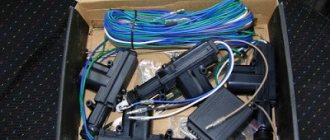
The gearmotor is usually sold together with a set of parts necessary for its installation. The kit includes: a mounting plate, a set of fasteners and a coupling (for connecting the gearmotor rod with the lock lock rod), as well as the gearmotor rod.
Purpose of the rear pillar
Comfort and safety of movement in a car directly depends not only on the presence of air conditioning or a transparent windshield. A hard suspension will not add comfort, and an overly soft one will cause the car to roll over when cornering. Therefore, the suspension characteristics are carefully selected by the manufacturer. Now there is a great opportunity to adjust the suspension to a certain driving style or to the quality of the road surface. There are no such conditions in the basic configurations of the 2110, but adjustable suspensions in both height and stiffness can be considered as an option. Such systems are capable of changing suspension settings in real time for more comfortable or safer passage of sections of the route.
These are quite expensive systems, so it makes no sense to install dozens of them. But there are a lot of manufacturers who sell assembled struts, already configured for a sporty driving style or a more comfortable one. Sports shock absorbers and springs have shorter strokes, they are stiffer than stock ones and allow the brake force to be dosed more accurately and respond better to changes in direction of movement in emergency situations. Also, by installing such struts, we lower the vehicle's ground clearance, which also helps to improve handling in dynamic modes. But any racks need to be changed sooner or later.
Let's make the alarm system and central locking together
Any modern alarm unit is equipped with two relays connected to the central locking control unit. One relay is opening, the second is locking, and the circuit in the general case looks like this:
In our case, the green and white cords coming from the signaling unit will be required, as indicated in the diagram. However, they will not be the only ones needed. We will connect the relay contacts to breaks in the standard wiring. This means there will be not 2, but 4 cords.
Connection diagram for VAZ central locker
Take another look at the diagram published in the first chapter. We will connect the relay to the gap in the white and brown wires going from the microswitch to the central lock control unit. And it is obvious that it is easier to break these wires near the 8-pin connector. The same one shown at the beginning.
To avoid any questions, we will show you what should happen as a result:
Connection diagram, central lock VAZ
The common contacts are connected to the wires coming out of the microphone. The white cord continues with the brown wire coming from the door, and so on. Normally closed contacts are also used, along with normally open ones. These are the features of connecting to the VAZ central locking system.
An approximate sequence of actions performed by the installer:
- Make and lay a 4-core cable running from the signaling unit to the 8-pin connector;
- Connect the cable on the side of the alarm unit (see the last diagram);
- Near the 8-pin connector, disconnect the white and brown wires coming from the microswitch (pins 5 and 7). The main thing is not to confuse them with the wires going to the triangular connector “C”;
- Make connections to the broken wires, white and brown. That's all.
We have given this sequence to emphasize once again that the relays are switched on between the microphone and the central lock control unit. There is no need to connect any additional devices. As a result, the alarm system will be able to control the state of the locks.
All wires added to the car structure must be protected (use heat-resistant tubes or electrical tape). Twisting is not the worst method to connect two wires. But it's even better to use soldering.
It would seem that if a person has experience working with electrical equipment, he can do everything according to the instructions given. As a result, if no mistakes are made, you may encounter an interesting phenomenon. Instead of closing, there will be a short-term locking followed by opening. And vice versa. What to do in this case?
Take a look at what exactly may be present in some of the configurations:
The driver's door may not have an actuator. And then, it is useless to connect the signaling system to the control unit. There is no actuator, which means there is no one to close or open the door and move the microphone lever. Let's say the locks are closed, and then we remove ground from the brown wire and we get the following: the white wire is on ground, unlocking occurs.
We note the following: installation can only be carried out when you are sure that there is an actuator in the driver's door.
There were configurations where only a microswitch was installed. There is no need for arrogance here - adding an actuator will be difficult, since standard wiring must go to it. As you understand, it may not be available from the factory. And it’s unclear what to do then.
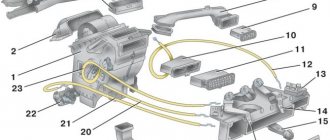
There remains one unanswered question - where exactly the central locking control unit is located. In these VAZ models, if there is a central locking system, then there is also a control unit. And it is located under the torpedo cover, next to the driver, on the right:
We remove the “beard” of the torpedo and look at what is on the upper right. On the same plane with the radio connector there are two boxes attached - the one we need, as well as the immobilizer (if there is one).
We would be lying if we did not say that in reality there is another option for installing the alarm. Standardly, only two power cables go to the actuators. Having a power outlet equipped with a fuse, these cables are connected directly to the alarm relay. This option, as you might guess, is not recommended. Imagine what would happen if the alarm system broke. The central lock must remain, but in this case this will not be done. Happy connection!
VAZ 2111 engine control circuit
- 1 — fragment of the mounting block.
- 2 — electric fan of the engine cooling system.
- 3 - status indicator of the car anti-theft system.
- 4 — control unit of the automobile anti-theft system.
- 5 — coolant temperature sensor.
- 6 — air flow sensor.
- 7 - throttle pipe.
- 8 - block connected to the throttle position sensor.
- 9 - block connected to the idle speed regulator.
- 10 – VAZ 2111 controller.
- 11 - block connected to the air conditioner wiring harness.
- 12 — oxygen sensor.
- 13 - knock sensor.
- 14 - crankshaft position sensor.
- 15 - speed sensor.
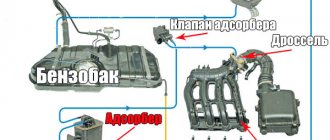
- 16 – adsorber.
- 17 - battery.
- 18 - main relay.
- 19 - block connected to the wiring harness of the anti-lock brake system.
- 20 — diagnostic block.
- 21 - main relay circuit protection fuse.
- 22 - controller protection fuse.
- 23 - fuse for protecting the electric fuel pump and its relay.
- 24 - relay for turning on the electric fuel pump.
- 25 — relay for turning on the electric fan.
- 26, 27 — blocks connected to the instrument panel wiring harness.
- 28 — ignition module.
- 29 - electric fuel pump with fuel level sensor.
- 30 - spark plugs.
- 31 – injectors.
Purpose of the plugs in block 26: 1 - to the low-voltage input of the tachometer in the instrument cluster; 3 - to the “Engine fault” lamp in the instrument cluster (from the controller); 4 - to the lamp switch located on the driver's door pillar; 5 - to the “Engine fault” lamp in the instrument cluster (supply “+” power); 6 — to the trip computer (fuel consumption signal); 7 - to the instrument cluster (vehicle speed signal 2111); 8 – to terminal “15” of the ignition switch (plug 4 of the switch block).
Car lock device
Several types of unlocking devices are produced with Finnish, safe, frame and pin keys. The cost of a whole castle starts from 1000 rubles, but the cylinder costs less. VAZs are equipped with a domestic mechanism with pins that have right and left teeth. Each of them has its own name. Those in the middle are called code ones. If the mechanism jams due to wear, lack of lubrication or temperature changes, the grooves become blocked and do not return to their original position when the key is turned.
Pin devices are easy to pick with a master key, and they can break if not properly maintained. It is quite possible to repair a classic VAZ larva without having to replace it. The price of a VAZ 2110 door lock starts from 500 rubles. This kit includes a locking mechanism for the driver's door and trunk.
How is vehicle clearance determined?
There are no clear rules among automakers for determining vehicle clearance. The measuring process in each individual case occurs completely differently. Most people overestimate the figure, and some underestimate it. Typically the lowest point is the front suspension arms. Although it is customary for SUVs to rather measure the distance from the ground to the gearbox. After all, it is bridges that often become an anchor when overcoming difficult off-road conditions. Based on the experience of MFC LFA specialists, it is possible to form a certain gradation of cars based on their ground clearance
✅less than 120 mm – sports and supercars
✅from 120 to 150 mm – most passenger cars without a special package for bad roads
✅from 150 to 170 mm – cars equipped with a package for bad roads
✅from 170 to 210 mm – crossovers
✅over 210 mm – SUVs
However, there are exceptions. For example, the Mini Countryman, being a crossover, barely has 150 mm under the bottom. At the same time, the competitor Subaru XV with its 220 mm is entering the territory of SUVs.
It will be useful to watch a video from our colleagues. It describes in detail all the features of measuring vehicle ground clearance.
The most important increase in ground clearance is for owners of foreign cars that do not have a package for bad roads and are not equipped with air suspension. An extra 2-3 cm will protect them from eternal breakdowns in the spring and on regional roads, and will also allow you to easily climb even the highest curbs without fear of damaging expensive front levers, including those made of soft aluminum, and the paintwork of the front bumper. In addition, not all cars are equipped with engine protection. If there is insufficient ground clearance, hitting a homemade concrete speed bump can cause damage to the engine and transmission.
According to statistics, the most popular spacers are for increasing the ground clearance of Ford Mondeo 3, Ford Focus 2, Volvo and Nissan Pathfinder, as well as Kia Sportage 3 and Passat B3. In addition, customers are interested in increasing the ground clearance of Ford Mondeo 3, Renault Duster, Hyundai ix35, Kia Seed Station Wagon, Suzuki Swift 2012, Honda Civic 4d, Kia Sorento 2010 and Kia Carens. Spacers to increase ground clearance can be purchased in Moscow along with the installation at the LFA MFC.
Why the central locking on the VAZ 2110 does not work correctly
The problem of improper operation of the actuator is not at all uncommon for cars in the domestic automobile industry. Despite the fact that there are a number of reasons for the failure of mechanism parts, the principle of operation of the automatic door closing system is quite simple, and the malfunctions are very typical in their entirety. This means that any motorist can deal with them.
You don’t have to grab your head and run to the workshop in search of a qualified specialist. Thanks to the diagnostic recommendations below, you yourself are very likely to become one. If, for some reason, you don’t want to get your hands dirty, at least no one else will dare to mess with you. And this, you see, also costs a lot.
What is required to install central locking on 2 doors?
- A working and installed car alarm system with power outputs for controlling door locks.
- Activators, actuators, actuators, solenoids, electric drives or, finally, just central locks - 2 pcs.
- The wires are two-core, copper. The diameter or cross-section of each wire must be at least 0.75 square. Length about 3-4 meters.
- Plastic clamps - 10 pieces, maybe more, “in reserve.”
- Other: electrical tape, heat shrink tubing, wire cutters, screwdriver, soldering iron, solder, multimeter, drill, drill bits, electrical extension cord, etc.
Before we begin directly installing central locks, we will analyze each point above in order, in more detail.
1) In this article we will not talk about how to install an alarm yourself, but we will assume that it is already installed. The cheapest option (about 1,300 rubles) is a simple alarm without feedback.
Which model to choose, how to connect correctly, how much it costs and other questions about car alarms will be discussed in another article. Just a few important points to keep in mind.
Firstly, the main alarm unit must have a connector (usually 6-pin) with power outputs for connecting door locks. Secondly, before purchasing, decide in advance whether you need an additional alarm channel. It can be used to open the trunk or, for example, implement the “light path” function and other similar functions. It all depends on your imagination and ideas, so it’s up to you. 2)
Lock activators are not called by any name, so don’t be surprised by so many names. We will stick to this term. The central locking solenoid most likely refers to an electromagnet, which is most often installed to open the trunk. In terms of power (traction force) it is much stronger than plastic activators, but it is also more expensive.
The approximate price for a regular central locking activator with 2 outputs (two-wire electric lock) is 100-120 rubles. a piece. For 2 doors you will need two activators, the total cost is about 250 rubles. The kit for each activator includes a special strip for attaching the central lock and self-tapping screws, as well as a rod, screws and a metal retaining plate.
3) To save insulating tape, it is advisable to take copper wires in general insulation around the insulated conductors, but you can also buy them separately (single-core). The cross-section of the conductor must be at least 0.75 square. The current consumption of a conventional electric central locking drive can reach 5A at its peak.
In auto stores you can choose wires of various diameters, colors and lengths. Some are sold in ready-made installation kits or kits. Individually or “by meter,” most often, single (single) wires are found.
We recommend going to a regular electrical supply store and purchasing a two-conductor copper cable (the individual wire of which has a stranded conductor). For example, a PVS 2×0.75 cable (with a polyvinyl chloride sheath) or a PVS 2×1 mm cable is suitable. These wires are used to connect various electrical appliances, power tools and other machines and devices. The cost is about 12-15 rubles per 1 meter.
You can look for special automotive PGVA wires, which are intended for automotive equipment and instruments. They also have polyvinyl chloride insulation and are undoubtedly suitable for connecting central locks.
For reference: PGVA wires are designed for flexible connection of electrical equipment and devices with a low rated voltage (up to 48 V) in temperate, tropical and cold climates. PGVA wire is resistant to vibration loads, cracking, gasoline and oils. When laid alone, it does not spread fire.
https://youtube.com/watch?v=aXgLJVtdJaQ
central locking
I decided to install a central locking system and connect it to the signaling system, I will describe everything in stages.
Tools:
To begin, we remove the door, remove the trim, the handle, the window lifter handle and the plug from the door handle.
Next, you can begin installing the actuator.
Personally, I attached the actuators to the included strips:
Why is this so? Because it was just enough to secure the length of the rod included in the kit and there was no need to add anything - shamanism. Some do this:
but then you will need to select and place a washer, nut or something else under the lower mount so that the actuator does not warp, it seemed to me that it would be easier and more reliable to use the bar.
In the open position of the door (pulled out) we pull out the acuator to the maximum and, using the included fastener, we hook the rods and screw in the bolts.
Now it is advisable to check the actuator so that it opens and closes the door freely. Just connect the wires to positive and ground, change the polarity and check the opening and closing. If everything is ok. We put it in the second door in the same way.
For convenience, unscrew the door stops
We drill a hole in the place we like, I drilled with a 10m drill. It's better to drill a hole in the door first.
We select a place so that it does not touch the seal and so on.
We close the door and draw or scratch a post from the inside of the door through this hole so that the second hole is coaxial and there is no bending of the wires when the door is closed.
Next, we drill the holes to the required size so that the rubber tube fits freely into it, the hole in the rack should not be much larger, so you will also need to insert the tube seal. We check whether the holes were made correctly, whether the wires will bend when closing the door.
We pull the wires, it’s easier in the passenger door, there is a hole in the glove compartment on the right, there is a wire going there to the door limit switch. We throw wires into it, lower them along the stand and catch them in the hole. For convenience, the end switch itself can be unscrewed so that the wires do not get caught once again and you can see whether the wires are running or not.
In the driver's room it is not much more complicated, you need to pull out the speedometer and run the wires through its hole into the same hole on the left, in principle it is not difficult to do by touch.
It is better to tie the wires with electrical tape to make it more convenient and avoid pulling them one by one.
We put rubber tubes on the wires.
We put it in the door hole.
We check how the tube moves in the door, whether it is loose or bent. open the door to the maximum and you can cut off the excess.
Repair features
As a rule, in the event of a central locking malfunction, experienced electricians first check the condition of the sensors. If the central locking system is connected to the anti-theft system, then it is this system that is checked first. As stated above, activators most often fail, so they should also be checked.
If a certain door refuses to work, the reason must be found in it. This could be the solenoid itself or the wires. During the operation of the car and the frequent opening and closing of doors, a break in the wiring circuit may occur due to kinking and mechanical breakdown of the wire itself. If this is the case, then the wire needs to be replaced or the broken parts reconnected, and then insulated.
Pros and cons of spacers for increasing vehicle clearance
Author Tatyana Efremova
Special spacers help increase ground clearance. But how justified is this from a performance point of view?
Advantages and disadvantages of spacers
The modification of spacers depends on the make of the car and where it is intended to be installed - on the front or rear shock absorbers. Spacers for front struts are available in steel and aluminum. They look like a bracket. The rear ones can be rubber or plastic; they are made in the form of rings.
The price level is influenced by the material and manufacturer. At service stations, spacers are usually installed quickly.
How the central lock works
Central locking is a system that, when given a certain command, performs the function of opening or closing an object. For ease of use, this operation is performed remotely. Some car enthusiasts choose the function of closing all doors after a certain period of time. It is very convenient for those cases when the driver does not have time or forgets to close the car door.
As a rule, using a long-range remote control you can control both the trunk and the hood, close and open the windows. The most common way to control the remote control is by pressing one button, after which all the locks on the car are activated. If the remote control does not work for some reason, then you need to insert the key into the door lock and turn it clockwise.
If an accident occurs, the car's security system is activated automatically and all locks open. At the heart of the central locking mechanism are incoming sensors located in the structure itself. These are microswitches and door switches (limit switches), actuators and a control unit.
The limit switch must maintain the door position and this information must be transmitted to the control unit. The switches fix the structural part of the door lock. The front doors of the car are equipped with a cam device. To fix the cam, the front doors are equipped with microswitches: there are two parts for each mechanism.
Blocking the lock is formed by one switch, and unlocking is formed by the second. There are two more microswitches used by the central locking mechanism. A fifth switch is installed on the lever device in the lock drive. It serves to determine the door position: when the door is open, the switch contacts close and the central locking system is deactivated.
The electronic mechanism (unit) receives the signal from the microswitches and sends information to the central control. In order to open an object, the central device sends a signal to certain control units, thereby activating the mechanisms in the locks.
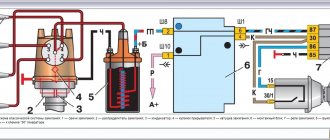
Electrical diagram of VAZ-2111 carburetor
1. block headlight; 2. front brake pad wear sensors; 3. fan motor activation sensor; 4. electric motor of the engine cooling system fan; 5. sound signal; 6. generator: 7. oil level sensor; 8. carburetor solenoid valve control unit; 9. heater controller; 10. recirculation valve switch; 11. illumination lamp for heater control levers; 12. switch; 13. carburetor limit switch; 14. oil pressure warning lamp sensor; 15. spark plugs; 16. carburetor solenoid valve; 17. coolant temperature indicator sensor; 18. ignition distributor sensor; 19. ignition coil; 20. VAZ-2111 starter; 21. heater fan electric motor; 22. additional resistor for the heater electric motor; 23. speed sensor; 24. reverse light switch; 25. micromotor gearbox for heater damper drive; 26. recirculation valve; 27. brake fluid level sensor; 28. blocks for connecting the rear window washer motor; 29. battery; 30. windshield washer motor; 31. washer fluid level sensor; 32. coolant level sensor; 33. windshield wiper gearmotor; 34. mounting block: 35. blocks for connecting the warning light harness; 36. outdoor lighting switch; 37. instrument cluster; 38. rear fog light switch; 39. fog light indicator lamp; 40. indicator lamp for heated rear window; 41. watch; 42. rear window heating switch; 43. steering column switch; 44. block for switching wires when installing headlights of a different type; 45. instrument lighting regulator; 46. ignition switch; 47. connectors for connecting the headlight cleaner wiring harness; 48. socket for a portable lamp; 49. lamp for individual interior lighting; 50. brake light switch; 51. interior lamp; 52. on-board control system unit; 53. fuel level indicator sensor; 54. hazard warning switch VAZ-2111; 55. driver's seat belt sensor; 56. cigarette lighter; 57. ashtray illumination lamp; 58. glove compartment lamp switch; 59. block for connecting the on-board computer; 60. glove box lighting lamp; 61. side direction indicators; 62. switches in the front door pillars; 63. switches in the rear door pillars; 64. parking brake warning lamp switch; 65. trunk lighting; 66. temperature sensor for the heating system; 67. external rear lights; 68. internal rear lights; 69. license plate lights; 70. rear window heating element; 71. block for connecting an additional brake light for VAZ 2111.
Installation and connection of central locks
Installing the central locking activator in the front door
Installation of the central lock should begin by removing the door trims and other elements that may interfere with installation. Then holes are drilled in each door to install a metal strip on which the door lock activator will be attached.
Having secured and adjusted the plastic activator, we move on to connecting and laying the wires. The task is to bring the wires into the car interior and connect them to the alarm unit.
In order to avoid moisture getting on the wires and further failure of activators and other devices (power windows, door lights), consider laying the wires along the door in advance.
Avoid placing wires at the bottom of the door, as this is where water tends to accumulate.
Central locking activator wire routing
When laying the wire, also pay attention to the most “problem” area, namely the place where the wires bend in the opening between the door and the body. Door wiring protection tube
Door wiring protection tube
The best option is to use a rubber tube through the pipe. This corrugation will protect the wiring from chafing and kinks.
For a competent approach to the matter, as well as in order to be able to easily identify and find the necessary wires (+12 Volts, ground, control outputs from the alarm unit), it is better to remove the instrument panel (dashboard) completely. Thus, you will not only simplify your work on laying wires, but you will also be able to connect, solder and insulate them without much difficulty.
On a VAZ 2106 car, the instrument panel can be removed quite simply (four self-tapping screws and four nuts).
Twist or solder wires?
We recommend purchasing female and male terminals, as well as a special tool for crimping wires. If the activator fails, you can easily replace it with a new one. To do this, you just need to disconnect the terminals, dismantle the old one and connect a working activator.
Twisting the wires and wrapping them with electrical tape is not a reliable option; in this case, it is better to “twist” + “soldering” + “heat-shrink tube”.
How to connect the central locking to the alarm system?
Since the VAZ 2101-2107 car is not initially equipped with a central locking or electric door lock drives, you can install additional electric drives and connect them to the system as follows.
Central locking connection diagram
The blue-white and orange wires of the 6-pin connector of the main unit of the alarm system are connected through 15A fuses to +12 V DC. Green and blue wires to the vehicle ground or, in other words, “ground”.
The white wire is to the blue door lock activator unlock wire, and the yellow wire is to the green power lock wire.
Most Chinese car alarms, especially inexpensive models (APS 2600 SHERIFF, Pantera CLK 355), have blocks similar in structure. Sometimes it seems that Chinese manufacturers only change the label, but the “filling” remains the same. At least, the 6-pin connector itself with power outputs for locks, as well as the colors of the wires, differ quite rarely.
Having familiarized yourself with the central locking connection diagram, feel free to start connecting the wires and checking the operation of the activators. After successful tests, all that remains is to assemble all the removed parts in place and then carry out a “control” check.
Job done, congratulations! The approximate cost is about 500 rubles, excluding the cost of the alarm system.
VAZ-2111 fuse block diagram
- 1 - ignition module
- 2 — speed, air flow, heating sensors
- 3 - fuel relays, pump, injectors
- 4 - fan
- 5 - fuel pump
- 6 - ignition
- F1 5 Lighting lamps: license plates, instruments, dimensions on the dashboard, left dimensions, trunk lighting
- F2 7.5 Low beam in the left headlight
- F3 10 High beam in the left headlight
- F4 10 Right front fog lamp
- F5 30 Door windows
- F6 15 Portable lamp, cigarette lighter
- F7 20 Radiator fan, sound signal
- F8 20 Heated rear window
- F9 20 Windshield washer and wiper
- F10 20 Reserve
- F11 5 Clearance on the right side
- F12 7.5 Low beam in the right headlight
- F13 10 High beam in the right headlight
- F14 10 Fog lamp, left
- F15 20 Car seat heating VAZ-2111
- F16 10 Hazard signal, turn signals
- F17 7.5 Brake light, ignition switch illumination, interior lighting
- F18 25 Cigarette lighter, glove compartment light, interior heater
- F19 10 Reversing lamp, brake light monitoring
- F20 7.5 Rear fog lights.
Source
Installation details
Very often, even the so-called silent locks (which are usually installed instead of old, noisy ones) are further modified.
There are several methods, but it is important to install a gasket between the body and the mechanism, since there remains a gap that affects the penetration of air, dust, and also the volume of sound. If it suddenly turns out that after installation the door does not latch, you can solve the problem in several ways:
If it suddenly turns out that after installation the door does not latch, you can solve the problem in several ways:
- Strengthening the lower springs (better suited for an old, noisy mechanism);
- Installing a cube of foam rubber in place of the bullet spring;
- By installing one large spring from below.
Set of spacers to increase ground clearance - select material
Installing spacers to increase ground clearance can be justified only if it is necessary to return the original ground clearance, which has decreased as a result of shrinkage of the springs. These changes are most suitable for motorists who often have to drive on rural roads.
However, even this fact does not justify the use of spacers with a thickness of more than 30 mm; moreover, it is necessary to take into account what material they are made of.
For example, polyurethane spacers to increase ground clearance, which are installed between the body and the pillar, have one significant drawback. Since their body is made of polyurethane, and the bushings are made of steel, during operation it is the polyurethane that wears out most quickly, as a result of which the steel parts cause damage to the car body.
Aluminum spacers to increase ground clearance are more reliable than the previous model, but, unfortunately, are susceptible to corrosion. There is a whole range of materials that are used to make spacers; their design is almost identical. Plastic is also attractive to car owners; it has not yet had any significant drawbacks.
Problem in the operation of the central locking electrical circuit on VAZ cars
The first possible problem follows smoothly from those mentioned in the previous section. Overload in the operation of activators leads to an increase in the operating current in the supply circuit above the rated value. As a result, the fuse blows and the central locking of the VAZ 2110 simply “dies”.
It is by checking the fuse that the diagnosis of central locking malfunctions begins. By the way, it is located in a very specific place and it is not easy to find it right away even if you know where to look. In order to get to it, you will need to fold back the central panel with the fuses and dig into the entire wiring harness in the niche that opens behind it. The “comrade” you need is packaged in a special plastic cup and connected to the pink wire.
Central locking unit VAZ 2110
Another very common and obvious problem is the central locking connector. It is located in the most unfavorable place for this in the interior body, under the foot mat. A large amount of moisture and dirt inevitably gets there. Electrical contacts are intensively oxidized. As a result, the power supply circuit involuntarily breaks at the point where the plug connector is connected.
Installing a central lock on a VAZ 2107
Before installing the central lock on your car, you should check its operation. This will help save time on installation/disassembly of parts if they turn out to be defective. And it will be possible to return the defective item to the store only if the product is not dirty and has no signs of use. Work must begin by removing the ground terminal from the battery. Next, you need to remove the window handles and door cards from all four doors. The control unit is installed in the cabin and secured with self-tapping screws. There are only two places to place it:
- under the dashboard;
- to the left of the driver's feet on the side wall of the cabin.
The second option is simpler, as it does not require additional work to remove and install the dashboard. The actuators must be secured to the internal elements of the doors so that their rods run parallel to the lock rods and the distance corresponds to the length of the clamps. The stroke of the actuator rods should be approximately 4 mm greater than the stroke of the lock drive rods, and the central positions must be aligned. Adjustment is made using clamps that can hold the rods in any arbitrary position relative to each other. The actuators are mounted on self-tapping screws, the holes for which must be marked and drilled with a drill. Instead of self-tapping screws, you can use rivets, which provide a more reliable fixation. However, when replacing actuators, you will have to drill out the rivets and install new ones.
Important: the actuators must be installed so that they do not interfere with the operation of the power windows!
All elements of the central locking system are fixed; all that remains is to route the wires correctly.
Central locking diagram for VAZ 2107
The actuator wires are routed inside the doors and lead to the control unit. The wires must be routed out of the doors through a protective corrugated tube. The power supply of the control unit must be connected to the positive wire of the battery. You can connect the “plus” from the ignition switch or fuse block, for example, from the terminal of the fuse that powers the clock. When connecting the unit to the ignition switch, it is necessary to install an additional 10A fuse to protect the circuit from overloads. When the VAZ 2107 central locking connection is complete, all that remains is to connect the minus to the battery and check the operation of the device. If everything works fine, you can put the door trim back in place and use the car.
Real car clearance measurements
Let's determine the ground clearance without applying the previously specified regulatory load. How to do it? Let's use a tape measure. We summarize the results of real measurements in a table.
An interesting experiment was carried out, the purpose of which was to check the veracity of the ratio of the ground clearance of the Lada Kalina in its usual version in comparison with the “Cross” version. For this purpose, 4 measurements were performed. The ground clearance was measured from the road surface to the side sill with the preliminary installation of a jack. For the purity of the experiment, it was necessary to place both cars in identical conditions. Both Kalinas were presented for testing with empty interiors and luggage compartments, as well as with a minimum of fuel in the tanks.
The regular version of the Kalina was shod with 14-inch radial tires of 175 width and 55 profile. The “cross” variation received 15-inch tires, the width and profile dimensions of which were respectively “195x55”.
The first to be measured was the Lada Kalina 2 in its standard version. In the no-load state, the ground clearance reached 198 mm. During the measurements, the “cross” version received a ground clearance of 217 mm.