VAZ-2110 is a front-wheel drive sedan produced by the Volzhsky Automobile Plant. Production of the car began in 1996 and continued until 2007. Knowledge of the structure of the car's gearbox allows the owner to objectively judge the need to adjust the gearbox, repair or replace it. And also consider the possibility of repairing the VAZ 2110 gearbox yourself.
Removal and installation of gearbox 2108,2110,2112,2118, Kalina
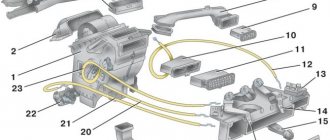
Removing and installing the gearbox, replacing the VAZ clutch.
GENERAL INFORMATION Recommendation Remove the gearbox with an assistant.
EXECUTION ORDER
Remove the battery, drain the gearbox oil and remove the starter
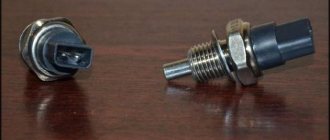
Disconnect the block with wires from the speed sensor by squeezing the spring clips.
Remove bolt 1 securing the ignition module bracket to the gearbox and two bolts of the upper gearbox mounting to the engine. Bolt 2 (front of the car) is short, bolt 3 is long.
At the bottom of the car, disconnect the block with wires from the reverse light switch.
Remove the two bolts securing the torque rod bracket to the gearbox.
Loosen the bolt of the gear shift rod clamp and disconnect the rod from the gear selector rod hinge by sliding it back.
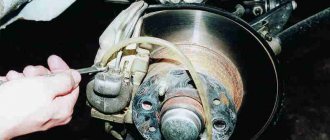
Remove the wheel drives. Tie the plug inserted in place of one of the drives with a rope or wire so that it does not fall out when removing the box. The right drive does not need to be completely removed. It is enough to disconnect it from the gearbox and, moving it to the side, hang it from the body.
To make it easier to remove the box, unscrew the two mounting bolts and disconnect the left ball joint from the steering knuckle
Unscrew the nut of the lower right mounting of gearbox 1 to the engine (engine side)
Please note that on models with a fuel injection system, an intake pipe support bracket 2 is installed under this nut, which must be removed from the stud. If necessary, loosen the upper nut securing this bracket.
If necessary, loosen the top nut securing this bracket.
Unscrew the three fastening bolts and remove the lower cover 1 of the clutch housing 2.
Remove the bolt from the lower left mounting of the gearbox to the engine. Suspend the engine using a hoist or board.
From the bottom of the car, unscrew the nut securing the left power unit support.
Unscrew the two nuts securing the rear power unit mount to the body.
Unscrew the two bolts securing the rear support of the power unit to the gearbox, holding the nuts from turning with a second wrench, and remove the support.
By inserting a screwdriver between the clutch housing and the cylinder block, slide the gearbox off the guide bushings. Be sure to hold it while doing this.
Product delivery options
Note! Below are the shipping methods available specifically for this product. Payment options may vary depending on the delivery method.
Detailed information can be found on the “Delivery and Payment” page.
Parcel by Russian Post
Available payment methods:
- Cash on delivery (payment upon receipt)
- Using cards Sberbank, VTB, Post Bank, Tinkoff
- Yandex money
- QIWI
- ROBOKASSA
Shipping throughout Russia. Delivery time is from 5 to 12 days.
Parcel by Russian Post 1st class
Available payment methods:
- Cash on delivery (payment upon receipt)
- Using cards Sberbank, VTB, Post Bank, Tinkoff
- Yandex money
- QIWI
- ROBOKASSA
Shipping throughout Russia. Delivery time is from 2 to 5 days. More expensive than regular delivery by Russian Post, approximately 50%. Parcel weight up to 2.5 kg
Pro tips, driver actions after gearbox repair
The gearbox must be installed in the reverse order. After installation, you need to adjust the clutch drive (How to adjust the clutch drive?) and the gearbox lever, and fill in the transmission oil. Having prepared everything you need, you can begin work.
The removal sequence is as follows:
- We place the car in the pit and immobilize it with wheel chocks installed under the wheels. We put the gearbox in the neutral position, do not tighten the handbrake;
- First we will do all the work in the salon. At this point it is necessary to remove the lever from the box rod. To do this, pull the lever boot up, which will provide access to the fixing sleeve. You need to carefully pry it up with a thin screwdriver so that it pops out, after which you can pull the lever off the rod;
- Remove the upper plastic bushing from the rod by loosening the petals with a screwdriver, then the rubber boot and the lower bushing. As a result, there should be nothing left on the rod;
- Remove the plastic trim located under the floor covering. To do this, you need to remove the seats, their guides, etc. from the car. It is much easier to make a cut towards the rear seats, this will allow you to not disassemble the interior. Having provided access to the cover, unscrew the 4 screws securing it and remove it. We turn on 1st gear at the gearbox;
- Let's go under the car. For ease of work, the exhaust system should be completely dismantled. To do this, unscrew the muffler from the exhaust pipe. To make it easier to unscrew bolts and nuts, you should treat them with WD-40 in advance;
- Having removed the muffler, we go into the engine compartment and unscrew the nuts securing the exhaust pipe to the exhaust manifold. Then we remove this pipe from the car;
- All subsequent work is carried out under the car. Unscrew the driveshaft from the gearbox flange. Next, unscrew the two safety crossbars to lower the cardan down;
Preparing to adjust the rocker
On an old car, it is better to lubricate the linkage mounting assembly with a penetrating compound in advance.
Before starting adjustment work, you need to prepare the place and carry out the following preparatory measures:
- The car needs to be parked in a pit.
- The handbrake must be tightened all the way.
- It is mandatory to install wheel chocks.
For a faster and better adjustment process, it is better to perform all work with an assistant. The process itself can occur in several ways.
First adjustment method
To adjust, you need to loosen the clamp connecting the rocker drive to the cardan.
This method is the simplest. In this case, the gearbox linkage is adjusted according to the rear speed. First of all, you need to loosen the clamp, after which the reverse gear is engaged. Then you need to position the lever in the position you need. After this, the clamp is tightened and the operation of the entire mechanism is checked.
If you don't succeed the first time, you need to listen for knocks and crackles when switching. They must either decrease or increase. In accordance with this, you need to position the lever in the desired direction. If all manipulations do not lead to the desired effect, you need to resort to another adjustment method.
Second adjustment method
The gear shift lever should rest against the locking plate (in the photo it is made of light plastic).
This method is used if the first one did not lead to the desired results. When using it, you can more clearly position the gearshift lever. This method is as follows:
- The gearshift lever switches to first speed.
- The backstage clamp is completely loosened.
- Next, you need to turn the drive of the rocker itself counterclockwise until the lever rests against the reverse speed stop.
- The backstage clamp is tightened.
Examination
VAZ 2110 replacing box bearings
A possible malfunction can be considered a low oil level. At such moments, not only do the bearings stop functioning correctly, but every part of the gearbox begins to adhere poorly. If you do not fill in the required amount of oil or transmission fluid in time, the parts will quickly wear out. The car is installed above the inspection hole. A thorough inspection is carried out at the time of checking for oil leaks.
So:
With the clutch depressed (see Repairing the VAZ 2110 clutch - we do it ourselves), you need to gradually shift all gears. Their accuracy of operation is checked at the time of switching on and off. If necessary, the gear shift mechanism is adjusted.
Replacing bearings in the box of a VAZ 2110 input shaft
- When the transmission lever is in neutral, the engine must be started. When you press the clutch pedal, you must try to hear the operation of the gearbox bearings. The characteristic sound of a breakdown appears the moment the pedal is released. As soon as you press, the sound disappears again. If the sound is loud, the bearings should be replaced.
- The operation of the gearbox is also checked while the vehicle is moving. It is necessary to accelerate the car, then slow braking. Gears shift up and then down. Here you should check the operation of the synchronizers and the clarity of the gear shift. There should be no extraneous sounds when the gearbox is operating. If the load increases, you must ensure that gears are not changed randomly.
Design features
If you have a “ten” with an 8-valve engine, then the design provides two side and one rear support;
On a 16 valve engine there are two side mounts, one lower and one upper.
It is important to note that 8 valve engines on the 10 have a rear engine mount, while on the 16 valve there is none. But such motors can boast of having additional supports
Regardless of the design, the replacement procedure is performed using a similar method.
Malfunctions
In fact, it is quite easy to detect failed airbags, since engine vibrations will immediately increase.
If the power unit is working normally, but the body is shaking, vibration is felt on the steering rack, pedals, and dashboard, then there is no doubt that the engine mounts are worn out.
The vibration peak occurs when the engine starts and when it is turned off. If the rubber elements are completely worn out, then a knocking noise will begin to appear. It is caused by contact of engine elements with the supports.
To make sure the cushions are worn, turn on the engine, lift the hood, and visually inspect the supports and cushions. By placing your hand on the engine, you will tactilely feel an increase in vibrations compared to the normal behavior of the car.
There may be several reasons for problems.
| Causes | Peculiarities |
| Deformations | Deformation of elements can occur during the life of the pillows, under mechanical or temperature influences |
| Loss of elasticity | Rubber does not have a large margin of strength, so it ages over time. This effect increases when exposed to temperature changes. |
| Delamination and cracking | The pillow can literally fall apart and creep apart when exposed to chemically aggressive substances. |
Is replacement required?
If you find that the rear airbag or any other airbag has begun to wear out, you should under no circumstances delay repairs.
In addition to the discomfort of the driver and passengers when the car is moving, you risk delaying the breakdown until the moment when destructive processes begin in the operation of the gearbox and power unit.
When starting to repair engine mounts, you should think about whether it is worth changing the cushions separately, or replacing the mounts as a whole.
If the support is not damaged, it is not necessary to replace it. That is, in such situations it is enough to simply replace the pillow. A set of new pillows for a VAZ 2110 today costs about 1.3 thousand rubles. A set of supports will cost you 2.5 thousand rubles.
Doing the work yourself or contacting a service station is your choice. But you should know that you will be charged at least 300 rubles for replacing one pillow.
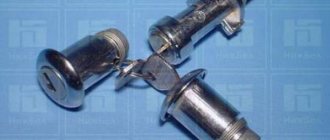
Disassembling and assembling the synchronizer
Synchronizers of 1st–2nd, 3rd–4th and 5th gears are disassembled and assembled in the same way. We show the disassembly and assembly of a synchronizer using the example of a 5th gear synchronizer. Before disassembling, we mark the blocking rings and their position relative to the synchronizer clutch. Remove the blocking rings. We mark the position of the hub relative to the coupling and the position of the crackers relative to the grooves of the hub, so that during subsequent assembly they will be installed in their original places.
To disassemble the synchronizer...
...carefully slide the coupling along the hub, holding the balls with your hand to prevent them from “shooting out”.
5th gear synchronizer parts
:
1 - coupling;
2 - ball;
3 - cracker;
4 - spring;
5 — hub Before assembly, inspect the synchronizer parts. Nicks and chips on the splines of the hub and coupling, the gear rims of the locking rings and the coupling are unacceptable. We replace defective parts with new ones. If there is significant wear on the working conical surface of the blocking ring (the minimum permissible axial clearance between the ends of the gear rims of the gear and the blocking ring is 0.6 mm), it must be replaced.
For ease of assembly of the synchronizer, generously lubricate the springs, crackers and balls with grease.
Putting the hub on the workbench...
...we insert springs into the hub sockets, and crackers into the grooves (in accordance with the previously applied marks). We insert the assembled hub into the coupling, orienting it so that when the ball is subsequently installed...
... it was located exactly in the middle part of the coupling groove - in its deepest place.
Place balls in the holes of the crackers...
...and, pressing each ball in turn with a screwdriver... ...we push the hub along the splines of the coupling.
When installing a synchronizing shaft on the synchronizing shaft, the grooves on the coupling and hub must face:
— for the synchronizer of 1st–2nd gears — to the 1st gear gear;
— for the 3rd–4th gear synchronizer — to the 3rd gear gear;
- for the 5th gear synchronizer - to the thrust plate of the shaft bearings.
Grooves on the clutch and synchronizer hub
Repair work
If the adjustment does not give the desired result, you will have to work more carefully with the box. A common problem is knocking out the gears responsible for speeds 1 and 2.
When dismantling, make sure that each individual fastener is in good working order. The latches are springs, of which there are a total of three. The first one is the longest, it is responsible for speeds 1 and 2. The second is medium in size, and its prerogative is 3 and 4 speeds. The third detent is the smallest, and its “guardian” is fifth gear.
How to repair a gearbox on a VAZ 2110
Adjustment does not always achieve the desired effect. Therefore, the motorist will need to carry out repair work. Practice shows that repairing a VAZ 2110 gearbox involves dismantling and reassembling the gearbox. Now I will tell you in detail how to do this.
How to remove/dismantle a VAZ 2110 box
How to remove the box? Before disassembling the gearbox, it must be cleaned
It is important that water does not get inside the box.
Main stages:
- Power from the battery is turned off.
- The block is disconnected from the speed sensor.
- Transmission fluid is drained.
- The bolts securing the jet thrust are removed.
- It is necessary to remove the constant velocity joints from their standard location.
- The existing ball joint bolts are loosened.
- Using a tool, unscrew the nuts holding the clutch cover to the gearbox housing.
- The bolts securing the gearbox to the engine are disconnected.
- The power plant must be lifted (use a jack).
- The engine mounts must be removed.
- To pick up the gearbox, you can use a screwdriver.
- The speed box slides off the guides. The input shaft should disengage from the clutch.
How to properly disassemble a VAZ 2110 gearbox
- We remove dirt and wash the outside of the gearbox (do not allow water to enter the crankcase).
- Using a 17mm wrench, unscrew the bolt securing the power unit suspension bracket.
- Using a 13mm socket, unscrew the six nuts securing the rear crankcase cover.
- Remove the bracket.
- Tapping with a copper hammer (or an ordinary one through a soft metal mandrel) on the tides of the lid, and remove it along with the sealing gasket from the studs.
- Having pressed the gear selection rod all the way, we turn on the third gear, or, by retracting the rod all the way, we turn on the fourth.
- Using a 10mm spanner, unscrew the bolt securing the fifth gear fork.
- Using a soft metal drift, we strike the fork downwards, including the fifth gear of the VAZ 2110
- Use a beard to straighten dents in the nuts of the primary and secondary shafts
- Using a 32" socket with a powerful wrench, unscrew the shaft nuts.
- Using a screwdriver, pry off the fifth gear fork and remove the fifth gear assembly. Remove the fifth gear shift fork.
- Remove the synchronizer sliding clutch from the hub. Remove the synchronizer blocking ring. We take out the thrust plate.
- We move the hub inside the sliding clutch of the Synchronizer and remove the hub, springs, clamps and crackers of the fifth gear synchronizer.
- Using a copper hammer we strike the end of the input shaft. Insert two screwdrivers into the resulting gap between the thrust plate and the fifth gear drive gear. Prying up the gear with screwdrivers, we press it
- Using the “13” socket, unscrew the three plugs of the gearshift rod clamps. Remove the springs and retaining balls from their sockets.
- Using a Phillips impact screwdriver, unscrew the four screws securing the thrust plate. The screws have special lock washers.
- Remove the thrust plate. Use two screwdrivers to pry off the thrust washer of the fifth gear driven gear bushing. We insert the puller arms into the resulting gap between the end of the rear bearing and the thrust washer and compress the gear sleeve and the thrust washer.
- Use two screwdrivers to separate the retaining ring on the input shaft and remove it. In the same way, remove the retaining ring from the secondary shaft.
- We insert a screwdriver into the socket of the latch and, applying a magnet to it, remove the ball.
- Using a “13” socket, unscrew thirteen nuts and one bolt securing the gearbox housing to the clutch housing.
- By inserting a screwdriver into the groove at the junction of the crankcase mating planes, carefully lift the box crankcase and remove it.
- Using a 10mm spanner, unscrew the bolt securing the 1st-2nd gear shift fork to the rod. We lift the rod up and disengage the fork. Using a 10mm spanner, unscrew the bolt securing the 3rd-4th gear shift fork to the rod. Use a screwdriver to remove the rod from the gear selection mechanism.
- Raise the rod up and remove the fork from the groove of the synchronizer sliding clutch.
- By turning the 5th gear engagement rod, we remove it from the gear selection mechanism. We take out the axis of the reverse intermediate gear.
- Remove the reverse intermediate gear. We simultaneously remove the primary and secondary shafts from the roller bearings of the clutch housing.
- We take out the differential assembly. The process of repairing a VAZ 2110 gearbox
- Using a 10mm socket, unscrew the three bolts securing the gear selection mechanism and remove it.
- Using a 10mm socket, unscrew the installation bolt of the gear selector lever. Remove the gear selector lever from the rod.
- Using a screwdriver, remove the protective cover of the rod from the bushing. We take out the gear selection rod.
Assembly procedure for the VAZ 2110 gearbox
How to remove a transmission on a Chevrolet Niva
Something bad happened and a VAZ 2110 gearbox needed to be repaired. Unit repair is required when:
- It is difficult to switch gears off and on.
- automatic switching off of gears.
- noise occurs when shifting gears.
- transmission oil leak.
The reasons for the breakdown may be different, perhaps the oil was not changed in a timely manner or the mechanism has simply exhausted its resource.
How is a VAZ 2110 gearbox repaired? Do-it-yourself VAZ 2110 gearbox repair, video.
Gearbox device
There are situations when removing the gearbox is not at all necessary; adjusting it is enough. The VAZ 2110 very often has problems with gear shifting, they get knocked out. To eliminate this problem, it is not at all necessary to remove the box; it is enough to adjust the gear selection drive mechanism. It is enough to make do with adjustment in the following cases:
- not so long ago, the input shaft bearing was replaced or any other repair was carried out where the gearbox was removed.
- Only one speed comes out.
- When the car is moving, the speed shifts poorly or completely jumps out.
To adjust the gearbox you need:
- Loosen the nut and bolt, which is located under the machine, tightening the clamp securing the box rod.
- Using a screwdriver, move the clamp and grooves of the rod apart. Set the rod to the neutral position.
- Remove the cover from the gearbox.
- In order to block reverse gear, you need to place a lever in the window of the bracket lining.
- Adjust the axial play in the rear direction and by turning to the left.
- Place the clamp in place and tighten it with a bolt.
Disassembling the gearbox
In the situations described above, a simple gearbox adjustment will be sufficient. This is much better than repairing the VAZ 2110 gearbox, disassembling and assembling the gearbox.
Procedure for disassembling the gearbox:
- Remove the oil indicator from the gearbox. Unscrew the bolts that hold the clutch cable.
- Unscrew the bolts that hold the back cover. The lid is hermetically sealed, so when removing it, you can use a hammer.
- To prevent the shafts from turning while disassembling the gearbox, turn on the third or fourth speed. Then unscrew the bolt that secures the fifth gear.
- Remove the fifth gear and fork together.
- Afterwards, remove the gear from the secondary shaft and the fork. Then remove the plate that protects the bearings.
Below you can see a DIY video repairing a VAZ 2110 gearbox.
Dismantling the VAZ 2110 gearbox housing
Having started repairing the VAZ 2110 gearbox, after all the steps described above, it is necessary to disassemble the crankcase and the operating mechanism. Let's get started:
- We unscrew the spring plugs that hold the gear rods. Once the plugs are unscrewed, the end balls will fall out of the holes. We do the same with the plug that holds the reverse gear. If the balls have not fallen out of the holes, you can get them out using a magnetic screwdriver.
- Next, we unscrew the bolts that secure the gearbox housing to the clutch housing. After the bolts are unscrewed, you can use a screwdriver to disconnect the crankcases.
- Next step. Unscrew the rod from the first and second gear fork.
- We do the same with gears third, fourth and fifth, respectively. To remove the rod, it must be removed together with the gear shift parts.
- You need to remove the axle from the reverse gear and, of course, the gear.
- Next, take out the differential and two shafts with gears. Unscrew the three bolts that secure the gear mechanism and remove it from the crankcase.
- Unscrew the rear lever bolt and remove the rod.
- If necessary, remove the bearings of the primary and secondary shafts with a separator.
Dismantling of the VAZ 2110 gearbox has been completed.
Adjustment
KAMAZ gearbox diagram and design
On a VAZ 2110, it is not so uncommon for the gears to shift poorly or get knocked out. A mechanism for adjusting the speed selection drive is provided specifically for this purpose.
Adjustment may be necessary if:
- the box was recently removed for repairs;
- one of the gears falls out;
- the speeds do not engage well or simply get knocked out when the car is moving.
If you have one of these problems, try making adjustments first. Its sequence:
- Under the bottom of the VAZ 2110, find and slightly loosen the nut on the bolt that tightens the clamp that secures the rod designed to control the gearbox;
- Use a screwdriver to slightly move apart the grooves in the end of the rod and the resulting gap on the clamp itself. This is necessary to ensure easy movement of the rod in relation to the gear selection rod. Place the rod in the neutral position;
- Release the shift knob from the cover in the cabin;
- Align the lever using a special template. This is done like this: install a template in the window of the rear speed lock bracket lining. After this, insert the lever axis stop into the groove of the template, pressing it without unnecessary force in the transverse direction;
- Then adjust the axial play of the rod in the rear direction, and its axial play by turning to the left;
- Install the clamp, not reaching a few millimeters from the end of the rod. Then tighten the clamp thoroughly with the bolt.
If the described adjustment did not help you, you need to remove and disassemble the VAZ 2110 gearbox
Pay special attention to the fact that the gears with which the first and second speeds are engaged often knock out. Don't forget to check each fastener
They are made in the form of springs, there are three of them. The first clamp is long, it is responsible for first and second gears. Second is medium, for third is fourth gear. For the fifth, the shortest clamp is used.
Finding a new synchronizer
Since the synchronizer is assembled for a specific gearbox, there is no reason to think that the mechanism from one car can be installed on the gearbox of another car. Of course, the operating principle of these two mechanisms will be the same, but, for example, their geometry may be different. It would be best to select a spare part according to:
- Vehicle VIN code;
- Code of an already installed synchronizer;
- Parameters of the vehicle and its gearbox.
- Onnuri (South Korea);
- Transporterparts (France);
- KAP (South Korea);
- Omix-ADA (USA).
Also, synchronizer components can be found in the catalogs of major European packers. The quality of these spare parts, as noted by car enthusiasts, is not always high. But spare parts from South Korean companies, on the contrary, please with both price and workmanship. As for assembled synchronizers, they can only be found under the names of automakers, i.e. originals . If you wish, you can save on buying a mechanism by choosing an option at a dismantling shop. If you are interested in purchasing a spare part with the longest service life, it is better to buy a new original.
selection of differential bearing adjusting ring
Differential bearings must be mounted with a preload of 0.25 mm (for control 0.15-0.35 mm). The tension is ensured by selecting the thickness of the adjusting ring 13 (see Fig. 3-7), installed in the gearbox housing socket under the outer ring of the differential bearing.
Note. Select the thickness of the adjusting ring when replacing one of the following parts: differential box, differential bearing and clutch or gearbox housings.
Determine the thickness of the adjusting ring using tool 67.7824.9517 in the following sequence: press the outer ring of the tapered roller bearing 3 together with the adjusting ring 4 (Fig. 3-24) into the gearbox housing;
Note. The installation ring 4 has a constant thickness of 1.25 mm.
Press the outer race of the other differential bearing into the clutch housing. At the same time, be careful not to mix up the outer rings of the differential bearings; install the differential into the gearbox housing and, covering it with the clutch housing, tighten at least three nuts, equidistant from each other, securing the gearbox housing to the clutch housing (tightening torque 24.5 Nm (2.5 kgcm)). Then turn the differential to self-install the bearings 2-3 turns; install support mandrel 2 on the differential box and secure indicator 1 with extension using a universal holder. Install the indicator leg on the support mandrel with a preload of 1 mm, and in this position fix the indicator and set its arrow to zero; move the differential from below and watch the indicator;
WARNING When measuring the axial movement of the differential, do not rotate it so as not to distort the measurement results.
Using the formula S = A + B + C, calculate the thickness of the adjusting ring of the differential bearings, where: S is the thickness of the adjusting ring;
A is the amount of axial movement of the differential; B - the amount of preload of the differential bearings; C is the thickness of the installation ring (constant value). Example.
The indicator reading when moving the differential is 1.00 mm. The preload of the differential bearings is 0.25 mm, the thickness of the mounting ring is 1.25 mm. S = 1.00+ 0.25+ 1.25 = 2.50 mm. After determining the thickness of the adjusting ring, disconnect the clutch housing and gearbox, remove the differential, press out the outer bearing ring from the gearbox housing using a puller 67.7801.9526 and install the selected adjusting ring instead of the adjusting ring 4. Press in the outer ring of the differential bearing using the mandrel 67.7853.9575 and install the differential into the gearbox housing and, covering it with the clutch housing, tighten the nuts securing the gearbox to the clutch housing. Check the moment of resistance to rotation of the differential with a dynamometer 02.7812.9501. To do this, pass the tip of the dynamometer through the hole in the differential box (for the wheel drive shaft) until it wraps around the pinion axis. Turn the dynamometer handle several turns clockwise and use the scale to determine the moment of resistance to turning. It should be: for new bearings 147-343 Ncm (15-35 kgf.cm), for run-in bearings at least 30 Ncm (3 kgf.cm).
Rice. 3-24. Scheme for selecting the thickness of the differential bearing adjusting ring: 1 - indicator; 2 - support mandrel; 3 — differential bearing; 4 — installation ring; 5 - mandrel
Something bad happened and a VAZ 2110 gearbox needed to be repaired. Unit repair is required when:
- It is difficult to switch gears off and on.
- automatic switching off of gears.
- noise occurs when shifting gears.
- transmission oil leak.
The reasons for the breakdown may be different, perhaps the oil was not changed in a timely manner or the mechanism has simply exhausted its resource.
How is a VAZ 2110 gearbox repaired? Do-it-yourself VAZ 2110 gearbox repair, video.
Instructions for removing the gearbox
The procedure for removing the gearbox is labor-intensive and time-consuming. It’s easier to replace it with a VAZ 2110 by visiting a car service center, but you can do it yourself.
Tools
To carry out the procedure, you will need tools consisting of:
- a set of wrenches, socket or open-end wrenches;
- set of heads with extensions;
- flat screwdriver;
- mounts;
- pliers;
- jack;
- clean rags.
In addition, you should prepare a container to drain the used oil. You can use a plastic 5 liter bottle.
Tools should be prepared in advance so that they are nearby while working.
Sequencing
To remove the gearbox, you need access to the underbody of the car, so it needs to be lifted. This can be done using a lift, or driving the car onto an overpass or inspection groove.
The following video demonstrates replacing the clutch, the first step of which is removing the gearbox.
Removing the gearbox from a VAZ 2110 car consists of a sequence of steps:
- First, you should remove the engine mudguard (protection). To do this, use a socket wrench to unscrew the mudguard mounting bolts and remove the protection.
- Next, we dismantle the engine compartment shield on the right.
- The next step is to drain the oil from the gearbox.
To ensure high-quality drainage of oil, it is recommended to warm up the engine before draining, allowing it to run for several minutes. Next, place a prepared bottle or other container under the drain hole and unscrew the drain plug. Draining oil from the box - When the oil has completely drained, clean the plug and hole from dirt. Then screw the plug back.
- After draining the oil, you need to turn off the power to the car by disconnecting the negative terminal from the battery.
- Next, you need to dismantle the air filter: disconnect the hoses of the crankcase ventilation system, air supply and air flow sensor. The air filter housing is removed along with the throttle valve, sensor and hose.
- Then you need to remove the starter from the car. First you need to unscrew the nut that secures the tip of the clutch wire connecting the starter to the positive terminal of the battery. Next, you need to remove the tip from the contact bolt. Now you need to disconnect the traction relay control wire, unscrew the fastening nuts and remove the starter.
- At the next stage, we disconnect the clutch drive cable from the gearbox bracket and the gear shift fork. To do this, you need to pull the clutch cable out of the fork lever in the engine compartment. Then you should loosen the fastening nut of the cable sheath to the bracket on the gearbox. While holding the sheath, you can pull the cable end out of the bracket.
- Now you need to disconnect the wire connector from the speed sensor, as well as from the reverse sensor.
Disconnecting the reverse sensor connector - Next, disconnect the jet rod. It is attached to the buffer using two nuts. After unscrewing the nuts, remove the bracket. Now the rod can be dismantled.
- Now we disconnect the gear shift rod from the hinge.
- Then we tighten the fastening bolts on the clutch housing cover and remove the cover.
- Now we remove the wheel drives.
A wooden plug should be installed on one drive to avoid any problems during installation. The moment of inserting the plug into the hole. Then we remove the right drive, but you can simply move it to the side and not remove it. - To simplify the removal procedure, you need to loosen the ball joint bolts.
- After unscrewing the mounting bolts, you need to remove the lower crankcase cover.
- Then you need to unscrew the lower bolt securing the gearbox to the engine.
- Next, we hang the power unit using the prepared support. You can use a board as a support. After unscrewing the fastening nut, remove the left engine mount.
- Having unscrewed the nuts that secure the rear engine support to the body, and the bolts securing it to the gearbox, holding the nuts from turning, we dismantle the rear support.
- To move the box from the guide bushings, you need to insert a screwdriver between the cylinder block and the clutch housing. When moving the box, it should be held so that it does not rest on the crankshaft diaphragm spring. Due to significant load, the spring may become deformed, which will lead to malfunction of the unit.
- While rocking the gearbox, we move it as far back as possible and dismantle it.
Removing the gearbox from a car
After dismantling the gearbox on the VAZ 2110, you can begin further repair work. Installing the box is done in reverse order.
Loading …
Gearbox device
There are situations when removing the gearbox is not at all necessary; adjusting it is enough. The VAZ 2110 very often has problems with gear shifting, they get knocked out. To eliminate this problem, it is not at all necessary to remove the box; it is enough to adjust the gear selection drive mechanism. It is enough to make do with adjustment in the following cases:
- not so long ago, the input shaft bearing was replaced or any other repair was carried out where the gearbox was removed.
- Only one speed comes out.
- When the car is moving, the speed shifts poorly or completely jumps out.
To adjust the gearbox you need:
- Loosen the nut and bolt, which is located under the machine, tightening the clamp securing the box rod.
- Using a screwdriver, move the clamp and grooves of the rod apart. Set the rod to the neutral position.
- Remove the cover from the gearbox.
- In order to block reverse gear, you need to place a lever in the window of the bracket lining.
- Adjust the axial play in the rear direction and by turning to the left.
- Place the clamp in place and tighten it with a bolt.
Repair work
If the adjustment does not give the desired result, you will have to work more carefully with the box. A common problem is knocking out the gears responsible for speeds 1 and 2.
When dismantling, make sure that each individual fastener is in good working order. The latches are springs, of which there are a total of three. The first one is the longest, it is responsible for speeds 1 and 2. The second is medium in size, and its prerogative is 3 and 4 speeds. The third detent is the smallest, and its “guardian” is fifth gear.
Installing an automatic transmission instead of a manual transmission on a VAZ 2110
Since KB VAZ does not have its own automatic transmission model, the German ZF continuously variable variator is used as an automatic transmission. The principle of operation of such a unit is based on the operation of a V-belt type transmission with the difference that both pulleys are of a split type. When converging or diverging, the segments change the depth of the stream, and the drive belt rotates at different radii. By changing the radii of rotation, the gear ratio also changes.
There is nothing complicated about installing this foreign equipment. All that was required was the manufacture of a special insert between the engine and the clutch housing, and the VAZ 2110 engine mount, which is attached to a manual gearbox, was also transferred. In the cabin, the gearshift lever was replaced with an automatic transmission selector.
With this modification of the transmission, the choice has become smaller; in addition to parking, neutral, reverse and the actual forward movement of the car, the braking mode of the power plant has been preserved, which distinguishes the CVT from other automatic transmissions and operates quite effectively.
In this position of the automatic transmission selector, the variator selects an extremely high gear ratio, operating in the “low” gear mode and continues to hold it when the accelerator is released. To prevent blocking of wheel travel, stage switching is done softly and smoothly, with some delay. When passing dynamic tests and during operation, the unit showed a sufficient degree of reliability.
Oil change intervals
The official manual for the car indicates how often the transmission oil in the box needs to be changed - 60 thousand kilometers. To prevent unit malfunctions, experts recommend adhering to certain rules:
- change the oil in the box in a timely manner;
- pour the required amount of oil into the VAZ 2114 gearbox and monitor its level;
- Use only high-quality lubricant.
The oil volume in the VAZ 2114 gearbox is also indicated in the manual for the car. According to the instructions, the box holds approximately 3.3 liters of lubricant.
When choosing oil for a manual transmission, you need to decide on the packaging of the fluid. It is usually sold in canisters of 1, 3 and 5 liters, but there are also non-standard containers. Also, anyone can buy oil from a barrel for bottling in specialized stores
Therefore, you can get the required amount of oil on favorable terms, but it is important to carefully check the quality of the products. Otherwise, imaginary savings may subsequently lead to serious costs for repair work.