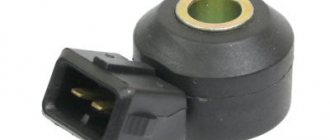
Types of sensors and operating principle
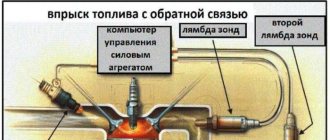
The lambda probe is installed in the exhaust system. Sensors are divided into two types: two-point and broadband.
The two-point sensor consists of ceramics, the elements of which are coated with zirconium dioxide on both sides. Installed in front of or behind the catalytic converter.
The principle of operation is to measure the level of oxygen concentration in the environment and exhaust gases. If the level changes and becomes different, a voltage is created at the ends of the sensor elements, from low to high. Low voltage is created if there is excess oxygen in the system.
Otherwise, if the system does not have the required level of oxygen, high voltage will be created. These signals are sent to the engine control unit, which distinguishes them by current strength.
The wideband sensor is a more modern design. It also has two ceramic elements. One of them can be called “pumping”. It is responsible for activating the process of pumping or removing air from the system.
The second element can be conventionally called “two-point”. The principle of operation is based on the fact that as long as there is the required amount of oxygen in the mixture, the current strength on the “pumping” element does not change and is transferred to the “two-point” element.
It, in turn, receiving a constant current from the “pumping” element, maintains a constant voltage between its elements and is inactive.
As soon as the oxygen level changes, the "pumping" element supplies the changed voltage to the "two-point". This, in turn, ensures either pumping air into the system or pumping it back.
Lambda probe on VAZ cars
VAZs use several types of sensors:
1. Bosch No. 0 258 005 133, Euro standard - 2. Installed on outdated models with an engine capacity of 1.5 liters. On later models with Euro 3 standard, this sensor was used as the first one, and was installed before the catalyst.
The second sensor was installed, which has a “return connector”. But you can find two identical sensors installed
2. Bosch No. 0 258 006537 was installed on cars manufactured since October 2004. They have a heating element in their structure.
Lambda probes produced are interchangeable with zirconium sensors of similar structure. Please note that a non-heated sensor can be replaced with a heated sensor. Not the other way around.
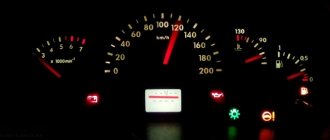
Self-diagnosis of the Kalina/Priora instrument cluster
Decoding error codes in the dashboard:
How to reset errors on Kalina? You can reset the errors yourself using the on-board computer, or contact a service station with special diagnostic equipment.
Let us remind you that you can find detailed photo reports in the Lada Kalina repair category.
Keywords: instrument panel Lada Kalina | dashboard of Lada Priora | on-board computer Lada Kalina | on-board computer Lada Priora | Lada Kalina engine | Lada Priora engine | ECM Lada Kalina | ECM Lada Priora
Share on social networks:
Found an error? Select it and press Ctrl+Enter..
Oxygen sensor malfunctions and error codes
Among the possible breakdowns of the lambda probe, the following can be distinguished: loss of sensitivity, non-functional heating. As a rule, the on-board computer will not show you a breakdown if the problem is loss of sensitivity. It’s another matter if the heating circuit breaks, then the malfunction will be recorded.
- Error P1115 - a breakdown has occurred in the heating circuit
- Error P1102 - low resistance on the oxygen heater
- Error P0141 - the heater has broken down on the second sensor
- Error P0140 - sensor number two has broken
- Error P0138 - the second sensor indicates an excessive signal level
- Error P0137 - the second sensor indicates a low signal level
- Error P0136 - there is a short circuit to ground of the second sensor
- Error P0135 - the heater on the first sensor has failed
- Error P0134 - the first sensor has no signal
- Error P0133 - the first sensor responds slowly to the request
- Error P0132 - there is little oxygen in the system, the signal is high at the first sensor
- Error P0131 - too much oxygen in the system, low signal at the first sensor
- Error P0130 - the first sensor sends incorrect signals
Why does P0134 occur?
There are not so many reasons that can lead to error P0134. It specifically indicates an incorrect signal being received from a particular sensor. Based on this, we can conclude that the causes of error P0134 are as follows:
- Failure of the oxygen sensor;
- Short circuit.
Broken wires;
Diagnostic equipment makes it easier to determine the cause of a problem. If, in addition to error P0134, the diagnostic tool reports the presence of error P0171, this indicates that the malfunction is associated with an open or short circuit. As you know, error P0171 indicates a lean mixture in the engine. It occurs together with error P0134 with the above-mentioned malfunctions, since the first oxygen sensor in the exhaust circuit is the control one for supplying the mixture. Accordingly, if it stops transmitting information, the electronic control unit will reduce the amount of fuel supplied, causing the air-fuel mixture to be lean - this is necessary to prevent possible breakdown of the catalyst.
It is worth noting that most often the P0134 problem is directly related to the failure of the sensor itself. In no more than 5% of cases, a malfunction occurs due to a short circuit, open circuit or oxidation of contacts.
Replacing the oxygen sensor
If any damage occurs, the sensor must be replaced. You can try to do this yourself. Let's consider the situation of replacing a lambda probe on a VAZ 2114:
- We put the car on an overpass or drive it into a pit and remove the motor protection (to replace the sensor with the neutralizer).
- We are looking for the wires from the oxygen sensor, and follow them to the sensors themselves, they are located on the catalyst (the first before the converter, the second after).
On other car models, replacing the sensor will be identical.
Replacement problems
When replacing, the old sensor may stick to the pipe. In this case, proceed like this:
- Apply wd-40 generously and try to unscrew
- Turn on the engine, heat the exhaust system and unscrew the sensor
- We try to heat (being careful) the sensor itself and unscrew it
- Tap lightly with a hammer and try to unscrew it again
- If that doesn't help, try thermal shock. Pour cold water onto the well-heated sensor. Try unscrewing it again.
Oxygen sensor price
The price of an oxygen sensor will vary by region and model. It ranges from 1000 to 3000 rubles . Buy a lambda probe in specialized stores and only with a guarantee.
Causes of oxygen sensor failure
- Coolant or brake fluid has come into contact with the sensor housing.
- The fuel used has a high lead content
- Severe overheating of the sensor caused by unclean fuel (clogged cleaning filters)
- The sensor has simply expired
- Mechanical damage to the sensor while the vehicle is moving.
A failed sensor will affect the operation of the vehicle as a whole and lead to additional problems. But using them you can immediately determine a possible breakdown of the sensor and replace it in a timely manner.
Related problems when the oxygen sensor fails
- The car began to consume more fuel than usual
- The car began to move jerkily
- The engine became unstable
- The normal operation of the catalyst is disrupted
- When testing for exhaust gas toxicity, the result gives inflated values.
What to do if error P0134 occurs
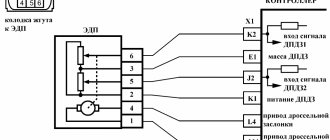
To resolve error P0134, which reports a loss of signal from the oxygen sensor, you will need to diagnose the sensor's power circuit and test it directly. To do this, the car must be placed on a “pit” or overpass. It is recommended to start the test by diagnosing the wiring. If there are no problems with it, and the contacts are not oxidized, you can proceed directly to checking the serviceability of the sensor.
Before you start diagnosing the sensor with a voltmeter, you need to visually inspect it. If there is a problem with the sensor heater or the mixture is too rich, there will be traces of soot on the sensor, which often clogs the element, causing it to fail. Another common cause of lambda probe failure is damage to it by lead, which is excessively contained in the gasoline used. If there are white deposits on the oxygen sensor, this indicates poor additives in the fuel used.
If an external inspection of the oxygen sensor does not help identify the problem, you can proceed to checking it with a voltmeter. Diagnostics of the oxygen sensor occurs as follows:
- The car engine must be warmed up to operating temperature;
- Next, the probes of the multimeter, switched to voltmeter mode, are connected between the signal wire and the ground wire;
- The car engine speed increases to 2500-3000 per minute.
Possible reasons
- Lambda probe faulty (bank 1, sensor 2)
- Short circuit or break in oxygen sensor wiring (bank 1, sensor 2)
- Malfunction of the oxygen sensor connector (bank 1, sensor 2)
- Incorrect fuel pressure
- Faulty fuel injectors
- Air leak in the intake manifold
- Exhaust system leaks (“burnt out” exhaust manifold)
Technical Notes
Typically, replacing the secondary oxygen sensor will resolve the P0140 code.
Symptoms of malfunction
The main driver symptom of P0140 is the MIL (Malfunction Indicator Light) illumination. It is also called Check engine or simply “check light”. They can also appear as:
- The Check Engine Light (CEL) or Malfunction Indicator Light (MIL) will illuminate.
- Possible high fuel consumption.
- There is too much smoke coming out of the exhaust pipe.
- There likely won't be any other noticeable problems other than the "Check Engine" on the dashboard.
The reason is this: the oxygen sensor at the rear or after the catalytic converter does not affect the fuel supply. It only measures the efficiency of the catalytic converter. For this reason, you most likely will not notice any problems with the engine.
Description of error P0140
Oxygen sensors monitor the level of oxygen in the exhaust gases before and after the catalyst. For optimal engine performance, the air-fuel mixture (air-fuel ratio) must be maintained near the ideal stoichiometric ratio.
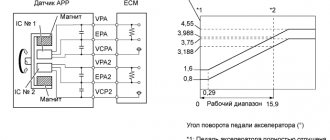
When the oxygen sensor output voltage changes near the stoichiometric ratio, the engine control module (ECM) adjusts the fuel injection so that the air-fuel ratio is near stoichiometric. The oxygen sensor generates a voltage of 0.1 to 0.9 V depending on the oxygen level in the exhaust gases. If the oxygen level in the exhaust gas increases, the air-fuel ratio becomes lean. The engine control unit interprets a "lean mixture" when the lambda probe voltage is less than 0.45 V. If the oxygen level decreases, the air-fuel ratio becomes rich. The control unit considers the mixture “rich” when the oxygen sensor voltage is above 0.45 V.
If the output voltage does not change at all, but remains a constant value (for example, 0.3 V), then error P0140 is recorded.
How to Troubleshoot or Reset Trouble Code P0140
Some suggested steps to troubleshoot and fix error code P0140:
- With the car warmed up, use an OBD scanner to check the voltage of the oxygen sensor (it should change periodically).
- We check the 12 volt circuit coming to the sensor, and if there is a problem, we fix it.
- We diagnose the 5 volt circuit from the control unit to the sensor and, if necessary, eliminate the fault.
- If the above problems are not confirmed, change the oxygen sensor O₂ block 1, sensor 2.
Diagnosis and problem solving
This is a fairly specific problem and shouldn't be too difficult to diagnose.
First start the engine and warm it up. Using a scan tool, monitor the voltage of the O₂ sensor bank 1, sensor 2. Typically the voltage should switch slowly above and below 0.45 volts.
If so, the problem is most likely temporary. You will have to wait until the problem is discovered before you can make an accurate diagnosis. However, if it does not switch or is frozen, do the following.
Turn off the car. Visually check the connector and wiring harness unit 1, sensor 2 for melting or chafing. Repair or replace as necessary.
Turn the ignition on but turn off the engine. Disconnect the O₂ sensor connector and check for 12 volts in the heater power circuit and proper grounding. If there is no 12 V power to the heater, check the fuses for an open circuit.
If the heater circuit fuse has blown, you can assume that a faulty heater in the O₂ sensor is causing the blowout. Replace the sensor and fuse, then repeat the test. If there is no ground, check the circuit and clean or repair the ground circuit.
Next, on the disconnected connector, we check the 5 volt signal coming from the control unit. If not, check for 5 volts at the PCM connector. If 5 volts are present at the PCM connector but not at the sensor harness O₂ connector. This means there is an open or short circuit in the wire between the PCM and the O₂ sensor connector.
If there is no 5 volts at the PCM connector, the PCM is most likely faulty due to an internal short circuit. In this situation, the PCM must be replaced.
If during the test all voltages are present, then it is necessary to replace the oxygen sensor O₂ Bank 1, Sensor 2. After this, we reset the error and re-check with the scanner, error P0140 should disappear.