I've been toying with the idea of making myself an American woman for a long time. I like the way it looks. I didn’t want to go to collective farming. I read a lot of information and found the best option for myself. All I needed: 1) A double-filament lamp (two-pin) with a base. 2 pcs.
2) Two-pin socket for the base. 2 pcs.
3) And the usual “auto electrician” kit: wires, terminals, electrical tape
Everything else is simple. There are two pluses and one minus from the cartridge. We connect the positives (wires) one to the marker, the other to the turn signal. There is a weak light on the marker, a bright light on the turn signal. We throw a minus signal on the turn signal. We isolate everything. Turn it on. We rejoice.
Now about possible difficulties. My new socket did not fit the turn signal. I had to trim some plastic to make the base fit snugly.
The next difficulty was finding components. I spent a week of daily trips around the city, first just to find the bulbs, and then several more days to find the sockets. In the end, I first bought red lamps. But when I connected it, I realized that I had screwed up. The next day I miraculously found a store with the last orange lamps.
That seems to be all that can be said. If you have questions, ask. I'll try to answer)
A light bulb socket is an intermediate element used for a convenient and reliable connection between electrical wiring and a lamp. Often various decorative elements of modern chandeliers and lamps are attached to it.
American women on VAZ 2114 through a two-pin cartridge
I've been toying with the idea of making myself an American woman for a long time.
I like the way it looks. I didn’t want to go to collective farming. I read a lot of information and found the best option for myself. All I needed: 1) A double-filament lamp (two-pin) with a base. 2 pcs. 2) Two-pin socket for the base. 2 pcs.
3) And the usual “auto electrician” kit: wires, terminals, electrical tape
Everything else is simple. There are two pluses and one minus from the cartridge. We connect the positives (wires) one to the marker, the other to the turn signal. There is a weak light on the marker, a bright light on the turn signal. We throw a minus signal on the turn signal. We isolate everything. Turn it on. We rejoice.
Now about possible difficulties. My new socket did not fit the turn signal. I had to trim some plastic to make the base fit snugly.
The next difficulty was finding components. I spent a week of daily trips around the city, first just to find the bulbs, and then several more days to find the sockets. In the end, I first bought red lamps. But when I connected it, I realized that I had screwed up. The next day I miraculously found a store with the last orange lamps.
That seems to be all that can be said. If you have questions, ask. I'll try to answer)
Why should a two-pin cartridge be used to make an American one? And where to find it?
Replaced the ten glass
by Adminrive · Published 03/12/2017
There were no problems with the radiator, but it was not possible to drain the engine
by Adminrive · Published 04/24/2014
What could be the problem with the gene? The diode bridge does not produce more than 10 volts.
by Adminrive · Published 08/03/2015
4 comments
- Comments 4
- Pingbacks 0
From some foreign cars with taillights
the base from a penny is suitable), it is three-pin), two pluses and a minus. But it’s easier to do America differently, write in PM, I’ll explain), about an hour and a half). You need a two-pin light bulb and several wires).
There are many tuning methods, the cheapest of which is modifying the headlights. In addition to the basic replacement of low and high beam bulbs, car enthusiasts are often interested in how to make dimensions in turn signals. Some drivers even duplicate the side lights on a VAZ 2110 or VAZ 2114. This is done because the visibility of the lighting on the road surface is not very good, which is very important at night and in bad weather to prevent accidents.
Mounting methods
In most cases, the socket is connected to the lighting fixture through the bottom. There is a hole in the bottom for entering an electrical cable. The E27 series is available with M16, M10 or M13 threads, and the E14 - M10.
For current-carrying wires
Direct connection of the cartridge to the wires is unacceptable! First you need to ensure reliable fastening of the product in the lighting fixture (lamp or chandelier), for which a plastic sleeve with a hole in the center necessary for the cable is installed on the bottom. A plastic screw is mounted to the sleeve for further fixation.
Connect the socket, clamp the wires with a plastic screw. The sleeve is intended for mounting decorative parts, and the screw ensures reliable fixation of the lampshade and the device suspension.
On the phone
The socket is attached using a metal tube, which allows you to hang heavy lampshades from the ceiling. The tube is equipped with additional nuts, with the help of which the fittings for the chandelier, including caps, are installed. The entire load falls on the metal tube, and the wires needed to connect the power are pulled directly through it.
Cartridges with threads on the outer surface of the body can be decorated with lampshade rings and other decorative elements.
Bushing
Tubular bushings are used for fastening sockets in table lamps and wall sconces. Products are made from sheet materials. It is enough to make a hole through which the cartridge should be attached using a sleeve.
Due to the heating of the light bulb, plastic bushings can become deformed, causing the socket to begin to wobble. Replace plastic with metal.
The mounting thread varies, as there is no specific standard for E27 socket sockets. To replace a plastic bushing with a metal one, use resistors. Before breaking, disassemble and compare the threads so as not to ruin the product in vain.
With screwless terminals
The body and bottom of the cartridge, using screwless clamp contacts, are connected to each other using two latches. The bottom of the product is screwed to the threaded tube, after which the electrical wires are inserted. The body is made in the shape of a cylinder and is attached to the bottom.
Types of jobs
You can modify turn signals on your car in the following ways:
- supplement the illuminated turn signals with dimensions by moving them from the headlights;
- insert additional side lamps into the front optics;
- change the color of the side lamps to yellow or white;
- use flexible DRLs with a turn signal function.
If the dimensions are yellow, then the light from the turn signals will merge with it, if the color is white, then the turn signals will stand out against the background of the main dimensions
Installation process
Before you understand how to connect turn signals to side lights, keep in mind that there are two main colors of side light optics:
- yellow (“American”) with the same color of rotating optics will merge;
- White when turning yellow is better to stand out on the road.
Side lights are inserted into turn signals on a car as follows:
- in the rotating optics on the VAZ, cut a hole where the cartridge will be inserted. It is acceptable to use the w5w cartridge type. It will fit into a standard 5W incandescent light bulb or LED strip;
- secure the cartridge in the optic for rotation to avoid moisture, dirt and for durable fastening;
- To transfer lighting from headlights to a VAZ 2107 or 2109, switch the wires to the newly installed socket. When connecting additional lights without transfer, it is necessary to close the contact in the block that goes to the headlight in a parallel manner.
After such modifications, the car acquires a special charm.
Despite the apparent convenience for the driver, according to the Administrative Code, such a change in configuration leads to confusion among other drivers and even causes accidents.
Also keep in mind that if you install lighting devices equipped with red lights or reflectors in front of the car, as well as devices with operating modes and colors that do not comply with the law, you will face a fine in the following amounts:
- 2500 rubles if you are a civilian;
- 15,000-20,000 rubles - official;
- 40,000-50,000 rubles - legal.
Penalties are regulated by the regulations on the admission of vehicles to operation.
Recently, motorists have resorted to the possibility of equipping side lighting in corners using bulbs with two contacts. But this measure can also interfere with other road users. Thus, manipulating the headlights, no matter how useful they may be for you, may impair your safety. Therefore, do not be surprised by the increasing attention to your car from traffic police officers.
How to connect a socket to an electric socket
At first glance, connecting an outlet to an electric socket is a completely meaningless process. Imagine if you urgently needed an outlet next to the mirror in the bathroom, but the distribution box was located too far away. The bathroom must have a lighting fixture with a socket, to which two cables necessary for operating the socket are connected in parallel.
But there is one caveat: the socket is de-energized whenever the light in the bathroom is turned off, which cannot be called a disadvantage. This relationship increases electrical safety - in the event of a water leak or moisture getting into the outlet, a short circuit is eliminated. For added safety, choose sealed outlets designed for rooms with high humidity levels.
How to make American cars on a VAZ 2114
I've been wanting to do this for a long time and never got around to it. And then the melancholy before the session set in, the realization that I would be working like a horse for the next 2 weeks. I decided to please myself with a little styling. Perhaps the simplest and most reliable option is installing a two-pin light bulb in a 2-pin socket. Don't cut anything. No relays or similar complex electronics What I bought: Light bulbs 50 RUB for 2 pieces Cartridges 200 RUB for 2 pieces Crimping tips 10 pieces of which 2 females and 8 males approximately
A piece of wire: found for free in the garage
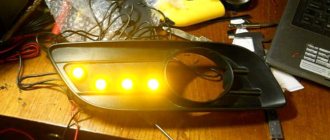
In general, we stir up such garbage as in the photo above. We crimp all the wires from the socket using daddies. Then we take the free wire in our hands, cut off a short wire of about 5 cm and a long wire of about 30 cm. We crimp each one individually on one side onto Mom. And then we twist the remaining ends together and crimp them onto dad. All! You can throw away the posatizhi and exhale, crimping is a tedious task if your hand is not full. No more crimping.
Analysis of reviews from Lada Granta liftback owners
- Grant-Eject (https://www.drive2.ru/l/6512513/): the sedan's lamps are different from those of the liftback. In the first modification they are combined, in the liftback they are separate.
- Diyk: taillights often sweat on sedans, the problem has been eliminated in the liftback;
- Silica Gel: to quickly remove moisture, attach a moisture absorber for shoes to double-sided tape. It doesn't last long, but it's effective. Improving the sealing of the rear lights is an alternative option.
- Grant-Eject: insufficient fixation contributed to the flashlight falling out during movement.
- LADA Granta 2012 (https://www.zr.ru/content/articles/832528-lampy-primenyaemye-v-avtomobile-lada-granta/): the car is reliable, unpretentious, subject to a moderate driving style. Over a period of five years of operation, breakdowns are typical and characteristic.
How to make American cars on a VAZ 2114
There are many ways to implement American cars on the VAZ 2114, each with their own pros and cons. Depending on your skills, desires and capabilities, you can choose any of the ones presented below, or come up with your own.
Turn signal lamp with two threads.
A two-filament lamp is a relatively good way. It is quite easy to install and easy to use. The lamp contains two filaments, one dim at 5 watts, the other brighter at 25 watts. A thread with low brightness is used as side lights, and a thread with strong brightness is used for turn signals. As a result, the turn signal is quite clearly visible against the background of the side lights.
To install, you will need a base with two +, or solder the wire directly to the lamp, but you need to be careful, in this case it may burn out.
The principle of signal inversion. In this case, the turn signal lamp is constantly on when driving, and when the turn signal is turned on, it begins to blink. The lights do not differ in brightness, as in the previous case, but the signal is highlighted due to the fact that the lamp goes out completely at the moment of operation.
Installation is simple, you just need to cut the wires a little and two five-pin relays, one for each headlight.
Relay with capacitor and diode
This method is, in fact, more correct than the previous one. An IN5819 diode and a 25 volt 4700 mF capacitor are added to the five-pin relay. The principle of operation is the same, but there is a guarantee that nothing will short out anywhere and will last a long time without problems.
DIY “American dimensions”
Good day, dear readers, the other day I was inspired to make my car a little American, and I decided to make the dimensions into turn signals, there are not many options for such an operation, for example these:
1)— Embed the second base and power it from the factory dimensions, but such a manual did not suit me, because... When you turn on the turn signal, it lights up brighter and dimmer.
2)— Install a two-filament light bulb (what makes it difficult is that two yellow-colored filament light bulbs are hard to find, and besides, the result is the same as in the first option.
3)— the option that I chose, and the most complex (creating two modes of rotary lamps using a 5-pin relay, diode and capacitor). I will try to tell you about all my actions.
First of all, we go to the electrical parts store and buy there:
1. Capacitor 4700 µF * 25v or 3000 µF * 25V or 3300 µF * 25V I don’t know what the difference is, it seems like in capacitance, I used 4700 µF * 25v, all you need is 2 pieces.
2. Diode 5817 or 5819, I also don’t know what the difference is, I took 5817 3. 5-pin regular car relay - 2 pcs 3. Terminals for the relay - 2 pcs 4. Round terminals - 2 pcs 5. Wire - 4 m. (colored) I took the colors as in the diagram 6. Electrical tape or heat shrink 7. Mother terminals
recruitment for young electrician
Then we take the diagram and begin to assemble everything exactly according to the diagram
After we have done our homework, we go to the car, remove both headlights and look for “+” from the dimensions and “+” from the turn signals. The turn signal has only 2 wires, the colored one will be a plus, and the plus from the marker will be in the far right upper corner of the chip. And again, guided by the diagram, we begin to twist the wires.
Then we connect “-” in any convenient place. Well, that’s all.
After assembly we enjoy the work done)))
We set the dimensions in the turn signals of the VAZ 2114, how to make American ones on a VAZ
Many people want to improve their front optics, because with good light, driving is much more comfortable and safer for you, as long as your light does not interfere with oncoming drivers. There are many ways to do this. But some people want to get a unique and unusual look by tuning their headlights. To do this, for example, they install additional dimensions in the turn signals or completely transfer them there, creating the so-called American style.
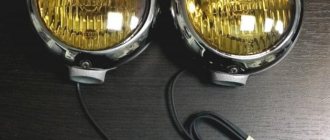
The American style is that the lights are constantly on, their bulbs are in the turn signals and most often they are orange.
American cars on the VAZ 2114 are a very common practice, with them the car really looks more interesting, besides, in the dark, any additional light will not hurt. In poor visibility, a car with such tuning is more noticeable on the road. But you need to understand that such a change can mislead other road users and sometimes cause accidents.
The yellow lights merge with the turn signals, and some road users may misjudge the situation. Therefore, it is better to use white dimensions, then the orange turn signals will stand out clearly.
The attention of traffic police officers to a car with such modification is increased, and they may stop you to check your documents more often.
When making an American VAZ 2114, everything must be done within the law; there are clear restrictions on any changes to the front optics. For example, you definitely cannot install red lamps, reflectors and any other devices with inappropriate color and operating mode. For such violations, a fine of 2,500 rubles was imposed.
Useful video
You can get additional information on installing dimensions in turn signals from the video below:
Good afternoon, visitors to this page) It seems to me that every second chiselman has such an entry in the logbook) In this entry I will tell you how I made myself an American one)
And so, I always liked American ones, I just knew that I would buy a chisel and put American ones there, and now that time has come)
What do we need:
1. Relay 5 contact - 2 x 24 = 48 UAH2. Relay connector 5 pin - 2 x 5 = 10 UAH3. Capacitor 4700mF 25V - 2 x 11 - 22 UAH4. Diode 1N5819 - 2 x 1 = 2 UAH5. Female type terminals - 8 pcs6. Male terminals - 2 pcs7. Ring terminals - 2 pcs8. Electrical tape/heat shrink tubing9. Bolt with nut for 6 - 2 pcs.
And now we have collected all this stuff and we can get to work)
I found the diagram by which we will connect the “correct” American ones in the open spaces of the drive) Here it is)
The advantage of this connection is that when they are turned on, and we need to turn on the rotation, one side lights up and the other blinks. That is, we do not interfere with other road users)
Having waited for the parcel, we begin to work)
First of all, I thought that I would solder the capacitor and diode. But when I started working, I realized that everything can be successfully crimped with terminals)
Please note that I inserted a small piece of wire into the terminal where the capacitor and diode go; it is exposed there. This is done to better fix the legs of the components in the terminal; it sits very tightly there). The diode needs to be connected with a gray strip to pin 86, and the opposite one to 87. The capacitor should be connected with a gray strip to pin 85, and the opposite one to 86 (to the diode)
Diode
you need to connect the gray strip to pin 86, and the opposite one to 87.
The capacitor
with a gray strip to pin 85, and the opposite one to 86 (to the diode)
I read several entries on Drive2 about American women, few people extended the wires, everything was done on the wires that come with the block. I had almost all my own wires, I made them new so that everything wasn’t flush, keep this in mind)
And after 10 minutes, according to the scheme, we get this miracle)
Then I went to check everything on the car, connected everything and then bam, nothing was on. I'm shocked and starting to look for reasons. First I removed and checked all the contacts to see if I connected them correctly. Everything is according to the diagram, everything is correct. I go further and start looking for + for size. I poke at the green wire, but there is no plus, but how? After all, the marker is on fire. Here I take out the block and look for the wire for the size. So here it is:
The diagram indicates that the green wire is + the factory size, in fact there is yellow on one side and yellow-black on the other side, be careful. It’s possible, of course, that the person who came up with this diagram simply indicated the green color of the wire, not meaning 2109 by wiring, but somehow I didn’t think about it.
Okay, we found the plus, I connect everything again, but it doesn’t light up! I’m panicking, I start looking at the plus at the turn signal, it’s there, but the lamp doesn’t light up. I think maybe it burned out? I take it out - it’s intact, I put in a new one, it’s working - it doesn’t burn! And then one movement and it caught fire. Well, I think it was a bad contact, I replaced the terminals, it seemed to me like there was a little oxidation. But again, it only lights up when you move it a little. I’m not happy with this kind of work, so I’m going to go to the auto shop to buy a new cartridge)
And I bite off the factory terminal from the yellow wire, I already crimp it with another wire
Everything is on fire, we are great. We pack everything securely and move on to finding a place for this crap)
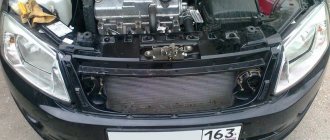
Time to find a place for the mass. I've seen a lot of people make holes in the wing and just throw a lot of stuff like that, but I'm not a fan of extra holes. There is a place in the corner, it seems like the factory provided it for American women) I don’t know what that place is for, but it’s there
How to make American cars on a VAZ 2114
There are many ways to implement American cars on the VAZ 2114, each with their own pros and cons. Depending on your skills, desires and capabilities, you can choose any of the ones presented below, or come up with your own.
Turn signal lamp with two threads.
A two-filament lamp is a relatively good way. It is quite easy to install and easy to use. The lamp contains two filaments, one dim at 5 watts, the other brighter at 25 watts. A thread with low brightness is used as side lights, and a thread with strong brightness is used for turn signals. As a result, the turn signal is quite clearly visible against the background of the side lights.
To install, you will need a base with two +, or solder the wire directly to the lamp, but you need to be careful, in this case it may burn out.
The principle of signal inversion. In this case, the turn signal lamp is constantly on when driving, and when the turn signal is turned on, it begins to blink. The lights do not differ in brightness, as in the previous case, but the signal is highlighted due to the fact that the lamp goes out completely at the moment of operation.
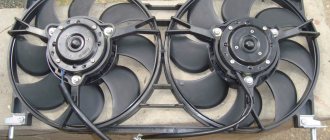
Installation is simple, you just need to cut the wires a little and two five-pin relays, one for each headlight.
Relay with capacitor and diode
This method is, in fact, more correct than the previous one. An IN5819 diode and a 25 volt 4700 mF capacitor are added to the five-pin relay. The principle of operation is the same, but there is a guarantee that nothing will short out anywhere and will last a long time without problems.
Short circuit of the dimensions to the turn signal lamp
There is nothing easier than closing the turn signals on a VAZ 2114. But this method is fundamentally incorrect, and using it is strictly not recommended. The turn signal lamp is directly connected to the headlights, and there is essentially no turn signal at all.
Additional socket for turning headlight
The most correct, according to the majority, but at the same time the most labor-intensive method is the introduction of an additional cartridge into the headlight. The cartridges are taken from unnecessary repeaters, cut off and soldered into the headlight. If done carefully, everything looks invisible; not everyone will realize the changes made.
Why don't my turn signals work?
Initially, it is necessary to define what is meant by the concept of “correct operation” of optical elements:
- The signal flashing frequency is 60 times per minute;
- when the car is running, the optics always work stably;
- after switching the control lever down/up, the turn signal is turned on on the desired side.
Deviations from the listed parameters mean malfunctions in the operation of the direction indicators, which can be caused by various factors.
Causes of problems
The list of causes of malfunctions varies slightly depending on the design of the rotary system and may include:
- Burnt out lamps and fuses.
- Relay failure.
- Damage to wiring.
- Damage to indicators on the instrument panel.
- Failure in the electronic control unit (relevant only for cars produced in the last decade);
- Switch malfunction.
Each of the listed technical problems has its own characteristic signs, which can be used to accurately or approximately determine the breakdown.
Malfunctions: types and solutions
Problems associated with the rotary system are the following:
- The turn signals light up without blinking. This malfunction is often corrected by gently knocking on the relay. But if it doesn’t help, then all that remains is to replace the relay. Still no blinking? This means that it is necessary to change the fuse block or the fuse itself if its resistance differs from the nominal one.
- Only one turn signal works. The cause of the malfunction definitely does not lie in the relay, since in this case the malfunction of both direction indicators is typical. In order of priority, you should first resort to replacing a light bulb that is similar in power and size (the current one could burn out). Then move on to inspecting the ceiling. Does it show signs of oxidation? You need to clean your contacts. Failure again? This means the problem is in the wiring - the wire is not tightly soldered to the socket.
- The turn signals don't function at all. The problem can be solved by knocking on the relay as already mentioned, or by replacing it or the fuses. Also, the problem may be damage to the indicator on/off lever, which is impractical to repair and is easier to replace with a new one. If a control unit is installed in the car, then it may turn out to be faulty; specific correction options are determined after diagnostics at a car service center.
- Flashing at an increased frequency. The car can thus signal that one of the lamps has burned out, or there is a short circuit in the wiring. If changing the light bulb does not solve the problem, then you need to check the electrical wiring.
- Flashing at a reduced frequency. It can be caused by poor contact of the light bulbs, failure of one of them, or broken wiring. In this case, it is recommended to check the wires last, since they are least likely to be the source of a malfunction.
Also, sometimes drivers encounter a “clicking” relay. This problem does not affect the functionality of the turn signals, but it also causes discomfort. A click-like sound occurs due to oxidized relay contacts or defective relay contacts. The problem is solved by cleaning the contacts or replacing the relay element.
How to make dimensions in the turn signals of a VAZ 2114
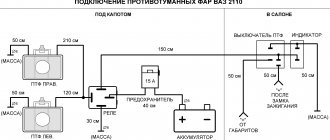
Headlight switching diagram for VAZ-2113, 2114 and 2115
Scheme for switching on headlights and fog lights:
1 – headlights; 2 – mounting block; 3 – headlight switch; 4 – ignition switch; 5 – external lighting switch (fragment); 6 – fog lamps in the internal rear lights; 7 – fog light switch with control lamp; 8 – indicator lamp for high beam headlights in the instrument cluster; K8 – headlight high beam relay; K9 – relay for low beam headlights; A - the order of conditional numbering of plugs in the headlight block; B - to power supplies
Replacing the lamp in the rear lights
To replace the turn signal bulbs in the taillights, remove the taillight circuit board and replace the burnt-out bulb on it. Read more in the article Replacing side lights.
When the light bulb suddenly burns out in the turn signal indicators, of course you need to change it, otherwise how will other road users see where you want to turn?
Where to start when replacing a turn signal bulb?
Of course, you first need to turn off the ignition and open the hood of the car, and then we find the burnt-out turn signal lamp socket and unscrew it counterclockwise, remove the socket along with the lamp without disconnecting the contacts. Then we take out a new lamp and change it, after which we insert the socket back into the index. Now we twist the cartridge clockwise. Everything is ready and we replaced the burnt out light bulb in the front headlight unit. How to replace a burnt out light bulb in the side turn signals? You will need to remove the side repeater and move it forward about 5mm, pulling the rear part out from under the wing. Then remove the side indicator completely and pull out the rubber boot from the hole in the front fender. The socket must be removed along with the cover, and the lamp must be removed and replaced with a new one.
After which everything needs to be installed in place, but in reverse order.
Everything is clear with the front and side turn signals, but what about the rear lights if the light bulb burns out there too? The leaders among automobile lamps are such companies as: Osram, Philips, etc.
First, you need to turn off the external lighting and open the trunk of the car, carefully remove the upholstery from the back side of the lamp and disconnect the wiring block, while doing this, squeeze the side latches and remove the contact plastic panel from the lamp. Gently press the bulb into the socket, twist it counterclockwise and remove it, then install a new bulb and screw it clockwise. We put everything back together in reverse order.
Now you have learned how to change the bulbs in the front, side and rear indicators of your car. It's not difficult at all and won't take much time, especially if you've done it more than once. Everyone's car is different, but the principle of replacing turn signal lamps is the same.
The operation is shown on the left turn signal. Removing the right turn signal is performed in the same way. To make it easier to work with the right turn signal, you can remove the battery, and to work with the right turn signal, you can remove the windshield washer reservoir.
1. We prepare the car for work (see “Preparing the car for maintenance and repair”).
2. Disconnect the wiring block from the front turn signal.
3. Release the tip of the turn signal mounting spring.
4. From the engine compartment side, press the indicator fastening clamp (shown with an arrow in the photo) and remove the indicator.
Install the front indicator in the reverse order.
Types of jobs
You can modify turn signals on your car in the following ways:
- supplement the illuminated turn signals with dimensions by moving them from the headlights;
- insert additional side lamps into the front optics;
- change the color of the side lamps to yellow or white;
- use flexible DRLs with a turn signal function.
If the dimensions are yellow, then the light from the turn signals will merge with it, if the color is white, then the turn signals will stand out against the background of the main dimensions