When replacing the clutch, you need to know how to remove the box on a VAZ-2109. Without this, it is impossible to repair the clutch basket and discs, as well as repair the gearbox. On “nines” you can remove the box without using an overpass or inspection hole. You can also install it without such conveniences. But skill will be required, since all the work is done in this case a little more complicated. You definitely need to get some tools, it is advisable to have a good set of keys on hand.
Preparatory work
Before removing the box on the VAZ-2109, it is necessary to prepare the car for dismantling. For this:
- Completely disconnect the battery and remove it.
- A jack is installed under the left side.
- Loosen the bolts that secure the wheels.
- Unlock the nut securing the outer CV joint and loosen it.
- Lift the left side and completely remove the wheel from the car.
- Place a container of at least 5 liters under the gearbox housing.
- Drain the gearbox oil. Assess its condition and, if necessary, refill it with fresh water.
With this, the preparatory work is completed, you can begin to dismantle the elements that will interfere with the removal of the gearbox.
The box is in its original place. What's next?
We figured out how to install the gearbox , now for the finishing touches.
- We carry out adjustment work in accordance with the operating instructions.
- Fill the oil to the required level, start the engine, turn it off, add oil. We make the first drive for a few kilometers, let the car cool down and again check the transmission fluid level. Top up if necessary. Thus, we fill all the cavities and voids of the hydraulics.
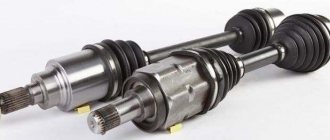
Disassembling the left drive
Before removing the box on the VAZ-2109, it is imperative to disassemble the left part of the suspension. The fact is that the left drive will interfere when the box is moved. Therefore, you need to free up space for maneuvers:
- Using the “17” wrench, unscrew the two bolts that secure the ball joint race to the hub steering knuckle.
- Using pliers, you need to pull the cotter pin out of the hole in the steering tip, and then unscrew the nut with a key “19”.
- Having installed the puller on the tip, you need to remove the finger from the fist hole.
- Move the brake hose to the side.
- After this, you need to completely unscrew the nut on the outer CV joint.
- Pull the entire stand toward you until the drive falls to the ground.
You don’t have to do the sixth point; you just need to remove the internal grenade from the gearbox. But the right grenade is removed only after the box is moved to the side. It is not difficult to remove the VAZ-2109 box with your own hands, just follow the sequence of all actions.
Necessary materials
To ensure that the removal and installation of the automatic transmission takes place without unnecessary fuss, buy all the materials and tools that you will need right away and keep them nearby.
Read
Reasons why a car with an automatic transmission does not move forward or backward
Materials and tools required for removing and installing automatic transmission:
- a set of hexagons, wrenches, ratchet sockets;
- container for draining waste;
- rags or lint-free cloth;
- original oil, repair kit of oil seals and gaskets for future repairs;
- oil filter;
- transmission jack for removal and installation. Without it, you won’t be able to position the machine gun correctly, because you won’t be able to hold 70 kilograms in the air for long.
You will also need those materials that will be used during automatic transmission repair, that is, for the purpose for which you are removing it. You will have to remove the box on some automatic transmission models if you want to change the filter device.
For example, Mitsubishi Lancer 9 automatic machines do not have a filter under the pan. It is inside the box. To get inside you need to disassemble the machine. And to disassemble the automatic transmission, you will have to remove it from the car.
After the tools are prepared, you can begin disassembling the machine.
Final disassembly
Then you need to perform the following manipulations:
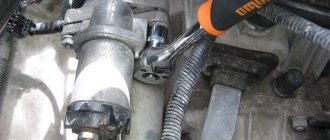
- Remove the starter, first disconnecting two wires from it.
- Using a 13mm wrench, unscrew the negative wire attached to the gearbox.
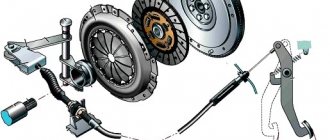
- Loosen the clutch cable and remove it.
- Unscrew the speedometer drive cable.
- Place a support under the gearbox; you can use a regular jack.
- Disconnect the lever from the rocker.
- Completely remove the cushions that secure the transmission to the car body.
- If you need to remove the VAZ-2109 engine with gearbox, you will need to hang it.
That's all, now the gearbox is held in place by just three bolts and one nut on the engine housing.
Removal
Disconnect the ground wire (-) of the battery.
Attention: this erases engine fault codes from the memory device, as well as the radio code. The battery can only be disconnected when the ignition is turned off, as otherwise the injection system control unit will fail. Before disconnecting, you should also read the instructions in the "Removing and installing the radio" and "Removing and installing the battery" sections.
Disconnect the electrical connectors at the gearbox.
Diesel engine with gas turbine supercharging: Remove the air hose from the turbocharger to the charge air cooler.
Remove the gearshift lever and guide lever, as well as the cable support from the gearbox, see below.
Vehicles with hydraulic clutch:
Remove the gearshift cable with guide lever so that the working cylinder can be removed, see below.
Unscrew the clutch slave cylinder and hang it on a wire to the body.
Caution: The hydraulic actuator remains connected, otherwise the system must be bled after installation. With the slave cylinder removed, do not depress the clutch pedal.
Vehicles with a manual clutch: disconnect the clutch cable from the gearshift lever and from the support, see chapter “Clutch”. Vehicles with a mechanical speed indicator: Unscrew the speed indicator drive shaft from the gearbox.
Vehicles with an electronic speed indicator: disconnect the connector from the speed sensor.
Remove the 4 upper engine and gearbox mounting bolts.
Raise the car, see section “Lifting the car”.
Disconnect the front exhaust pipe from the exhaust pipe and support it on a wooden stand.
Unscrew the cardan shaft protective shield.
Unscrew the cardan shafts to the left and right of the gearbox and tie both shafts high.
Install a suspension device, for example, VW 10-222A, and pre-tighten the engine with the lead screw. If there is no hanging device, place a suitable rod on the sawhorses and tighten the engine with a cable.
Remove 3 bolts -A- from right engine support -B-.
Remove bolt -C- from left gearbox support -D-.
Attention: The bolt is somewhat difficult to reach. On vehicles with power steering, carefully press the hydraulic lines to the side. On vehicles with anti-lock braking devices, if necessary, remove the coolant expansion tank, see chapter "Cooling system".
Remove nut -A- from the front engine mount.
Remove front console -B- engine mount.
If available, tie the power steering hoses together and securely tie them to the front of the body, for example to the front engine mount.
Unscrew the shock absorber from the front axle beam, see chapter “Front Axle”.
Move the power unit as far as possible to the right, and lift the engine a little more using a cable.
Attention: If there is not enough space, remove the radiator fan, see chapter “Cooling system”.
Unscrew the support -A- and bracket -B- from the gearbox. Press the power unit against the front wall of the body and remove the mounting bolt -C- from the gearbox console.
Please note: As of 4/93, the transmission console is no longer installed. If there is a console, then during assembly it must be installed again.
Unscrew and remove the small gearbox protective shield.
It is easy to lift the gearbox using a V.A.G 1383 lift. If there is none, lift the gearbox with a garage jack.
Attention: Place a wooden spacer between the gearbox and the jack.
Remove the engine/gearbox mounting bolts.
Press the gearbox away from the guide bushings and carefully remove it.
Press the clutch release lever against the gearbox housing and secure it with a mounting pin or bolt M8x35 (length 35 mm). After installing the gearbox, remove the bolt and close the hole with a plug.
How to completely remove the box?
After completing all the previous steps, you will need to unscrew the three bolts and one nut using “19” keys that secure the gearbox to the engine boat. Do not be afraid, the box will not fall after unscrewing these threaded connections. It will have to be undocked using mounting blades.
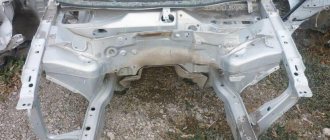
Carefully, trying not to damage the crankcase elements, move the gearbox away from the engine. It is best to carry out all work on an overpass or inspection hole, but if you do not have such facilities, then it is enough to hang the front part of the car. Be sure to install a piece of pipe in the hole instead of one of the inner CV joints. Otherwise, the differential mechanism may be destroyed, and the box will have to be completely disassembled and repaired. Once the transmission input shaft has come off the splines, you can lower the gearbox to the ground. This gives you full access to the clutch mechanism, which is mounted on the crankshaft flywheel.
Malfunctions
Every car owner with experience begins to feel a malfunction in the car’s gearbox based on characteristic signs. Most gearbox breakdowns are associated with wear of rubbing parts, because they experience constant significant load while driving. However, such wear rarely reaches a critical state immediately. This is usually a gradual process, which is why a novice driver is always advised to learn to “listen” to the car. The sooner you notice a problem, diagnose it accurately and fix it, the less repair work will need to be done and the less it will cost.
It is recommended to regularly check where the vehicle is parked for stains to monitor leakage of technical fluids.
You can classify signs that indicate breakdowns as follows:
- Noise in manual transmission. This may be a crackling, knocking, rustling, grinding, as well as beating of the gear shift lever. Knocking can occur during different phases of the box's operation. An experienced motorist can even determine from such a rustle which parts are at risk. For example, noise when a car turns into a turn indicates wear on the differential gears.
- Gears are hard to engage. In addition to the wear of parts of the gearbox itself, the malfunction may also lie in the clutch. In addition, there is a risk of deformation of the gearshift control rods. Remember that plastic parts break much more easily than metal parts.
- Spontaneous “dropping out” of the gear while driving. Over time, gear teeth become chipped and worn down, becoming shorter. The slightest vibration disengages them and the transmission “flies out”. In this case, it is also necessary to check the engine mounting.
- A sharp click and loss of smoothness when changing gears. If the clutch is working properly, then the cause of such a problem is most often the failure of the synchronizer blocking ring of the desired gear.
- The box “eats” a lot of oil. Increased oil consumption is primarily a leak. It can occur through a depressurized crankcase, as well as worn oil seals, which are located on almost any hole in the box body.
Malfunctions also include rattling of the gearshift lever. More information can be found here:
Most of these faults cannot be solved in any other way than by replacing worn parts. The gearbox is close to the center of mass of the car and breaks down much less often than the engine or suspension.
Such gear failures cannot be eliminated in any way except by replacing the unit
Therefore, if something happens to it, repairs will definitely be required. In order to find out which wear parts cause noise or interfere with the smooth movement of the lever, you need to remove and disassemble the gearbox.
Installation of the box
The installation procedure is performed in reverse order. Be sure to clean the gearbox housing of any dirt. You need to do the following:
- Raise the transmission until the input shaft is approximately centered on the flywheel. At the same time, you need to install the right grenade into the hole.
- Install the input shaft in the flywheel hole. If necessary, you can twist it so that it fits onto the splines.
- Pull the gearbox housing as close to the engine as possible. Do this as evenly as possible so that the gearbox does not go awry.
- Install three bolts and a nut for securing the gearbox.
- Install the left inner CV joint into the hole.
- Replace the cushions, the rocker, the starter, and connect all the wires.
- Reinstall the clutch and speedometer cables.
After this, you can assemble the left side of the suspension by installing the ball joint in place and securing it with two bolts. Place the steering knuckle on the steering knuckle and tighten the nut. Secure it with a cotter pin. The hub nut must be tightened only after the vehicle is installed on the wheels. Here's how to remove the gearbox on a VAZ-2109, the procedure is not complicated, but skill is required - the process can take a couple of days if there is no experience.
VAZ 2110 gearbox device
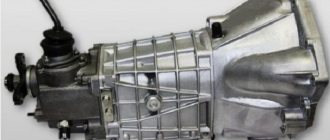
The Volzhsky Automobile Plant's 10th series vehicles are equipped with a five-speed manual gearbox. It is two-shaft, has five gears for forward movement and one reverse gear for reverse. The main gear, differential and the gearbox itself are combined in one housing. When connecting the crankcase to the cover, it is possible to seal it with a gasket or sealant that is resistant to gasoline and oil.
The two-shaft system is represented by a primary and secondary shaft. The first is a block of driving gears, the second contains driven gears that provide forward movement. The two groups of gears are in constant mesh. The secondary shaft parts can be removed for replacement or repair.
The secondary shaft is made empty inside to lighten the weight of the structure. At the locations of the gears there are circular grooves that ensure the supply of lubricant to the surface of the shaft during operation. The rotation of the fifth gear gear is carried out through the bushing. The shaft splines are used to install synchronizer hubs. The shafts themselves are installed in the box body on bearings - a pair of roller bearings on one side and a pair of ball bearings on the other.
The differential uses two satellites. The pretension of the bearings in it can be adjusted by changing a special ring from thick to more or less thin. This ring can be found under the outer differential bearing cover. The speed sensor is connected to a plastic gear located on the gearbox housing, which, in turn, is driven by the drive gear on the differential housing.
VAZ 2110 gearbox design: 1- clutch release bearing; 2 — guide sleeve of the clutch release bearing; 3 - main gear drive gear; 4 — roller bearing of the secondary shaft; 5 - oil sump; 6 — satellite axis; 7 — speedometer drive gear; 8 — axle gear; 9 — differential box; 10 — satellite; 11 — clutch housing; 12 — driven gear of the main gear; 13 — adjusting ring; 14 — tapered roller bearing of the differential; 15 — axle shaft seal; 16 — driven gear of the 1st gear of the secondary shaft; 17 — synchronizer for 1st and 2nd gears; 18 — driven gear of the second gear of the secondary shaft; 19 — driven gear of the third gear of the secondary shaft; 20 — synchronizer for 3rd and 4th gears; 21 — driven gear of the fourth gear of the secondary shaft; 22 — ball bearing of the secondary shaft; 23 — driven gear V of the secondary shaft transmission; 24 — 5th gear synchronizer; 25 - secondary shaft; 26 — rear cover of the gearbox housing; 27 — drive gear of the 5th gear; 28 — ball bearing of the input shaft; 29 — input shaft; 30 — gearbox housing; 31 — roller bearing of the input shaft; 32 — input shaft oil seal; 33 - breather
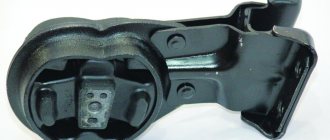
When driving on a bumpy road, the engine experiences vibrations, which, if the rubber dampers are worn out or sagging, can lead to displacement of the gearbox shafts. This can result in unpredictable transmission disengagement when the gears on the two shafts become disengaged. To compensate for such vibrations, a reaction rod is provided in the connection between the gearshift handle support and the gearbox housing. It is equipped with a rubber gasket to dampen vibration from the engine, which causes the gearshift lever to shake.
You can read more about the clutch design in a car here:
You can find out how much oil is in the gearbox by checking the dipstick. According to factory standards, the gearbox holds 3.5 liters. If the oil level drops, it is necessary to add it, otherwise accelerated wear of the gears can lead to breakdown. Technical regulations require routine oil changes every 90 thousand kilometers.
When to remove the gearbox
If signs of malfunction appear, the manual transmission must be removed to carry out repair work. These characteristic features include:
- presence of increased noise,
- problems with gear shifting, including unclear engagement or spontaneous disengagement,
- the appearance of oil leaks.
Sometimes the gearbox is removed so that the flywheel, engine wheel seal or clutch can be replaced.
The automatic transmission is removed when the symptoms described above appear. But the automatic transmission does not need to be removed to replace the flywheel or clutch, since these parts were not originally installed in this case.
Kak snyat korobku peredach
The methods for removing automatic and manual transmissions are basically identical. The main differences are in the size of the devices, as well as in the presence of hydraulic hoses in the automatic version, which are connected to the cooling radiators.