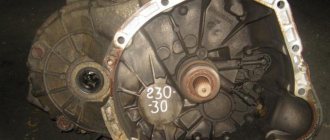
How to remove and disassemble the Lada Kalina gearbox control drive
We carry out the work on an inspection pit or on a lift.
1. From the bottom of the car, using a 13mm spanner, loosen the nut of the coupling bolt of the clamp securing the control rod to the shank of the gear selector rod hinge (Fig. 1).
2. Use a slotted screwdriver to unclench the clamp and move it along the rod.
3. Remove the transmission control rod from the shank of the gear selector rod hinge.
Remove the clamp from the rod.
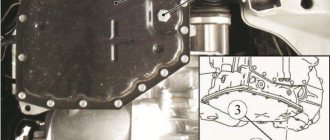
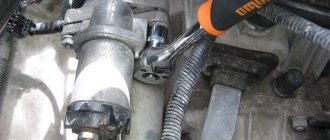
4. Using a 13 mm spanner, unscrew the two bolts securing the torque rod to the base of the gear shift lever.
5. And disconnect the jet rod from the base. In the cabin we remove the lining of the floor tunnel.
Having unscrewed the fastening nuts, disconnect the air ducts for blowing the feet of the rear seat passengers from the heater and lift the air ducts.
6. Squeezing the clamps of the wire block, disconnect it from the block of the reverse gear lock solenoid switch.
7. Use a 13mm socket to unscrew the three bolts securing the base of the gear shift lever, and unscrew the fourth bolt under the air duct with a 13mm wrench
8. Remove the gear shift lever with its base, bringing the control rod into the cabin through a hole in the floor.
9. Use an awl or a thin slotted screwdriver to pry up and remove the plug for the gear shift lever handle.
Using a 13mm socket, unscrew the locknut securing the handle.
10. Unscrew and remove the handle from the lever.
Turning the decorative cover inside out, loosen the plastic clamp securing the cover or cut the clamp.
11. Remove the cover from the lever.
12. Loosen the plastic clamp securing the solenoid switch wires and remove the switch.
If it is necessary to replace only the reverse gear lock solenoid switch, these operations can be performed on the vehicle without removing the entire gearbox control drive.
13. Using a 13mm wrench, unscrew the nut of the control rod axle bolt, holding the bolt - axle from turning with the 13mm wrench.
Repair and restoration work
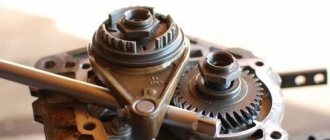
To begin repair work, it is advisable to remove the Lada gearbox cover, then you should make several movements with the lever to accurately determine where the rattling of the gearbox lever comes from. The driver can see poorly fixed parts with the naked eye.
If the problem lies in the bushing, then you need to arm yourself with the following tools:
- key to 13;
- pliers;
- electric sharpener.
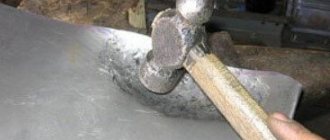
First, the lever casing is removed to unscrew the fastening nut. The next step is to remove the bolt, washers, and bushings. If there is a gap between the listed elements, then the driver may experience vibration when moving when the gear lever is switched. The reason for the gap may be due to the fact that the bushing is large; it is advisable to grind it off with a special tool (about 1 mm). After performing these manipulations, the metal mechanisms need to be lubricated.
This procedure can be carried out independently in your garage. In this case, you need to be extremely careful.
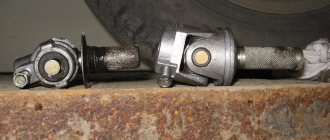
The Lada Kalina gearbox includes such an element as a clip. When it deforms, vibrations and rattling may also appear at certain speeds of the power plant. If its rubber part is torn, replacement is required. Replacing the gearshift lever ball joint race begins with removing the lever housing. The lever device itself must be removed, the bolts are unscrewed, and then you can begin dismantling the clip with the boot.
Societies › VAZ: Repair and Modification › Blog › Replacing the gearbox lever cage Kalina car 1, 6 8kl
Mineralnye Vody, Our homeland
There is a joke that AvtoVAZ engineers will not die of their own destruction. Every time I take on car repairs, this joke becomes more and more powerful.
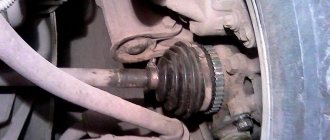
It all started with an iron dull knock in the engine area on bumps. At first I thought maybe there was something to do with the protection. But that was not the case here. I drove into the pit. And there p?ts. The gearshift lever rod rests on the muffler. Oh how! It turns out that the gearshift lever is held on a clip, which is rubber and in two places very narrow for such loads. This is how a week of waiting for repairs and driving with the understanding that something was wrong with the car began. I read on the web about repairs. There are few articles on this subject. One person wrote that the shift took 20 minutes. HOW?! I don't know how he did it. The replacement me about 2 hours.
Removing and disassembling the gearbox control drive
We carry out the work on an inspection ditch or overpass. Below the car..
. Using a 13mm spanner, loosen the tightening of the nut of the coupling bolt of the clamp securing the control rod to the shank of the gear selector rod hinge.
Using a slotted screwdriver, we open the clamp and move it along the rod.
Remove the transmission control rod from the shaft of the gear selector rod hinge. Remove the clamp from the rod.
Using a 13mm spanner, unscrew the two bolts securing the torque rod to the base of the gear shift lever.
. and disconnect it from the base. In the cabin, remove the floor tunnel lining (see “Removing the floor tunnel lining”). Having unscrewed the fastening nuts, disconnect the air ducts for blowing the feet of rear seat passengers from the heater (see “Removing the instrument panel assembly with the heater”) and lift the air ducts. Squeezing the clamps of the wire block..
. disconnect it from the reverse gear lock solenoid switch block.
Use a 13mm socket to unscrew the three bolts securing the base of the gear shift lever, and unscrew the fourth bolt under the air duct with a 13mm wrench.
We remove the gear shift lever with its base, bringing the control rod into the cabin through a hole in the floor. Use an awl or a thin slotted screwdriver to pry it off.
. and remove the gear shift knob plug. Using a 13mm socket, unscrew the locknut securing the handle.
Unscrew and remove the handle from the lever. Turning the decorative cover inside out, loosen the plastic clamp securing the cover or cut the clamp.
When to remove it
The only reason why it is really necessary to replace the gearshift lever cover on a Kalina is mechanical damage, that is, a cut or rupture of the material. However, such protection has to be removed much more often, for example, to repair or service the gear selection mechanism.
Damaged gearshift lever cover
In addition, some drivers remove it to replace it with a more beautiful analogue that fits better with the interior of the car.
Automatic transmission Jatco
In August 2012, sales of LADA cars with Jatco automatic transmission began. To remove the handle, you must first lift the casing up and remove the two screws securing the mount to the rod. Then, on the bottom right side, disconnect the white wire that goes to the O/D button. By the way, the automatic transmission handle can be shortened.
How much does the case cost?
Cheap cases cost 130–170 rubles. For this price, the buyer receives a lever protection made of leatherette (leatherette) with a plastic frame. It is unknown how long such an accessory will last, it all depends on the care of the driver and passengers, nevertheless, it will perform its function, but you should not expect beauty and style for that kind of money.
For 500–700 rubles they buy a set of lever protection and handle covered with the same material; it looks more beautiful, but is functionally no different from the first.
Cover for the gear knob for Lada Kalina
Expensive sets will cost a thousand or more rubles, and they are made of high-quality soft leather, so they will last much longer than cheap ones. They are often equipped with stylish gearshift knobs that will decorate the interior of any Lada Kalina. However, functionally they are no different from the first and second sets, so the buyer only pays for good leather and a beautiful design.
Making a pattern
This is the most important step in re-tying the gearshift knob with your own hands. The parts must be cut to the ideal dimensions. And this is achieved by the accuracy of the pattern made. To do this you will need construction tape. The procedure in this case is as follows:
- We draw lines on the front and back of the handle dividing equal right and left sides.
- We completely cover the right half of the handle with pieces of tape, making sure that the edges of the tape fall exactly on the edges of the dividing lines and with an overlap of 3-5 mm in the places where the panel and the lower part of the handle will be located.
- Then carefully remove the tape. This will be the pattern for the leather on the right side of the handle. The left one will serve as a mirror image of the right one.
- Our original pattern has a convex relief. In order to make it flat, carefully use small scissors to cut its edges to such a depth that it becomes completely flat.
- We place the pattern on a piece of prepared leather and outline its outline. There are gaps in the places of the cuts; we fill them, smoothing out the overall contour. The leather for the right side of the handle is ready.
- We turn the pattern over and make a blank for the left half of the handle.
What will it take?
Both leather and high-quality leatherette are equally suitable for reupholstering the gearshift knob. It is worth paying attention to the word “quality”, since when stitching the edges of a loose and fragile material will simply tear. It is also necessary to pay attention to the covering of the front side of the leatherette. It should be dense and thick so as not to fray from constant hand touches during the first months after reupholstery.
So, when you have chosen a suitable piece of leather (we will focus on it), you should take care of the tools and other consumables. To carry out the work, in addition to leather, we will need:
- Glue "Moment".
- High-quality nylon thread.
- Small, sharpened scissors.
- A sewing needle with an eye suitable for the thickness of the nylon thread.
- Awl.
- Construction tape.
- A table knife or a not too sharp screwdriver.
When everything is collected, you can start working. We will tighten the handle of the Lada Vesta car. Re-upholstering the gear knob with leather from Vesta with your own hands will be the easiest thing to do, especially for those who are going to do this for the first time. Let's prepare two patterns, which will subsequently be pulled together (sewn) by us in front and behind the handle.
Stitching of cut parts
If you have a machine that can sew on leather, great. If not, the edges of the blanks will have to be sheathed by hand. You need to sew the edges with a simple shuttle stitch, which looks like a regular dotted line. The process includes the following stages:
- We draw straight lines at a distance of 2 mm from the edges of the right and left parts of the workpieces and at an equal distance (steps of no more than 3 mm).
- We make holes in the lines with an awl.
- Then we sew a stitch along the holes using nylon thread of the selected color.
- We make knots at the edges so that the seam does not unravel.
Gluing parts to the handle
Another important point in the process of reupholstering the gearshift knob with leather with your own hands. “Moment” we lubricate the handle completely on one side, we also lubricate the leather blank corresponding to this half on the back side and glue the leather to our half of the handle. It is glued strictly along the drawn dividing lines. Then we repeat the same with the other half.
The slouched edges on the side of the panel and below will puff up. It's okay, that's how it should be. We cut out small corners (cuts) in them, so that later it will be easier to bend these edges and glue them to the inside, on the side of which the panel with speed switching will be mounted, and from the bottom, where the decorative rim will be pressed against the handle.
Material selection
All work begins with the selection of material. Nobody forbids you to take some kind of rubber, fabric or any other option. But here the issue of practicality and operational stability should be taken into account.
It is optimal to choose one of the following materials.
- Leather. If we take practicality, quality, aesthetics and price-quality ratio, then leather cases are objectively the best. Only leather should be purchased specifically for cars, and not for haberdashery or furniture. These are materials that are completely different in quality and characteristics. Automotive leather has a polymer coating that additionally protects against mechanical damage, ultraviolet radiation, chemicals, oil, gasoline, etc. When selecting parameters, it is also worth choosing perforated leather without large pores;
- Eco leather. Fashionable and popular material based on polyurethane. Do not confuse with leatherette, which uses PVC. The latter does not breathe and has worse performance characteristics than eco-leather. Practical, inexpensive and easy to use. Although the skin is still a little inferior;
- Alcantara. A relatively new material that is very pleasant to the touch, does not fade, does not freeze, unlike leather, and does not crack. Don't be put off by the fact that Alcantara is thin. In fact, it is durable and wear-resistant. May cost slightly more than genuine leather. Plus, Alcantara is easier to work with and can be processed better.