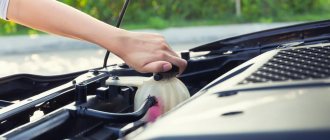
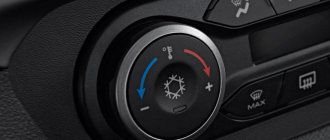
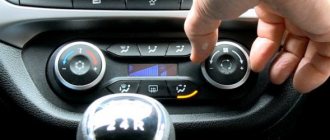
Hello everyone, it’s no secret that the heater on the Lada Kalina car heats just fine. Today I would like to talk about the heater control unit and its control. Of course, this is aimed at beginners; for experienced drivers, this article will not be interesting, but for beginners it may be useful. So, let's go. The control unit on Kalina has four regulators.
The first is a temperature regulator for the air supplied to the cabin.
The second is an air flow power regulator with four speeds.
The third regulator changes the direction of flow.
And the fourth regulator is the recirculation damper control.
The extreme right position drives air only inside the cabin, and the extreme right takes air from the street. By the way, if you suddenly notice that your windows are sweating, look at what position this lever is in. Usually they sweat when this lever is positioned on the right.
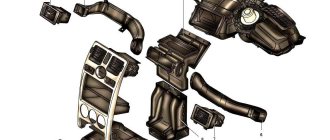
The design of the heating system Lada Kalina
The heater in a car transfers heat from the engine to the cabin. Without heating, the windows quickly fog up and become frosty in winter. On Kalina, the location of the stove allows for the possibility of integrating an air conditioner. The system is designed extremely simply and clearly, and is the same for models regardless of body type - station wagon, sedan or hatchback. It is shown schematically in the photo.
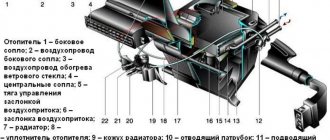
Heating system diagram
- The air duct exit is on the left.
- Air duct on the left.
- Windshield air ducts.
- Air duct distribution housing.
- Heater.
- Ventilation duct on the right.
- The air duct exit is on the right.
- Air duct for heating feet.
- Air duct for heating the interior.
- The air duct outlet is in the center.
The design uses the supply and exhaust circulation principle. Air enters the cabin, heated by the coolant, which simultaneously removes excess heat from the engine. The stove operates as a result of the radiator being heated by coolant. Then, with the help of a fan, the heated air flows through the air ducts through the deflectors into the car interior.
The heating system is controlled electronically. The volume of air masses that are heated from the heater radiator is regulated using a damper. On the center console there is an air conditioning control unit that controls the position of the damper and the speed of the electric fan.
The heater control unit consists of the following elements:
- Temperature regulator. By turning the knob, you can adjust the temperature of the air entering the cabin. Turning to the blue zone adds cold air, turning to the red zone adds hot air.
- Fan speed switch. It regulates the speed of air flow into the cabin.
- Air flow direction switch - to the windshield and down, only down to the feet, to the upper part of the cabin, to the windshield and side windows.
- Recirculation handle. Enables air circulation inside the cabin, while no air enters from outside. Can be used for a short time due to fogging of windows.
- Rear window defogger.
The control system also includes air duct deflectors. They can be closed or opened, and can also be used to regulate the direction of air flow.
How to choose the right heater radiator
| When the engine is running, heated fluid from the cooling system circulates through the heater core, heating the air passing through it. The amount of air passing through and around the radiator is set by the central heater damper, depending on the position of the temperature control knob installed on the instrument panel. |
The air distribution throughout the cabin can be adjusted by rotating the control knob for the air distribution flaps, as well as by turning the flaps and guide blades of the instrument panel ventilation grilles.
First of all, you need to pay attention to the metal from which the heating system element is made. Cheap options are made of aluminum
If it cracks, the owner has only one choice - throw it away and buy a new one.
Meanwhile, the brass-copper model, although more expensive, can be easily repaired - cracks in it can be easily sealed.
It is also important that the swirlers of the new radiator are made of durable plastic. As practice shows, such models last for many years and rarely become clogged.
Before choosing a stove radiator, you should know that they can be either aluminum or copper-brass. It is difficult to clearly prioritize the choice of one material, but each one has specific features of its work. These features are dictated by the properties of the material. Copper has a slightly lower thermal conductivity than aluminum, and therefore warms up more slowly. This cannot be said to be bad, since the thermal inertia of such a radiator is quite large. This means that it may not cool down for a long time.
We recommend: How to choose speakers for a car
An aluminum radiator is the opposite. It warms up quickly, but cools down just as quickly. It has a few more disadvantages. Firstly, the aluminum radiator cannot be repaired. Once it drips, you can throw it away. Copper is soldered quite simply and as many times as necessary. You just need to choose it correctly, because when selling, especially in the car market, you may come across a repaired copy with the partitions removed. It won't leak, but it won't provide heat either. Antifreeze will simply pass through such a radiator as if through a pipe.
The stove has a simple design. Its main element is the heater radiator. During the first 20-30 minutes, the engine heats the coolant to a temperature of 40-50 degrees, and then it circulates through the cooling system and enters the heater radiator. Warm air is distributed throughout the cabin using fans.
Each type, depending on the properties of the material, has its own advantages. The thermal conductivity of copper is less than that of aluminum, so it heats up more slowly. But it also retains heat for a long time. Copper products have high maintainability and can be soldered a large number of times.
Aluminum, on the contrary, heats up quickly and cools down quickly. The disadvantage of an aluminum radiator is low resistance to mechanical damage and non-repairability. If it leaks, it should be replaced. The advantage of aluminum devices is their low cost.
Swirlers in pipes
In any case, it is better to buy original products to avoid fakes. The car owner decides which radiator is best to purchase.
Malfunctions of the Kalina heating system
The most common malfunctions of the stove are that the air flow is weak, only cold air comes in or not at all. Among the reasons why the stove on the Lada Kalina does not heat:
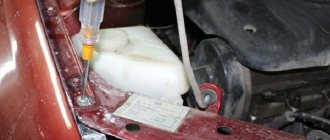
- Wear of the engine cooling system pipes. Antifreeze leakage due to worn hoses leads to a decrease in its level in the system, and therefore to insufficient heating of the heater radiator.
- The stove valve is out of order. This malfunction can be determined by the puddles of coolant that appear on the floor, under the front mats.
- The heating control unit is faulty. First, you should check the power supply from the on-board network. If it arrives, there is a problem in the air conditioning system. It is better to entrust unit repair to specialists.
- Wiring problems. There is no voltage supplied to the heating control unit. To check this, you will have to “ring” all sections of the chain.
- The additional resistor used to control the electric fan is faulty.
- The heater regulator is broken. In this case, it will be impossible to set a comfortable air temperature in the cabin.
- The radiator is faulty. One of the most common problems is that the Lada Kalina stove does not heat well. In the event of a breakdown, coolant leaks are typical. The part cannot be repaired.
If the problem is not heating, the cause is a malfunction of some part of the cooling system. These two systems are interconnected, and problems with one negatively affect the other.
Reasons for poor heater performance
Deposits form on the inner walls of the cooling system elements, which impair the performance of:
- The car engine regularly overheats.
- The heater does not heat the interior when it gets cold.
- The coolant temperature changes abruptly and over a wide range.
This situation cannot last long. The negative impact on almost all components of the machine ultimately leads to serious and expensive repairs. The car heater is no longer able to heat the air in the cabin, and you begin to understand that a clean Kalina stove is simply necessary. Why does this situation happen? The heater radiator stops performing its function:
- The coolant was not changed in a timely manner.
- Low-quality antifreeze was used.
The internal channels of the radiator become clogged with scale and coolant oxidation products, which makes it difficult for the fluid to circulate. This directly affects the process of heating the interior air.
Checking heating system elements
If the heater on the Lada Kalina does not work - it blows cold air - it is better to look for the reason, starting with the simplest thing. You should not immediately disassemble complex components. Typically, most problems arise from minor problems.
temperature sensor
If only hot or, conversely, only cold air blows from the air duct nozzles, regardless of the position of the damper, the cause of the malfunction is the interior temperature sensor. It is located in the ceiling, in the lampshade. The problem is solved by replacing the sensor.
Heating fan
If switching modes and air flow speed does not produce anything (a whistle or crackling sound is heard, the fan begins to make noise), the malfunction is related to the electric fan. To check this, you need to do the following:
- Set the temperature control knob to the extreme blue zone position.
- After that, use the switch to change the fan speeds from first to fourth.
The air flow should become stronger as speed increases. If this does not happen, then the fan is faulty. If it works, but not in all modes, or the speed changes disproportionately, then the cause of the breakdown is a failed auxiliary resistor. The source of the problem may be a blown fuse F5 in the mounting block due to an open circuit in the power supply.
Heater damper
To check the heater damper on the Lada Kalina, you need to set the temperature control knob to the extreme position in the blue zone, and the fan speed switch to “maximum”. Then you need to turn the damper control knob and at the same time monitor how the direction of air mass flow changes. If nothing happens, this indicates a malfunction of the damper regulator or the damper is stuck in one position (the traction cable has come off).
Heater radiator repair
It’s worth paying attention right away to change Kalina’s stove - you need to do a very labor-intensive task. The manufacturer of this car provides a proprietary manual that describes repairs for the most common breakdowns. Replacing the radiator is included in the instructions
Replacing the radiator is included in the instructions.
Craftsmen have developed their own loophole on how to carry out repairs without significant expenditure of effort and time. But when replacing the Kalina stove, you will need to cut out a piece of the housing under the casing so that you can remove the radiator without disassembling the dashboard.
DIY heating system repair
To change this or that part of the heating system, it is not at all necessary to seek help from specialists. This will help save time, but not money. If you follow the recommendations, you can replace some system components yourself.
Heater fan
Even beginners can replace the Kalina stove fan. The main problem is its location. For this reason, most of the time is spent not replacing the part, but dismantling it.
Fan replacement with panel removal
The method is recommended by AvtoVAZ engineers, but it is not the simplest. Not everyone decides to use it in a regular garage. When performing work, you must follow the instructions:
- First, turn off the power to the on-board network by disconnecting the battery terminals.
- Drain all coolant and remove the cabin filter.
- After unscrewing the fastening nuts, lower the steering column to its lowest position.
- Release the brake light switch from the wires, unclip the clips, and remove the upholstery from the pillars.
- Unscrew the screws and remove the front panel (cladding), then remove the dashboard along with the deflectors.
- Now you can begin dismantling the fan. To do this, you need to disconnect the terminal with wires from it, remove the ventilation hose, and unscrew the fastening nuts.
After installing the new fan, all further actions are carried out in the reverse order of dismantling. The procedure requires attention and accuracy and takes a lot of time. At some points, the help of a second person will be required.
Replacing a fan without removing the panel
It is not practical to remove the entire dashboard just because of the heater fan. You can replace the device without removing the dashboard - you just need to lift its right side. Next, you should “arm yourself” with a knife and a flashlight and crawl under the panel. The noise insulation is cut off, the fasteners are unscrewed, and replacing the Kalina stove motor becomes much easier. This method will significantly save time and nerves, although it will create some inconvenience.
Before you start replacing the electric fan, you need to make sure that this particular device is faulty.
Replacing the temperature controller
To dismantle the part and replace it, it is necessary to remove the control unit assembly. The procedure looks like this:
- the on-board network is de-energized by removing the “negative” terminal from the battery;
- the radio tape recorder (if any) is removed, and the terminal block of wires is unhooked from it;
- the damper control lever is removed;
- Next, the handle for controlling the temperature and direction of air flow is dismantled;
- there are plugs located at the bottom of the control unit - they need to be removed and the fastening screws underneath must be unscrewed;
- the center console should be carefully pulled towards you;
- After removing the console, disconnect the terminal blocks from the switches.
After replacement, everything is assembled in the reverse order. This operation is simple and only requires a couple of different screwdrivers to get the job done.
Replacing the heater core without removing the panel
Changing the heater radiator on a Lada Kalina, as on all front-wheel drive VAZ cars, is not an easy task. You will have to remove most of the front panel. To work, you will need a new heater radiator, hoses, clamps, an angle grinder and a standard set of tools. First you need to carry out some manipulations in the engine compartment:
- drain antifreeze from the cooling system;
- remove the battery and air filter housing, ensuring unhindered access to the heater pipes;
- you need to disconnect all the rubber pipes from the stove in the engine compartment, unscrew the nut securing the metal shield that covers the hoses going to the stove into the cabin.
device, malfunctions and diagnostics, replacement of radiator and fan1ladakalina.ru
The Lada Kalina air heater is considered one of the best in terms of heat performance in the VAZ family, but is far from the most reliable in operation. Problems begin almost at the car dealership, as many motorists say. But most of the problems are completely solvable, and often even without the involvement of car service specialists.
Common faults
The stove itself on Kalina is well conceived, but due to the poor quality of the elements and parts, various troubles constantly happen to it. Even the latest models with climate control have various “diseases”.
The list of the most common faults looks like this:
- The heater core is leaking;
- the heater damper is jammed or does not open completely;
- failure of the fan or control unit;
- gear motor failure;
- the temperature sensor or heater resistor has become unusable;
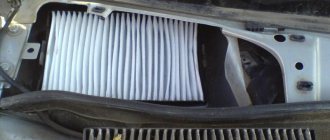
- The cabin filter is clogged.
To find out where this or that element of the heating system is located, you should look at the operating instructions; there will definitely be a corresponding diagram there.
The design of the Kalina stove without climate control is such that the air sucked in by the fan passes through the air filter and enters the heater radiator. There it is heated and supplied to different areas of the cabin through adjustable grilles and openings. The dampers are controlled and the fan speeds are switched manually. This heating system is more reliable because it does not contain any electronics.
Diagnosis and troubleshooting
The easiest way to resolve the issue is regarding the cabin filter. For the first time, thorough blowing of the element will be enough, but then it is better to replace it. The real problem is a leaking radiator or a broken fan; an expensive replacement of the unit cannot be avoided. An equally high price will have to be paid for a new control unit.
It will be somewhat cheaper to install a new temperature sensor, gearmotor or resistor for the Kalina heater. Moreover, the malfunction still needs to be correctly diagnosed, which can be quite difficult. A burnt resistor is easily identified - the fan only runs at maximum speed.
It is more difficult to check the sensor hidden in the lighting shade. Symptom of a malfunction - a hot or cold stream flows from one or more grilles, regardless of the position of the regulator handle.
It is more difficult to detect how well the mechanical heater regulator is functioning. To do this, you need to get to it by disassembling part of the front panel. In the same way, the proper operation of the air dampers is determined.
How to change a radiator
The operation is very labor-intensive, for which the car service center will charge you a hefty sum. But there is another, slightly barbaric, but fast and widely practiced method. The work flow diagram is as follows:
- Drain the antifreeze, disconnect and remove the battery, and then disconnect the hoses from the heater pipes.
- Unscrew the nut located near the fittings in the engine compartment. It holds a steel plate that will interfere with the removal of the heater.
- Remove the gas pedal and pull out the steel brake pedal shaft. Unscrew the decorative panel and behind it the plastic panel covering the stove radiator.
- To remove it, cut an opening in the plastic frame that allows you to pull the radiator towards the driver.
- Install the new element and reassemble in the reverse order. The cut opening can be sealed with plastic and decorated in any suitable way.
Heating system modifications
Every owner of a Lada Kalina is faced with the need to modify the stove. The upgrade usually involves installing a new 6-hole thermostat, a coolant filter element, and a different heater valve. Many, given the mediocre performance of the pump, install an additional water pump. There are many ways of minor tuning that can be used to achieve improvements for greater comfort.
Increase in operating temperature
This method is suitable for Lada Kalina with an electronic gas pedal. Previously, the throttle valve, which was heated by a common cooling system, was controlled by a cable drive. After installing the electronics, the hose that went for heating was looped into the cooling system.
To upgrade, you will need a tee, an additional hose and clamps. The second air duct is mounted as close as possible to the thermostat - the tee is installed in the coolant supply pipe to the radiator. The other end of the air duct is connected to the outlet of excess steam near the expansion tank fitting. Thanks to such a simple modernization, it is possible to increase the operating temperature to 92-95 ° C when the stove warms up from 50 ° C and above.
Installation of a hydraulic fence for drainage
A regular medical dropper is inserted into the channel of the steam outlet tube, which is immersed in antifreeze to the bottom of the expansion tank. As the liquid cools, obeying the law of physics about communicating vessels, it will begin to be drawn into the steam outlet, preventing the possible formation of air plugs - airing. Thanks to this simple method, the stove will begin to heat much more efficiently, which means the interior will be warmer.
You can also change the clamps to more reliable ones - self-tightening ones, and ordinary rubber hoses - to silicone ones. To reduce heat losses, it is worth taping all the joints of the air ducts, but to do this you will have to dismantle the panel again. The most convenient way to do this is when troubleshooting a problem.
Regular removal and installation of the dashboard will lead to its loosening, squeaks, knocks and other extraneous sounds will appear coming from under the panel while driving.
Adjusting the heater damper
To get to the heater damper, you will have to disassemble part of the front panel - unscrew the center console. This is where the stove control unit is located. You will need to remove the ashtray and two plugs under the hazard warning button. There are two self-tapping screws that need to be unscrewed. All knobs and switches are removed from the control unit. When releasing the latches, the console must be pulled out towards you, and then all the wires behind it must be disconnected.
Often the cause of damper malfunction is wear and breakage of the mounting of its drive. If it is not possible to replace the part, use epoxy glue and seal the broken mount. It may be broken due to the drive cable being too tight. In this case, you will have to develop it manually - usually this is enough to avoid similar problems in the future.
It is better to start adjusting the damper position by adjusting the stove tap. The bracket holding the cable sheath should be removed from its body. After this, you can remove the cable from the crane. Turn the tap lever to the maximum open position and remove the old cable. In fact, the heater tap may not be closed at all in the future.
If this method does not suit you, use another, more time-consuming method:
- The length of the cable sheath must be adjusted so that in the extreme right position of the switch on the control unit the valve is opened to the “maximum”.
- Using a latch bracket, the cable is fixed in this position, after which you can begin adjusting the damper.
- Remove the bracket that secures the cable sheath to the stove body and feel for the yellow lever, which is located on the right. You need to pull it all the way towards you.
- The cable sheath should be adjusted so that the lever on the control unit in the extreme right position fully opens the damper.
- After this, the cable can be secured with a bracket.
The same cable controls the position of both the damper and the heater valve lever. Damper malfunction is the most common problem in the heating system not only of the Lada Kalina, but also of other VAZ models. Therefore, it is recommended that this part be adjusted before the onset of cold weather.
If you monitor the condition of the heating system and periodically carry out maintenance, the stove will work for a long time without any serious problems.
Every car owner knows how important the operation of the heating system is, especially in winter cold conditions. If the stove fails, it will, at a minimum, cause considerable inconvenience for the driver and passengers, so the performance of this unit must be at the highest level. You can learn more about how to replace the stove on Kalina and in what cases it is required from this material.
Kalina stove switch diagram
On our Nivas we have two speeds in the stove.
I read on the Internet that you can make four. Nothing complicated really. On the Internet there is a circuit on the left using an old standard resistor: I didn’t like it right away, and so I started to understand the Kalinov circuit. Sheviniva’s is exactly the same:
We buy a Kalinovsky (Shnivsky) resistor with four contacts (200 rubles) and a Kalinovsky heater switch (100 rubles):
Connection diagram for the electric motor of the heater fan and the rear window heating element:
1 - ignition switch; 2 — mounting block; 3 — heater motor switch; 4 - additional resistor; 5 — heater electric motor; 6 — rear window heating element; 7 — switch for heating the rear window with a control lamp; A - to power supplies; K6 - additional relay; K7 - relay for turning on the heated rear window.
The vehicle is equipped with an electric heater fan motor excited by permanent magnets. To obtain different rotation speeds, an additional resistor is installed in the power supply circuit of the electric motor. The resistor has three spirals and a fuse. When current passes through all three spirals, the 1st speed of rotation of the heater fan is ensured, if the current passes through two spirals - 2nd speed, through one - 3rd speed. When the electric motor is turned on without an additional resistor, the armature of the fan motor rotates at the maximum 4th speed (3000 min -1 ).
If the electric motor fails, replace it with a new one. The only possible repair of the electric motor is to clean the commutator.
As can be seen in the diagram, contacts 4 of the switch and resistor are closed and go to the plus of the motor. We have three wires coming out of the motor. Minus - black, blue-black and red - plus (soldered to one contact in the motor). Just in case, I replaced the short red wire with a longer one (longer than the blue-black one). It will go to the switch, and the blue-black one will go to the resistor (fourth contacts). If you disassemble the motor, mark the cover.
In the place where the resistor stood, cut out a rectangle for the new resistor. In order not to pull the wires through the top of the stove, next to the resistor, where the niche is protected from the fan, we drill a hole and stretch the wires. We make a harness of three wires for contacts 1, 2 and 3.
On the switch, pins 1 and 2 are smaller than the others. Here, where the upper arms are, there is an unnecessary block (for the headlight cleaner). I cut it off and collected all the wires. You can buy it if you wish. Black-blue to 4, and with a harness, respectively, 1, 2, 3. To pin 5 of the switch (in the center), connect the yellow-blue plus from the stove button at the very end when installing the console. I made the illumination of the levers separately, so we use the window illumination wires to illuminate the switch.
To install the switch, take out the original plug and trim the plastic a little on the right and left. We place the switch so that 0 is at the bottom, and the latches are on the right and left. An elastic band fits the frame, I don’t know why. I trimmed it and added speed marks with a stroke. I'll probably redo it in the summer. For illumination, I took a strip with 9 diodes, cut a slot, connected it to the wires from the backlight of another window (+/- not to be confused), and covered it with silicone. I hooked up the backlight of the original key so that the wires would not dangle:
Update dated 10/15/11, by AveGeo.
There is an inaccuracy in the article. The numbering of the heater motor switch terminals from Kalina does not coincide with the switch used in Shnivy.
The attached diagram shows the correct numbering.
In addition, this switch uses an LED for illumination, and its power supply plus is on the right when viewed from the rear.
For a comfortable climate, the car has a climate control system. Thus, it includes an electric motor, which in the summer takes air through a system of ducts from the street and supplies it to the cabin, and in the winter, through a system of air ducts and a radiator of the cooling system (popularly called a stove), it supplies warm air to the cabin
The electrical diagram for connecting the electric motor of the “stove” conventionally shows:
1 - fuse and relay in the mounting block, 2 - mode switch, 3 - circuit resistor, 4 - electric motor of the radiator of the interior heating system (stove), 5 - ignition switch. A - to the power source (battery)
The heating system in the cabin of the budget Lada Kalina model can significantly increase comfort for the driver and his passengers. It ensures that the required temperature conditions are maintained inside the car. Along with such useful options as:
- "ABS";
- airbag;
- electric power steering;
- electric front windows;
- front seat heating function,
The design of the interior heater allows the manufacturer to achieve a fairly acceptable level of equipment, which is very worthy for a small-class Lada Kalina model and makes it competitive among its rivals in this segment.
Heating system composition
The operating principle of the heater in the Lada Kalina is very simple. It is built on a supply and exhaust circuit. The heater circuit contains:
- cabin air filter;
- air ducts;
- heater radiator;
- electric fan;
- air flow and fan operating mode control module.
The design of the interior stove looks exactly like this, and is located behind the dashboard and only the system controls are present on its front surface in the Lada Kalina cabin. A running engine generates heat, which is removed from it by the cooling system. This circuit includes a heating radiator. The circulating liquid heats the honeycombs, from which the warm flow is directed into the cabin by means of a fan. Adjustment of the required temperature, strength and direction of the air stream is carried out using the handles and dampers present in the cabin. Sometimes the dampers need to be adjusted.
The air taken from the external environment initially passes through the intake element located on the hood at the bottom line of the windshield of the Lada Kalina. Next, the air rushes to the filter component and is supplied inside the cabin space by means of a fan.
The fan can operate in 4 different speed modes. The adjustment is carried out using the corresponding knob on the device, and the switching itself is possible due to the presence of a resistor block in the control module.
How to diagnose a heating system in Kalina?
Before performing a diagnostic procedure, you will need to carefully study the diagram. You should only try to check while the engine is running.
- The temperature regulator, located on the control unit in the cabin, is installed in the extreme left position. We activate the fan and observe hot air entering the cabin through the deflectors. Gradually moving the handle to the right until it stops, we reach the exit of the cold air stream.
- Checking the speed should begin by setting the appropriate knob to the minimum speed position. If the fan and its control module are working properly, then the force of the air stream should increase as the handle is moved to subsequent positions (and so on until the 4th speed mode, corresponding to the maximum number of revolutions).
- We check the dampers. Here we move the temperature level regulator to the maximum to the left position. We move the fan speed switch to the position corresponding to the 4th speed. The check itself boils down to smoothly moving the damper regulator between the extreme positions. This should be done in order to feel the adjustment in the direction of flow. By moving the temperature regulator to different positions, we observe a change in the degree of heating of the incoming air.
List of faults in the heating circuit
If the owner of LADA Kalina suspects the presence of any deviations from the normal functioning of the heating system, then the diagnostic procedures below will be required.
- The first step is to make sure that there is a sufficient amount of antifreeze in the cooling circuit.
- Next, check the integrity of the fuse.
- We make sure that the fan speed regulator is working properly.
- A weak air flow through the deflectors indicates the need to check the condition of the filter component.
- If there is no warm flow into the cabin when the engine is warm, then there may be air pockets in the cooling system or the dampers in the air ducts are jammed.
- A faulty temperature sensor will cause only hot or, conversely, cold flow to enter the cabin.
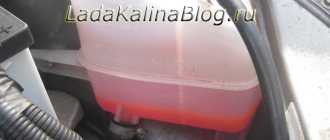
- Among the common reasons is depressurization of the LADA Kalina cooling system. Sometimes this may be due to the loss of tightness of the heater radiator itself. At the same time, antifreeze will enter the cabin, giving itself away as a specific smell and wet decorative floor covering. In order to detect a leak in a timely manner, it is necessary to monitor the level in the expansion tank frequently.
Possible heater malfunctions and ways to eliminate them
If the stove blows very weakly or in the current mode it basically refuses to blow air, then there may be several malfunctions, as well as solutions:
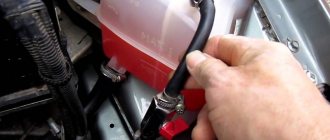
- The heating system hoses are worn out. As a rule, if antifreeze leaks or the stove does not heat, this may be due to wear and tear on the pipes. To solve this problem, it is necessary to carry out a thorough diagnosis of each of the pipes. Coolant may escape through cracks or other damage.
- The heater valve has failed. If the stove control valve is broken, this can be indicated by traces of leakage of consumables in the vehicle interior.
- There are malfunctions in the operation of the control unit. If the problem lies in the unit, then first of all you need to check the quality of its connection to the on-board network. If it is connected correctly, then most likely the problem lies there. It is better to entrust unit repair to specialists.
- Wiring faults. Perhaps the unit does not turn on the heating system due to lack of contact with the on-board network. In this case, the problem is solved by checking the circuit to find the broken section.
- The additional resistor is broken. This device is used to control the heater fan, so if the stove on Kalina does not heat, you also need to check the functionality of this element. If it doesn't work, then it will need to be changed.
- The Kalina heater regulator, located in the car's interior, does not work. If the heater only blows hot air, but does not react in any way when switching its mode from hot air to cold air, then most likely the regulator installed on the center console has failed.
- The radiator of the heating unit is broken. This problem is considered one of the most common on domestic cars, and it is especially relevant for Kalina. You can try to repair this device or change it yourself. We will tell you more about how to shoot and how to replace the device below (author - Interesting Video channel).
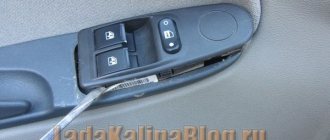
Replacing the heater fan resistor
Disconnect the wire terminal from the negative terminal of the battery. Under the glove compartment.
. Use a slotted screwdriver to pry up the top edge of the plug.
Disconnect the wire block from the resistor. Using a Phillips screwdriver, unscrew the self-tapping screw securing the resistor.
The arrow shows the hole for the resistor mounting screw. Install the heater fan resistor in reverse order.
If the light on the button for turning on the windshield defogger (heating) blinks, then most likely the heater rheostat has failed.
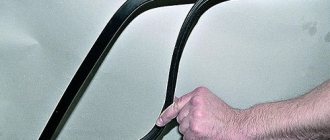
Replacing the stove rheostat is easy. Remove the wiper caps. Using a 13 mm wrench, unscrew the wiper nuts.
With the hood down, lift up the windshield wipers and remove them.
Remove the 4 plugs.
Unscrew the 7 screws to remove the elastic and the left side of the frill.
Remove the left side of the frill.
Unscrew the right side of the frill in the same way.
Remove the elastic completely. Remove the right side of the frill.
Thanks for subscribing!
Unscrew the 2 screws that secure the rheostat and disconnect the connector.
Reassemble the parts in the reverse order of dismantling.
I started the car in the evening and smelled something burning. The heater was turned on at first speed and when I started it, apparently all the energy was spent to start the engine, but the heater motor did not start. As a result, the heater heater resistor burned out. I turned on the 4th one, it works. And the stove fan works at 4 even without a resistor. Just don’t know why a turbo aircraft is needed at all)
The photo shows that the thermal fuse is located by bending it as close as possible to the heater resistor coil. If the resistor is heated to 117 degrees, its internal circuit melts and breaks. The same thing can happen when soldering a new one. But in fact, it burns out not from temperature, but from increasing current strength when the stove fan cannot move. When the fan cannot move, the load on this fuse increases to 17 amperes.
In fact, the resistor itself rarely burns out; the shiny part soldered to pin 4, called a thermal fuse, burns out. Such fuses are still installed in irons and refrigerators. And since this is a fuse, it’s very easy to check whether the resistor itself is working; take any piece of wire and try to short it with a “bridge”. That's exactly what I did. I turned the heater on to first, shorted it out, it works at all speeds. If it works, then it's the fuse. We go to the radio parts store (in Ufa “World of Electronics”) and buy a new one for 15 amperes 117 degrees for 25 rubles. Solder in a new fuse. When soldering, do not overheat, overheating more than 117 degrees will cause the fuse to fail!
You need to solder with a heat sink. Overheating will cause the part to become unusable. We put it in place under the glove compartment shelf. Voila, the stove works on all 4.
How else can you stir things up, for example, if this crap burned down on the road? We take a large plastic 20A auto fuse, tear apart the body, cut off the thermal fuse from the resistor so that then, by bending the antennae, you can crimp the terminals. Just don’t turn it on immediately without pushing it into place under the glove compartment, it will melt without blowing. And it works with airflow.
If you say that this is a collective farm version, then you can step it up like this, solder the mother terminals and insert a torn 20A fuse into the mother
The option of soldering in new fuses is the best. But they sell out quickly in electronics stores. I visited two stores. What do you think, where do the replaced resistors go in services? They sit and solder. Kalym!
Question for a guru in radio electronics.
What else can be soldered instead of this thermal fuse? Maybe a light bulb to illuminate the shelf? I also heard that in trucks, instead of this thermal fuse, there is a thermal relay or a reusable self-resetting thermal fuse. Curious about the part name? The Gazelle's heater resistor is very similar to ours, but it is three-pin and instead of a thermal fuse, some large black square piece is soldered in there. What kind of detail can be soldered into ours?
Instructions for replacing the stove
Before removing all the necessary parts, cables and other components from Kalina, prepare a new radiator, pipes and clamps. The pipes will be required in case the old ones are worn out or they have never been changed over the years of operation. As practice shows, hoses are most susceptible to wear due to temperature changes, so in any case they need to be changed from time to time.
Instructions on how to change the radiator are presented below:
- We begin the replacement procedure in the engine compartment. First, place a container under the drain hole and drain all consumables from the radiator. If you notice that the coolant is already old and has exhausted its service life, which can be understood by its color and deposits, then it is also better to change the antifreeze.
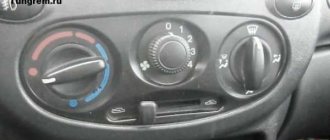
- You need to ensure the most convenient access to all pipes and hoses of the radiator assembly in the engine compartment. To do this, dismantle the power unit air filter housing, the battery, and its platform. Next, you need to disconnect all the lines from the radiator unit in the engine compartment. Having done this, you can use a wrench to unscrew the nut that secures the metal casing to the engine shield. This nut is located next to the pipes that go into the Kalina's interior.
- Next, we move into the car interior. You need to remove the gas pedal; to do this, unscrew the three nuts. As for the brake pedal, it cannot be removed, so just move it to the side as far as possible.
- Now you have to cut the steel casing as shown in the photo, and then cut off the tubes of the radiator assembly. Having done this, you can dismantle the device from the pedals, but to do this you will also need to unscrew the bolts that secure it.
- Before installing a new radiator device, it will be necessary to carefully sand its tubes. Please note that they should be as even as possible. After all surfaces are ready, a line with a widened end is put on the upper tube, and a line with a narrower end is put on the lower tube. The remaining outputs must be connected in the engine compartment instead of the old ones. Also note that on the side of the Kalina’s interior, it is advisable to treat the place where the lines exit into the engine compartment with sound-insulating material.
Price issue
The range of radiator units for Kalina is not particularly large. On average, prices for radiators are as follows:
Types of ignition switches
All ignition switches are divided into several categories according to type, purpose and functionality.
There are two main types of ignition switches:
- With key;
- Keyless (ignition switches).
Key locks are the most common today and are installed on most cars and other vehicles. Keyless ignition switches were especially common in the early days of the automobile industry, and were installed on cars (especially trucks) into the 1940s and 1950s. Switches were then replaced by key locks, but today ignition switches are making a comeback. Modern keyless switches are more technologically advanced than the regular buttons found on older cars, but their functions remain roughly the same.
All existing ignition locks can be divided into two large groups according to the number of key positions:
- Locks with three key positions;
- Locks with four key positions.
Locks with three key positions are out of use today; they can only be found on older models of cars and trucks, especially domestically produced ones. Since the 1960s and 1970s, new four-position locks have been installed on cars, which have expanded functionality. The functionality of ignition switches will be discussed in more detail below.
Also, ignition locks can be divided into two groups according to the presence of an anti-theft system:
- Conventional locks without steering wheel lock;
- Locks with mechanical steering wheel lock.
The steering wheel is locked by almost all ignition locks with four key positions; old three-position locks do not have this function.
Finally, ignition locks can have various additional functionality, including protection against turning on the starter while the engine is running, a warning system for a key left in the lock, and others.
Regardless of the type and purpose, all ignition switches have fundamentally the same design and operating principle.
Main causes of malfunctions
So, what should we do if heat does not flow inside our car and cold air blows. Let's consider the main causes of such malfunctions:
- Failure of the Kalina heater switching control cable. The reason for such a malfunction may be that the latch has fallen off, and the cable stretches normally in one direction, but does not reach the opposite direction.
- On Kalina, the stove only works at speed 4. Associated with a broken thermistor.
- On a Kalina car, the heater switch often breaks when turned on abruptly, which is due to insufficiently strong plastic.
Here is a list of the main breakdowns that may occur. Next, we move directly to the repair itself and replacement of failed parts.
Power supplies Lada Kalina
The on-board network of the Lada is characterized by direct current, the nominal voltage of which is 12 V. The electrical circuit of the VAZ 1118 is single-wire. The main elements of the Kalina network can be divided into 4 groups.
- Sources.
- Consumers.
- Protective elements.
- Sensors
Sources and consumers of electrical energy are connected by negative terminals to a metal body (“ground”), which acts as a second wire. Power for all electrical devices of the Lada Kalina car is supplied from two main energy sources: a generator and a battery. While the engine is running, power is supplied to consumers from the alternator. When the engine is turned off, the devices are powered by a battery. While the generator is running, the battery is charged.
A generator is an alternating current synchronous eclectic machine. The rotating crankshaft of the car rotates the moving element of the generator - the rotor. In this way, the mechanical energy of the crankshaft rotation is converted into electricity. The rotor shaft rotates in bearings located in the covers. The bearings are lubricated at the factory with a material that does not require replacement until the end of the generator's service life. The stationary element of the generator - the stator - is tightened with four bolts to the generator cover.
( 1 rating, average 4 out of 5 )