VAZ 2105 was introduced by the plant in 1979. Back then it was a comfortable car that fully met the requirements of the time. It must be said that there was nothing outstanding here, however, the angular body shapes quickly won over their customers, just like the VAZ 2107, which, in fact, became an improved version of the “five”.
Tuning the VAZ 2105 became widespread only in the 2000s, and it all started with external tuning, but we will miss this moment, since you can do anything with the car, just let your imagination run wild. Let's look at the more serious changes to the 2105, starting with the engine.
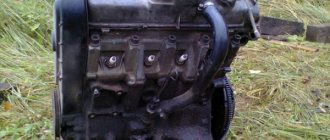
Characteristics of the original engine 2105
Before repairing the engine, you should pay attention to its main characteristics:
- The engine modification was produced from 1979 to 2006, the latest versions have minor improvements.
- Cast iron was used in the manufacture of the cylinder block.
- The power system can be represented by a carburetor or an injector.
- Type of cylinder arrangement is in-line.
- Number of cylinders 4.
- There are 2 valves per cylinder.
- The piston stroke is 66 mm.
- The diameter of each cylinder is 79 mm.
- The compression ratio of the fuel mixture is 8.8.
- The volume of the cylinder block is 1.3 liters.
- Power, according to the manufacturer, is 64 horsepower, but may vary depending on the type of carburetor installed and other fuel system settings.
- Fuel consumption in the combined cycle is 9.5 liters.
- Oil consumption is 700 grams per 100 kilometers traveled, provided there is no malfunction and the use of synthetics.
- Recommended low levels are 5W-30, 5W-40, 10W-40, 15W-40.
- A maximum of 3.75 liters of oil can be filled into the engine.
By modern standards, a power of less than 70 horsepower is an insignificant indicator that does not allow you to comfortably drive a car on the road. That is why quite often the modification is represented by the improvement of the engine to increase its power, as well as its complete replacement.
Device
VAZ 2109 tuning Solex carburetor
Before tuning, you need to know how the Solex carburetor works. It was produced in several modifications and on the VAZ 2109 it was installed either DAAZ-2108 or DAAZ-2183. The first of the carburetor modifications was installed on a 1.3 liter engine, the second on a 1.5 liter engine. These carburetors are devices that are designed to accurately meter fuel into the air stream. The Solex carburetor also has the following features:
- It is in the carburetor that the process of forming a combustible mixture from fuel and air takes place, with its subsequent supply to the engine cylinders (see When replacing a VAZ cylinder is not necessary);
- Note that the Solex carburetor has two vertical channels called chambers.
Solex carburetor design
VAZ 2109 carburetor tuning
Technical parameters of DAAZ-2108/2183 carburetors
| Diffuser and its diameter, mm | 21-23 |
| Performance of the main fuel jet TZh | 97,5-97,5/95-97,5 |
| Performance of the main air jet or VJ | 165-125/165-125 |
| Mixing chamber diameter, mm | 32 |
| Diameter of pump nozzles, cubic cm for 10 strokes | 14,5/14,5 |
Problems with the engine in question
An important point is that the VAZ 2105 is equipped with an engine that is structurally not significantly different from the engine on the 21011. The only significant difference is that the drive is belt driven to reduce the hum coming from the engine compartment. Other positive qualities include the following:
1.As the history of the vehicle’s operation has shown, the engine does not bend the valve.
2. A disadvantage of the design is that it is necessary to periodically adjust the valves due to changes in the clearance.
3. A common situation is difficulty starting due to the high thickness of the oil in the box.
4. There are frequent cases when the engine seals. As practice shows, the reason is untimely oil change or insufficient quantity.
5. After several years of operation, the engine begins to smoke.
6. A knocking sound may indicate that it is time to adjust the valves.
Important! Models 21011 and 2105 are equipped with almost identical engines, they are tuned in the same way.
Let's take a closer look at how the design is refined.
Main adjustment steps
The adjustment, as mentioned above, is carried out using quality and speed screws.
These screws are located deep in the carb valve body. On some modifications of carburetors, bushings are also pressed onto the screws, which limit turns. In this case, you can only rotate them half a turn.
With gas analyzer
The adjustment algorithm with a gas analyzer looks like this.
- The car engine starts and warms up.
- The fuel assembly speed screw is rotated using a flat-blade screwdriver. This must be done until the amplitude of the power plant’s revolutions reaches eight hundred per minute.
Attention. As you turn the screw as the clock progresses, the speed will decrease
And vice versa, if you rotate counterclockwise, i.e., open the screw, the speed will increase.
- Proceed to setting the amount of CO in the gases. Now you need to rotate the fuel assembly quality screw. The principle is the same: rotation with the clock - the CO content decreases, rotation against the clock - increases. It is not worth lowering the CO indicator below the norm, as the amount of unburned hydrocarbons can sharply increase.
- The speed screw is adjusted to stabilize the amplitude of rotation of the crankshaft.
- The CO content is checked using a gas analyzer. Appropriate conclusions and adjustments are made.
After all adjustments have been made, it is recommended to do this. Get into the car, sharply press and release the accelerator pedal. At the same time listen to the engine running. It should not function intermittently, and when the pedal is released, it should not stall. If this is the case, the engine stops after releasing the pedal, you need to increase the flywheel speed to 800 per minute. To do this, use the speed screw on the carburetor, which must be unscrewed slightly against the clock.
Without gas analyzer
You can adjust the speed, reduce it, and without a gas analyzer.
- Start to smoothly rotate the fuel assembly quality screw until the speed reaches the maximum possible (this can be determined by the tachometer or looked in the technical literature of a particular car).
- Set the speed with the second screw to 1100/min.
- Tighten the fuel assembly quality screw until the speed on the tachometer reaches the 800/min position.
Definitely, the main advantage of a carburetor is the ability to quickly adjust it yourself. In this case, as mentioned, a minimum of available tools is used - one screwdriver is enough.
As you understand, the main task when tuning is to set the speed of the power plant at which the engine will operate most stably. The role of the tachometer cannot be underestimated, although many other methods of determining rotation speed are used today.
Tachometer is a device for measuring shaft rotation speed. During the movement of the flywheel, unification occurs into a direct current signal when the speed reaches the specified values. For example, a standard tachometer is capable of remembering maximum rpm values.
The tachometer consists of a sensor, a block with a converter and a control element, a remote device with digital indicators and fastening elements.
This device not only monitors engine speed, but also makes it easier for the driver to select the correct gear. So, when its needle approaches the red zone, it is recommended to switch to a high gear - for example, from third to fourth.
The principle of operation of a standard tachometer comes down to recording the number of signals coming from the sensors. Information is transformed into certain quantities - meters, seconds, minutes or hours.
Old and experienced motorists do not always trust standard tachometers. And this, in a sense, is correct. The best electronic devices are capable of measuring revolutions, but with an error of up to 100/min. The worst of the models have an error of 500 rpm and above, which, you see, is in no way suitable for accurate measurements.
There are many other ways. For example, connect an external tachometer with much wider capabilities and a smaller error factor. Technicians, in general, came up with a way to integrate the engine with a laptop through the Adobe Audition sound editor.
So time does not stand still, something new comes out every day. Take care of your car, and then it will last much longer.
- Absolutely legal (Article 12.2);
- Hides from photo and video recording;
- Suitable for all cars;
- Works through the cigarette lighter connector;
- Does not cause interference to radios and cell phones.
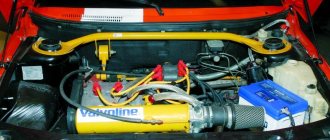
How to remove a factory installed engine?
In order to replace or tune the engine, it must first be removed from the car. The dismantling procedure is quite simple, represented by the following works:
- To begin with, you should take into account the fact that only two people can do the job. To do this, you will need a lift (it will be easier, but you can get by with jacks), as well as a standard set of tools.
- Work begins by removing the hood, as it will interfere with further work.
- The next step is to drain the oil. To do this, unscrew the plug from the pan, and before doing this, place a container of more than 5 liters with a wide neck.
- Next, you need to drain the antifreeze from the system, for which you unscrew the plug and nut.
- The next step is to disconnect all wires and hoses from the engine. It should be taken into account that the fastening is carried out simply, for example, wires through chips, hoses are secured with clamps or other fixing devices. In order to avoid confusion in the future when connecting, you should mark all hoses and wires or photograph their position before removal.
- We unscrew the crosspiece bolts. Difficulties may arise when performing this work, since due to prolonged use without cleaning the surface, the bolts may become corroded.
- You also need to disconnect the gearbox, which involves unscrewing the bolts. It is recommended to place it under the gearbox so that it does not fall.
- We remove the gear shift knob.
After completing the above work, you can remove the engine. It should be remembered that its weight reaches several tens of kilograms, that is, you cannot do without a winch. When attaching with a winch, pay attention to the strength of the connection. After this, the structure is slowly lifted.
Many people decide to remove the engine in order to replace it or carry out a major overhaul with tuning. Disassembling the engine itself is a much more difficult task than removing it from the car.
Transmission tuning
In general, this is a rather sensitive topic, because incorrect changes can lead not only to a loss of torque along the way, but also to a decrease in speed, as well as acceleration dynamics. To begin with, of course, it is worth deciding what is more required: dynamics or peak speed?
- In the first case, it is worth stopping on the bridge from the VAZ 2101, since here the main pair has a gear ratio of 3.9.
- If it is necessary to develop high speeds, then it is necessary to purchase and install bridge 2107. Here the indicated value is 4.1.
It would seem that the difference is not great, however, this is far from the case. There are craftsmen who dial up the gearbox themselves by changing gear ratios, thereby “lengthening” or “shortening” gears. You should not experiment with this, since the transmission is not to be joked about. Not only can it fail and “break,” but it can simply jam the drive wheels, which will lead to completely unpredictable consequences.
Is it worth installing a new engine?
A fairly common question is whether it is worth installing a new engine or modifying the original one. As previously noted, the VAZ 2105 engine design was first assembled several decades ago, and the power is at the level of 64 horsepower. Even with significant improvements in design, you can count on about 120 horsepower. In this case, other elements of the fuel system will also have to undergo tuning, and the service life of the engine may be significantly reduced. Therefore, if financially feasible, another engine with a more advanced design should be installed.
The installation of another engine can only be carried out by a professional who has already performed similar work. However, not all engines will fit the car in question. Therefore, this kind of modification can only be carried out in a car service center.
However, if it is not possible to buy a new engine and install it on the car, you can also perform minor tuning, which will increase the engine power. Let's take a closer look at several of the most popular methods.
Pump booster drive
The greatest controversy in carburetor tuning is replacing the pump amplifier drive cam. Some car owners recommend replacing it with No. 4, but many are against it, citing the following arguments:
- a significant increase in fuel consumption in urban and mixed driving modes;
- dips in dynamics when the accelerator pedal is pressed sharply;
- poor acceleration at low speeds, which is especially noticeable when trying to make a sharp start at a traffic light.
Tuning and standard cams for pump amplifier drives
Upgrading the carburetor by replacing the cam should be done with the possibility of returning it back, so you should not throw away the standard spare parts left after tuning. The result for each car is individual, so after replacement you should check the gas mileage and improvement in dynamic performance. If the ratio of these parameters suits the car owner, then you can leave the tuning spare part, otherwise you should return to the standard part.
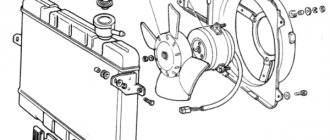
Installing a zero resistance filter
You can slightly increase engine power and make driving more comfortable by installing a zero-resistance filter. Its essence lies in high throughput, that is, air enters the engine with less resistance. The work can be done as follows:
1. We remove the pan from the carburetor.
2. We install the turtle, which was borrowed from 2141. It does not fit a little in size, but with a little pressing, it will fall into place. Let us note that the structure is quite fragile, which means that a large load should not be applied.
3.The turtle has large holes, so you need to use washers to secure it.
4.The zero resistance filter can be secured with a clamp.
In addition, you will have to disconnect the battery mount and push in the filter, since the hood may not close. In this way, you can add up to 10-20 horses. At the same time, the costs are not significant; there is no need to carry out complex work on changing the engine.
Two carburetors instead of one
This approach is also considered as effective tuning.
This idea has quite sound grounds. It would seem why the engineers themselves didn’t think of this at the design stage of the VAZ 2109, but that’s another conversation. This error can, of course, be corrected by polishing the collectors and both chambers from the inside. This procedure will allow more mixture to enter the chambers, as a result of which the flow resistance will drop, the quality will improve and everything will become much more efficient. But, still, this is not an ideal option - installing two carburetors instead of one looks much more attractive.
Important points
Here are the important points to consider during installation:
- Both carburetors must be the same model (in this case Solex);
- You also need to install two filters and prepare the appropriate number of fasteners, tees, hoses, and so on;
- After installation, which in itself is not so complicated, you need to start tuning both carburetors, which is considered a more difficult operation.
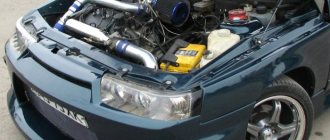
Turbine on a VAZ engine
You can also come across a common question regarding the installation of a turbine on VAZ engines. This is due to the fact that the turbine can increase engine power by approximately 20% without loss of service life due to more efficient enrichment of the mixture with air and the creation of a high-quality fuel-air mixture.
The TKR-7 turbocharger is more suitable than others for installation on VAZ engines. It has a radial centripetal turbine type, the wheel diameter is 74 mm, the pressure ratio in the system is 1.6, and the air flow is about 0.4 kg/s. Recommendations for installing a turbine on a VAZ are as follows:
- First, you should reduce the pressure, since too high will cause the pistons to burn out and the exhaust valve to burn out. The recommended pressure should be 1.2. This figure will be enough to increase power by at least 20%.
- The degree of supply of exhaust gases is also reduced, for which a bypass pipe is installed. You can install replaceable throttling washers at the inlet to the TCR.
- We remove the battery to the left side of the compartment.
- Remove the carburetor and air filter.
- We install an aluminum intake pipe on the standard site.
- We install the gas supply pipe through the standard gasket.
- The TKR is fixed on the horizontal flange of the pipe.
- We fix the rectangular flange of the pipe through the copper gasket.
- Instead of a pressure plate, a throttle valve drive bracket is mounted, to which the slides and long rods are attached.
The work is quite complex and requires knowledge of all the operating features of the internal combustion engine and turbine.
The importance of carburetor modifications
Carburetors produced from the factory are designed to operate the engine on a forced lean mixture, which ensures maximum efficiency and environmental concern. Because of this, the standard carburetor does not allow the engine's power to be fully realized, and the car does not realize all its dynamic characteristics. Carburetor tuning is especially important when boosting the engine, since the need for a sufficient amount of prepared air-fuel mixture increases even more. Standard carburetor adjustments can affect idle speed, but set it up for optimal performance in the midrange. and even more so at high speeds it is not possible. At speeds above 4500, engine starvation occurs, since an unfinished carburetor is not able to cope with an air flow at a speed of about 120 m/s. As a result, a situation arises that an untuned carburetor strangles both forced and conventional engines.
Expert comments
Michael. The engine was bored to increase the volume of the cylinder block. I’ll say right away that it’s better to buy another motor and not touch this one, which has long had a place only on stands.
Dmitriy. I decided to increase engine power by refining individual elements related to the fuel system. I installed low resistance filters, adjusted the valves and the result met expectations. There is no need to carry out boring work if the engine is in good technical condition.
Chassis of the “five”
It is almost similar to other classic VAZ models. Thus, an independent spring suspension with transverse swing arms was installed on the front of the car. There is also a stabilizer bar at the front. At the rear there is a spring dependent suspension with longitudinal and transverse bars. The brake system is hydraulic, dual-circuit, with a vacuum booster. Disc brakes are installed at the front, drum brakes at the rear. The handbrake is mechanical, with drive to the rear wheels.
As reviews note, the suspension on the “five” is very soft. It is able to dampen vibrations even at high speeds. But at the same time, the suspension did not tolerate sharp impacts. Due to breakdowns, owners were faced with deformation of the axles of the lower arms. Also, due to the excessively soft suspension, the car took turns poorly and was practically uncontrollable at high speeds. Reviews include all hinge joints as weak points in the chassis. These are steering rods and ball joints. The shock absorbers quickly became unusable due to the large suspension travel. Also, due to low-grade metal, wheel bearings have to be replaced frequently.
Recycling program
The car was not in demand, and the manufacturer had already begun to suffer losses. The situation was smoothed out after the introduction of a recycling program, when the owner of an old car received 50,000 rubles from the state as compensation for melting it down. During this period, all AvtoVAZ models, including the VAZ-21053, again became in demand. Prices rose, and then a balancing act began between the cost of the scrappage certificate and the market value of the car. This continued until the model was removed from the assembly line (2009).
We recommend: German ZF gearboxes on KAMAZ trucks
Why did the car attract buyers, albeit few? First of all, the availability of spare parts and components, which were relatively inexpensive. In addition, the attractiveness of the VAZ-21053 for Russians was the possibility of repairing and servicing it on their own (in the garage, on the site, or simply “in the field”). This circumstance somewhat leveled out the low demand for the car, but its prestige on the world market fell hopelessly. The car was no longer equipped with even the most necessary accessories; it got to the point that at the beginning of 2009, the daily mileage counter was removed from the dashboard.
Brake system
The VAZ-21053 model was equipped with efficient dual-circuit hydraulics. From the central brake cylinder, pressure was supplied to the front and rear wheels according to a separate scheme. One pipeline connected the cylinder to the left front and right rear wheels, and the other connected the left rear wheel to the right front. This separation provided braking in case of failure of one of the circuits.
The front brakes, non-ventilated disc pads, were driven by a caliper covering the brake disc on both sides. The pistons were equipped with special rubber sealing rings that returned them to their original position after each press on the brake pedal.
The rear brakes, drum type, consisted of two self-adjusting shoes, driven by a hydraulic cylinder. The pads returned to their original position under the action of a spring. The design also included a handbrake mechanism controlled from the interior. The handbrake lever was located in the cabin, between the front seats.
DIY repair
If you want to overhaul the engine yourself, pay special attention to the marks, which are needed even for ordinary simple operations, such as adjusting valves. Marks also allow you to correctly install certain parts and components. A diagram or a detailed video, which you will find at the end of the article, will help you in your work. Regardless of the simple device, the VAZ 21053 engine must be assembled as accurately as possible. Of course, the engine should be repaired on a clean workbench so that particles that accelerate wear do not penetrate inside.
Remember that in some cases the markings are applied to the parts incorrectly, so even if the marks are compared, unstable operation of the unit may be observed. In this case, the part should be replaced or contacted by specialists with high-quality diagnostic equipment. You can always consult with experienced owners of VAZ 21053 cars, who should know the structure and features of repair work.
Sources
- https://www.syl.ru/article/398875/vaz—foto-i-opisanie-tehnicheskie-harakteristiki-tyuning
- https://Driving24.ru/tyuning-i-kapitalnyj-remont-dvigatelya-vaz-21053-chto-vybrat/
- https://pochiniavto.ru/vaz/21053/
- https://FB.ru/article/154809/vaz—tehnicheskie-harakteristiki-otzyivyi-foto-tsenyi