Having beautiful windshields is the desire of many car enthusiasts, and the reason for this is not only the popularity of Hollywood films that glorify the beauty of speed and the aesthetics of sports cars like the Fast and the Furious series. But not everyone welcomes such “tuning” - you can often hear how it can spoil the appearance with its obsessive provocative design.
Nevertheless, installing deflectors helps the motorist avoid many problems, in the long run allowing him to save peace of mind, time and money - indeed, their installation will not take more than an hour. It should be noted that all this will be relevant only if you install the deflectors yourself - alas, this service is very popular in car repair shops, and therefore the price may turn out to be quite “evil”.
However, as was said earlier, their installation is not a labor-intensive process, does not require much time and is quite feasible even for inexperienced motorists. Further, the article will reveal the main reasons why you should think about purchasing and installing deflectors, their types, various installation locations in addition to the hood, some features of the installation itself, and draw conclusions containing some reasoning on this topic and summing up everything written below.
Method 1: hood deflectors are attached with self-tapping screws
The oldest method, used by the first owners of fly swatters, is to attach the hood deflectors directly to its surface using self-tapping screws. This option is reliable, simple and suitable for absolutely any car, ensuring that the product is pressed tightly against the hood.
However, with all this, attaching hood deflectors using this method is far from the best idea. Extra holes, especially on the top of the hood, will definitely not bring any benefit, becoming an additional weak point and a potential source of corrosion on the hood. After the deflector wears out, you will either have to replace it with a new one, or fill the holes in the hood, which will definitely not add beauty to the car.
Method 2: fly swatter on the hood with double-sided tape
This option, such as using only double-sided tape, is suitable for exclusively city cars that are not designed for sudden maneuvers and driving at high speeds. For them, the fly swatter on the hood is only a decoration, and therefore does not need strong fastening.
A big mistake is adding additional glue to what is already on the tape. The fly swatter on the hood will indeed hold on more firmly, but if damaged, it will only be possible to tear it off together with the paint or varnish, piece by piece. If you want to increase the reliability of the connection, simply heat the tape with a hair dryer before installing the fly swatter. This will strengthen the connection, but during sudden maneuvers there is still a chance that the accessory will fly off the car.
Method 3: buy hood deflectors with a special bracket
The best way to attach fly swatters is to buy hood deflectors, which come with a special mounting bracket. It provides several advantages:
there is no need to drill holes in the hood. Technological holes are used that are on the inside;
the fastening is reliable, and the fly swatter is guaranteed not to fall off even during sudden turns and high speeds;
the accessory can be easily installed and removed without causing any damage to the car.
If you decide to buy deflectors for the hood with such a fastening, then double-sided tape can still be useful as small gaskets for a tighter fit of the fly swatters on the hood. They definitely won't make noise or vibrate, but this is more of an additional precaution than a necessary measure.
Our store offers affordable model accessories designed for installation on a specific machine, as well as universal products that are no less reliable and attractive in appearance. Take a look at the catalog and choose an original and beautiful, useful new thing for your car!
What are the nuances?
You should start by choosing a part. The laws of aerodynamics are such that each body has its own specially designed deflector. This includes the width and shape of the part. The deflector must strictly correspond to the dimensions of the hood and strictly follow all its bends.
When you come to the store and select the part you need according to the stated characteristics, do not be lazy to try the product on the hood. Unfortunately, there are quite a lot of unscrupulous manufacturers on the market.
Elastic acrylic plastic is considered optimal. The easiest way to check the quality of the deflector is to grab it in the center with one hand and swing it in weight. If the edges of the part bend significantly up and down, this is a bad choice. Such a deflector will overreact to oncoming flows, bend, vibrate, no matter how carefully and carefully you install it.
What is a hood deflector for?
As the power of car engines increased, they began to come up with streamlined body shapes to reduce air resistance at high speeds. Engineers and designers are trying to create a body shape that will have the best appearance and low resistance, that is, the shape should be streamlined and cut through the air flow.
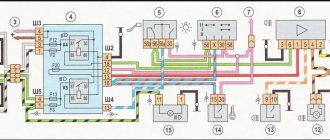
This is what the installation diagram for a fly swatter on a Chevrolet Niva looks like.
All models of fly swatters have deflectors with a raised edge, due to which the oncoming air flow rises sharply upward. That is, flying insects that were supposed to crash into the hood or windshield fly off with the outgoing air flow and manage to rise above the windshield. Thus, both flying insects remain alive and the car is clean.
Pros and cons of the deflector
Like any part or device, a fly swatter for a car has both pros and cons.
pros
If the deflector is installed correctly, it has good geometry, then when the car moves at high speeds, the hood and windshield will not get dirty with insects, they will fly safely over the obstacle. A fly swatter is a springboard for flying insects. Moreover, they themselves fly quickly, plus the car drives quickly. In addition to its main purpose, the deflector can be used as a decorative element for external car tuning.
Minuses
When driving at low speeds, there is no effect from the deflector. It will simply give a certain look to the car body. Low speeds are now considered to be speeds less than 100 km/h.
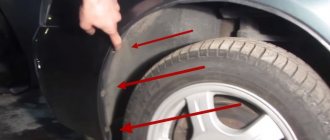
If you install the fly swatter incorrectly on the hood of the car, then debris (leaves, insects, sand, etc.) will gradually collect under it. This is what will happen if you install the deflector on the hood of your car incorrectly. In addition to the possible formation of corrosion due to the accumulation and wetting of debris under the fly swatter, the deflector may rattle. This happens due to the plastic material being too soft. The noise from the vibration of the deflector will be heard inside the car, especially if sound insulation is not installed.
How to apply anti-gravel film
You can install the anti-gravel film yourself. If you are not sure of the quality of the result, we recommend contacting a service center for professional service.
If you decide to stick the film yourself, here’s what you’ll need to apply it:
- Use the spray bottle twice - the first with distilled water, the second with a soap solution.
- A rubber spatula (spatula) with which we will expel water from under the film.
- Degreaser (alcohol or vodka will do)
Sequencing:
- The part to which the film will be applied must be checked for chips, thoroughly washed and degreased. Apply a soap solution to the surface using a spray bottle.
- Peel the film off the base and cover it generously with soapy water. This is necessary in order to get rid of static electricity.
- Carefully glue the film onto the part. Using a spatula, remove the soap solution. If dust has managed to get under the film or air bubbles remain, peel off part of the film and rinse it with distilled water.
If all actions are carried out carefully, you will be able to reliably protect your car, and it will delight you with its original appearance for a long time, and the hood will be free of chips and dents.
Moscow Automobile and Highway State University, Moscow. Level of education: Higher. Faculty: AT. Specialty: Special engineer Cars and automotive industry. Experience in the automotive industry (master consultant...
How to install a deflector on the hood
The difficulty of installing a fly swatter on the hood depends on the car model and the mounting method. So, it’s not difficult to install it yourself.
Classification of fly swatters according to the method of attachment:
- installation on adhesive tape that is already applied to this plastic product;
- mounting on brackets;
- installation with self-tapping screws.
The first method, that is, using double-sided tape, is the easiest and fastest way to install a fly swatter on the hood.
Before installation, you need to wash the place where the hood is attached, degrease it, attach it correctly and glue it. The disadvantage of this installation method is that it is not reliable, that is, at high speeds the deflector can come off. There will be glue left at the installation site that is difficult to wash off and will attract debris.
An affordable way to improve the aerodynamics of the VAZ 2110 — Lada 2110, 1.6 l., 2002 on DRIVE2
For a comparative test in the wind tunnel of the Dmitrov Automotive Test Site, we assembled five “tens” equipped with different sets of attachments. Three sets - Lada Lady, Titan and Courage - come from Togliatti, and Stalker and Junior were created in Moscow. In addition, we decided to “blow” the VAZ-21106 in the pipe - a “charged” car with an Opel engine and a modified body and suspension, which is produced in small batches in Togliatti. After all, the “one hundred and sixth” can be considered the result of deep tuning of the “ten”. Moreover, factory tuning... Surprises began already when calculating the aerodynamic drag coefficient Cx. Of course, we have noticed before how much the installation of even the simplest “fly swatter” on the hood affects the aerodynamics of the car (see AR No. 23, 1999). But they couldn’t imagine that the spread of Cx values in the tuning “ten” would be so large - up to 20%! Fortunately, the surprises were mostly pleasant. Firstly, four sets out of five helped to significantly reduce Cx. The best here was the VAZ-2110 Lada Lady with an excellent result of 0.315. And the obvious outsider turned out to be... VAZ-21106. It seems that the creators of this car simply did not pay attention to the value of Cx, believing that the two-liter Opel engine would easily overcome the drag force of “one hundred and six”, which was much greater than that of a regular “ten”. The second pleasant surprise was the reduction in lifting force: all the tuning “tens” outright beat the standard car. The Junior and Courage kits turned out to be the best - setting them to “ten” can reduce the lifting force by 5 and 7 times, respectively! Moreover, the creators of Courage were able to achieve this result in parallel with a significant reduction in the drag coefficient, which can be considered an excellent result. But the designers who designed the Junior managed to press the car to the road, only by increasing its drag. The picture with the distribution of lifting force along the axes was not so rosy. To accurately record the distribution of lift forces that act on the front and rear of the vehicle, the so-called tipping moment is measured. Ideally, it should be equal to zero - this means that the lifting force affects the front and rear wheels equally. So, only the VAZ-21106 and, to a lesser extent, cars with the Titan and Courage kits were able to maintain the distribution of lift along the axes, characteristic of the standard “ten”. And in cars with the Junior, Lada Lady and, especially, Stalker kits, a significant downforce acting on the front axle is combined with a strong unloading of the rear wheels. At high speeds, this can increase the tendency of the “ten” to skid. So, which tuning option is better - of course, not from an aesthetic point of view (we won’t argue about tastes now), but from the standpoint of aerodynamics? The Lada Lady, Courage and Titan kits are especially good - they will help owners of the “ten” save fuel and reach a higher maximum speed. Installing the Junior kit will also not harm the aerodynamics of the “ten” - in any case, thanks to a noticeable decrease in the turning torque, the car should become more reliable in handling at high speeds. But we would recommend that the developers of the Stalker kit still work on aerodynamics and optimize the distribution of lift force along the axes.
And yet, how did the small tuning companies that developed and produce these body kits achieve such impressive aerodynamic success? Unfortunately, none of them used a wind tunnel. As some of the authors admitted to us, they created their spoilers and wings in the image and likeness of body kits on cars of foreign tuning companies. And it worked! Apparently, the main thing is to choose the right role model...
PSC February 23rd guys! Who else if not us =)
Video
This video shows how to install an acrylic hood deflector on a Nissan.
Installation on Chevrolet Aveo (Chevrolet Aveo).
The benefits of a deflector. How does a fly swatter work on a car?
Every car owner tries to make his faithful steed look beautiful and be protected from the negative effects of external factors. There are many ways to do this, and one of them is a deflector or fly swatter that is installed on the hood of the car. To install such an accessory, it is not necessary to go to a car service; you can do the job yourself.
What is a hood deflector (fly swatter)
The hood deflector, also called a fly swatter, is a plastic plate that matches the shape of the hood at the front. While the car is moving, this accessory:
- protects the hood from chips caused by stones or other hard objects;
- changes the direction of air flow, so flying debris is removed from the windshield;
Thanks to its shape, the deflector directs the air flow upward, whereas previously it flowed around the hood and windshield.
The fly swatter will be most effective at speeds exceeding 70 km/h.
To avoid the accumulation of dust, sand and other debris under the deflector, it is mounted at a distance of 10 mm from the hood and during washing with a stream of water, all debris is easily removed. Some drivers are afraid to use such an accessory because they believe that the paintwork will be damaged at the mounting points and the beauty of the car will deteriorate. It's in vain:
- For a high-quality deflector, the fastening does not lead to damage to the car’s coating;
- The shape of the accessory is developed for each car brand separately. Not only aerodynamic indicators are taken into account, but also the appearance, which should be in harmony with the car;
- deflectors are made of durable material that can be transparent, black or match the color of the car.
- when driving on uneven roads, it may rattle a little, but it all depends on the quality of installation;
- The aerodynamic properties of the car deteriorate slightly, but this is only relevant when participating in racing;
- Fuel consumption increases slightly.
How to choose the right plastic cover?
Today, in car stores there are a large number of deflectors that differ not only in shape and size, but also in color. Thanks to this variety, the motorist can choose a fly swatter that best suits his requirements. However, do not forget about the selection rules. The main thing you should pay attention to when purchasing is the external condition of the plastic deflector.
What types of hood deflectors are there?
In our market, you most often find Australian deflectors from EGR and Russian ones from SIM.
In both cases, high-strength acrylic glass is used to make such an accessory. During installation, there is no need to make holes in the hood. During installation, the paintwork is not damaged.
EGR is one of the first manufacturers to produce deflectors for different car brands. And now the company continues to remain among the leaders, therefore it supplies its products to all well-known American, European and Asian car factories.
The Russian brand SIM also feels confident in this direction. Production is located in Barnaul. A full production cycle has been created here, from development to manufacturing of deflectors. Models are produced for all domestic car models, as well as for most foreign cars.
This accessory can have different widths:
- standard - 7–8 cm;
- wide - more than 10 cm;
- narrow - 3–4 cm.
They also differ in the type of fastening:
- under the seal;
- on adhesive tape;
- on special metal or plastic clips.
Deflector installation procedure
Depending on the make of the car and the model of the deflector, its mounting will differ. Before starting work, the place where the double-sided tape will be glued is degreased. To ensure the safety of the paintwork, you can additionally treat this area with car wax.
To work you will need:
- deflector with a set of fasteners;
- Screwdriver Set;
- soft sponge;
- degreasing agent and car wax;
- construction hairdryer With its help, double-sided tape is heated so that it sticks better;
- regular tape. It is glued in places where the clips are installed for additional protection of the paintwork.
Installation on the inside of the hood
Installation is carried out by placing the deflector on the lower edge of the hood, and then it is fixed on the reverse side using clips and screws.
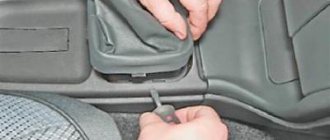
- Open the hood and apply a fly swatter to it. On the inside, the factory holes are determined where the deflector will be fixed.
- Using a screwdriver in certain places where the fly swatter is attached, remove the seal from the hood.
- Mount the clips. This is done through the holes that are located under the seal on the inside of the hood.
Fixation on the outside of the hood
In this case, installation is carried out using clips installed on top of the hood. Here, too, there is no need to make additional holes in the hood.
- Place the deflector on the hood and determine the mounting locations of the clips.
- Degrease the attachment points.
- Cover the places where the clip is attached. This is done with adhesive tape on both sides of the hood.
- Mount the clips.
- Fix the deflector. It is applied to the clips; if everything is done correctly, the holes will match. After this, it is fixed with screws.
Some versions of deflectors can have top and bottom mounts at the same time. This ensures a more reliable fixation, but installation becomes a little more complicated.
Video: installing a deflector on the hood
Any owner can independently install a deflector on the hood of his car. There is nothing complicated here - just follow the developed instructions and do the work carefully. There is no alternative to a fly swatter yet. It helps you save on the purchase of car cosmetics used to repair damaged paintwork and extends the life of your windshield.
Installation options
I won’t dwell on how to choose a suitable deflector for myself. I can only say that it is better to buy designs that are suitable for your specific car.
Also choose among trusted manufacturers, some of which I have already named. You can even use the product SKU to search online if you know exactly what you need.
There are many car accessories stores in Moscow, St. Petersburg and other cities. Don't forget about the tuning studio. They will help you with your choice and install a suitable deflector. If you want to do everything yourself, use video instructions and my recommendations as an assistant.
Since many people have coped with tuning the radiator grille, this task will also be feasible for you.
The main point is to determine which mounting principle is used on your particular deflector. Manufacturers use three. Let's get to know them separately.
- Option one. Using adhesive tape. It is already applied to the part by the manufacturer, so you only need to remove the protective film. The method is simple, since you need to degrease the surface and attach the part to the car. But such fastening is not highly reliable and durable. And after dismantling you will have to try to remove the remaining glue;
- Option two. Brackets. Simple and safe for the car. The brackets are already included. Installation is carried out without damage to the hood. No need to use additional glue. Plus the brackets allow you to change the gap as needed. Attach the fly swatter to the car, make marks for fastening. At these points, glue the protective film (this will protect the paint), and then install the fasteners. It is advisable to additionally use silicone dampers under the deflector, which will dampen vibrations and protect against noise;
- Option three. Only for barbarians. This method involves drilling the hood for self-tapping screws. I immediately recommend abandoning this method, since it will not give anything good.
I advise you to apply an anti-gravel coating as an additional measure to protect the bottom of the machine. In combination with a properly selected deflector, the result will be beyond your expectations. It is still unpleasant when the paint layer is damaged due to debris on the road. These measures will minimize damage.
That's all I have
Thank you all for your attention!
Subscribe, leave comments, ask questions and wait for new interesting materials! (5 ratings, average: 4.80 out of 5)
(5 ratings, average: 4.80 out of 5)
Subscribe to updates and receive articles by email!
We guarantee: no spam, only new articles once a week!
Deflectors on car windows and hoods are used everywhere. Most vehicles on the road are equipped with black or body-colored visors pasted over the sliding windows.
Some vehicles have a similar design in the front part of the hood. What are these devices used for? How to choose and install a deflector with your own hands?