Types of panels
During the release of the Lada XRAY, several instrument panel options have changed, but the differences between them are not fundamental and mainly come down to design and software. All panels are combined, well-type, in the center there is a larger analog speedometer, on the left there is a well of the same tachometer, and in the right well there is an on-board computer screen (in most brands it is placed in the center).
Since the car was created at one time on the basis of Sandero, the XRAY is suitable for a fully virtual dashboard from the “French”, but it costs 4-6 times more than the original one and the feasibility of replacement is a big question.
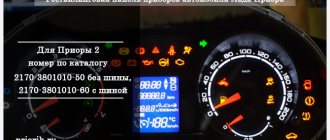
Error codes on the Priora dashboard
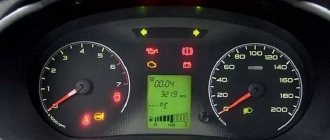
When entering self-test mode, combinations of numbers and letters may appear on the display indicating the part of the circuit where a malfunction is detected.
Usually, after entering the service mode, one or more numbers appear on the device:
- 2 – a critical overvoltage was detected in the on-board network, caused by a short circuit or breakdown of the unit;
- 3 – an error has been detected in the fuel level sensor, a circuit break is possible;
- 4 – there is overheating of the cooling system, or the corresponding sensor is broken;
- 5 – the thermometer that determines the temperature outside is broken or there is an open circuit in versions before 2012, mounted optionally;
- 6 – the engine has boiled, you need to wait for cooling or check the serviceability of the sensors;
- 7 – the oil pressure in the crankcase of the power plant is too low, the sump may leak or the lubricant level has dropped significantly;
- 8 – breakdown of the brake line or units of the corresponding system;
- 9 – the battery is discharged or the element is faulty; it can also appear after the car has been idle for a long time in the cold;
- E – the firmware has failed or there is a critical error in the EEPROM data packet.
Removing (replacing) the instrument panel
This in itself is not particularly difficult:
- Remove the screws connecting the upper and lower parts of the steering column housing.
- Unscrew the screws, disconnect the connectors and remove the steering column switches.
- Unclip the panel frame latches in the following order: starting from the lower left corner, bottom, left, top, right.
- Remove the panel frame.
- Unscrew the 2 screws at the bottom of the instrument panel.
- Disconnect the connector on the back of the panel.
- Remove the panel.
The installation is carried out in the same way.
Removal and installation
The Kia Rio 3 instrument panel is dismantled using a Phillips screwdriver. Procedure:
- The wire is removed from the negative side of the battery.
- The steering wheel is removed. The column goes down to the limit.
- The upper part of the casing is detached (the presence of clamps requires the use of force).
- The visor with the instrument lining is also detached from the shield and moved to the side.
Snap off the visor
- A block with wires is connected to the Trip key; it must be removed from the socket (the switch can be replaced).
- The visor is finally removed.
Dismantling the visor
The Kia Rio 3 dashboard is secured with 4 screws. After unscrewing them, the panel is retracted to the length of the wiring harnesses.
Dashboard
The pads are disconnected, the tidy is removed. Instead, a new one is installed in the reverse order.
Carefully disconnect the pads
If the plastic clips are damaged during removal, they should be replaced.
Pinout
According to experts, the pinout of the contact group in all versions of the X-Ray device is the same, in theory, this simplifies interchangeability between generations. However, if you replace the “native” one with the dashboard of another VAZ model, there will be no more matches.
The example below shows the pinout of the X-Ray and Vesta models; when trying to replace it, I had to tinker a lot.
In the end, everything worked out for the person, the panel started working, but flashing the firmware is a rather complicated process, requiring programming skills and specific equipment.
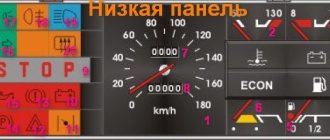
The engine temperature scale on the dashboard is missing.
Indeed, on all XRAY cars there is no engine temperature scale in the instrument cluster, but this characteristic is monitored in a different way. When the engine temperature increases to a critical value, the coolant temperature indicator will light up in red on the indicator field inside the speedometer scale, which requires an immediate response from the driver (reducing the speed or completely stopping the engine to reduce the temperature, checking the coolant level). As for the operation of a cold engine, the instructions for the LADA XRAY provide recommendations for driving the car at subzero temperatures. It says there - warm up if necessary to achieve comfortable conditions. By the way, many experienced drivers note that when the engine warms up and begins to operate with more stable characteristics, they do not use instrument prompts.
Icons and indicators
Like other cars, VAZ provides the driver with information about malfunctions, errors and other events that require his attention, by highlighting various icons on the dashboard.
- ABS warning light.
- Airbag warning light.
- Multifunctional indicator reporting problems with the internal combustion engine. To accurately determine the error, you need to connect a scanner; it is recommended to contact the service.
- The need indicator will switch to a higher gear in the gearbox.
- Engine overheating indicator.
- The battery discharge indicator indicates problems in the vehicle's power supply system.
- Left turn signal indicator lamp.
- Indicator of the applied handbrake, if the parking brake is released and the lamp is on, this indicates problems in the braking system.
- Right turn signal indicator lamp.
- ECO mode indicator.
- Oil pressure indicator.
- ICE preheating activation indicator.
- Signal switch for disabling the electronic stabilizer.
- Indicator for activation of the electronic stabilizer.
- On-board computer screen.
- Low fuel tank indicator.
- Speed controller warning light.
- Cruise control warning light.
- Speed limiter indicator.
- High beam indicator.
- Heating alarm.
- Low beam warning light.
- PTF activation indicator.
- Rear PT lamp indicator.
- Speedometer needle.
- Indicator of problems with the internal combustion engine.
- The need indicator will switch to a lower gear in the gearbox.
- Tire pressure warning light.
- Open door alarm.
- Tachometer needle.
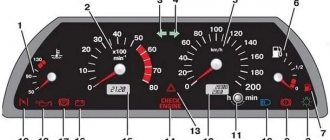
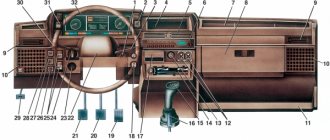
Component Location
| Pos. | Spare no. | Name |
| 1 | parts | Tachometer |
| 2 | — | Glow plug activation indicator |
| 3 | — | Seat belt indicator (GCC only) |
| 4 | — | Malfunction Indicator Light (MIL) |
| 5 | — | Left turn indicator |
| 6 | — | Coolant temperature (ECT) gauge |
| 7 | — | High temperature indicator ECT |
| 8 | — | High beam indicator |
| 9 | — | Alarm indicator |
| 10 | — | Fuel level indicator |
| 11 | — | Right turn indicator |
| 12 | — | Traction control indicator |
| 13 | — | Speedometer |
| 14 | — | Differential lock indicator |
| 15 | — | Rear fog lamp indicator |
| 16 | — | Odometer and trip meter display |
| 17 | — | Odometer reset button |
| 18 | — | Trailer indicator |
| 19 | — | Low fuel level indicator |
| 20 | — | Anti-lock brake system (ABS) indicator |
| 21 | — | Brake Warning Light |
| 22 | — | Side light indicator |
| 23 | — | Anti-theft alarm indicator |
| 24 | — | Transfer case low range indicator |
| 25 | — | Ignition indicator/charging circuit fault |
| 26 | — | Low oil pressure indicator |
Flight computer
Its screen is located in the right well of the instrument panel, the control is located on the end button of the right steering column switch. A rather extravagant solution, perhaps caused by the relatively limited functionality of the on-board computer, for which a simple “flipping” is sufficient.
However, it cannot be called completely “empty”; some budget set of functions is present, but some of the following operating parameters may be absent depending on the specific configuration of the car:
- odometer (mileage counter);
- mileage counter No. 1 (daily mileage or mileage per trip);
- total gasoline consumption (after zeroing);
- current consumption;
- average consumption;
- expected range based on the remaining gasoline in the tank;
- mileage counter No. 2 (mileage after reset);
- average speed information;
- remaining mileage before maintenance;
- set cruise control/speed limiter parameter;
- watch;
- air temperature outside the car;
- tire pressure data.
To reset the readings, you need to select the desired item in the menu and hold the button pressed for several seconds. To reset the mileage until the next maintenance, you will have to hold the button for about 10 seconds. Schematically, all the functionality of the on-board computer complex is presented in the table below.
In general, the dashboard of the Russian-French VAZ baby can be called acceptable, given the price range in which the car is located.
Logan on-board computer
When you press the button located on the windshield wiper and washer switch lever, the Renault Logan on-board computer is activated.
The on-board computer display partially duplicates the information from the Logan instrument panel. On the left is the fuel level scale in the fuel tank. On the right, the scale displays the temperature of the working fluid in the cooling system. The top numbers display the total mileage of the car, the bottom – the daily mileage.
Display of information on the display: a — on-board computer information; b - hours; c — engine coolant temperature gauge. During normal engine operation, the four rectangles are dark. Do not allow the engine to operate in overheating mode; d — fuel level indicator in the fuel tank. When the fuel tank is full, all rectangles are dark.
The display also shows the following data:
- how much fuel was used after resetting the on-board computer information;
- average consumption value (in liters per 100 km) after resetting the values. The counter is activated after 400 meters of travel from the moment you start moving;
- current consumption value (displayed at speeds of 30 km/h and above);
- How long will the car travel at the current fuel level? The calculation is made taking into account the average flow rate;
- mileage since the last reset of the on-board computer;
- the speed at which the car has been moving on average since the last reset;
Instead of daily mileage, you can set the time display. To do this, activate the corresponding mode using the button on the lever, and set the exact time using button 8. By long pressing, minutes and seconds can be changed quickly.
Activating self-diagnosis of the on-board computer
To activate the self-diagnosis mode of the Renault Logan 1 on-board computer, follow these steps:
- Insert the key into the ignition.
- Press and hold the daily mileage reset button located on the instrument panel.
- Turn the key while holding the button until numbers appear on the display.
- Release the button.
Peculiarities
The appearance of such a tidy is simply luxurious - it looks stylish and expensive, immediately highlighting the interior of your X Ray.
It has a 4.3-inch display using TFT technology
In addition, 5 indicators can be displayed simultaneously on it, which makes reading information even faster and more convenient, and when driving at high speed this is important
This component was received for testing by one of the Drayvovites, known there under the nickname Valdemar600. He immediately noted a number of pleasant and useful points:
- Colorful – this dashboard looks much more attractive than the standard one;
- The presence of a sports mode, which allows you to display the current engine speed, as well as maximum speed during acceleration;
- Fuel indicators – fuel consumption (instant and average), as well as remaining range on the current gasoline supply;
- Battery charge level;
- The calendar is far from the most necessary aspect in this case, but it is there;
- Crossover maintenance - for example, you can set a notification for an oil change;
- Possibility to display an overspeed indicator.
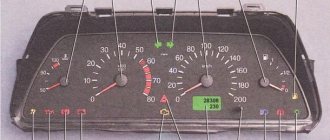
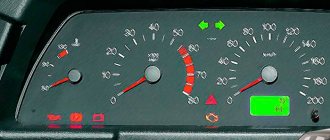
Kia Rio 3 dashboard indicators
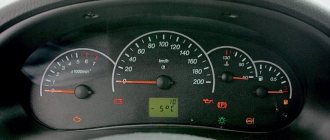
For clarity, you can consider the instrument panel of the 2013 Kia Rio 3. The location of the indicators ensures constant monitoring of the vehicle’s condition; information about the state of affairs with working units and mechanisms is grouped and is available to the driver without distracting him from driving.
Control arrows on the instrument panel:
- speedometer (shows how fast the car is moving, the indicator is expressed in km/h);
- tachometer (indicates the number of revolutions of the internal combustion engine crankshaft, the indicator is expressed in rpm);
- gasoline level indicator in the fuel tank (full, half tank, empty);
- antifreeze temperature indicator in the cooling circuit.
The engine temperature scale on the dashboard is missing.
Indeed, on all XRAY cars there is no engine temperature scale in the instrument cluster, but this characteristic is monitored in a different way. When the engine temperature increases to a critical value, the coolant temperature indicator will light up in red on the indicator field inside the speedometer scale, which requires an immediate response from the driver (reducing the speed or completely stopping the engine to reduce the temperature, checking the coolant level). As for the operation of a cold engine, the instructions for the LADA XRAY provide recommendations for driving the car at subzero temperatures. It says there - warm up if necessary to achieve comfortable conditions. By the way, many experienced drivers note that when the engine warms up and begins to operate with more stable characteristics, they do not use instrument prompts.
No tuning
Even before the start of production of the Lada X-Ray, manufacturers hinted that they would minimize the desire of motorists to carry out independent tuning of the interior. For early VAZ cars this was quite common. Now, in the interior of a high hatchback you can find many small niches and pockets in which you can transport small items. Cup holders are not superfluous. Everything is done compactly and wisely. For expensive trim levels, a cooled, illuminated glove box is provided, which will be very useful in hot weather.
The handles above the passenger seats fold into special niches without getting in the way when getting out of the car.