ECU Tweaker, or ddt4all on Android
ECU Tweaker is an application for Android devices that allows you to change the configuration of your car using a regular Bluetooth ELM327 adapter (with the original PIC18F2480 chip).
Unlike the PyClip application, ECU Tweaker works with the ddt database. You can download the application on the author’s page on github.com
, or on
Yandex disk
.
Installation of the application is normal, downloaded and installed. Only then do you need to independently write the ddt database to the root of the device’s internal or external memory. The Zip archive with the database should be called ecu.zip and nothing else. The database itself (ecu.zip) can be taken from the latest builds of ddt4all for Windows. It is located in the folder with the installed program. Or here is the latest, for today, database ecu.zip
.
The connection to the ECU is normal. Almost the same as with ddt4all. Press the magnifying glass button, select the desired car and then select the desired ECU (ESP, AIRBAG, etc.) from the list. Or AUTO IDENTIFY so that the application independently selects the appropriate ECU file.
Initially, the application is only available for viewing the vehicle configuration and does not allow you to change anything in it. To unlock this function, you need to contact the author and send him a “request code”, after which he will send an activation code. To find out your “request code”, click on the lock icon.
Source
What did I buy for myself?
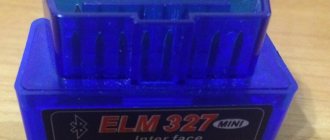
I purchased the Viecar 4.0 device. It is not cheap, it costs a little more than 1000 rubles. I chose the expensive version in a plastic container with delivery from Russia. I received it within 10 days. Nothing else is written on it, but this is ELM327 version 1.5 with Bluetooth 4.0.
Many people will ask why I recommended taking 2.1, but I myself took 1.5. When I chose it, I knew little about them, they recommended it to me, they said that they use it on the Lada Vesta without any problems. There are good reviews about it, but it is practically no different from the ELM 327 device for 300 rubles. Now I would take the expensive version 2.1 for this price.
ECU tweaker. First steps.
Establish a bluetooth connection between your smartphone and the ELM327 adapter (or via WiFi). Launch ECU Tweaker. If a connection has not been previously established, the application will offer to do so.
When you launch the program for the first time, a message about the found database should appear.
[1] and [2] working with logs of program exchange with the car. When running, the program writes logs to the file data\data\org.quark.dr.canapp\files\log.txt. With each new work session, data is added to the log.txt file. “CLEAR LOGS” – deletes all previously recorded data from log.txt. “VIEW LOGS” – copies log.txt to the downloader folder.
[3] Area where the application outputs system messages, outputs data exchanged with the car, outputs logs. (possible to scroll)
[4] Selecting a project - choosing a car.
[5] Select the connection type - bluetooth or WiFi.
[6] Select a connection from a list of all available devices.
[7] Connection indicator (“green” color – connection established with ELM327).
3. Connection with the car.
[8] This area will display all possible blocks of the selected vehicle, including those connected to CAN2. Those. even those that are not present will be displayed (the actual number of blocks depends on the vehicle configuration). We select the block we want to work with.
[9] This area will display files from the DDT2000 database for the selected block for a specific vehicle. If you select “ALL” in the project selection [4], then all database files for the selected block will be displayed.
To check whether the unit we have selected is present in our car, we must press “AUTO-DETECT”[10].
If it is not known which bus the unit is on, then you must alternately select KWP(K-line) or CAN
Message when trying to select KWP (all blocks on CAN)
Message when trying to connect (auto-detection) via the CAN bus to a unit that is not in the car.
[11] In this area, when a block is found, the results of auto-detection will be displayed. The transcript can be found in [3].
A short digression - how “AUTO-DETERMINATION” works. ECU Tweaker sends a request to the unit's ECU and receives a response containing supplier version (supplier code), diagnostic version, version and soft version. Based on these parameters, the appropriate file is selected in the database (in the db.json file). If there is a complete match, the found files (or one file) will remain in area [9] and the area itself will turn green.
If only three parameters match, area [9] will turn red and a warning will appear in [3].
If there are two or fewer matches, then the list of files in area [9] will remain unchanged. The possibility and safety of working with database files, both “unmarked” and “not marked”, is described a lot in the logbooks of this site.
4. Screen for working with the block
Selecting a category, selecting a screen and further working with car blocks are well described in publications dedicated to ddt4all (on drive2 and on other forums).
[12] Return to “category selection”. [13] Reconnection. [14] Read errors from a block [15] Clear errors from a block
[16] Connection indicator [18] Zoom
[17] Advanced settings
19] Font size [20] Set timeout for CAN bus. In cases of not receiving a response from the unit or receiving an error message (7Fxxxx) – increase to the maximum. [21] Select the session opening command (diagnostic session opening command – 10C0). [22] Enable software Flow Control (required for some ELM327).
———- Second digression, and again about “AUTO-DETERMINATION” - will come later -
Source
Lada Vesta has quite a lot of functions that almost no one knows about
In addition to those described above, you can change the settings for power windows, daytime running lights, brush sweep, and belt buzzer. There is also a hidden menu for MMS, radio and testing. The connection occurs via Bluetooth.
You can customize the car for yourself, but remember that all work is performed at your own risk. If you are not confident in your strengths and capabilities, then contact specialists.
There are a lot of additional functions and settings - this is good and interesting. However, the manufacturer decided to remain silent about some of them, although they could make life easier for drivers and make AVTOVAZ products more attractive to potential buyers. Not all functions are necessary or required, but they can be useful in different cases. Therefore, it is worth learning about them in more detail and deciding for yourself whether to use them or not.
Reading time
Difficulty of the material:
For the pros - 4 out of 5
Electronic car diagnostics is an effective way to find out the condition of your car. Owners of the Lada Vesta now have access to the possibility of independent service, since the car uses a unit with a CAN communication bus. A basic scanner based on the ELM 327 is capable of providing detailed information on components, and diagnostic software can be found on the Internet.
The material is suitable for car owners: LADA VESTA, X-RAY
This instruction describes in detail the process of reading data from the ECU. The article also contains recommendations: which car scanner and program to choose for diagnosing a Lada Vesta of any year of manufacture. In the article you will find useful links to more detailed instructions and reviews of diagnostic equipment.
Author of the site elm327-obd2.ru
Setting up and describing the functions of DDT4all and Ecu Tweaker
background:
I once installed PyClip on my phone, a useful program that can count errors and test various systems. But there is an Executing test mode, in general I launched it, or it didn’t wait, or maybe it didn’t execute... I don’t care. But after this it happened that the UCH unit went into emergency mode: the trunk lid did not open from the external button, the doors did not lock from the button on the central panel (it was constantly on), the hands-free function stopped working.
Everywhere on the Internet there is one solution: to auto-configure the UCH unit with a CAN CLIP. I didn't find any more solutions.
I decided to install the DDT4all program on my laptop and try to figure out the settings.
I’ll write right away that I managed to return everything to its previous state, and at the same time activate several additional functions.
Since the description on the Internet about DDT4all is kept to a minimum (opening the lid with a key fob, wiping off a drop, etc.), I decided to make the description of the functions more detailed. I found the operation of some functions myself intuitively (at random), some on Russian-language resources, some on foreign ones.
I ask you to join this question, correct the description somewhere, add something somewhere. Because inaccuracies are possible. One head it's good, but two better.
Description of the main parameters:
GLASSHATCH_CF — glass hatch translation
LONG_PRESS_TM_CF -
translation of the press duration
CRASH_DETECTION_CF - accident detection.
Turning on the alarm system by the ABS unit during sudden braking. PLANT_LOCK_WITH_SPEED_CF — Automatic closing of central locking. The doors can close automatically once the vehicle starts moving. AUTO_RELOCK_TIMEOUT_CF (min) — Change the timeout for automatically reclosing the central lock. By default, if you opened the central locking with the key, but then did not open any of the doors for 2 minutes, the CEBKS will close the central locking again automatically. We change the value to the desired one in minutes or disable it altogether by setting the value to 0. ANTI_HIJACK_CF - Anti-theft mode. When you press the button, hands-free opening is partially disabled. It closes itself, and to open it you need to press a button on the card. The first press opens the driver's door, the second all the others. When activated, hands-free opening is disabled. It closes itself and to open it you need to press a button on the card. BTN_TAILGATE_OPENING_CF - maybe in some trim levels there is a trunk opening button in the cabin RKE_BTN_TAILGATE_OPENING_CF - When you press the button on the key card, if the car was closed, the trunk lid opens and you can simply lift it without pressing the button on the trunk itself. SEPARATED_TAILGATE_OPENING_CF — separate opening of the trunk lid. Opening the trunk without opening the central locking. KNOB_CF - when you press the close button, you do not close
the door HIGH_LOCK_WITH_SPEED_CF - Enables locking the doors from the outside when the speed reaches 7 km/h and if you stop at a traffic light, then no one will get in from the outside until you open it from the inside with a handle, a button on the panel or a map .
SUPERLOCK_CF - When you press the close button twice, it locks the rear doors from the inside, i.e. passengers will not get out on their own, or if thieves break the glass, the doors will not be opened with the inside handle either. CHILD_LOCK_CF — activates the button on the driver’s door to lock the rear doors and windows from the inside. Children in the back will not be able to open the doors and windows. GLASSHATCH_CF — translation of the glass hatch
HANDS_FREE_CF — If the parameter is turned off, then when starting the car it will ask you to insert the “Hands Free” card into the corresponding slot RKE_BACK_DOORS_CF — FUEL WAC LOCKING DELAY TM CF (min) — Sets the specified delay interval for blocking the fuel tank door.
CAR_BODY_TYPE_E_CF - translation of the car body type
POWER_SLIDING_DOORS_CF -
translation of sliding doors
CHILD_LOCK_SWITCH_REVERSE_CF -
Reverse operation of the CHILD_LOCK_CF mode
BATT_TAILGATE_OPENING_CF -
translation of opening the trunk lid cf
Flasher
HAZARD_WITH_BRAKE_CF - warning during sudden braking HAZARD_WITH_CRASH_CF - warning during an accident OVERLOAD_BY_SMART_CF - TPULSE_CF - Polite (pulse) turn signals - short (without fixation) movement of the turn signal lever - triple blinking of the lamps. PC_SIGNALISATION_CF
FRONT_WIPER_CF - Presence of front brushes AUTO_WIPE_CF - Automatic brush mode (most likely the presence of a rain sensor) FRONT_DROP_WIPE_CF - Additional wiping after washing. The windshield wiper makes 3 passes. After the 3rd pass and a delay of 3 seconds, another final pass of the brushes is performed. SWITCH_HI2LO_LO2INT_CF — When the car stops, the brushes change speed from fast to slow HEADLAMP_WASHER_CF — The presence of a headlight washer. DUAL_WIPING_MOTOR_CF - translation: double wiper motor. GO_TO_SERVICE_POSITION_TM_TP (ms) — Time to enter the service mode (when, with the engine off, pull the switch all the way down, pull the brushes vertically)
CF_VSC_WAC_Buzzer_inhibited - After automatically closing the car using a smart key, the central locking lock will block everything and there will be a sound signal. sans (without), avec © CF_VSC_HandFreeLockByDoorHandle - Opens doors when you bring your hand to the touch sensor in the door. CF_VSC_WAC - The central locking is locked when you move away from the car, if you have a smart card CF_VSC_HandFreeUnLock - Activation of the hands-free function. VSC_Timeout_Learning_Key - translation: learning timeout key IMMO_Timeout_REWORK_MODE_TM_CF (min) - translation: Immo waiting mode for reworking TM MV VSC_WARNING_BATTERY_LEVEL_IDENTIFIER - Notification on the dashboard about a dead battery in the key card. CF_VSC_WAC_NB_RF_FRAME_LOST (time) - translation: Authorization of the servant card function LockUnlockByButtonCF - Unlock lock using the BF button. Use on door handle optical sensor to unlock CF_VSC_AVEC_DEMARRAGE_ML - CF VSC WITH ML START. Actif active. Inactif inactive CF_VSC_WAC_BACKUP CF_VSC_SANS_Locking_des_Badges - No icon locking. CF_VSC_Driver_Right - steering wheel location? conduite a droite right-hand drive, conduite a gauche - left-hand drive CF_VSC_CAR_BODY_AND_THATCHAM - BODY AND THATCHAM CF_VSC_WITH_SERVANT_IDENTIFER - WITH SERVANT IDENTIFER
AUTO_WINDOW_CLOSING_CF — Automatic closing of all windows when you double press the key fob button, only impulse windows work. LVE_CF - Rear window operation FRONT_PASSENGER_WLAP_ECU_CF - REAR_PASSENGER_WLAP_ECU_CF -
Source
ECU tweaker. First steps.
Establish a bluetooth connection between your smartphone and the ELM327 adapter (or via WiFi). Launch ECU Tweaker. If a connection has not been previously established, the application will offer to do so.
When you launch the program for the first time, a message about the found database should appear.
[1] and [2] working with logs of program exchange with the car. When running, the program writes logs to the file data\data\org.quark.dr.canapp\files\log.txt. With each new work session, data is added to the log.txt file. “CLEAR LOGS” – deletes all previously recorded data from log.txt. “VIEW LOGS” – copies log.txt to the downloader folder.
[3] Area where the application outputs system messages, outputs data exchanged with the car, outputs logs. (possible to scroll)
[4] Selecting a project - choosing a car.
[5] Select the connection type - bluetooth or WiFi.
[6] Select a connection from a list of all available devices.
[7] Connection indicator (“green” color – connection established with ELM327).
3. Connection with the car.
[8] This area will display all possible blocks of the selected vehicle, including those connected to CAN2. Those. even those that are not present will be displayed (the actual number of blocks depends on the vehicle configuration). We select the block we want to work with.
[9] This area will display files from the DDT2000 database for the selected block for a specific vehicle. If you select “ALL” in the project selection [4], then all database files for the selected block will be displayed.
To check whether the unit we have selected is present in our car, we must press “AUTO-DETECT”[10].
If it is not known which bus the unit is on, then you must alternately select KWP(K-line) or CAN
Message when trying to select KWP (all blocks on CAN)
Message when trying to connect (auto-detection) via the CAN bus to a unit that is not in the car.
[11] In this area, when a block is found, the results of auto-detection will be displayed. The transcript can be found in [3].
A short digression - how “AUTO-DETERMINATION” works. ECU Tweaker sends a request to the unit's ECU and receives a response containing supplier version (supplier code), diagnostic version, version and soft version. Based on these parameters, the appropriate file is selected in the database (in the db.json file). If there is a complete match, the found files (or one file) will remain in area [9] and the area itself will turn green.
If only three parameters match, area [9] will turn red and a warning will appear in [3].
If there are two or fewer matches, then the list of files in area [9] will remain unchanged. The possibility and safety of working with database files, both “unmarked” and “not marked”, is described a lot in the logbooks of this site.
4. Screen for working with the block
Selecting a category, selecting a screen and further working with car blocks are well described in publications dedicated to ddt4all (on drive2 and on other forums).
[12] Return to “category selection”. [13] Reconnection. [14] Read errors from a block [15] Clear errors from a block
[16] Connection indicator [18] Zoom
[17] Advanced settings
19] Font size [20] Set timeout for CAN bus. In cases of not receiving a response from the unit or receiving an error message (7Fxxxx) – increase to the maximum. [21] Select the session opening command (diagnostic session opening command – 10C0). [22] Enable software Flow Control (required for some ELM327).
———- Second digression, and again about “AUTO-DETERMINATION” - will come later -
Source
Instructions for diagnosing VESTA via OBD2 connector with your own hands via a laptop or smartphone
Determine where the OBD2 connector is located
Determine which scanner is suitable for your car
The selection of a scanner (adapter) for LADA VESTA depends on the ECU model, as well as the needs of the diagnostician / car owner.
To select diagnostic equipment, use the calculator: “Selecting a scanner for Lada Vesta”
The diagnostic adapter requires software that can be installed on a laptop or smartphone/tablet. Auto scanners with their own software shell and display do not require software.
To select a program for the adapter, go to the section: “Programs”
Use the instructions and carry out diagnostics
When you purchase an adapter, instructions are included with the adapter. More detailed instructions on diagnostic car scanners and descriptions of their operation are posted in the section: “OBD2 car scanner reviews”
Identify errors and decipher them
Error codes and their interpretation are displayed in the scanner program interface. You can also study the complete database of errors for your car in the section: “OBD2 error codes for Lada Vesta”
Make repairs according to the error code
The unit is repaired according to the decoding of the error (problem) or contact a car service to eliminate a particular malfunction.
Check errors again
Scan Tool Pro - budget multiscanner for Lada Vesta
A good choice for a novice diagnostician
Nowadays there are scanner models with different versions of firmware and chips on sale. Scan Tool Pro with firmware 2022 is the most stable version so far, and also has maximum compatibility with cars manufactured since 2001, including Lada Vesta.
By following the link on the right you can get acquainted with the scanner for autodiagnostics “Scan Tool Pro”. This is an official dealer website that provides a 12 month warranty.
Standard method with sensors in wheels
At the end of 2022, a new item “Tire Pressure Monitoring System (TPMS)” appeared in the owner's manual. The vehicle is equipped with a tire pressure monitoring system (TPMS) in a variant (export version).
How to activate the TPMS indicator in the Vesta dashboard
told pavel-kor
After this, the TPMS and SET TP icon will turn on in the bookmaker. However, for the system to work, it is still necessary to install sensors in the wheels and force the instrument panel to receive data from the sensors. How to do this is still unknown.
Possibilities
The application contains a translation of the ABS unit to activate TPMS and monitor tire pressure. You can activate the display of the current engine temperature, the backlight of the instrument panel during the day, and adjust the brightness of the scale, indicator and arrows.
Like the CarWebGuru program, the utility helps you manage your car. The application allows you to disable the gear shift assistant. It is possible to configure notifications for exceeding the speed of 120 kilometers per hour. Activation of the tire pressure monitoring system and hazard warning lights during heavy braking is available.
Using the program, you can check the dashboard firmware version and mileage. The utility is capable of automatically closing the doors when you start driving. Supports anti-theft mode, separate trunk opening, installation of a light sensor, battery saving, remote lighting control, notifications on the dashboard and much more.
Non-standard method with sensors in wheels
How to activate the TPMS indication in the Lada Vesta dashboard in a regular manner still remains a mystery, but one of the owners of this car (plos) found an alternative way to modify the design.
Required
: TPMS kit (for example, U912 tire pressure monitoring system (available in the selection of products on AliExpress, price about 3,500 rubles).
Now, if the tire pressure is below normal, then the TPMS indicator on the instrument panel will light up and a warning sound will follow.
Methods for diagnosing ECUs and errors on Lada Vesta via OBD2
Let's look at examples of analyzing machine systems in different ways.
Check Engine light on Vesta?
Detailed article on the causes of Check Engine and how to clear the Check. If your Check Engine light comes on, read this article immediately. The material explains what a Check Engine is, what to do if it appears, and how to remove this error yourself.
Is the Check Engine light on?
TOP 15 reasons why the Check Engine light comes on and ways to solve the problem. Read the article to solve the Check Engine problem.
Self-diagnosis:
To enter the BC diagnostic mode, hold down the top key and turn on the ignition.
Reviews of diagnostic scanners for LADA VESTA
Read detailed articles on the review of car scanners, including those compatible with LADA VESTA.
Reviews of OBD2 diagnostic car scanners
This section provides descriptions of diagnostic scanners and adapters. Before purchasing a scanner for your car, it is recommended that you read reviews of the most popular equipment models.
New software is written using programmers. There are open and closed ECUs.
- In a diagnostic way. Without removing the ECU from the vehicle via the diagnostic connector using flash loaders and a program such as Combiloader.
- Work via BSL mode of the ECU processor. With this method, programming the ECU is carried out by removing the latter from the car using bootloaders that work with the ECU processor via BSL mode.