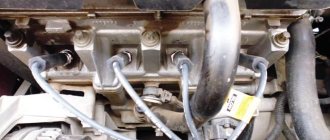
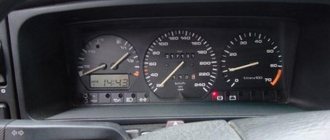
Where did all this even start? Yes, because one day after work I started the car and realized that it was a complete mess. I opened the hood and looked. I think we need to check which cylinders are working. I take the wire of the first cylinder. And then the machine gave me a thousand pricks from the discharge that this wire emitted... Everything is clear, it breaks through. Having warmed up to 40 degrees, the tripping disappeared o_O. Ok, you can live. went home. I started thinking about what to do with the wires that I bought a year and a half ago. "Elephant". I looked at how much new ones cost - 900 or more, silicone wires. Hmm...a little expensive.
I started digging into the drive. And then I remember that I saw an article about homemade explosive wires. 1 minute in Google and 15 articles on the drive are ready to read. Someone makes it from ZIL wires, there is a copper core - the resistance tends to 0. Someone makes a corrector vacuum from acoustic wires and silicone hoses. I settled on this decision. The article that I took as the BASIS! Special thanks for the advice Stuff0rd McSystem
What we need: — MGTF wire -0.35mm 2 meters (enough almost point-blank). (I came across this brand of wire by accident in the comments) I read that the cross-section is not so important as the insulation of the wire, and that 0.2-0.5 cross-section is enough for the eyes. — Silicone vacuum corrector hoses 3 pcs. — Heat shrink 8mm (more than the diameter of the hoses) — 2 meters. - BB wires. - VDeshka - Someone’s mother... (Required!)
1. First, we take the old (or the only ones - like I did) wires and begin to disassemble them. I simply pulled the terminal on the spark plug side out of the insulator. It's hard but it works out. But the corner terminal must be carefully disassembled and the wire pushed towards the terminal so as not to damage it. Since I also pulled out the first one by force and almost broke it at the bend))
Diagram, procedure for connecting VAZ high-voltage wires.
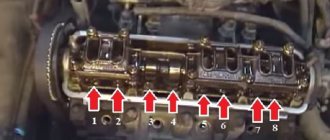
First, let's decide which of the four cylinders is first?
The first cylinder in front-wheel drive VAZs is located closer to the timing belt. If you look at the engine from the front, the first cylinder is the leftmost). And then everything is simple - from left to right - 1, 2, 3, 4.
In rear-wheel drive VAZ Classic and Niva, the first cylinder is located closer to the front bumper of the car.
Wiring replacement process
The procedure for removing and installing the ignition coil on old VAZ models:
- First, disconnect the central high-voltage wire leading to the distributor (ignition distributor).
- Disconnect all power wires from the coil contacts. Since they are fastened with nuts, you will need an 8 wrench for this.
- If you don’t know which wires to connect to which connector later, it’s better to immediately remember or mark them somehow, so that later during installation you can connect them correctly.
- Unscrew the coil housing. It is attached to a clamp (clamp), which is pressed to the car body with two nuts.
- After the work has been done, you can remove the ignition coil and replace it if necessary.
For new type VAZ cars:
- We remove the “minus terminal” from the battery.
- Remove the top protective cover of the engine. If the engine volume is 1.5 liters, then this part is missing and this step is skipped.
- We remove the high-voltage wires from the coil.
- Now, using a 13mm wrench, unscrew the two fasteners.
- Using a 17mm wrench, loosen one bolt securing the coil.
- We take out the module.
- Use a hexagon to unscrew the coil from the holder.
- Assembly is carried out in reverse order.
Replacing the ignition coil on a VAZ is quite simple. Even a novice motorist can do this in his garage, and if everything seems too complicated, contact a car service center. Particular attention should be paid to the choice of product, since this will determine how well the engine and ignition system will work.
Cylinders are numbered from left to right. In the module, the internal ignition cylinder 1 is located on the lower left side. The second and third cylinders are located in the left and right compartments, respectively. The output of the fourth cylinder is located at the bottom in the right compartment.
General tips for connecting high-voltage wires.
Checking high-voltage wires. To check the wires, you will need a multimeter tester. Check the resistance of the wires - it should be no more than 20 KOhms (in practice, the longest wire of cylinder 1 has a resistance of up to 10 KOhms). If the wire resistance is more than 20 Kom, it must be replaced. Carefully inspect the wires for chafing on parts of the motor or other wires. In case of significant abrasion, replace the wire. In case of minor abrasion, it is possible to lay the wire so that it does not rub and fix it in this position.
Laying wires. Do not try to connect the wires in a bundle. Disassemble the wiring harnesses, release the wires from the plastic holders. Connect the high-voltage leads to the corresponding cylinder spark plugs. Lay the wires so that they do not rub against each other, engine parts, or hoses. Avoid sharp bends and tension on the wires. After connecting all the wires, secure them into the bundle with special comb holders included in the delivery kit.
The procedure for connecting I/O wires to a VAZ carburetor (2108, 2109, 21099)
The central wire from the distributor cover always goes to the ignition coil (bobbin).
The outlet of the distributor cover, which faces towards the front of the car, is connected to the first cylinder.
The outlet of the distributor cap, looking down, is connected to the third cylinder.
The outlet of the distributor cap, looking rearward, is connected to the fourth cylinder.
The outlet of the distributor cap, looking up, is connected to the second cylinder.
The procedure for connecting high-voltage wires to a VAZ Classic, Niva with a carburetor and distributor.
Central wire from the ignition coil (bobbin)
1 cylinder - above the vacuum corrector. Next, clockwise, the order is 1-3-4-2.
Injection VAZ produced before 2004 with an old-style ignition module (4-pin low-voltage connector)
Actually, on the module body it is already indicated which cylinder the pins correspond to - but we duplicated them in red in case the module gets completely dirty, and you might not be able to see it in the photo.
Injection VAZ produced after 2004 with a new ignition coil (3-pin low-voltage connector)
As with the old-style ignition modules, the new coils are also marked with pins corresponding to the cylinders. But the connection order is different from the order on the old-style ignition module. Be careful.
Source
Firing order
The cylinders in a car do not work chaotically, because for stable operation of the engine and alternate execution of all four strokes, their strict synchronization is required.
So there is a special order of operation of the cylinders of the VAZ 2114, thanks to which each of them at one point in time performs any of 4 strokes, namely:
- Injection of a mixture of fuel and air that fills the entire volume of the cylinder.
- Compression of the working mixture due to the upward movement of the piston.
- The combustion of the working mixture and the expansion of the resulting gases pushes the piston in the opposite direction, thereby driving the connecting rod and crankshaft.
- The release of exhaust gases from the cylinder with their further discharge into the exhaust system.
Ignition order of the VAZ 2114
It is worth noting that on cars of different brands and even models, the engine may have a different operating circuit, but the operating order of the cylinders of the VAZ 2114 injector always looks like this: 1-3-4-2. According to this diagram, the high-voltage wires should be connected.
Introduction
High-voltage wires of VAZ cars are one of the most important elements in the ignition system. It is the wires that transmit high electrical voltage from the module to the spark plug.
Failure of the wires affects not only the formation of a spark, but also the operation of the entire power plant. This article will talk about how to correctly select and independently replace high-voltage wires on a VAZ car.
Below we discuss the procedure for connecting wires to the ignition module, as well as examples of the highest quality and best wires that can be purchased in terms of price and quality.
Preparatory activities and necessary tools
Installing the ignition of a VAZ 2109 carburetor begins with preparatory activities. In particular, you need:
- Warm up the car engine;
- Set the parking brake and install wheel chocks under the rear wheels.
Remember that you cannot ignore safety rules, because a car is a highly dangerous vehicle, and failure to comply with safety rules when driving, servicing and repairing it can cost you dearly.
An important point: before you start work, you should make sure that the carburetor is correctly configured on the car. It would be a good idea to carry out a visual inspection of all elements of the system.
If we are talking about a carburetor car, special attention should be paid to inspecting the condition of the distributor
If you have a car with an injection engine, it is worth checking the ignition module for serviceability. The thing is that, as practice shows, it is this module that fails most often and is the reason for the inoperability of the entire system.
To complete the work we need:
- strobe;
- a set of keys.
Signs of faulty wires
There can be many different signs of faulty high-voltage wires, but there are several signs that, once detected, require the wires to be replaced.
- The car jerks when you press the gas pedal. This is due to the fact that with a higher load the engine needs a large amount of fuel and its timely combustion, but since the wires are not able to give a spark at the right time, the car begins to twitch.
- When starting the car, one or more cylinders may not fire. This is due to the fact that when a spark is transmitted, it breaks through to the housing due to breakdown of the insulation.
To check the wires in more detail, you need to remove them from the car and carefully inspect them.
The wires should not contain:
- Gusts;
- Zadirov;
- Insulation breakdowns;
- Cracks in the plastic case;
Rupture of the protective cap of the GDP
If such problems are found on the wires of your car, then they need to be replaced.
Typical ignition cable faults
There are 3 main problems associated with high-voltage wires:
- Internal break of current-carrying conductor.
- Breakdown of external silicone insulation.
- Unreliable contact at the junction of copper tips with the terminals of spark plugs and high voltage coils.
A break or fracture of the carbon core does not always lead to complete failure of the explosive wire. Since a high voltage pulse with a nominal value of more than 20 kilovolts is applied to the spark plug, the current still “breaks through” the break point and reaches the spark plug electrodes. But the power of the spark noticeably weakens, hence problems arise with the high-quality ignition of the air-fuel mixture in the combustion chamber. In the worst case, there is no spark at all and the cylinder fails completely.
A similar picture is observed with weak contact of copper conductors at the joints. Due to an oxidized or poorly fitting terminal, the power of the electrical impulse is lost to overcome this obstacle, and the discharge on the spark plug electrodes weakens.
We recommend: Motor oils and everything you need to know about motor oils for Lada Vesta
When two insulating layers break down, the voltage is lost differently. The principle is as follows: the current that detects a circuit of lower resistance tends to pass along that path. If the point of insulation breakdown is located close to the metal parts of the machine connected to the “minus” of the on-board network (ground), a spark discharge is formed between them. As a result, the spark plug receives only half the impulse, causing the ignition of the combustible mixture to occur sluggishly. By the way, it is impossible to check armored wires with a multimeter for insulation integrity; you will need special equipment.
Interruptions in the supply of spark discharges are monitored by the following signs:
- the engine is unstable due to misfires and insufficient spark power;
- one or more cylinders periodically fail, the engine vibrates at idle;
- while driving, acceleration dynamics deteriorate, a weak response to the accelerator pedal is felt;
- more fuel is consumed.
Similar symptoms appear on faulty spark plugs, but checking their performance is more difficult. Therefore, start diagnostics with high voltage wires.
Connection diagram for high voltage wires
Connecting new or removed old wires must be done strictly according to a specific scheme. Otherwise, the spark will not coincide with the compression stroke in the cylinder block.
In other words, when the fuel mixture is ready to ignite in the cylinder, a spark is required to ignite it. If the connection is incorrect, the spark will not appear at the required moment and ignition will not occur, which will make starting the engine impossible.
Scheme
The order and counting of cylinders in VAZ engines starts from the timing belt drive, from left to right, that is, the first cylinder will be at the timing belt, and the 4th at the oil filler neck.
Most often, the cylinder number is indicated on the ignition module, but there are cases when there are no designations on the module, then it is necessary to connect the cylinders according to the diagram shown below.
- The first cylinder is connected to the lower left contact on the MH;
- The second cylinder is connected to the upper left contact on the MH;
- The third cylinder is connected to the upper right contact on the MH;
- The fourth cylinder is connected to the lower right contact on the MH;
Advertisements on NN.RU - Auto
A specialized company for converting trucks into tow trucks invites you to install a tow truck platform on.
The company offers you to upgrade the Fiat Ducato Fiat Ducato basic version for a solution.
Power take-off boxes Kamaz, Maz, Ural, Kraz, Gas, Zil Dispatch on the day of payment. Sending by transport companies. We work as with. Price: 18,500 rub.
With us you can not only extend the frame to fit a body of 5.1 m, 6.2 m, 7.5 m, 9 m for Maz Zubrenok, Maz, Kamaz, Ural, Zil, Mitsubishi, Nissan.
Today, Nizhny Novgorod fast food lovers have a real holiday: a new worldwide outlet has opened on the renovated Nizhne-Volzhskaya embankment.
An accident occurred in the Moskovsky district of Nizhny Novgorod: a girl was swinging her friend, but the swing suddenly fell. As a result.
A street film festival will be held in Nizhny Novgorod for the second time. Short films by young Russian directors will be available for free.
Imagine, you wake up in the morning, open the curtains, bright sunlight bursts into your apartment, and outside the window is a stunningly beautiful landscape.
Source
Cost and articles
Below are prices and articles for good and high-quality high-voltage wires for VAZ cars, both for 16 and 8 valve engines.
| Manufacturer | Number of valves | vendor code | Price, (rubles) |
| Standard | 16 | 21120-3707080-81 | 990 |
| SLON | 16 | 2112-3707080 | 1450 |
| VOLTON | 16 | VLT-2112005 | 915 |
| TESLA | 16 | Т516M | 1710 |
| LADA | 8 | 21110-3707080-82 | 695 |
| TESLA | 8 | Т514M | 875 |
| Standard | 8 | T684H | 620 |
| Original | 8 | 21110-3707080-12 | 710 |
HOW OFTEN SHOULD I CHANGE GDP?
According to the recommendations of Avto-VAZ, replacement of high-voltage wires of the VAZ 2114 should be done every 30 thousand kilometers. In practice, motorists rarely comply with these replacement deadlines, since if the wires do not have any mechanical damage, they can travel about 100-150 thousand km.
When the service life is exceeded, the internal resistance of the GDP increases, which negatively affects the transmission of the electrical impulse. This leads to problems with ignition and acceleration dynamics, since when the supply of current to the spark plugs is delayed, the normal engine operating cycle is disrupted.
Change the wires every 25-30 thousand km and everything will be fine
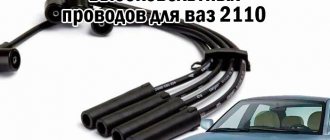
High-voltage wires VAZ 2110: Diagram, Design and malfunctions
High-voltage wires are an integral part of any gasoline car. It is this part that transmits such a powerful spark necessary to ignite the fuel mixture in the combustion chamber of the car. Armored wires are a part that quite seriously affects the operation of the engine and malfunctions in them or any damage can significantly reduce the technical characteristics of the engine and harm its stable operation.
This article examines in detail the topic of high-voltage wires, as well as which ones are best installed on a VAZ 2110 car.
Types of damage and malfunctions
- Breakage of current-carrying conductors in high-voltage wires.
- Damage to the wire insulation. Sometimes, just one accidental scratch on the insulation is enough for a current leak to occur that can cause problems.
- The conductor is oxidized. This damage is a direct result of torn insulation, which allows moisture to enter the core.
- High wire resistance. Here the fault lies with the manufacturer (alternatively, the car owner himself may be to blame for installing wires from a car of a different brand).
- Bad contacts. They in the wire caps wear out over time and no longer fit tightly to the spark plugs (or to the contacts on the ignition coil).
All of the above damage can lead to sparks and “stray” electromagnetic pulses that will interfere with the normal operation of the car’s sensors. In addition, if the conductor is broken, voltage will not be supplied to the spark plug in a timely manner. This will lead to the fact that the fuel-air mixture in the combustion chamber will ignite late, and one of the engine cylinders will always be “late”, that is, the synchronization of the cylinders will be disrupted.
Purpose
Gasoline engines operate by burning fuel in the cylinders, ignition is carried out using a spark plug, which generates a spark. The supply and distribution of current is handled by the ignition system, in which high-voltage wires play a very important role. Through them, high-voltage voltage is transmitted directly to the spark plugs from the ignition module. Transporting voltages reaching 15,000 volts is quite a serious task, which the wires must cope with without difficulty.
Video on repairing KZ VAZ
Ignition of gasoline in the cylinders of an internal combustion engine occurs using a spark generated by the ignition system. The ignition module is the main element of the system, creating a spark on the spark plugs using high voltage. Each car manufacturer develops and produces its own original module, but the principle of its operation is the same for all devices. During operation, deviation from the specified parameters or breakdown of the ignition module negatively affects engine operation until the power unit fails.
Installation of high-voltage wires
Regardless of the make and model of the car, all high-voltage wires have a similar design. Currently, armored wires are widely developed in modern cars and have many engineering solutions to increase their conductivity and insulation resistance.
The wires consist of:
- Conductor;
- Insulation;
- Tips for connection;
- Protective caps for tips;
Conductor
The conductor has several design options, and this depends on the quality of the wire, its manufacturer, etc. Each manufacturer tries to add as many new solutions as possible to their wires that can increase the efficiency of wires.
- Copper , the simplest and most outdated, requires additional noise suppression resistors;
- Non-metallic with metal coating. The central part is made of fiberglass and impregnated with graphite. It is possible to cover it with ferroplasts, which prevent interference from spreading. And finally, everything is wrapped around a thin metal wire, creating the role of a screen. Just like copper, it requires the installation of additional noise suppression resistors.
- Non-metallic , has a high distribution voltage. No additional resistors are required.
Wire insulation
To ensure safety and protection against breakdown of wires, as well as to bring high voltage to the spark plug, the insulation of the wires must be at a high level and provide reliable protection against breakdown.
- Single layer (Fig. A). A conventional shell made of polymers does not have the best insulating qualities, which is why it is almost never used;
- Two-layer (Fig. B). Much better than a single layer, it consists of an inner coating and an outer one. High degree of protection against dust, various technical liquids and temperature changes;
- Multilayer (Fig. B). The most advanced option on the market. It consists of an inner layer of insulation that protects the core from breakdowns. The braiding of the inner layer, thanks to it, the core is protected from breakage, deformation and other damage. And an outer layer that provides complete protection from external factors.
Tips
In cars, two types of connecting tips are used (on the spark plug side):
As a rule, on a VAZ 2110 car, wires with straight tips and L-shaped ones are installed, on one side the tips have a direct contact, it is connected to the spark plug, and the wires are connected to the ignition module with an L-shaped contact.
Products from Carden: main features
Products from this brand are used on cars of various brands: GAZ, ZAZ, VAZ and so on. The products are designed to operate at temperatures up to +180 degrees. The minimum indicator is minus forty degrees. The length of the wires may exceed the length of those products installed on the vehicle.
Carden high voltage wires
The characteristics of products from this company are high, since they contain two layers of silicone insulation. The company guarantees that the wires will withstand considerable voltage - up to 45,000 volts. Before installing new products, it is necessary to check the spread of their resistance. If it is too high, then you should think about replacing the old options.
Location
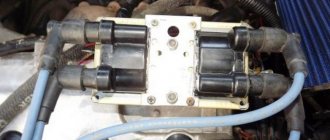
On VAZ 2110 injection engines, high-voltage wires are attached at one end to the ignition coil, which is located on the front side of the cylinder block slightly to the right of the center, and the other end is connected to the spark plugs. On carburetor engines, the circuit is exactly the same, only instead of a coil, the wires go to the distributor, which is installed to the right of the cylinder head.
Which is better?
SOATE devices manufactured in Stary Oskol have proven themselves to be the most reliable ignition modules.
Module structure
The module consists of two ignition coils and two high-voltage switch switches.
The coil generates a high voltage pulse, and it is a simple transformer with two windings, primary (induction voltage about 500 V) and secondary (induction voltage at least 20 kV). All this is assembled in a single housing, on which there is a connector for signal wires (from the engine control unit) and four terminals for high-voltage wires.
Symptoms of a problem
As a rule, high-voltage wires fail for the following reasons: breakage of one or more wires, oxidation of the core, degradation of the insulating material (which causes current leakage), damage or oxidation of the connecting tip.
Here are some signs of faulty armor wires:
- The engine starts with difficulty;
- The engine is tripping;
- Loss of dynamics and increased fuel consumption;
- Dips and kicks during acceleration;
- The formation of sparks on the surface of the wire is especially noticeable in the dark and at high speeds;
Errors
A module malfunction can also be determined using an error scanner. Error codes associated with the module are:
- R-3000, R-3001, R-3002, R-3003 and R-3004 - gaps in sparking, the module itself, spark plugs, high-voltage wires or the ECU may be to blame;
- R-0351 - the coil of cylinders 1-4 does not work;
- R-0352 - the coil of 2-3 cylinders does not work.
The scanner readings do not yet indicate problems with the module itself.
It is possible that the spark plugs are not working or the high-voltage wires are broken, but if we initially diagnosed them, then the fault lies entirely with the ignition module. In this case, we can repair it ourselves, or buy a new one, which is faster, easier and guarantees uninterrupted operation of the ignition system. Good luck to everyone, strong spark and good roads!
Examination
To begin with, you can simply inspect the wires for damage. If a visual inspection does not yield anything, you will have to arm yourself with a multimeter. To do this, you need to disconnect the wire, switch the device to ohmmeter mode and attach the probes to different ends of the wire. Resistance information will appear on the multimeter; the values should not exceed more than 20 kOhm, otherwise replacement is necessary. Thus, check all the wires.
If you don’t have a multimeter at hand, but you need to check the wires, then there is such a diagnostic method. You need a regular wire with ends exposed on both sides. So, short one side to ground (fix it to the car body), and drive the other side along the surface of the armored wire. If it starts to spark somewhere, the wire is faulty and needs to be replaced. This diagnostic can also be used to check the tips.
How to check the ignition coil of a VAZ
If the ignition coil is faulty, the engine will not start. A characteristic sign of a faulty coil is its increased temperature when the ignition is turned off. This is easy to determine by touch.
Signs of a faulty ignition module may include the following:
- hesitant engine starting or failure to start;
- failures during sudden changes in speed;
- high fuel consumption;
- two cylinders do not work, the engine is feverish;
- lack of dynamics;
- a sharp drop in power;
- drop in power and thrust after warming up.
These symptoms may not only be caused by the ignition module. To determine the malfunction, it is enough to spend a few minutes diagnosing spark plugs, high-voltage wires and caps. This will eliminate the remaining elements of the ignition system and make sure that it is the ignition module that is faulty.
Checking the ignition coil is performed in one of 2 ways. The simplest one is to remove the central wire from the breaker-distributor, bring it to the motor housing and turn it with the starter, and a running spark should appear. After this, we check the energy supply to a separate spark plug, for which we unscrew the working spark plug, bring its contact to ground and attempt to start the engine. In this case, the spark should come from the wire to ground. If it is absent, the reason will be a malfunction of a system element such as the ignition coil.
To check the module in the second way, we only need a multimeter, then follow the step-by-step instructions:
- We check the power supply and the presence of pulses supplied from the ECU. We check the power between the central terminal (15) of the wire block connected to the module and the engine ground. When the ignition is on, the voltage should not be less than 12 V. Otherwise, either the battery is dead or the ECU does not work.
- We check the pulses from the ECU on the wiring block. We install one tester probe on connector 15, the second on the far right, then on the far left. The assistant cranks the engine with the starter, and at this time we record short-term voltage surges with a tester. If there are no impulses from the ECU, it is he who is to blame.
- We check the resistance on the secondary windings of the coils. We put the tester in resistance measurement mode and measure it at the high-voltage terminals of the module cover. Between pins 1 and 4 and pins 2-3, the resistance should be 5.4 kOhm. Otherwise, the module must be replaced.
- We check the resistance of the primary windings between contacts 15 and the rightmost, then the leftmost terminals. Nominal - 0.5 Ohm. Deviation is not allowed.
- Check the module for a short circuit. In ohmmeter mode, install one multimeter probe on the central terminal, the second on the metal body. There shouldn't be any resistance. If the device detects at least some resistance (other than unity or infinity), the module must be replaced.
The cost of high-voltage wires for a VAZ 2110
Like any other spare parts for the domestic auto industry, armored wires have a low cost. The simplest ones with a copper core and single-layer insulation will cost about 500 rubles. Better and more reliable from 1000 to 2000 rubles.
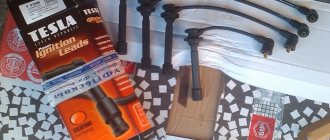
Which ones to choose
The most popular companies among motorists that are worth taking a closer look at:
- Tesla and its best models: T395S, T684H, T774S;
- Slon with GO series models for injection engines, model K-102;
- And also, original armored wires from AvtoVAZ;
In general, all these options are good, the choice depends only on the budget.
VAZ models 8 and 16 valves
Despite the similarity in engine design, the ignition system of the 1.5-liter injection 16-valve engine differs from the 1.6 16-valve engine. The 1.6 liter engine uses an electronic contactless ignition system with individual coils on each spark plug. Therefore, there was no need for an ignition module. Such a system is more reliable and cheaper to operate, since if one coil fails, there is no need to replace the entire module.
The 16-valve 1.5-liter VAZ 2112 injection engine used the same non-contact ignition system as the 8-valve engine, but a different ignition module was installed. Its catalog number is 2112-3705010. The design of the module remains the same - two ignition coils (for cylinders 1-4 and 2-3) plus switch keys in a single block.