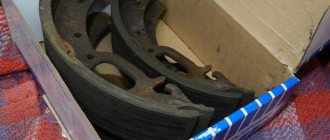
To find out when it is necessary to replace the rear brake pads of a VAZ 2110, you should focus not only on your own sensations or the appearance of squeaks when braking, but also on their actual wear.
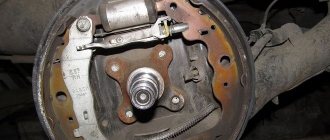
You can assess the condition of the pads through the inspection window without even removing the drum. To do this, remove the rubber plug in the dust shield, pry it off with a screwdriver, and look at the pads. Their thickness should be more than 1.5 mm.
Pry off the plug with a screwdriver
We remove it from the shield
If it is less, then they will no longer provide a quick stop after pressing the pedal. In addition, with such a thickness, the piston stroke of the cylinder will be greater than normal. Hence, leaks leading to loss of fluid, a drop in its pressure, that is, the entire braking system is at risk.
Rear wheel brake
Replacement of rear brake pads VAZ 2110, 2111, 2112
If, when braking on a VAZ 2110, 2111 or 2112, a motorist hears a grinding noise and feels vibrations, most likely the rear brake pads need to be replaced. There is no need to delay repairs. Traffic safety directly depends on the serviceability of the brakes, and the pads directly take part in stopping or reducing the speed of the car. The cause of the malfunction may be resource exhaustion. The average is 45 thousand km for the rear pair. The intensity of wear depends on operating conditions, so in an urban environment the pads wear out faster. Another reason for replacement may be malfunctions: destruction of the protective layer and exposure of the structure. You can take the car to a car service center or do the repairs yourself. It is important to understand the devices of this node.
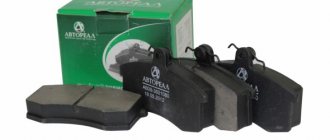
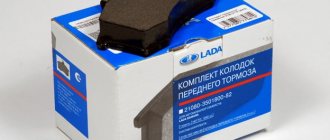
Required spare parts
Just 10 years ago, old pads were not replaced; they were glued on, linings were changed, or they were riveted. Today on the market you can easily purchase the entire mechanism. To replace, you need to prepare new pads. Experts believe that it is better to install replacement factory parts, article number 2110-3501080-60 (TIIR-260), 21100350180082 or 2110-3501080. There are other opinions. Some motorists believe that pads from well-known brands provide the best braking parameters on the VAZ 2110, 2111, 2112. These are parts from brands such as Brembo, ABS, Ferodo, TRW, Bosch, Optimal or Delphi.
Tool needed for work
Before you repair your car, you need to prepare the following tools:
- jack;
- pliers;
- hammer;
- long screwdriver or awl;
- a set of keys;
- wire cutters;
- heads for 7 and 30.
The work is also accessible to a beginner if he knows how to handle the tool. This way you can save time on a trip to a car service, and money. The average price for this type of work as of January 19, 2019 is 600 rubles. How to replace the rear brake pads of a VAZ 2110, 2111 or 2112 yourself will be discussed below.
Order of Operations
Compared to repairing the front pair on the above VAZ models, working with the rear elements is more difficult, since they have a drum structure. To ensure ease of operation, you need to place the machine on a level floor and jack up the rear part.
- First the wheel is removed. Behind it there is access to the dirty drum. It is necessary to completely loosen the handbrake cable, otherwise there will be problems with dismantling.
- The studs on the brake drum are loosening. If they are heavily oxidized, you can remove the part together with the hub; to do this, you also need to unscrew it.
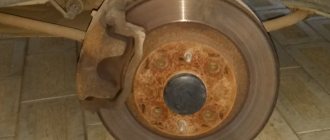
First you need to try to remove the drum. If that doesn’t work, you can coat the acidified areas with a brake or aerosol compound. This will increase the repair time, but will make the work easier. Then tap the part with a hammer through a mounting blade or wooden block.
You need to clean the shield from dirt. The condition of the linings should be assessed. Manufacturers recommend replacing them with a thickness of one and a half millimeters, but practice shows that it is advisable to use new ones even with a thickness of 3 millimeters.
New pads are mounted, the rod is pinned, the spring is installed with a screwdriver. Care must be taken to ensure that the cable housing does not come into contact with moving parts.
See the order of events in this video:
Let's summarize
Replacing both rear pads takes about 40 minutes. This does not take into account the application of compresses to welded elements. It is important to understand that these elements always need to be changed in pairs. Do not use gasoline or other aggressive compounds for cleaning. If these requirements are met, the results of the work will be of high quality.
THIS IS WORTH PAYING SPECIAL ATTENTION
Replacing rear pads on a VAZ 2112 has its own characteristics, without knowledge of which you can add unnecessary work and unnecessary problems to yourself:
- Loosen and tighten the wheel bolts only when the vehicle is on the ground. The instructions specify bolt tightening torques of 65–95 Newtons per meter (which corresponds to 6.5–9.5 kilograms of force per meter)
- The use of gasoline, diesel fuel or any mineral solvents for washing brakes (drums, pads, etc.) is not allowed, in order to avoid problems
- When installing old pads back, it is not allowed to replace the rear and front pads with each other, as well as to move them from the right to the left wheel. Such a rearrangement will lead to uneven braking.
- Brake pad sets must be replaced on both sides of the car at once.
- Check the fluid level in the brake reservoir; if it reaches or is very close to it, you need to pump out some of the fluid using a syringe. Otherwise, the brake fluid will overflow when you install new pads.
Tuning and repair of VAZ 2110
The pads should be replaced with a remaining friction lining thickness of 1.5 millimeters. How often to change them depending on the mileage is very difficult to say, since it depends on your driving style. The instructions, of course, say that replacement needs to be done every 10 thousand km, but... The rear pads wear out more slowly than the front ones. And there are cases that they begin to require replacement only after 60 thousand km.
Therefore, if the friction linings have a thickness of more than 1.5 millimeters and are not chipped, damaged, or oily, then do not rush to change them, they can still serve you.
Bottom line
The work is completed. For the first time, it is better to put detailed instructions in front of your eyes, so as not to get confused and make a mistake, it would be good to also watch video materials on installing brake pads.
The second time, this work will be performed automatically and will take no more than half an hour. The main thing is not to delay replacement: brake pads are a serious matter that cannot be tolerated, because they ensure the safety of the vehicle.
We wish you good luck and good mood!
Preparation for replacing VAZ rear pads:
- Buy new rear pads. Here, as they say, it’s up to your taste and color. There are a lot of manufacturers. I advise you not to go for the cheapest ones, as they have the same quality. But you don’t even need to go for the most expensive ones, unless you take your car into races where braking is of great importance.
- Pump out the brake fluid from the reservoir under the hood.
- Remove the handbrake
- Shift into first gear
- Remove one of the rear wheels
- Repairs will be made with the following tools: a screwdriver, a 12mm wrench, a rubber hammer, two pry bars and pliers.
Installation
Installation of the new element is carried out in the reverse order. Before installation, you need to thoroughly clean the brake mechanism from dirt using sandpaper. Degrease the seat with white spirit.
So, first you need to open the hood and add brake fluid to the maximum level. It is not recommended to mix different classes of products. Cars of the “tenth” family are filled with RosDot-4 class fluid
Please note that during pumping the level in the tank will drop. As soon as it drops 1.5 centimeters, you need to top it up again
Next we need an assistant. He will press the brake pedal at your command. So, unscrew the cap from the bleeder fitting and put the hose on it. We put its second end into a plastic bottle. We give the command to the assistant. He must press the pedal 5 times and at the last stage press it “to the floor”. At this time, you will observe how aired liquid flows out of the fitting.
Replacing the rear brake pads of a VAZ 2110
Many motorists have encountered in their practice such a procedure as replacing rear brake pads. This operation requires professional skills and experience, so if you are confident in your abilities, it is better to immediately go to a car service center and entrust the operation to specialists.
Before you start replacing, you need to make sure that the problem is in them. The main symptom of worn brake pads is an unpleasant squeaking sound that accompanies the braking process.
Rear brake pads wear out more slowly than front brake pads. But still, someday the moment of replacement will come. The service life of the rear brake pads reaches about 50 thousand kilometers, after which the effectiveness of the car's braking system is greatly reduced, and the handbrake becomes much worse.
As mentioned above, this operation is quite complex and only an experienced car enthusiast can cope with it, which is why, to make the task easier and save your nerves, it is better to prepare for it properly. You need to start by choosing a place to hold it.
This place should be equipped with an inspection hole or a lift. The fact is that during the replacement process you will need to carry out two operations that are almost impossible to carry out from the ground. For example, to remove the rear brake drum and replace the brake pads, you will need to release the handbrake cable. It will be very difficult to do this “from the ground”, even with a special key. Without this tool, you can only get to the equalizer and unscrew the nut by removing the resonator. And this is extra work that no one needs.
Also, quite often it is not possible to remove the brake drum without effort, due to the fact that it is tightly stuck. And it will not be possible to remove the drum using two M8 bolts, which are screwed into the threaded holes of the brake drum and press it from the hub (although you can, of course, try). In this case, you will have to knock down the brake drum using a hammer and a wooden adapter. It is not recommended to use a metal attachment to avoid crumbling the drum. This operation is not only quite difficult to carry out in a lying position, but also dangerous if the car is on a jack. Once you have decided on the location of the work, you need to think about tools and spare parts.
To work you will need:
- jack;
- wheel wrench;
- hammer;
- a special wrench for unscrewing the parking brake cable equalizer nut;
- screwdriver;
- pliers;
- steel wire;
- metal crank for tensioning the spring.
It is also very important to choose the right new brake pads. Many car enthusiasts are often tormented by the agony of choosing brake pads and this is not surprising. If you buy the cheapest ones in any market or store, then you should not expect quality from such a new thing. What you can get from this type of savings is:
- rapid wear of the linings;
- ineffective braking;
- extraneous sounds when braking (creaking and whistling).
As practice shows, as well as numerous reviews from car owners, the best option for brake pads for the VAZ 2110 are products from ATE and Ferodo.
Step-by-step instructions for removing rear brake pads
First of all, it is necessary to carry out all the preparatory procedures - lifting the car on a lift and removing the rear wheel. When the wheel along with the disk is removed, you will notice two guide bolts on the drum that need to be unscrewed. A 12 key is perfect for this purpose.
Now you will need to remove the brake drum. In most cases, this action can be quite difficult, since very often it happens that the drum literally sticks tightly and cannot be removed without some tricks. That is why we recommend that before starting work, run WD-40 liquid over all the cracks; if this does not help, then you need to knock down the drum with a hammer and a wooden block. It is highly recommended not to use metal products as attachments, as there is a risk of significantly damaging the drum.
- The next step is to remove the spring that tightens the pads using pliers or a screwdriver. After this you will need to disconnect the guide spring. This is the one that secures the brake pad to the shield.
- After this, you need to take the free edge of the block that is not directly attached to the handbrake yoke. This part is located closer to the front of the machine; it must be pulled to the side until it is removed from the support bar.
Replacing the rear brake pads of a VAZ 2110
Replacing the rear brake pads of a VAZ 2110
Instructions for installing new pads
- The first thing you will need to do is push the pistons of the brake cylinder inside as much as possible, connect the brake pad and the handbrake rod, and install the cotter pin back.
- Now you can install the guide spring back, connecting it to the brake shoe, after which you will need to attach the handbrake rod to the cable.
- The next step is to connect the top spring to the new brake pad that is installed, and the other end to the second new pad that is not yet installed.
- Now you need to rest the block on the corresponding heel of the brake cylinder and pull it by the lower edge so that the spring is tensioned and the installation of the bar becomes possible. Then we install the second block in the desired place, make sure that it fits into the slot of the bar.
- Using pliers, you need to engage the remaining spring with the block. It is necessary to ensure that the sheath of the handbrake cable does not touch moving parts. Then you need to put the brake drum in place.
- Finally, you need to tighten the guide bolts and put the wheel in place. After which the procedure for installing new rear brake pads will be completed.
At first, immediately after replacement, it is worth running in the mechanisms a little so that the pads get used to the drums properly, and only after that the braking efficiency will increase and return to normal.
Replacing the rear brake pads of a VAZ 2110
If your VAZ 2110 makes a terrible squeak that gets on your nerves when you start to brake, then it’s time to change the brake pads on the rear wheels. This can be done in two ways: entrust the procedure to their car service technicians, and change the worn part yourself.
If you want to change the pads yourself, you should not be afraid of the lack of special skills, knowledge and experience. The replacement procedure is quite simple and will not cause difficulties if approached correctly.
Next we will explain how to do this correctly.
Steps to replace a car's rear brake pad.
In addition to the jack and wheel wrench, you will need pliers, a large slotted screwdriver, and a 12mm wrench.
- Using the necessary tools, remove the rear wheel from the drum;
- Using a #12 wrench and two nuts, unscrew the studs securing the drum.
- Remove the brake drum by hand, opening access to the pads.
- Using a large slotted screwdriver or pliers, remove the spring that tightens the brake pads.
Removing old parts from the drum
We remove the handbrake rod from the old shoe and install it on the new one.
Don’t forget to secure it with a cotter pin, bending the ends with pliers or a screwdriver.
Installing parts in place.
- By inserting it into a special groove in the brake cylinder, we fix the block with a spring.
- We carry out the same action with the second part
- We secure the pads together with a spring. To make tensioning the spring easier, it is better to use pliers.
- Replace the brake drum cover
- Screw in the fixing pins.
Even if you do not have the necessary experience, the process of replacing pads on one wheel will take you no more than an hour.
If you encounter the problem of not being able to remove the studs from the drum, use WD-40 penetrating agent.
Actions required after replacement.
Upon completion of work, the brake system should be adjusted. The rear brakes should lock a little earlier than the front ones.
This is done as follows. At a speed of no more than 40 km/h, we brake sharply. If it feels like the front brakes are engaging earlier, use the brake pressure regulator located under the hood to reduce the gap between the bracket and the spring by 2 mm. Next, we test for braking again. By adjusting the distance of the lever, we achieve the desired result.
What kind of pads are installed on the VAZ 2110
Inexpensive and high-quality brake components for the VAZ 2110 are produced by the Russian manufacturer Artex. In the catalog, the pads are numbered 2108–3502090. At a low cost, no special problems were noticed with them, with the exception of the fear of prolonged overheating.
How to remove
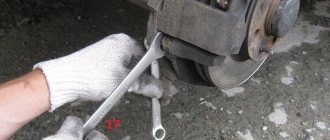
For this operation, you need to prepare key No. 17, key No. 13 and pliers. First we jack it up, remove the wheel as when replacing it, and prepare a set of new brake pads intended for the VAZ 2110. Next:
- Using pliers, bend the edge of the locking plate at the lower bolt on the wheel cylinder.
Using pliers, bend the edge of the locking plate
- We take wrench No. 13 and unscrew this lower bolt, but at the same time hold the guide pin with an open-end wrench No. 17.
Take key No. 13 and unscrew the bottom bolt
- We take out the lower bolt and plate.
We take out the lower bolt and plate
- We pry off the caliper and cylinder with a screwdriver and lift them up.
We put on the caliper and cylinder with a screwdriver, lift them up
- We remove the brake pads from their guide.
We remove the brake pads from their guide
We change the rear brake pads on a VAZ 2110 with our own hands
To find out when it is necessary to replace the rear brake pads of a VAZ 2110, you should focus not only on your own sensations or the appearance of squeaks when braking, but also on their actual wear.
You can assess the condition of the pads through the inspection window without even removing the drum. To do this, remove the rubber plug in the dust shield, pry it off with a screwdriver, and look at the pads. Their thickness should be more than 1.5 mm.
If it is less, then they will no longer provide a quick stop after pressing the pedal. In addition, with such a thickness, the piston stroke of the cylinder will be greater than normal. Hence, leaks leading to loss of fluid, a drop in its pressure, that is, the entire braking system is at risk.
Rear wheel brake
Device
Before disassembling, you need to know the structure of the braking system. The VAZ 2110 has hydraulic brakes with distributed circuits. One circuit is the front right and rear left mechanisms, the second circuit is diagonal.
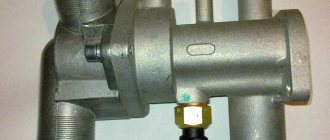
The hydraulic drive includes a (also dual-circuit) pressure regulator. It helps regulate the brake fluid pressure on the rear brake systems. It is through the regulator that the fluid flows to both rear mechanisms.
Hydraulic brake circuit diagram
Adjustment is carried out through four chambers. Their design is as follows: two are connected to the main cylinder, and two, respectively, to both cylinders of the rear brakes.
For high-quality braking, it is necessary that the entire system works smoothly, there is correct adjustment and reliable mechanisms.
Parsing order
It is better to carry out the repair operation on an overpass (you can use an inspection hole), or just a flat area with a hard surface, because you will have to remove the rear wheels, naturally, first jacking up the car.
- Remove the wheel and disk;
- We unscrew the guide bolts, of which there are 2, and remove the drum;
- A common problem is the drum sticking, so sometimes it is not so easy to remove it. The problem has long been solved by tapping a drum with a hammer (through a board);
- Using pliers, remove the tension spring;
- After this, a fixing guide spring holding the block;
- We remove the block from the support bar that is not connected to the handbrake rod. To do this, pull its free edge to the side and along the shield;
- Loosen the upper spring. To do this, you need to turn the block to the side until you can disconnect the spring;
- We do the same with the spring of the second pad;
- Remove the spacer bar;
- Disconnect the handbrake rod from the cable;
- We note to ourselves or sketch how the connection to the rod is made;
- Unhook the spring, remove the cotter pin, and disconnect the brake pad.
Thus, the disassembly process is completed.
Replacement
In principle, assembly occurs in the reverse order, although there are some peculiarities:
- To achieve normal brake fluid pressure, in the future, it is necessary to drive the piston of the brake cylinder inside;
- Connect the handbrake rod and the block, be sure to insert the cotter pin;
- Connect the guide spring to the brake pad;
- Connect the cable to the handbrake rod;
- Connect the upper spring to the installed new block;
- You need to rest the second shoe on the heel of the brake cylinder and pull its lower edge. The spring is tensioned, the bar can be inserted;
- All that remains is to insert the second block and place it in the slot of the bar;
- Using pliers, engage the spring with the second block;
- After making sure that the cable does not get affected by the movement of the parts that make up the brake mechanism, it is necessary to install the brake drum in place;
- All that remains is to tighten the guide bolts, then install the wheel.
We do the same with the other wheel.
Adjusting the pressure
First, you need to adjust the parking brake. This device always requires adjustment after repair work.
Secondly, the rear brakes are adjusted so that the system locks the rear wheels a little later than the front ones.
Knowing the structure of the brakes, loosen the bolt securing the pressure regulator, using a screwdriver, move the bracket of the regulator drive lever to create a gap of about 2 mm between the lever and its spring.
We carry out a test - we accelerate the car to 40 kilometers, then sharply brake. Someone observing the process from the outside notes whether the wheels are locked correctly. If the front wheels lock later than the rear ones, then the adjuster must be moved in the direction of decreasing the gap. Then test again until correct wheel locking is achieved.
Features of the system
VAZ 2110 cars have a special design. In them, the brake drums are controlled by different hydraulic drives, that is, the front and rear left wheels are controlled by one hydraulic drive, and the front left and rear right wheels are controlled by another.
The peculiarity is that these systems are interchangeable. If any circuit fails, the second one is able to provide insurance and prevent an accident.
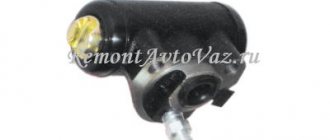
The hydraulic drive is based on four main elements - a brake cylinder, a brake pad, a rear brake shield and a guide spring. Moreover, the efficiency of the entire system depends on the integrity of the cylinder and its serviceability.
During operation, the unit may wear out, become damaged and fail. The only solution here is to replace the rear brake cylinder of the VAZ 2110.
Do-it-yourself replacement of rear brake pads on a VAZ-2110
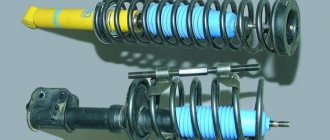
A car is a whole complex of complex systems, components and mechanisms. An integral part of any vehicle is the braking system. On VAZ cars of the “tenth” family, disc and drum mechanisms are installed on the front and rear axles, respectively. The pads are compressed by a hydraulic drive.
Over time, these elements wear out and require replacement. In today's article we will find out how to replace the rear brake pads on a VAZ-2110. See photos and instructions below.
Main features
There are several symptoms by which you can determine the wear of these elements:
- Increased brake pedal travel. It becomes softer and only grips at the end. This reduces the braking efficiency of the vehicle. This significantly affects traffic safety. Similar symptoms can occur with brake fluid leaks. But if its level is in order, and there are no drips on the tubes and connections, then the rear brake pads on the VAZ-2110 need to be replaced.
- Increased travel of the parking brake lever. If the pedal can be soft even if the front pads are worn out, then a weak handbrake indicates wear on the rear ones. How to determine whether the lever stroke in a car is normal? To do this, place the car on an inclined surface (at least ten degrees) and tighten the handbrake. If the car rolls down, it means the cable is loose or the rear pads are worn out. You can also count the number of clicks on the lever. In normal condition there should be 3-4. If there are 5 or more of them, then you need to replace the rear brake pads on a VAZ-2110.
- Characteristic creaking noise when braking. Subsequently, it can develop into vibration. In this case, the friction material is completely worn out, and the lining is in contact with the drum mechanism with bare metal. Driving with such a symptom is extremely dangerous. At one point, the pads can simply jam, not to mention the crazy wear caused by metal-to-metal friction.
- Minimum thickness of friction material. Unlike previous cases, this can only be found out by removing the drum cover. Experts note that the thickness of the friction material on the rear drum mechanisms of the “tens” should be at least one and a half millimeters.
Resource
As for the resource, no one gives specific figures. It all depends purely on the driver’s driving style. Some people only have pads for six months, while others don’t change them for years. With a calm driving style, the rear pads on the “ten” are enough for 100-150 thousand kilometers. The front elements are subject to much more wear. They should be changed after 40 thousand. But again, it all depends on your riding style.
Tools
In order for the replacement of rear brake pads on a VAZ-2110 to be successful, we will need:
- Balloon wrench.
- Jack.
- Flat and long nose pliers.
- Screwdrivers (slotted and Phillips).
- "7" head and knob.
Let's get started
So, how do you replace the rear brake pads on a VAZ-2110 with your own hands? First we need to place the car on a flat and hard surface. The presence of a hole is not necessary.
We remove the car from the handbrake and put it in gear. For greater stability, we install anti-roll bars in front. Then we remove the wheel bolts from the rear and lift the wheel. Next, we take it completely out and start working with the drum. We need to unscrew its guide pins. Please note that they may be difficult to remove. Use liquid key lubricant. As a last resort, unscrew the rear hub nut using a 30mm wrench with a long lever (on a dressed wheel). Next, take out the drum cover and, using long-nose pliers, remove the cotter pin from the left side. Using pliers, disconnect the lower spring that tightens the pads.
How do you then replace the rear brake pads on a VAZ-2110? After that, we move on to the springs located on the sides. They hold the brake pads for greater stability. We also remove them out using pliers. At the next stage, we push the lining from above. To do this you need to make every effort. When the pads are stretched, the plate will fall down. Next, the pads can be safely removed out.
But replacing rear brake pads on a VAZ-2110 does not end there. Below we highlight some points that should be taken into account when installing new pads on a car.
Installation
Now we take a set of new friction linings out of the box and put them in place. We will need to install the cotter pin and drive arm pin support washer. The upper ends of the pads must fit exactly into the grooves of the piston. The slightest distortions are excluded. To bring the pads together, you need to move the piston to the center of the cylinder. To do this, you can use a mount. To finally bring the pads to the drum, press the brake pedal two or three times. Further assembly is carried out in reverse order. If the pads are difficult to get in, your handbrake cable may be too tight. It needs to be loosened and then adjusted. How to do it? We will talk about this below.
Setting up the parking brake
To do this, we need access to the bottom, so we put the car in a pit or lift it up as much as possible. To adjust the handbrake on the “ten”, it is enough to have two open-end wrenches “13” and pliers. First, we sit down in the cabin and pull the lever until the first click. Then we go down into the pit and find the tension adjustment nuts on the bottom.
note
When replacing rear brake pads on a VAZ-2110, other difficulties may arise (for example, dirty cylinders in the drum). Do not use gasoline, kerosene or other mineral solvents to clean them. Use only specialized products that are sold in spray form. The product is called “Brake Cleaner”. Judging by the reviews, products from TRW have proven themselves well.
Also note that the pads are replaced in pairs on both wheels. This way you will eliminate problems with the effectiveness of the handbrake and the operation of the system as a whole. In total, you will need 4 pads to replace (two on each side). Their cost for the “ten” is small - about 500-700 rubles per set. As for manufacturers, many motorists recommend installing pads from NIPPON (Japan).
Setting up the parking brake
To do this, we need access to the bottom, so we put the car in a pit or lift it up as much as possible. To adjust the handbrake on the “ten”, it is enough to have two open-end wrenches “13” and pliers. First, we sit down in the cabin and pull the lever until the first click. Then we go down into the pit and find the tension adjustment nuts on the bottom.