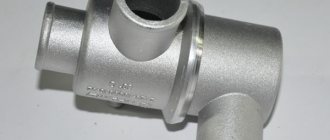
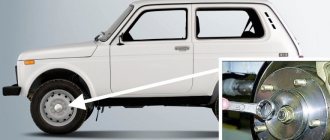
It all started with an article in ZR, but I repeatedly postponed such a rework until better times. Then a message from Mason appeared, from which it followed that everything was much simpler and there was no need to mess with soldering. Then Trener and I decided to test everything on our own cars, without waiting for the next winter. Here is a drawing of a thermostat made by a Mason:
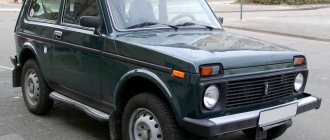
The thermostat was originally installed on a 2000 Fora. with engine 21213 (hereinafter referred to as “Option 1”), then to Niva 21213 1995 (hereinafter referred to as “Option 2”). The thermostat was installed identically on two cars, but the supply of two (out of five) hoses was done differently, so the beginning of the article will be the same for two cars, and then the options will be described. When installing in the Fora, the task was to make the most of the available parts and not take up extra space under the hood (at the same time, option 1 is more labor-intensive and time-consuming), in option 2, when installing on the Niva, we decided to simplify the task and take the path of least resistance. The owner is the master, so which option to choose for himself - let everyone decide for himself, depending on WHAT the driver wants to see under the hood of his car and how much time he has for this alteration.
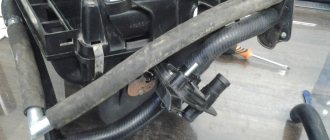
For the operation according to option 1, the following were used: · a brass thermostat from ShNiva (judging by the logo - Stavrovo); · antifreeze; · two lower hoses and one upper one from the standard thermostat (one of the lower hoses will be used instead of the middle one); · high temperature sealant (for example, red Abro); · gasket between the coolant drain pipe from the heater (the pipe is numbered 24 in the diagram from the Illustrated Album) and the engine; · a self-made metal plate to the size of the gasket indicated above, with holes for fasteners, but without a central hole; · clamps in assortment; · M8 bolt 10-15 mm long; · hose from the cooling system 08-09 (photo below); · the ability to work with an 8 mm tap, a hacksaw for metal and a file.
For the operation according to option 2, the following were used: · an aluminum thermostat from Shniva (judging by the logo - Stavrovo); · antifreeze; · two lower hoses and one upper one from the standard thermostat (one of the lower hoses will be used instead of the middle one); · clamps in assortment; · hose from the Gazelle heater (internal diameter about 18 mm, length 1 meter, cut to size); · wheel stud from "Gazelle".
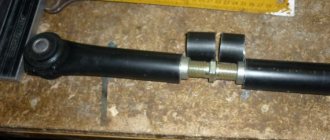
So, drain the coolant and remove the old thermostat. For implantation according to option 1, take an 8 mm tap and use it to cut a thread in the thinnest pipe of the thermostat. We take the bolt, put heat-resistant sealant on it and screw it into the pipe. If you choose option 2, neither thread nor bolt will be needed. Installing the thermostat requires 3 thick hoses: the upper one (the same as before), the middle one (the old middle one is not needed, we use the old lower hose, cutting it on both sides to the required length), and another lower hose. Next, you need to try on how much one of the lower thermostat hoses should be cut (it will be used instead of the middle one). In the photo from left to right: standard middle hose, cut bottom and original bottom hose:
Roughly speaking, you need to cut the straight sections of the hose so that about 2 cm remains from each straight section for putting on the thermostat and engine pipes. We connect the lower and middle hoses to the thermostat to get this design:
You may have to cut the middle (formerly lower) hose several times, following the rule “Measure seven times, cut once.” We put on the upper hose. Yes, it will raise the structure a little, but there’s no way without it. This is not to say that the new thermostat fits like a glove, it will be “pulled” up just a little, but the authors think that this is not fraught with anything serious. If you are sure that a more precise fit is not possible, you can put on the clamps and tighten them, or do this later to free up space for further work.
Connection of hoses leading from the heater and carburetor heating unit
For ease of operation, remove the generator ventilation hose. From the metal coolant drain pipe from the heater (it runs behind the “pants” and the starter shield), remove the heater outlet hose and the coolant drain hose from the carburetor heating unit. Unscrew the two nuts securing this tube to the pump (at the right end of the pipe):
Loosen the nut that secures the starter shield under the air heating pipe (closer to the left end of the pipe):
We remove the tube from the engine, move it to the left along the engine (towards the gearbox) into the tunnel and remove it from behind the “pants” and the starter shield. This is the only way we could remove this tube, maybe there is a better way. We clean off the remaining paper gasket from the flange of the tube and the engine. Using a hacksaw, we saw off the flange from the tube (as close to the flange as possible), removing the burrs. We cut out a metal plate to the size of the flange with holes for fasteners; the central hole should not be made. With this plate we will close the hole in the motor that formed after removing the tube. Now we put the following sandwich on the pipe mounting studs in this order: a pre-purchased flange gasket, lubricated on the engine side with a heat-resistant sealant, then a manufactured plate, lubricated on the same side, then a sawn-off flange. We put on the nuts and tighten the “sandwich”. You should end up with something similar to this:
We pass the tube behind the “pants” and the starter shield. We managed to do it in reverse order, i.e. first push it with the curved end into the tunnel towards the gearbox, and then towards the front of the car. While we were wondering how the tube would be reinstalled, we sawed off the hinge that attached it to the engine, but perhaps this should not have been done. If you decide to leave the loop, it makes sense to put it on the stud and tighten it with a nut later, when all the hoses are put on, since it will be problematic to put the hoses on the fixed tube. So, on the tube located behind the starter shield and “pants” we put on the coolant outlet hose from the heater and the coolant outlet hose from the carb heating block, tighten them with clamps, and then proceed to selecting and cutting a suitable hose that will connect the metal tube in place of the cut flange with thermostat. The picture that appeared to our eyes suggested that in order for the hose not to be pinched and the coolant to flow unhindered, a hose in the shape of the letter “S” would be most suitable. A set of hoses for the VAZ 08-09 heater was purchased, and this one was considered the most suitable:
If I'm not mistaken, one end is slightly thicker than the other - this will need to be kept in mind when you decide which side and by how much it should be shortened. Since there is a thickening at the end of the thermostat pipe, but not at the end of the cut pipe, it seems advisable to connect the thicker end of the hose to the thermostat, and the thinner end to the tube. We cut off the ends of the hose that are redundant, put the hose in place, tighten it with clamps, and install the thermostat. In my version, it turns out that the metal tube is supported by only three hoses. It is quite possible that the pipe hanging on three hoses will dangle and rattle against the starter shield, but I do not hear this noise. At this stage, you may need to put its loop on the nut that also secures the starter shield (on the right, the nut is in the lower right corner):
Make sure that the rubber hose “metal pipe-thermostat” does not rub against the flange mounting studs. We check the tightness of the clamps, put back everything that was removed during the work, and fill in antifreeze. This is what the transplanted organ looks like:
What was and what became:
I had no complaints about the standard Stavrovsky thermostat that came from the factory; it regularly maintained the operating temperature, and the engine reached it quickly enough, but the temperature in the cabin could not be called comfortable for a long time. (A small note: for the winter I remove the standard Carlson, and I only have an additional, electric one). Since my trips were mostly short, the interior usually finally warmed up by the time I had to get out of the car. Now hot (namely “hot”, not “warm”) air begins to flow from the stove when the coolant temperature reaches 90 o. The engine warm-up time decreased slightly, but I did not measure the difference in time. The greatest effect should be expected when the temperature outside drops to -10-15 o and below. I had a chance to drive at a temperature of -12 o, and this is what I can say: About 20 minutes after the start, it became hot in the car, I began to turn on the heater only at traffic lights. At speeds of 60-80 the heater was turned off - not because it was noisy, but because it was hot. The engine is also warmer: with the old thermostat, coolant entered the engine at a temperature lower than the required one; now, with the new thermostat, turning the heater on/off will not affect the coolant temperature. Anyway, I wish I had had the “implantation” done sooner!
Thermostat from Shnivy to Niva (2121)
Thermostat from Shnivy to Niva (2121)
Message by Anatoly » 10 Dec 2010 22:20
An article in the magazine “Behind the Wheel” made me think about improving the standard cooling system, because cooling the engine in winter is a real problem. There was no desire to solder an additional pipe into the original thermostat, so I settled on the option of replacing the thermostat with a Shnivovsky one. Having additionally studied the articles on Niva-faq by Turner, Mason and Chocolate Hare, as well as St.Rangera, I made a shopping raid, as a result of which I purchased:
Thermostat LUZAR — 340 rub. Set of pipes LUZAR VAZ 21213 - 300 rub. Clamps in assortment 200 rub. (a few left) Hose Ø16mm - 90 rub. meter (I took a meter) Sealant - 40 rubles. There was about 0.5 liters of antifreeze.
Let's start the installation: Drain the antifreeze, dismantle the thermostat along with the pipes. We are figuring out the location of the new thermostat, I decided to put it higher and in a horizontal position, as was done on Shnivy. We cut the pipes according to location. In general, nothing complicated, except for a couple of points: I plugged the outlet from the stove into the block with a stud of the GAZelle wheels, ran a hose from the outlet pipe of the stove to the thermostat (there is an electric pump in the section), put a suitable hose on the carburetor heating nipple (on the thermostat) and plugged it with a bolt. Fill with antifreeze and remove the plugs. ALL!
Installation time - 4 hours with swearing and smoke breaks, without much stress. It feels like - I start the car, turn on the heater - warm air blows from the heater when the needle moves at the “50” mark, as it warms up the heat increases. As a result, at idle the car warmed up to 80 degrees in about 7 minutes! At an outside temperature of -13°C, while driving the engine warmed up to 90°C and the needle froze. The air came out of the stove hot, and then the “Piano in the Bushes” came in, or rather the electric pump from the GAZelle! And this whole thing is blown through by a heater motor from a VAZ-2108! Can you imagine what Tashkent is like? And I felt
RESULT: with the heater on, the car warmed up to operating temperature, just like with the original one WITHOUT turning on the heater! The engine operating temperature reached REAL 90°C. Due to its simplicity, cheapness and USEFULNESS, I advise you to take care of this alteration. Due to the transfer of the thermostat higher, to replace it it is enough to drain the antifreeze from the “stove-thermos” pipe, unscrew the 4 clamps and repeat the assembly in the reverse order. I'm happy, like an elephant! Plus, it seems to me that the plugged “nipple” for heating the carburetor can be used to bleed air from the system, so it is level with the intake manifold.
International NIVA Club
| Forums |
- Unanswered topics
- Active topics
Photo gallery NIVA-SHOP Files Video
- List of forumsAuto - EquipmentTechnical section Lada 4x4 NivaEngine - general questions
- Search
Links
- Unanswered topics
- Active topics
- Search
Cooling system. Radiator. Thermostat.
Re: Cooling system. Radiator. Thermostat.
Post by malunin » 24 Feb 2022, 09:51
Re: Cooling system. Radiator. Thermostat.
Post by Mikhail Belaya Niva » 24 Feb 2022, 10:55
Re: Cooling system. Radiator. Thermostat.
Posted by al-awast » 24 Feb 2022, 13:43
Re: Cooling system. Radiator. Thermostat.
Post by Touareg » 24 Feb 2022, 21:06
Re: Cooling system. Radiator. Thermostat.
Posted by al-awast » 25 Feb 2022, 04:53
Re: Cooling system. Radiator. Thermostat.
Post by Stasyan » 25 Feb 2022, 08:04
Re: Cooling system. Radiator. Thermostat.
Post by Rastopchuk » 25 Feb 2022, 09:25
Re: Cooling system. Radiator. Thermostat.
Post by Anton773 » 25 Feb 2022, 09:48
Re: Cooling system. Radiator. Thermostat.
Post by Mikhail Belaya Niva » 25 Feb 2022, 09:54
Re: Cooling system. Radiator. Thermostat.
Post by Stasyan » Feb 25, 2022, 10:17 am
I just have to change the radiator anyway; it’s just in terrible condition and it’s leaking! He's still bigger and has no throat! So let's say it's a closed system.
As for the installation like on Drift2, I didn’t want to! When replacing the radiator, I want to install electric screws from 214 to different temperature sensors such as the ShN principle! and there he deepens the radiator into the TV in order to install a larger screw!
That's why I asked the question. maybe someone did the same. I would be glad to know all the nuances and pitfalls
Added after 4 minutes 13 seconds: And the desire to install all this so that the operating temperature is around 90.
In winter it’s a little cold, I just installed the 08 snail and in the 2nd position of the heater there is not enough heat to supply to the side and legs!
Replacing the thermal switch
How to replace the timing belt on a Chevrolet Lacetti with your own hands?
The thermostat is replaced if the engine's thermal conditions are violated. This usually happens after 60 thousand km. The replacement process is not difficult. It is not necessary to completely drain antifreeze or antifreeze from the system.
Required materials and tools:
- screwdriver;
- new clamps;
- sealant;
- Coolant for topping up.
1.Loosen the screws on the five clamps, using a screwdriver, tightening the pipes.
2.Pull off the rubber pipes from the thermostat housing.
3.Remove the old thermostat.
4.Install the new device in reverse order. Before installation, lubricate the joint with sealant. Tighten the new clamp screws securely with a screwdriver.
Replacing the thermostat - step-by-step instructions:
In the NIVA 21214 car, the valve is conveniently located; there is no need to dismantle adjacent elements.
No special tools are required - just a Phillips screwdriver is enough. You may also need a flat blade screwdriver to pry up stuck hoses. Drain some coolant to a level below the connection between the pipes and the valve. Cover the generator with plastic wrap. If antifreeze gets inside the generator, this will entail a labor-intensive operation to clean and dry it. It is even possible that electrical equipment may fail, and the generator will have to be replaced. Next, you need to loosen the clamps on the inlet pipes and check their free movement. When replacing, do not pull off the hoses with a sharp movement, as this may damage the pipe or cause injury.
After making sure that the joints are not stuck, unscrew the clamps until they sag and separate the pipes. Be prepared to catch any leaking antifreeze; you can use a rag to cover it. Inspect the supply pipes. If there are cracks or large creases, replace them. After removing the part from under the hood, inspect it for fallen springs or other metal parts.
If there is a foreign object left in the pipe, you will have to change the water pump as well. Before installing a new thermostat, thoroughly wipe the internal surfaces of the pipes to remove any deposits. Be careful not to allow debris to get inside the cooling system. Attach the new valve in reverse order. First, tighten the screws fully and check the connections for rubber kinks. Then crimp the clamps all the way. Add antifreeze to the standard level and start the engine. Check the joints for leaks. Check the functionality of the thermostat by touching the hoses of the circuits.
Manufacturers and types
Do-it-yourself improvements to the Niva 2121 "
Standard sizes of thermostats, which by their design are suitable for installation in the engine of a Chevrolet Niva car, are produced by a number of global companies. The table below presents a list of products.
| Model | Product serial number | Opening temperature |
| Thomson | 21230-1306010-05-0 | 80° |
| Zommer | 2123-1306010 | 80° |
| Metal Inkar | 2123-1306010-01 | 80° |
| Pramo | 2123-1306010-02 | 80° |
| WEEL | 182-0114 | 80° |
| Luzar | LT0123 | 80° |
| Herzog | HL36010 | 80° |
| Vkt | VT29003 | 80° |
| Fenox | TS009E7 | 80° |
| Finord | 21231306010 | 80° |
| Baker | 21231306010 | 80° |
| Finwhale | FinwhaleT123 | 80° |
| Gallant | GLTH14 | 80° |
| Hofer | HF 445 730 | 80° |
There is an opinion among car owners that the highest quality, reliable and durable thermostats are products produced by Russian factories. There are currently three such enterprises:
- City of Stavrovo, Vladimir region, ATO plant;
- City of Rzhev, Tver region, PRAMO plant;
- City of Vladimir, Thomson LLC.
Among foreign models, car owners have good reviews of the Metal Inkar model from the Polish manufacturer.
These products work great in the Chevrolet Niva cooling system, the engine warms up quickly, there are no complaints.
The only negative is that the body is made in two versions - plastic and brass. The second option is not very popular among drivers, although it also works well in a circuit.
Zommer, Luzar, WEEL thermostats should only be selected from approved manufacturers. There are a lot of fakes on the market and on the Internet. Retailers seek to sell their dubious products under the guise of original ones to newcomers in the automotive business. To avoid getting burned, when purchasing, you must require licenses, certificates and supporting documents from sellers.
Choosing a new pump
The range of commercially available pumps is very wide. Well-known pump manufacturers include Hepu (Germany), NK (Holland), Airtex (Spain), Graf (Italy), SKF (Germany - Spain). Among the manufacturers, it is worth highlighting Hepu and Graf. Pumps of these brands use large impellers made of cast iron. Such impellers last much longer than steel and plastic ones. The TZA 2123 pump for the Chevrolet Niva, with reinforced bearings and oil seal, has proven itself worthy. This brand is a leader in the budget segment. In fact, this is the same pump as on the VAZ Kopeyka. Unfortunately, there are many fakes of this pump on the market.
Installing a thermostat from a Chevrolet Niva - Lada 2106, 1.7 l., 2003 on DRIVE2
Tuning Niva 2121 with your own hands (photo video)
Anyone who follows my BZ must remember the war between me and engine overheating (unless they are veterans of some Afghan war). As a result, after a long confrontation, I won and took thirtieth place in this category... from the endwww.drive2.ru/cars/ lada/2…/288230376152379421/#postyes I won so much that the needle didn’t want to reach 90 (apparently I did a lot of damage to the whole system), even when I covered the radiator with cardboard, hammered it with boards and covered it with bricks (and this was in October). That’s when I thought about it and imagined that in winter it wouldn’t be as warm as with a diesel engine.
Therefore, remembering an article I read a long time ago from the magazine “Behind the Wheel” www.zr.ru/articles/41822/I decided on such a revision. For the rework it is necessary: 1. Thermostat for Chevrolet Niva2. A pair of L-shaped pipes for draining antifreeze from the stove3. Clamps 4 pcs. 4. Possibly radiator pipes (I did without them) 5. Remove old parts 6. Patience and willpower
There are now plenty of articles on the conversion all over the Internet, so I won’t explain it in detail - they are not very suitable for demonstrating such things. I’ll just briefly write what needs to be done. Drain/suck out the antifreeze/antifreeze/water. Remove the old thermostat. We unscrew the tube from the pump through which coolant flows from the stove. We saw this tube approximately in half. We plug the hole where it was previously connected.
The hole in the pump is plugged, and the tube that was there before now leads the coolant to the thermostat
We install a new thermostat from Shnivy. Through L-shaped pipes and a cut tube we connect the drain from the stove to the thermostat. We also connect the pipe coming from the manifold to the thermostat. We fill in the coolant, bleed the air and rejoice at the work done if nothing leaks. If it flows, it’s a pichalka. We dig into the system with sealant and straight hands.
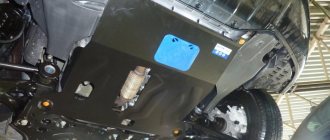
This is how it all looks to me
PS: During the conversion I encountered one problem. The angle of entry of the pipe into the thermostat from the radiator differs from the classic one, so you will have to puff.
Then, while the coolant was drained, I installed drain valves for myself, so that later it would be easier and without loss to drain the antifreeze, otherwise it costs money and I don’t want to pour it on the ground.
Radiator tap
Faucet on the block
Well, after the work was done, I went for a ride and checked the work... I couldn’t resist and stopped to take a photo against the backdrop of such beauty, although I don’t like this time of year, when the hellishly hot summer ends.
Well, after driving, I noticed that, as promised in the article, the coolant temperature does not drop when the heater is turned on. No, of course it drops a little (I noticed this when standing in a traffic jam and watched the fan turn on; with the heater on, it turns on less often). And when driving, the thermostat stably maintains its assigned 80+-2* degrees. Some people write that the engine warms up faster, but this is not so. If the thermostat is working properly, the warm-up time will be the same. The only difference between them is that the Shniv thermos keeps a more stable temperature on a WARM UP engine. And the engine temperature does not drop so much when the heater is turned on.
If anyone is interested or unclear, ask... someone =-))))
Thermostat and pump from Chevrolet Niva - Lada 4×4 5D, 1.8 l., 2005 on DRIVE2
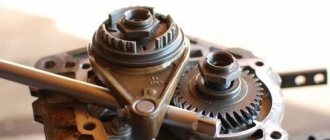
After reading the forums, the idea came up to install a thermostat and pump from Shniva.
The thermostat on Shniva works “more correctly” due to the fact that it has two additional inputs from the interior heater return and throttle heating. And the Shnivy pump has larger blades and a reinforced bearing with double seals.
We will need: - thermostat 2123 - pump 2123 - a set of cooling system pipes for 21213 - a hose from UAZ with a diameter of 18 mm (1m) and angles for it (6 pcs) - clamps in abundance - a short pipe for the thermostat from 2108 - a lower pipe for the radiator from the thermostat from Shnivy (or a pipe from a Priora which we cut off locally)
I decided not to split hairs and chose the Shniv location of the thermostat (lying down). This requires a minimum of modifications.
We unscrew the heater return line (the tube running below the manifold) and, sawing off the flange attaching to the pump, throw it away. Some people redo it, cut it, but I decided to do it differently. We weld a hole in the flange and screw it into place with sealant. We connect all the pipes to the thermostat and only the stove return remains. I made it from an 18-gauge hose and corners. Passed it in front of the collector. You can see everything in the photo. Having collected and filled the antifreeze, we remove the plugs and watch the work.
Effects: - quick warm-up - beyond 95 degrees the temperature did not rise even once during the day - the stove blows hot air even at speed 3 of the figure-eight snail
I am very pleased with the result of the work))
As it was here
stove return. Having installed the filter, I realized that the hose was in the way and I had to shorten the elbow and run it higher, a couple of cm from the manifold.
Issue price: 1,500 ₽
Grant thermostat for VAZ classic
653
October 13, 2016
Ivan Ivanov
The Shnivo thermostat from the Luzar company gives the same Tashkent. Its intake from the cylinder head is narrower and draws more liquid through the stove. It works in the same time as the others and is better than the Polish Metal-incar, which likes to jam. Operated the car in Siberia down to -45. There is heat from the stove when the temperature needle moves from zero. Paired with a thermostat is a radiator valve. Native removed. Up to -20, warming up the cabin to a comfortable temperature in 10 minutes. At -40 minutes 20-25, because The engine idles for a long time.
IG-Technique
I have a classic engine with a volume of 1.6 liters, compression ratio = 13.11 compression = 16 kg/cm2, standard cooling system, aluminum radiator, in the summer on hot days the temperature in the engine compartment reaches 80 degrees Celsius, everything works and does not overheat.
Show me how it works on the car.
Andrey Vasiliev
Look, if you change the iron tube on the pump to another one where the piss is located near the stove, will it be better or will the circulation be better or worse?
Vladimir Shestakov
Complete nonsense. I installed a thermostat from a John Deere combine, it’s really big, I had to cut a hole in the hood, but it dries the grain and my feet feel warm!
Sanya SHS
Damn how many people have you fooled here!
Sanya SHS
How will he behave when we close the stove tap in the summer? The circle will close. There is no faucet on the grant and it is designed for the grant, there is no need to deal with bullshit.
Evgeny -Pechorsky-
An interesting option, but for a small circle the diameter of the siphon will be too small, there will be an additional load on the pump, as well as on the engine itself at increased speeds, the excess resistance will begin to take away torque when working only on a small circle, just like the power and efficiency of the engine, and it is also possible cavitation in the pump which will kill the impeller and more. It is already there; when disassembling, you can see how the liner of the first cylinder opposite the pump outlet is snapped. Plus, the supply to the stove will need to be organized through a tee, otherwise, with the valve covered and especially closed, the above-described effect will only intensify, and the engine without circulation will generally overheat, especially the cylinder head. I wouldn’t risk betting in this option. It seems to me that you need to throw out the saxophone, make one similar to the diameter of the Grant hose and turn around the pump inlet, or turn it off, and make a tee between the hose going to the bottom of the radiator and the pump and connect a small circle from the thermostat there, to which the stove will also be connected through a tee , the entrance to the stove will remain standard from the head.
Alexander Vovchuk
Many thanks to the author! I installed this thermostat today. I didn’t bother with the adapter plate, but simply welded the thermostat to the outlet pipe, cutting off all the excess from it (after removing the inside of the thermostat for the duration of welding). In the Tashkent cabin, the temperature according to the sensor is a little more than 90°, and the engine warms up much faster. Very pleased, thank you again. Niva 21213
Show me how it works on the car
TOP thermostat models
The list of thermostat manufacturers for Niva is quite large. The average price level for a device is around 500 rubles. Based on reviews, the most popular models for 2020/early 2021 will be:
| Manufacturer | vendor code | Price |
| Lugar | LT 0123 | 540 |
| Lugar | LT 0124 | 660 |
| LADA | 21230-1306010-83 | 680 |
| Belmag | BM.0240 | 390 |
| Pilenga | Tt-P 4002 | 350 |
All thermostats from the listed manufacturers are of the required level of quality and are recommended for purchase by many automotive professionals. It is difficult to determine which is better from the list. All of them interact well with the standard Chevy Niva engine cooling system, passing related tests for trouble-free operation.
Lada 4×4 3D VYATSKAYA GUN › Logbook › Installing a thermostat according to the principle of the NIVA-Chevrolet scheme.
For a long time I was planning on switching to a thermostat from a Chevrolet Niva on the Niva, before that it was installed on the 2106... Unlike the native one, a more thought-out scheme ensures: - supply of coolant/oil directly to the cylinder block. - Air pockets are quickly expelled. - Faster warm-up motor and, as a result, the heater heats up faster in winter.
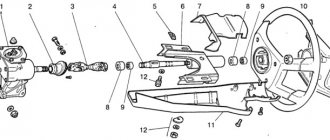
For the remodel you will need:
-2 pipes (in the picture No. 1 and No. 16) -Hose of 18 mm in inner diameter to the stove. -Hose from the expansion tank to the radiator (now this will be the return (in the picture No. 13) -Expansion tank (I took from 21214) - Chevrolet Niva thermostat. - Plug for the coolant/oil supply channel to the heater from the pump. (I made it myself) - Clamps (it is advisable to take NORMA GM, very high quality.
And in detail:
We remove all the old parts of the coolant/oil system and attach the thermostat to the pump with the purchased hose.
From the old hose we cut out a new pipe from the thermostat to the head.
We adjust the purchased hose from the thermostat to the radiator in place...
After that
Take a purchased hose with an internal diameter of 18mm
And pull it onto the upper pipe of the stove.
We connect the carburetor heating to the smallest fitting of the thermostat. I recommend using a very strong oxygen hose…
We install a pump plug made from a former pipe.
The radiator fitting, which previously served to supply coolant/fuel from the expansion tank, has a double cross-section; we attach a hose to the smaller one.
And we pull it into the new expansion tank.
Now coolant/fluid will circulate through it, expelling air pockets and constantly maintaining the required level of coolant/fluid in the radiator.
We slightly modify the radiator cap. We saw off the rod with a grinder and cut out 2 gaskets from the inner tube to seal the connection as much as possible.
General form.
And assembled.
In addition to everything, I installed a thermocouple and an emergency coolant temperature sensor in the upper radiator pipe.
The sensors are oriented downward to avoid contact with steam and incorrect readings.
In the afterword, I will say that an electric fan with forced shutdown will be installed, and the emergency sensor will be displayed on a warning lamp. Do not switch