Can the problem be resolved under warranty?
Whether dirt getting on the fan of the ventilation system is a warranty case is described in the AVTOVAZ information letter, which was received by the editors of the Lada.Online website.
It says that when operating warranty-covered cars “Lada Vesta”, “Lada XRay” and “Lada Largus”, there may be vibration felt by the consumer on the steering wheel and instrument panel. The reason for this is the operation of the interior heater fan at speed 2 or higher with dust/dirt and/or other foreign objects on the fan impeller. Dust accumulation occurs when the vehicle is used for a long time on contaminated public roads, on dirt and field roads when the fan is not working, which is a failure to follow the recommendations set out in the operating manual.
Another video of replacing the heater without removing the panel on Kalina
I ended my December report on Vesta on a minor note: two problems were waiting for a solution at once. Fortunately, both are guaranteed, so they are free for us.
I arrived for replacement only in the second half of January. But they assured me that the problem of leaky LED sections on the new parts has already been solved.
At the same time, he complained about the rear window heating not working. The problem turned out to be a loose “mass” under the rear parcel shelf. So, at the end of winter, the necessary “trick” finally worked. By the way, in the process of independently troubleshooting, I was surprised by the contents of the block under the steering column. The inscriptions on all relays read: Made in Portugal. I, of course, knew about a significant share of imported components in Vesta. But dragging such a cheap and primitive detail to Izhevsk from the far end of Europe is beyond my understanding of common sense. Maybe we are really in vain in demanding high-quality Russian cars from AVTOVAZ and UAZ, if they can’t make relays in our country?
In the operating instructions, data on the throw from zero to 100 km/h appeared only in the seventh edition, published in September 2022. According to them, the “mechanical” Vesta completed the test exercise in 11.2 seconds, and the “robotic” one in as much as 14.1. What a raise! Where does this discrepancy come from if technically the car has not changed?
In the same table in the book, numbers were also indicated for a car with a domestic manual transmission VAZ-21807, which at that time it had already been decided to replace the French unit - 10.2 seconds. That is, the transition to the Russian version promised a noticeable increase in dynamics. But already in the next version of the instructions from December 2022 for modification with mechanics, the same 11.2 seconds remain. Moreover, this absolutely applies to the VAZ box: the imported one has finally been retired.
Sources
- https://carfrance.ru/menyaem-radiator-pechki-bez-snyatiya-paneli-na-lada-kalina-fotootchet-video-cena-radiatora/
- https://www.zr.ru/content/articles/905554-lada-vesta-iz-parka-zr-skolk/
Basic faults
Fuse box lada largus
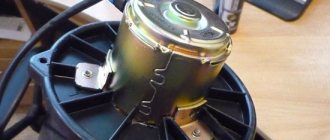
A whistle is already a malfunction - there are not many of them in this unit. You have to say “heater” - either it works or it doesn’t. If the stove does not blow at all, this means the electric motor is jammed or the brushes are worn out. If you were still skating with a bang, and then at one point it disappeared, and the heater stopped working, then it’s definitely an engine failure, most likely the problem is in the bearing or bushings.
Therefore, in 70% of cases, lubrication really helps, but if you have been driving for a long time with noise, it is possible that the bearing is already worn out. Therefore, as soon as noise appears, crackling and so on, we disassemble the stove and clean it. What else I would like to note on our VAZs, especially on the “classics”, bushings were used instead of bearings; after they were worn out, they needed to be replaced, however, many craftsmen still install bearings on the VAZ heater - I think this is correct!
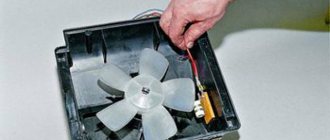
Disassemble and clean the fan
The main thing is that before starting work, do not forget to disconnect the terminals from the car’s battery so that a short circuit does not occur.
There are two options for developing actions:
- Just clean it: to understand what the problem is, you will need to spin the already removed engine; if it turns over with difficulty, sometimes even familiar noisy sounds appear, then in this case you will need to vacuum the engine and lubricate the bearings and other rotating parts. You can lubricate with any silicone grease or WD-40. Also be sure to clean all dirt from the shaft. In 65% of cases, these actions are enough to get rid of extraneous sounds from the stove and will last for a long time.
- Repair or replace shaft bearings: To determine whether any work needs to be done on the shaft bearings, you first need to look at their condition. If they don't turn at all, then you will have to disassemble the motor. Bearings may fall apart or become jammed from prolonged operation. Of course, you can just buy a new motor and not have to worry about repairs, but a new part costs a lot and if you try really hard, you can still fix the old one yourself.
Checking the stove dampers
As you already know, air is pumped into the interior of the Lada Vesta by an electric fan through air ducts. It would be possible to drive air directly without using air pipes. However, then it would be impossible to regulate the speed and direction of air flows. For the orderly movement of air masses, an air flow distribution damper is used, which is located between the fan and the outlet from the air duct. There are several of the latter on the dashboard, and accordingly there are the same number of dampers.
Like any mechanism, the dampers that distribute air fail. To detect it, we will check the maximum power of the Lada heating device. This is exactly how the malfunction makes itself felt most easily.
If the volume of incoming gas does not change when moving the mode control lever. This means that the motion limiter does not operate. Most likely, the signal is lost along the way (electric drive). If you hear a creaking or noise when switching the heating mode. Lubricate the dampers with a lubricant containing silicone. Why do windows fog up?
When there is a large difference in temperature or humidity inside the cabin, a coating of water droplets forms on the glass. This is a very dangerous condition - the driver cannot see the road. One of the main functions of the stove is to quickly remove fogging. To do this, several air duct nozzles are directed at the windshield, as well as the side windows of the Lada Vesta. The luxury version also uses heated mirrors.
A working device quickly restores the windows to their normal state. This is achieved by supplying hot air to the surface. Therefore, if Vesta’s windows do not fog up, the reason for this is a faulty radiator.
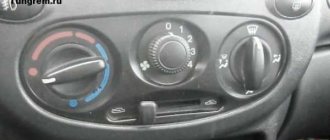
Heater and air conditioner control
“Classic” block without air conditioning
Left regulator (No. 9) – supply air temperature control; Right (No. 17) – air flow regulation; Buttons (No. 11-16) – setting the direction of air flow.
Comfort unit with air conditioning
The left regulator additionally has the function of turning on the air conditioner (No. 18), and the right one has the function of turning on air recirculation (No. 19). Otherwise, the control of supply air temperature, fan speed and air flow distribution of the Comfort version of the system is similar to the Classic version.
Luxe unit with climate control
Two buttons are replaced on the control unit:
- “Defrost MAX” mode (No. 24) – the air conditioning is forcibly turned on (if conditions permit), electric heating of the windshield and rear windows and side rear-view mirrors. The entire air flow is directed to the blower nozzles of the windshield and front side windows, and the maximum speed and air temperature are set.
- “AUTO” mode – in this mode, the air flow intensity (fan speed) and one or another air flow distribution mode are automatically set depending on the outside air temperature, the cabin air temperature and the coolant temperature of the engine cooling system.
The information display (No. 10) has also undergone changes; the air temperature scale has been replaced with numbers.
Checking heating efficiency
_x000D_
_x000D_
We start the engine and warm it up to operating temperature. We check that the inlet and outlet pipes of the heater radiator are heated and have approximately the same temperature. If the pipes have different temperatures, then it is possible:
_x000D_
- _x000D_
- low coolant level in the expansion tank (which antifreeze is better)
_x000D_
An air lock has appeared in the engine cooling system (air can be released through a special valve)
_x000D_
Heater radiator clogged (replace)
_x000D_
_x000D_
_x000D_
We install the temperature regulator on the stove control unit all the way to the red zone. We make sure that the temperature of the air leaving the panel deflectors begins to rise. If it blows cold, it means:
_x000D_
- _x000D_
- the damper drive is faulty (the damper does not open, preventing air from passing through the heater radiator)
_x000D_
The heater control unit is faulty (how to remove)
_x000D_
_x000D_
Standard heater radiator
The heater radiator is the same in design as the radiator of the Lada cooling system, only smaller. They have a common antifreeze range. Dirt from the expansion tank may also end up in the small interior assembly. Unfortunately, the radiator cannot be repaired. Need a replacement. When we come closer to the question, it turns out that the standard unit does not have a serial number. There is only a code - UT-00006936, according to which they can sell you another spare part. Therefore, before purchasing, check with the seller for information.
Why is the air blowing from the left warmer and from the right colder?
I recently learned the answer to this question, found it on the Internet. One Lada Vesta owner also encountered this problem and contacted the official dealer. The car dealership replaced the heater radiator without any problems.
What was the reason? The radiator just clogged. It is not entirely clear why this happened on an almost new car. The dealer's employees explained that such cases happen often. Apparently, when cars are assembled, the cooling system is not flushed properly. Small particles remain in it and clog the radiator. The channels in it are very thin and look like a kind of filter.
It drives coolant through itself, and the particles in it get stuck in the radiator honeycombs. As a result, heating occurs unevenly. The heating in the Lada Vesta is designed in such a way that air to warm the interior is taken from different parts of the radiator. If it is clogged, then these parts heat up differently.
If the car is under warranty, then you can safely go to the official dealer and solve the problem. If there is no longer a guarantee, then you can simply flush the radiator without removing it from the car.
Disassembly - cleaning the fan
As I already wrote above, in each car the removal of this device is done differently, but the essence always remains the same, we either have the fan completely removed or there is direct access to it so that the elements can be lubricated.
I WOULD LIKE TO CAUTION - before you remove the electric motor, disconnect the terminals from the car battery to avoid unnecessary unnecessary short circuits.
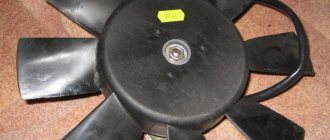
The fan is almost always designed the same way - it is an electric motor and at the top there is a cylindrical comb (blades) that pumps air. Here's a small example.
Lada X Ray
You can independently eliminate the noise of the Lada X-Ray heater fan using one of 2 options:
- Through the top panel in the glove box;
- Through the cabin filter.
First way
Compared to Vesta, it is noticeably simpler due to the fact that you do not have to dismantle several components at once, although it is not as convenient to work with.
First you need to remove the top panel in the glove box on which the lamp is located.
The motor itself is on the left. To remove the impeller, you need to lightly press the top plastic lock and carefully turn the fan counterclockwise.
It is worth noting that it will not be possible to completely remove the motor, since this will require disassembling part of the dashboard. However, even the indicated hole is enough to clean the blades with a thin screwdriver wrapped in cloth.
Second way
To implement this option for eliminating heater fan noise in the Lada X-Ray, you will first need to remove the cabin filter and frill on the passenger side.
To get to the cabin filter, you need to remove the plastic lining of the transmission tunnel on the front passenger side (fastened with screws), and then, according to the above algorithm, remove the glove box lid (if necessary).
Next, you need to squeeze the latches and remove the filter cover.
To remove the filter itself from the housing, you need to grab its lower edge and then pull. After removal, it is recommended to clean the seat from debris (leaves, dust, etc.).
When the filter element is removed, all that remains is to remove the frill, which will require a 16mm wrench and a Torx T20 sprocket.
First you need to pry with a screwdriver or knife and remove the plastic caps that cover the nuts securing the windshield wiper arms. When this is done, all that remains is to unscrew the nuts and remove the leads along with the brushes. They should be removed carefully so as not to damage the splines.
The next step is to remove the hood seal. Then 3 screws are unscrewed in the right half of the frill and the clip is removed. Finally, you need to remove the right side of the frill. As for the left one, it is not necessary to dismantle it.
Location of fixation points and components when removing the Lada X-Ray frill
When dismantling is completed, it is necessary to insert an air conditioning cleaner tube into the air intake on the passenger side, then activate the heater and fill it with foam.
Assembly is carried out in reverse order. Before installing the windshield wiper arms, it is recommended to clean the trapezoid axes of the wipers from dirt.
As you can see, all the ways to independently eliminate the noise of a Vesta or X-Ray heater fan are more than feasible. All that remains is to implement them.
The stove in the Lada Vesta differs from similar devices on other AvtoVAZ models. The difference can be found not only in the design of the heating system, but also in the features of correction and control.
How to remove the fan on Lada Kalina
If the stove on Kalina is humming, it is already clear from what has been described above that it is simply necessary to repair or replace the fan motor. Therefore, we begin dismantling by removing the outer plastic grille and removing the cabin filter.
- Then remove all debris from the seat so that it does not fall on your head while removing the fan.
- To proceed further, you will have to remove the front passenger seat, otherwise you will need to take an acrobatic pose inside the Kalina's cabin.
- The fan runners are held on by four nuts that need to be unscrewed. Then open the glove compartment and empty it of its contents, unscrew the four screws on its back wall and don’t forget about one more on the outside, under the airflow grille.
- Remove the decorative trim from the front right pillar; under it there are two more screws that secure the plastic panel and the blower unit. You need to unscrew them, remove the blower unit and lift the plastic panel, which is held on by Velcro. Underneath you will find two nuts; you will need to loosen them using a socket wrench. Then move the torpedo as far as possible and lock it in this position.
- Sit comfortably on the floor of the Lada Kalina and remove the heater fan, while disconnecting the electrical connector. You will need to replace its turbine with a new motor or repair the old one and put it back. Then install the unit in its place and reassemble everything in reverse order.
Replacing the Lada Largus heater motor (VAZ Largus)
In order to feel comfortable in a car at any time of the year, it is necessary to monitor the health of its heating system, or in other words, the “stove”. Such a system is responsible for the heating, cooling and air circulation functions in the cabin. Since we have not yet created a car that is 100% protected from malfunctions, you must know how to do such work with your own hands as replacing the heater motor on a Renault Logan.
It cannot be said that the Renault Logan ventilation and heating system is a weak point, but such a malfunction, especially in the cold season, promises unpleasant consequences. The operating principle of the interior heating system does not differ significantly from the device in other cars. But if the rear window heating does not work, then this can also spell trouble.
The heater radiator is connected directly to the cooling system, in which the coolant circulates (coolant, about replacing it here, about choosing a coolant here), which warms up within 95°C during engine operation. A special fan blows onto the hot radiator, which creates a strong air flow and directs it into the cabin through special air ducts. The quantity and speed of supply of heated air is regulated using a damper.
Signs of a malfunctioning stove
You should think about the upcoming repair and replacement of the stove motor if the following malfunctions are observed in its operation:
- An extraneous noise appeared when the stove was turned on.
- Warm air stopped flowing into the cabin.
- The speed of the incoming air flow has decreased.
- And of course, if the stove does not turn on at all. (However, in the event of such a malfunction, first of all analyze the condition of fuse F36, which is located inside the car. It is located in the green housing and is responsible for short-circuit protection of the heater system).
Removing the heater system
Most Renault Logan owners are convinced that replacing the heater motor requires completely dismantling the front panel. The same position is described in the car repair and operation manual. Since such a process is quite expensive and inconvenient, many owners prefer to leave this problem unresolved. However, in reality, to dismantle the housing with the heater fan, it is enough to unscrew only a couple of screws. You can handle a similar task with your own hands.
But at the very beginning, make sure that the cabin filter is clean; sometimes, due to its contamination, air cannot get into the cabin. The filter is installed on the right side of the front panel.
If the filter is clean and its condition does not give you any doubt, you can begin dismantling the “stove”.
Tool for the job
To dismantle the heater we will need the following tools:
- Screwdriver with straight blade.
- Phillips screwdriver.
- Plastic puller (or a regular ruler).
- TORX T20 key.
Sequence of work to dismantle the stove
- Remove the door seal.
- Using a screwdriver, pry up the plastic lining of the rack and remove it from the latches.
- After this, the first screw will be visible; use TORX T20 to unscrew it.
- Then, using a flat-head screwdriver, carefully remove the plug in the lower right corner of the panel near the glove compartment and unscrew the second screw.
- Now that the panel is not fixed, pull it towards you to create a small gap.
- Then we inspect the surface behind the panel to find the fan housing. It is not difficult to find, it is round and located not far from the cabin filter.
- After the stove fan is detected, remove the chip with the power cable from it and turn the fan housing clockwise to pull it out.
There are two types of fan designs, although the differences between them are minimal.
DIY stove motor repair
Typically, failure of the stove fan is caused by high wear on the motor brushes. In order to replace them, you just need to press out three latches, or use a Phillips screwdriver and unscrew 2 bolts.
After access is opened, we check the condition of the brushes and replace them if there is high wear.
Dimensions for brushes: 4 by 4 mm, and length up to 2 centimeters. If you find any that are longer, you can sharpen them. After repairs, it is necessary to lubricate all rubbing elements with high-temperature oil.
If the malfunction is related to a technical part, the housing has collapsed or individual parts have burned out, then the entire element must be replaced with a new one.
Installation of a repaired or new part should be carried out in the same way as removal.
Replacing the Renault Logan heater motor with your own hands (+ video and photos)
How does airflow work?
The device is very simple - in the cabin, under the panel, there is a heater radiator (possibly an air conditioner nearby), on which a special powerful fan blows. As a rule, it has several blowing modes, usually divided from “1” to “4”; the more you turn on, the stronger the air flow will be. As it becomes clear, in winter the stove radiator is used to heat the interior, in winter the air conditioner radiator is used for cooling.
On new foreign cars it does not make noise (in the first and second positions it is practically inaudible); more precisely, a strong flow of air can be heard, but there are no third-party sounds. This indicates that the fan is working properly and the entire system is working normally.
If you experience a whistling or crackling sound when you turn on the fan, it means that something is wrong here, you need to disassemble the panel and remove the fan. Radiators have nothing to do with it.
Removing and installing the Lada Vesta engine radiator
We prepare the car for the job. We install the car on a viewing hole or lift. Disconnect the negative terminal of the battery.
Remove engine protection.
Remove the front bumper of the car.
Remove beam 1, figure 1, of the front bumper.
Release the clamps and disconnect the air intake pipe from the air deflector 2.
Release the clamps and disconnect the ambient temperature sensor 1, Figure 2, from the air deflector 2.
Release the fasteners and remove the air deflector 2.
Drain the liquid from the engine cooling system (see article on replacing coolant).
Release the fastening clamps and disconnect:
— supply hose 1, Figure 3, radiator from thermostat pipe 3;
— radiator outlet hose 4 from the water pump inlet pipe;
— steam removal hose 1, Figure 4, from the expansion tank pipe 3 (use pliers).
Cut the clamps securing the hoses to the upper cross member of the radiator frame and the bracket on the gearbox.
Disconnect the connectors of harness 1, Figure 5, of the front wires from the connectors of block 2 of the electric fan relay, horn 3 and radiator electric fan 4.
Cut clamp 5 securing harness 1 of the front wires to the electric fan casing.
For vehicles with air conditioning
Press the clamps, disconnect and move aside condenser 1, Figure 6, of the air conditioning system from radiator 2 of the engine cooling system.
Operations for all vehicle trim levels
Turn and remove from the brackets 1, Figure 7, on the upper cross member of the radiator frame, the radiator fastening clamps 2 3.
Remove radiator 2, Figure 6, from the mounting on the lower cross member of the radiator frame and remove the radiator assembly with the electric fan and hoses.
Release the fasteners and disconnect the engine cooling fan from the radiator.
Radiator installation
Install the engine cooling fan onto the radiator.
Install radiator 2, Figure 6, engine cooling system with electric fan and hoses assembly into the fastening elements of the lower cross member of the radiator frame.
Secure radiator 3, Figure 7, of the engine cooling system with two clamps 2 to brackets 1.
Connect the inlet, outlet and steam exhaust hoses of the radiator of the engine cooling system to the corresponding pipes and secure with fastening clamps, Figures 3 and 4.
Install new hose clamps to the upper cross member of the radiator frame and the bracket on the gearbox.
For vehicles with air conditioning
Install and secure condenser 1, Figure 6, air conditioning system on radiator 2.
Operations for all vehicle trim levels
Install and fix the air deflector 2, Figure 1, on the radiator.
Install sensor 1, Figure 2, of ambient air temperature on air deflector 2.
Connect the air intake pipe to the air deflector.
Connect the connectors of harness 1, Figure 5, of the front wires to the connectors of block 2 of the electric fan relay, horn 3 and radiator electric fan 4.
Install a new clamp 5 securing harness 1 of the front wires to the radiator electric fan casing.
Install beam 1, Figure 1, of the front bumper.
Install the front bumper.
Fill the engine cooling system in accordance with the article (Replacing coolant).
Connect the earth wire terminal to the battery.
Start the engine and let it run for 2 - 3 minutes at idle speed to remove air pockets in the cooling system.
Check the functionality of the heater.
After stopping the engine, check the coolant level and there are no signs of leakage, and if necessary, bring the fluid level to normal. The coolant level should be between the “min” and “max” marks on the expansion tank.
Install engine splash guard
A malfunction of the Lada Xray stove most often consists of a decrease in air temperature or a cessation of air circulation altogether, i.e. The car's heater blows cold air and doesn't heat up like before. The main cause of this malfunction is the radiator of the interior heating system. On the Lada Xray, as on the Lada Vesta, it is located in the housing of the heating and air conditioning ventilation unit on the left side (driver's side).
Interior ventilation diagram
Air ducts run from the stove body, which direct air flows to the windows, into the interior and legs. The central deflectors can adjust air flow in different directions, and its strength is controlled using a horizontal wheel underneath them.
AvtoVAZ has implemented airflow for the Vesta driver’s feet in a new way. The air duct nozzle is located not on the side, but above the foot of the right foot. Some owners of the new sedan believe that this design is not very successful, because It warms the toes worse than the foot itself. For the front passenger, the air duct exits closer to the wall of the engine shield and a similar situation will not arise.
Worth o. On versions of the car with air conditioning, a small air duct fits into the glove compartment, which can cool, for example, a water bottle.
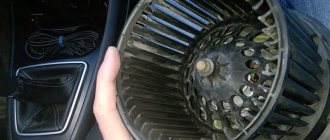
Eliminate noise and vibration of the heater fan on Lada Vesta and XRAY
One of the differences between the Vesta and XRAY heater and other Lada cars (for example, Grants or Prioras) is that the cabin filter is installed after the fan. This design feature makes it easy for debris and dirt to get into the blades, which causes extraneous noise (whistle, howl, rustle) or vibration. How to solve the problem yourself 1. On a Lada Vesta. You will need to remove the heater fan. Over 10,000 km, dust accumulates on the fan blades; the thickness of this layer can be several millimeters. Also, pieces of debris (a twig, leaf, etc.) may get stuck between the blades. All this causes imbalance during rotation. Sometimes at speed 4 of the stove the vibration is so strong that it causes noise and is even transmitted to the steering wheel of the car. And the leaves in the impeller create an unbearable rustling and whistling sound. The main task is to clean the heater fan from dust and dirt. To check vibrations, you can connect a motor from a battery. If necessary, to reduce vibrations, we rearrange the balancing weights to other blades. It is also proposed to slightly modify the design (to reduce the vibrations transmitted by the fan) - stick an anti-creak (madeline) on the edges. 2. On Lada XRAY. Method 1: Remove the top panel in the glove compartment. Remove the impeller from the housing (press the petal on top and turn the motor slightly counterclockwise). It is not possible to completely pull the motor out through this hole, so we clean it with a suitable tool (for example, a flat-head screwdriver) without removing the fan. Method 2: Remove the cabin air filter and place a cloth at the front passenger's feet. Remove the frill from the passenger side and insert the air conditioner cleaner tube (the canister costs about 700 rubles) into the air intake. Turn on the stove and release the foam. Is it possible to solve the problem under warranty? Is dirt getting on the ventilation system fan a warranty case? It is described in the AvtoVAZ information letter, which was received by the editors of the Lada.Online website. It says that when operating warranty-covered cars “Lada Vesta”, “Lada XRay” and “Lada Largus”, there may be vibration felt by the consumer on the steering wheel and instrument panel. The reason for this is the operation of the interior heater fan at speeds 2 and higher with dust/dirt and/or other foreign objects on the fan impeller. Dust accumulation occurs when the vehicle is used for a long time on contaminated public roads, on dirt and field roads when the fan is not working, which is a failure to follow the recommendations set out in the operating manual. And to prevent leaves and other small objects from getting in, install a protective mesh on the air intake in the engine compartment. Let us remind you that in this article you can leave reviews about the operation of the Vesta stove.
AVTOVAZ methodology
To eliminate vibration of the interior heater fan, it is necessary to carry out work in accordance with the procedure.
1. Place the car in the workplace, brake with the parking brake, open the hood, disconnect the earth wire terminal from the battery (spanner 10).
2. Remove the heater fan, Figure 1, in accordance with the requirements of the technological instructions for the corresponding car model:
- TI 3100.25100.20546 “Body of LADA Largus cars - removal / installation of main components and parts”;
- TI 3100.25100.20589 “LADA Vesta car body – removal / installation of main components and parts”;
- TI 3100.25100.20599 “LADA X-Ray car body – removal/installation of main components and parts.”
Figure 1 – Heater fan
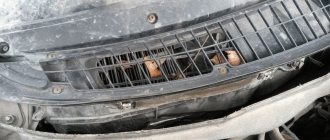
3. Blow out the heater fan impeller, Figure 2, with compressed air to remove dust, dirt and foreign objects (compressed air blow gun).
4. Wash the heater fan impeller with a cleaning solution to remove any remaining dust and dirt, avoiding contact of the cleaning solution with the heater fan motor (technological container, brush, wiping cloth, cleaning solution - water, liquid soap).
Figure 2 – Places where dust accumulates on the heater fan impeller
5. Use a rag to wipe off the remaining cleaning solution from the heater fan impeller (wiping rag).
6. Install the heater fan on the car in accordance with the requirements of the technological instructions for the corresponding car model.
7. Connect the earth wire terminal to the battery (spanner 10).
8. Turn on the ignition, turn on the heater fan at 2nd and higher speeds, make sure that there is no increased vibration of the fan in all operating modes. Turn off the fan and ignition.
And to prevent leaves and other small objects from getting in, install a protective mesh on the air intake in the engine compartment. Let us remind you that in this article you can leave reviews about the operation of the Vesta stove.
Source
Why is the air blowing from the left warmer and from the right colder?
I recently learned the answer to this question, found it on the Internet. One Lada Vesta owner also encountered this problem and contacted the official dealer. The car dealership replaced the heater radiator without any problems.
What was the reason? The radiator just clogged. It is not entirely clear why this happened on an almost new car. The dealer's employees explained that such cases happen often. Apparently, when cars are assembled, the cooling system is not flushed properly. Small particles remain in it and clog the radiator. The channels in it are very thin and look like a kind of filter.
It drives coolant through itself, and the particles in it get stuck in the radiator honeycombs. As a result, heating occurs unevenly. The heating in the Lada Vesta is designed in such a way that air to warm the interior is taken from different parts of the radiator. If it is clogged, then these parts heat up differently.
If the car is under warranty, then you can safely go to the official dealer and solve the problem. If there is no longer a guarantee, then you can simply flush the radiator without removing it from the car.
Ventilation and heating system
Removing and installing the fan module The heating, ventilation and air conditioning system fan is located in the housing of the heating and air conditioning ventilation unit on the right side, on the front passenger side.
1. Place the car in the workplace. Open the hood and disconnect the ground wire terminal from the battery (spanner 10).
2. Open the glove box lid, remove the glove compartment lighting lamp from the mounting hole, disconnect the instrument panel wiring harness block from the lamp lamp (flat-head screwdriver).
3. Unscrew the five screws securing the glove box, remove the glove box by disconnecting the instrument panel wiring harness block from the limit switch of the glove box lid (replaceable head Torx 20, knob).
Fastening the glove box:
- glove box;
- glove box mounting screw;
- dashboard
4. Disconnect block 4 of wiring harness 1 from fan 2 of heating, ventilation and air conditioning unit 5.
HVAC fan:
- HVAC wiring harness;
- HVAC unit fan;
- fan clamp;
- heating, ventilation and air conditioning unit wiring harness block;
- housing of the heating, ventilation and air conditioning system
5. Press the fan lock 3 and at the same time, by turning the fan housing counterclockwise, remove the fan from the housing of the ventilation, heating and air conditioning system unit.
6. Install the fan of the heating, ventilation and air conditioning system unit in the reverse order of removal, check its functionality.
7. Install the glove box.
Removing and installing the fan speed controller
The HVAC fan speed control is located in the HVAC unit housing on the left side, driver's side.
One of the differences between the Vesta and XRAY heater and other Lada cars (for example, Grants or Prioras) is that the cabin filter is installed after the fan. This design feature makes it easy for debris and dirt to get into the blades, which causes extraneous noise (whistle, howl, rustle) or vibration.
If the car is under warranty, it makes sense to contact the dealer to troubleshoot the problem. Further instructions for those who decide to deal with the problem themselves.
1. On Lada Vesta.
You will need to remove the heater fan.
Over 10,000 km, dust accumulates on the fan blades; the thickness of this layer can be several millimeters. Also, pieces of debris (a twig, leaf, etc.) may get stuck between the blades. All this causes imbalance during rotation. Sometimes at speed 4 of the stove the vibration is so strong that it causes noise and is even transmitted to the steering wheel of the car. And the leaves in the impeller create an unbearable rustling and whistling sound.
Messages 20
1 Topic by Bishop 2016-02-29 16:53:38
- Bishop
- Participant
- Inactive
- Messages: 22
- Thank you: 13
Topic: Extraneous noise behind the dash
In general, an unpleasant and rather nerve-wracking sound appeared (especially on a long trip). Behind the dashboard, under the windshield, it’s as if sand is pouring onto the fan or the electrician is shorting out. The most annoying thing is that the sound is random in nature: when you go to the dealer it is there, when you go with a specialist inside, it disappears))) Actually, that’s why the dealer couldn’t say anything. A quick internet search turned up nothing. Maybe someone had this? Maybe there are some thoughts.
2 Reply from Al.Voitov 2016-03-03 16:35:00
- Al.Voitov
- Participant
- Inactive
- Messages: 130
- Thank you: 16
Re: Extraneous noise behind the dash
Are the wipers not working at this moment?
3 Reply from aler 2016-03-03 16:50:57
- aler
- Participant
- Inactive
- Messages: 11
- Thank you: 6
Re: Extraneous noise behind the dash
as if sand is falling on the fan or the electrician is shorting out
Some strange sound) Is there a burning smell? Maybe when you turn on some electrical appliances, a sound appears? Pay attention to this.
4 Reply from Bishop 2016-03-04 14:21:15 (2016-03-04 14:22:11 edited by Bishop)
- Bishop
- Participant
- Inactive
- Messages: 22
- Thank you: 13
Re: Extraneous noise behind the dash
as if sand is falling on the fan or the electrician is shorting out
Some strange sound) Is there a burning smell? Maybe when you turn on some electrical appliances, a sound appears? Pay attention to this.
The sound is strange, I agree) I tried to find the dependence of its appearance on the inclusion of something, to no avail. I'm betting that something got into the air duct. On a standing one, no, when moving with a flow of air, this “something” begins to fumble. This confirms the "ball effect". It appears on a turn, less on a straight line, braking crackles again, turns in the other direction and disappears completely. It's like it's hanging out there. But I don’t know yet how to get there and check.
Activation of functions via ELM327 and Ddt4all software
https://www.youtube.com/watch?v=9kQGmf5S-sM
Required:
- 4-pin relay (article: 75.3777).
- Wires.
- Connector for installing an additional fuse (available in the Aliexpress catalog).
- Connectors that fit onto the fuse.
Description of the scheme:
- Contact 85 is the “minus” from the handbrake (under the handbrake there is a breaker on “-”), we pull the wire from the breaker to the relay.
- Pin 86 is a constant 12 V (can be taken from the cigarette lighter).
- Pin 30 is 12 V from the DRL fuse.
- Pin 87 is the plus from the relay, which should be connected to the second socket of the DRL fuse.
As a result, when the handbrake is raised, the DRL will turn off. We release the car with the handbrake - the DRLs turn on.
The advantage of this connection diagram is that at any time (for example, during a visit to an official dealer), you can remove the wires from the connectors of the mounting block and insert a standard fuse in their place.
Show/Hide text
On the Lada Vesta in the “Lux” configuration, the DRLs are controlled using an additional body electronics unit (EMM or comfort unit), which is located behind the glove compartment.
Scheme No. 1: DRLs operate only in the left steering column switch mode - “AUTO”. To turn off the DRL, set the switch to the “0” position.
Scheme No. 2: DRLs are disabled as long as there is ground on the additional channel of the car alarm or while the handbrake is raised (depending on the connection).
An additional car alarm channel should be programmed:
- The minus appears after the engine starts, and the car is armed.
- The minus disappears after releasing the handbrake.
Accordingly, after lowering the handbrake, the DRL begins to operate normally.
All connections are made on the EMM block:
- Points 1 and 2 (broken). Points 3 and 4 (broken).
- Broken wires: S1-C1 and S1-C2 in the diagram - power supply to the DRL lamps.
- Point 5 (contact S2 D15 in the diagram).
Let us remind you that there is an easier way to disable the DRLs without interfering with the wiring. Owners of cars without DRLs can install them themselves.
A variant version has remote control of electric window lifters. Power windows are controlled using the remote control buttons when the ignition is off. The windows are raised while the lock button is held down for more than three seconds. The windows of the front doors are raised first, then the rear doors.
Owners of Grants and Kalin in the “Lux” configuration claim that the frequency of wiper operation on their cars can be adjusted. To do this, you need to make one sweep of the blades (without fixing the lever), wait until the windshield becomes dirty, and turn the wipers to the first position. The brushes will work with the pause that you set.
The headlight switch-off delay function (on foreign cars this option is called “Follow Me Home” or “walk me home”) allows the headlights to remain on for some time after the engine is stopped, illuminating the owner’s way home. This is a standard option in some trim levels of Lada Kalina and Lada Granta.
We talked about it in detail earlier. On Lada Vesta and Lada XRAY it needs to be activated (see links at the end of the article).
On Lada Granta and Lada Kalina you can choose one of two modes of closing the car:
- When you press the key fob button, all doors open.
- When you press the key fob button, the driver's door opens, and when you press it again, all other doors open.
To change the opening mode, you need to turn on the ignition (do not start the engine), press and hold 1 and 2 key fob buttons simultaneously until a sound signal appears.
CM. all functions with ELM327.
ps the article will be updated as new features appear.
Found an error? Select it and press Ctrl Enter..
Crash tests at AvtoVAZ - 80% of them are virtual
Installation of additional (top) rear lights on Lada Largus
How the warranty conditions for LADA cars have changed over 3 years
What gasoline to fill in Lada Vesta (survey and tests)
...designed to heat the car interior. The stove is also actively used during rain or cold weather.
The heater is also activated if necessary to quickly remove fogging from the windows or warm up passengers. In the “Lux” configuration, the car is additionally equipped with air conditioning, which creates a favorable temperature for a person.
The most common malfunctions of the Lada Vesta heater radiator: leakage, fan noise, engine vibration. The replacement process is not complicated, but requires care on the part of the repairman.
There have been no fundamental changes in the control of the air conditioning and ventilation system. Still, you may notice a few new keys.
Comments • 158
Video from the VALEO factory ru-clip.com/video/tVX4S6Rs1Ds/video.html Videos about replacing the stove fan Replacing the stove fan Kaptur, Duster after 2022 onwards. ru-clip.com/video/7um8upoZdJo/video.html Replacing the stove fan Logan, Sandero until 2010. ru-clip.com/video/B2vubFXSc0U/video.html Replacing the heater fan for Logan, Sandero after 2010, Lada Largus, Almera G15, Duster before 2015. Replacement heater fan Megan2 ru-clip.com/video/MjTWDF7w8cw/video.html Replacing the heater fan Megan3 (EUROPE) ru-clip.com/video/MDby8CYFvYw/video.html Replacing the heater resistor for Logan, Sandero, Lada Largus ru-clip. com/video/U8bQzYeoHf8/video.html
Contents of the repair: 0:00 SHOTS FROM THE FILM 0:45 WHAT THE FILM IS ABOUT 1:15 EXAMPLE OF VIBRATION 2:30 REMOVING THE SIDE AIRBAG TRIM 3:13 REMOVING THE GLOVE COVER 6:17 PASSENGER'S FOOT AIR DUCTS 7:07 REMOVING THE FAN CONNECTOR 7:33 REMOVING HEATER FAN 8:28 HOW TO REVIEW A FAN 14:55 WHAT NEW FAN IS BETTER TO TAKE 16:03 COMPARISON WITH A CHINESE FAN 19:07 WE PUT A CHINESE FAN ON THE CAR 21:15 WE PUT A VALEO 21 FAN ON THE CAR: 50 CONCLUSIONS
The device of the "tens" stove
The design features of the heating system include the presence of a fuse assembly, a fan housing, a radiator with dampers for the influx of air masses and their uniform distribution. Cooled air flows, entering through the heater dampers on the VAZ 2110, warm up.
The key component of the heating system is the radiator of the VAZ 2110 stove. It is equipped with special inlet and outlet pipes. They go into the engine compartment and are attached to the car's cooling circuit. The radiator is fixed with a pair of screws, and the valve on the VAZ 2110 stove is mounted in the underwater pipe, which regulates the flow of coolant.
This mechanism can be controlled using a flexible rod mounted on the panel. A furnace electric motor is mounted at the bottom of the radiator on 2 elastic cushions located in the guide housing.
An auxiliary resistor is also built into the engine power circuit, which provides a 2-speed mode for the heater fan on the VAZ 2110. The heater is equipped with air ducts that distribute air masses to the deflectors for blowing the side windows, as well as to the tubes pointed at the windshield.
Hot air can be controlled by alternately opening or closing the heater covers. The air inlet damper is directly controlled by rods from levers.
Vesta stove blows cold through all air ducts
Regardless of the configuration and type of climate control equipment, cold air from the stove can indicate only a few faults equally:
- Low antifreeze level. There is nothing easier than checking the level and topping up if necessary, observing the tolerances and brand of liquid. After this, it is better to warm up the car and make sure that the heater starts to warm up. If everything is in order, you don’t have to read further.
- Air lock in the cooling system. A very common malfunction on Tolyatti cars. As a rule, a plug occurs when the system is depressurized or when antifreeze is replaced using the wrong technology. In this case, the air plug simply prevents the heated antifreeze from reaching the heater radiator. We described in detail how to get rid of an airlock here and here.
- Dirty cabin filter. Everything is clear here - air simply does not flow to the heater radiator, so there is nothing to blow through the interior. Replacing the cabin filter on a Lada Vesta, unlike a Granta, Priora or Kalina, is much easier. The filter is carefully removed from the cassette, then a new one is inserted.
- Clogged heater radiator.
The symptoms are the same as in the case of an air lock: antifreeze does not get into the heater radiator or the radiator throughput is so small that the liquid does not have time to warm it up. New branded heater radiator Lada Vesta
The best option is to remove and wash the heater radiator. It's a lot of work, but it's worth it. On the other hand, you can flush the radiator without disassembling it, right on the car. How to clean a honeycomb radiator without dismantling is described here, and the most correct, but time-consuming method of washing is described here.
The engine takes a long time to warm up or does not warm up to operating temperature. In severe frosts, even plugs on the engine air intakes (car blankets, plugs) do not help solve the problem. The thermostat is the only culprit here. It is necessary to check its operation and replace it if necessary. How to do this is described here.
Why doesn't the heater blow after replacing the thermostat?
If the thermostat is new, and after replacing it the stove does not blow heat, it means that either this part is faulty, or the reason lies in something else. In this case, you need to remove the thermostat and turn on the stove. If it heats up, then the reason is in the thermostat: it is faulty and needs to be returned back to the store. If not, you will have to look for the reason in other automotive components.
Fan doesn't work
The most common reason. Air does not enter the cabin at all. Naturally, the stove will work, but its “power” is very small to heat the entire cabin. In this case, you will have to replace the fan or the electronics that control it. In some cases, replacing the corresponding fuse is sufficient.
Low antifreeze level
Insufficient coolant level can also be considered as a reason for cold air entering the cabin. Although this is unlikely, since most cars are equipped with special antifreeze level sensors. For example, if coolant leaks out due to a hole in the tank or a leak in the radiator pipes, that is, almost cold liquid enters the stove, only cold air will flow into the cabin. To fix this problem, just add antifreeze or antifreeze to the required level.
Heater radiator clogged
In this case there may be several reasons:
- use of water - it forms scale on the walls of the system, and also causes rusting of metals;
- improper mixing of cooling materials (antifreeze and antifreeze), which leads to precipitation and clogging of thin radiator pipes;
- eliminating radiator leaks with sealants. This method is called “treat - cripple”. Due to excess sealant, the passages in the radiator are clogged, which does not allow the liquid to circulate normally and thereby “heat up”.
The engine pump has failed
This is a pump that serves to pump hot liquid throughout the system. That is, the pump leads hot liquid from the main engine block through the pipes and then directs it to the radiators for the purpose of cooling (or heating the interior). The most common pump breakdowns are as follows:
- the pump is jammed – its internal part – the “impeller” or the pump as a whole – does not rotate;
- the crankshaft belt has broken, which is why the pump does not rotate, which is why the stove does not heat;
- the use of low-quality coolants that “eat” the inside of the impeller. Physically, the pulley of the part rotates, but the fluid is “pumped” through the system at the lowest possible level. In this case, the stove will also not heat.
If all of the problems described above occur, the pump will have to be replaced (since it cannot be repaired). Take note of the first signs of the need to replace the pump: whistling noises under the hood, as well as a cold hose after the pump, but hot before it.
Broken engine head gasket
The engine block and its head are connected to each other by a special gasket. If it is broken, then antifreeze, water or antifreeze will go into the muffler or cylinders (as indicated by white and thick smoke emanating from the muffler). That is, there will not be enough coolant in the system (or air pockets will occur), which is why the stove will not be able to properly warm up the interior. In this case, it is necessary to replace the head gasket as quickly as possible so as not to “kill” the engine.
Well, we hope this article was useful to you, and thanks to it you can find the root cause of exceptionally cold air entering the cabin. And you will also be able to fix it as quickly as possible. Good luck!
Typical stove malfunctions
The most common problems with the stove on Lada Vesta are the following:
- the actual temperature does not correspond to the set one - low level of antifreeze (antifreeze), clogged radiator pipes or the formation of an air lock, which causes cold air to blow;
- vibration appears during operation - the electric motor is loose;
- insufficient air flow from the deflectors - clogging of channels and air ducts;
- the heater is inactive when it is activated on the dashboard - failure of the fuse (No. 14) of the mounting block.
Checking the stove fan
During the circulation of the air flow, dust particles settle on the surface of the impeller, as a result of which it begins to make noise and extraneous sounds appear.
To clear the fan blades of debris, it is necessary to provide access to the unit.
- Unsnap the glove box.
- Remove the filter element.
- On the right is the furnace mechanism. We press the plastic clips and turn the impeller counterclockwise.
- We remove the motor.
- We wipe the drive with a rag.
- Install the parts in reverse order.
Checking the stove dampers
Dampers are installed in the area between the deflectors and the fan. During operation, they fail, become deformed, and become damaged. Checking the serviceability of the damper on your own is quite simple: you need to activate the stove at maximum speed. If it doesn't blow well, it means the air duct is clogged. Change the damper positions. If you hear squeaking or noise, lubricate the moving parts with silicone grease.
Foggy windows when the heater is activated is the first sign of a ventilation problem. This problem provokes a sharp decrease in visibility on the road and an increase in the risk of an emergency. As soon as fogging is detected, check the condition of the ventilation; most likely, the air ducts are clogged.
Checking heating efficiency
Carry out prevention before the onset of winter. Be sure to check:
- heating the air;
- changing speed modes when switching the control lever, if necessary, replace the brushes of the stove motor;
- absence of extraneous noise, whistling in fan operation;
- the need for a time interval to warm up the air ducts.
Note to the driver! The left and right pipes must be at the same temperature. Otherwise, this is a sign of a malfunction of the heating system.
Procedure for resuscitation of the Lada Kalina stove fan motor
- Before removing the clamp, mark the location of the impeller relative to the shaft and remove the impeller.
- After you gain access to the two bolts, you need to unscrew them and open the motor.
- Unhook the anchor lock at the top, remove the washers and pull out the anchor.
- This will give you access to the bushings.
- Clean and lubricate parts.
- At anchor, wipe and sand the contact plates with the finest grain sandpaper.
- You also need to clean the contact pads and wipe them down.
- Do not lubricate the contact surfaces under any circumstances! Everything should be sterile clean and shiny.
- Use graphite lubricant only to lubricate high friction surfaces. But under no circumstances use oil or grease for these purposes, as they will leak in the future.
Important! Do not drill holes or pour oil onto the shaft or spray WD while removing the cooling hose. This is not recommended, although you can find many recommendations on this matter on the Internet. Such actions are dangerous for the motor and can lead to its failure.
- Reassemble the motor in reverse order. Now it will not buzz and will spin without squeaks or noises.
- Reassemble all other parts in reverse order.
As you can see, the steps are not at all complicated, the main thing is not to get confused about what to screw on during assembly. If you have problems with heater fan noise, try to solve the problem yourself as much as possible. If repairing the problematic part is impossible, then replace it with a new one, and if you still doubt your abilities, seek the help of specialists.