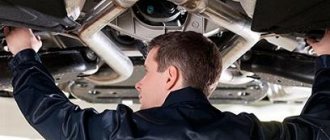
If the car interior is left without heating in the cold season, this does not bode well for either the driver or his passengers. This rule applies to all passenger cars, and the Lada Kalina is no exception. In general, the heater in this car is quite reliable. But it has one weak point: the furnace fan. It is this part that most often fails and becomes a source of real headache for the Kalina owner. Is it possible to replace the stove fan on a Lada Kalina yourself? Can. Let's figure out how this is done.
Main stages of testing
Despite the variety of resistors, conventional elements of this class have a linear current-voltage characteristic, which greatly simplifies the test, reducing it to three stages:
- visual inspection;
- the radio component is tested for breakage;
- Compliance with the nominal value is checked.
If everything is clear with the first and second points, then with the last there are nuances, namely, you need to find out the nominal resistance. Having a schematic diagram, this will not be difficult to do, but the trouble is that modern household appliances are rarely equipped with technical documentation. You can get out of this situation by determining the denomination from the markings. We'll briefly tell you how to do this.
Types of markings
On components produced during the Soviet Union, it was customary to indicate the denomination on the body of the part (see Fig. 1). This option did not require decoding, but if the integrity of the structure was damaged or the paint burned out, problems with text recognition could arise. In such cases, you could always turn to the circuit diagram that supplied all household appliances.
Figure 1. “ULI” resistor, the part rating and tolerance are visible on the body
Color designation
Now color marking has been adopted, representing from three to six rings of different colors (see Fig. 2). There is no need to see this as the machinations of enemies, since this method allows you to set the denomination even on a heavily damaged part. And this is a significant factor, given that modern household electrical appliances are not equipped with circuit diagrams.
Rice. 2. Example of color marking
Information on decoding this designation on components is easy to find on the Internet, so it makes no sense to present it within the framework of this article. There are also many calculator programs (including online) that allow you to obtain the necessary information.
Summary
The Lada Kalina car is available with a ventilation and heating unit or with an air conditioning unit. For the first option, it is impossible to provide a cabin climate whose temperature will be lower than the ambient temperature.
The Lada Kalina air heater is considered one of the best in terms of heat performance in the VAZ family, but is far from the most reliable in operation. Problems begin almost at the car dealership, as many motorists say. But most of the problems are completely solvable, and often even without the involvement of car service specialists.
Marking of SMD elements
Surface-mounted components (for example, SMD resistor, diode, capacitor, etc.) began to be marked with numbers, but due to the small size of the parts, this information needed to be encrypted. For resistances, in most cases, a designation of three numbers is accepted, where the first two are the value, and the last is the multiplier (see Fig. 3).
Rice. 3. An example of decoding the value of an SMD resistor
Visual inspection
Violation of the normal operating mode causes overheating of the part, therefore, in most cases, the problematic element can be identified by its appearance. This can be either a change in the color of the case or its complete or partial destruction. In such cases, it is necessary to replace the burnt element.
Figure 4. A clear example of how a resistor can burn out
Pay attention to the photo above, the component clearly needs to be replaced, while the neighboring parts “2” and “3” may be working, but they need to be checked.
Replacing the Kalina stove resistor
I started the car in the evening and smelled something burning. The heater was turned on at first speed and when I started it, apparently all the energy was spent to start the engine, but the heater motor did not start. As a result, the heater heater resistor burned out. I turned on the 4th one, it works. And the stove fan works at 4 even without a resistor. Just don’t know why a turbo aircraft is needed at all)
The photo shows that the thermal fuse is located by bending it as close as possible to the heater resistor coil. If the resistor is heated to 117 degrees, its internal circuit melts and breaks. The same thing can happen when soldering a new one. But in fact, it burns out not from temperature, but from increasing current strength when the stove fan cannot move. When the fan cannot move, the load on this fuse increases to 17 amperes.
In fact, the resistor itself rarely burns out; the shiny part soldered to pin 4, called a thermal fuse, burns out. Such fuses are still installed in irons and refrigerators. And since this is a fuse, it’s very easy to check whether the resistor itself is working; take any piece of wire and try to short it with a “bridge”. That's exactly what I did. I turned the heater on to first, shorted it out, it works at all speeds. If it works, then it's the fuse. We go to the radio parts store (in Ufa “World of Electronics”) and buy a new one for 15 amperes 117 degrees for 25 rubles. Solder in a new fuse. When soldering, do not overheat, overheating more than 117 degrees will cause the fuse to fail!
You need to solder with a heat sink. Overheating will cause the part to become unusable. We put it in place under the glove compartment shelf. Voila, the stove works on all 4.
Checking for a break
Actions are performed in the following order:
- We turn on the device in the “dialing” mode. In Figure 5 this position is marked as “1”.
Rice. 5. Setting the mode (1) and connecting probes (2 and 3) - We connect the probes to sockets “2” and “3” (see Fig. 5). Despite the fact that in our testing polarity does not matter, it is better to immediately train yourself to connect the probes correctly. Therefore, we connect the red wire (+) to socket “2”, and the black wire (-) to “3”.
If the model of the device you are using differs from the one shown in the figure, read the instructions that came with the multimeter.
- We touch the pins of the problematic element on the board with the probes. If the part “does not ring” (the multimeter will show the number 1, that is, an infinitely large resistance), we can state that the test showed a break in the resistor.
Please note that this testing can be carried out without desoldering the element from the board, but this does not guarantee a 100% result, since the tester can show communication through other components of the circuit.
Pinout of the dashboard / instrument panel of Lada Priora, Kalina, Granta, Largus
Lada Priora instrument panel pinout
Lada Kalina instrument panel pinout
Lada Granta instrument panel pinout
Lada Largus instrument panel pinout
Lada Priora instrument panel pinout
Instrument panel wiring harness connection diagram:
No. Connection of the Itelma gearbox with navigation without CAN 1 To the electric power steering 2 MUTE 3 To the oil pressure sensor 4 Parking brake switch 5 To the immobilizer control unit (electrical package) 6 To the airbag control unit 7 To the light control module (light on indicator) 8 Turn signal switch (right side) 9 Turn signal switch (left side) 10 To the engine control system unit 11 AUDIO OUT - “Battery” 12 To the seat belt sensor 13 To the ABS unit (EBD malfunction) 14 Steering column switch “Buttons” 15 Brake fluid level sensor 16 To the ABS unit (ABS malfunction) 17 To the high beam switch 18 To the light control module (scale lighting regulator) 19 Housing 20 Terminal “30” of the battery 21 Terminal “15” of the ignition switch 22 To the control unit (signal fuel consumption) 23 To the steering column switch “UP” 24 To the steering column switch “DOWN” 25 To the radio receiver “AUDIO OUT “+” 26 To the outside temperature sensor 27 To the fuel level sensor 28 To the speed sensor 29 To the coolant temperature sensor. liquid 30 To control unit engine (tachometer signal) 31 Service diagnostics 32 To terminal “L” of the generator relay regulator
Pinout of the Lada Priora instrument panel with CAN bus
Lada Kalina instrument panel pinout
Pinout of the instrument panel Lada Kalina 1
Pinout of the instrument panel Lada Kalina 2
Lada Granta instrument panel pinout
Lada Granta instrument panel pinout
Lada Granta instrument panel pinout
Connection diagram of the instrument panel wiring harness on a Lada Granta VAZ 2190:
1, 2 — connectors of the instrument panel wiring harness to the connectors of the front wiring harness; 3, 4 — connectors of the instrument panel wiring harness to the connectors of the rear wiring harness; 5 — external lighting control unit; 6 — ignition switch; 7 — on-board computer mode switch; 8 — glass cleaner and washer switch; 9 — instrument cluster; 10 — switch for direction indicators and headlights; 11 — trunk lock drive switch; 12 — diagnostic connector; 13 — connector of the instrument panel wiring harness to the connector of the wiring harness of the air supply box; 14 — rear window heating switch; 15 — alarm switch; 16 — brake light switch; 17, 18 — connectors of the instrument panel wiring harness to the head unit and audio device; 19 — driver airbag contact ring; 20 — driver airbag module; 21 — mounting block connector; 22 — mounting block; 23 — electric power steering; 24 — cigarette lighter; 25 — backlight lamp for the heater control unit; 26 — backlight lamp; 27 — connector of the instrument panel wiring harness to the connector of the ignition system wiring harness; 28 - controller; 29 — clutch pedal position sensor; 30 — electronic accelerator pedal; 31 — additional resistor; 32 — heater electric motor; 33 — heater motor switch; 34 — control unit for the door lock system; K1 - relay for the electric fan of the engine cooling system; K2 - door lock relay; K3 - additional starter relay; K4 - additional relay; K5 - relay-interrupter for direction indicators and hazard warning lights; K6 - windshield wiper relay; K7 - headlight high beam relay; K8 - sound signal relay; K9 - relay for low beam headlights; K10 — relay for turning on the heated rear window; K11 - main relay; K12 - fuel pump relay.
Lada Largus instrument panel pinout
Lada Largus instrument panel pinout
Lada Largus instrument panel pinout
Validation check
If the part is soldered, then this stage will guarantee its functionality. For testing we need to know the denomination. How to identify it by markings was written above.
The algorithm of our actions is as follows:
- We connect the probes as in the previous testing.
- We turn on the resistance measurement (the range is shown in Figure 6) in a mode greater than the nominal value, but as close as possible to it. For example, we need to test a 47 kOhm resistor, therefore, we need to select the “200K” range.
Figure 6. Resistance measurement ranges (marked in red) - We touch the terminals with the probes, take readings and compare them with the nominal value. If they do not match, and this can be guaranteed with a probability close to 100%, do not despair. Both the error of the device and the tolerance of the element itself should be taken into account. A little clarification is necessary here.
What is clearance and how important is it?
This value shows the possible deviation of a given series from the specified nominal value. A correctly calculated circuit must take this indicator into account, or appropriate adjustments are made after assembly. As you understand, our friends from the Celestial Empire do not bother themselves with this, which has a positive effect on the cost of their goods.
The result of such a policy was shown in Figure 4; the part works for some time until the limit of its safety margin is reached.
- We make a decision by comparing the readings of the multimeter with the nominal value; if the discrepancy goes beyond the error limits, the part definitely needs to be replaced.
How to test a variable resistor?
The principle of operation in this case is not very different; we will describe them using the example of the part shown in Figure 7.
Rice. 7. Trimmer resistor (internal circuit marked with red circle)
The algorithm is as follows:
- We take a measurement between legs “1” and “3” (see Fig. 7) and compare the resulting value with the nominal value.
- We connect the probes to terminals “2” and any of the remaining ones (“1” or “3”, it doesn’t matter).
- We rotate the adjustment knob and observe the readings of the device; they should change in the range from 0 to the value obtained in step 1.
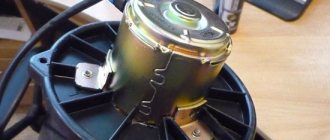
Fan Resistor Functions
The Kalina cooling fan resistor is connected in series to the power supply circuit, which allows the engine to operate at different speeds. The resistance of the resistor changes depending on the temperature of the coolant and the load on the engine, and the current and speed of the fan motor change accordingly. This helps to eliminate sudden temperature changes and maintain optimal engine temperature in all engine operating modes. The fan resistor has a thermal fuse, which de-energizes the electric motor from overload (for example, when the shaft is jammed) and thereby protects the electrical wiring from fire.
What tools should be used for diagnosis?
You can check the power supply to the engine connector with a regular test. But when carrying out full diagnostics and identifying faults of a high degree of complexity, a multimeter is needed. If you have knowledge of using a multimeter, you can easily measure the power on the connectors and check the resistance, which will make it possible to quickly troubleshoot wiring problems or identify problems with resistors.
In addition, measuring resistance and diagnosing wires in this mode will greatly facilitate the search for a short circuit.
You can diagnose PWM controllers for electrical systems that control fan speed using an oscilloscope. But purchasing this device for diagnostics is not advisable due to its high cost.
Isn’t it better to use the diagnostic methods listed below, which in most cases will help identify the sources of malfunctions in the stove fan without expensive equipment. So let's get started.
If it is impossible to start the fan , this situation occurs due to:
- worn brushes. When performing the functions of a conventional DC motor for a stove fan, the main problem is the abrasion of the brushes, with the help of which voltage is supplied to the commutator. With strong abrasion of the copper-graphite brushes, the pressing spring force that creates the contact is reduced, which in turn leads to the fan operating at a variable frequency. For example, it turns on when you hit the front panel or hit potholes in the road.
- faulty electrical control circuits. The source of the problem is contacts that have been sealed off due to strong heating;
- break in wires, oxidized contact;
- blown fuse element. If a fuse constantly blows (after replacing it), the technician must find a section of the circuit with a short circuit.
Self-diagnosis of stove malfunction
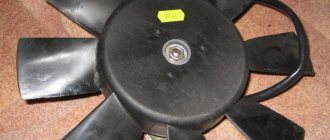
If the safety elements are intact, you need to check how efficient the fan is by first opening its power supply connector. The electric motor in the stove is located either in the space under the hood (behind the engine shield near the passenger compartment), or under the dashboard of the car interior.
The location of the heating fan and how to open it are in the vehicle operating instructions. There is also a circuit for starting the fan.
When studying the circuit, you need to find out which of the connector pins of the electric motor is positive when starting the first speed of the fan. Next, any contact of the control device is connected to this pin, another of its contacts is shorted to ground, the ignition system is turned on and the fan switch is turned to any position. If the control lamp turns on, then the cause of the fan malfunction is the electric motor. Otherwise, fan malfunctions occur due to a break in the wiring leading to the heating switch.
Some useful tips
Any car owner who has to carry out work to replace or repair a heating system radiator wonders about the reason for the failure of the unit
It is important to consider 2 factors that allow you to extend the continuous operation of the device
- It is necessary to timely replace the system air filter. A clogged radiator is more likely to fail. There is a set period for periodic replacement, but you can do it more often, for example, change the filter after winter use and at the end of the summer season.
- Replace the coolant in a timely manner. This operation should be carried out every 60 thousand kilometers. Accumulating wear products destroy the light metal of the radiator, depriving it of its tightness. Many car owners believe that by periodically adding antifreeze to the system, they will not have to change the unit. However, corrosion products continue to accumulate, having a detrimental effect not only on the heater radiator, but also on the engine as a whole.
A pressing issue is the use of high-quality antifreeze. You should buy it from trusted sellers and do not use water in the cooling system.
The operation of any vehicle involves not only the maintenance and repair of parts and systems that ensure its movement. Assistive devices play an important role in the operation of a car. And if the radiator of the cooling system fails, not only the microclimate in the car is disrupted, but it also becomes unsafe to drive due to fogging of the windows.
The heating system in the cabin of the budget Lada Kalina model can significantly increase comfort for the driver and his passengers. It ensures that the required temperature conditions are maintained inside the car. Along with such useful options as:
- "ABS";
- airbag;
- electric power steering;
- electric front windows;
- front seat heating function,
The design of the interior heater allows the manufacturer to achieve a fairly acceptable level of equipment, which is very worthy for a small-class Lada Kalina model and makes it competitive among its rivals in this segment.
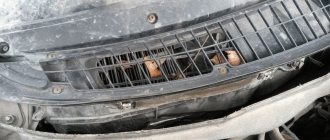
The main reasons for the failure of the stove fan
There are many more reasons for failure, they arise for a variety of reasons, we will look at the most basic causes of failure, which even an ordinary car enthusiast who is not involved in professional repairs can eliminate.
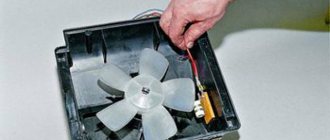
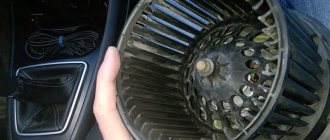
The stove brushes are worn out or damaged
In such a situation, you need to disassemble the stove motor and be sure to replace the brushes. To do this, the impeller wheel is removed from the electric motor housing (it is usually secured with latches). If the catalog of automobile spare parts does not contain the necessary brushes, then you can unsolder the old analogues and replace them with identical ones in size. As a last resort, graphite-copper brushes are filed using a needle file.
Naturally, soldering brushes cannot be done without solder, rosin and a soldering device. After replacing the brushes when assembling the electric motor, it is necessary to clean its insides from the wear product of the outdated brushes.
If squeaking or noisy sounds occur during operation of the fan, it is necessary to lubricate the bushings with a lithol solution when repairing it. To do this, a small portion of lubricant is placed on the bushing (its end) and then heated to ensure it flows inside. When the fan operates silently, lubrication of its bushings is excluded, since the lubricating solution, trapping dust, turns it into a viscous paste, making it difficult for the fans to operate .
The fan runs at maximum speed or does not switch.
If the fan only operates at maximum speed or it is impossible to switch to one of its speeds, this problem occurs due to damaged additional resistors used in the electrical circuits on most machines.
How to test a resistor?
Additional resistors are checked using a multimeter. The diagnostic process consists of measuring the resistance value of the terminals of this electrical element, as well as comparing the obtained values with the resistor values specified in the instructions for a particular machine. In this case, it is worth checking the condition of the thermal fuse, which can burn out if there is a short circuit. Sometimes a problem arises when the resistor is desoldered due to its high heat. A new resistor with identical parameters is selected on the radio market.
The automatic heating control system does not function.
The sources of the problem are the temperature sensor, the sensor that fixes the position of the air dampers, the control electrical circuit, as well as the automatic electronic control module unit. Using the above information, you can easily determine the cause of the stove fan failure, and if you have experience working with electricity, you can repair this element yourself.
How to change the heater radiator on a Lada Kalina
The “weak point” in the interior heating system of the VAZ Kalina is the heater radiator. The heat exchanger on this car is made of aluminum (tubes and honeycombs) and plastic (tanks), so the service life of this part is not that long. Over time, the radiator loses its seal and begins to leak, which can lead to serious problems. The designers placed the engine ECU under the heater housing. If the radiator leaks, the antifreeze flowing from it gets onto the control unit, which causes it to burn out.
There is only one way to solve the issue of a leaking heater radiator on a VAZ Kalina - replace the damaged heat exchanger with a new one, since aluminum heater radiators are not repairable. But here a second problem arises - how best to carry out the replacement. The heater on the VAZ Kalina was not designed well, so replacing the radiator is a complicated procedure.
According to the automaker's recommendation, replacing the heater radiator with a Kalina can only be done by removing the front panel from the car. Removing the panel is a labor-intensive operation due to the large number of fasteners, and at the same time it is necessary to dismantle a number of interior elements - the front seats, steering column, pedal unit. An additional negative factor in replacing the heater radiator on a VAZ Kalina with removing the front panel is the appearance of “crickets” after assembly.
The only advantage of the replacement technology recommended by the automaker is that no alterations or modifications to the heater are required to remove or install the heat exchanger. Car enthusiasts have come up with alternative methods for replacing the heater radiator without removing the front panel, but each option has disadvantages.
Features and nuances of the heater design
Note that problems during replacement are caused not by dismantling, but by installing a new radiator. There are two main nuances that make it difficult to fit the heat exchanger into the heater housing. The first one is the installation side. The radiator is pulled out towards the pedal block, and the pedals themselves prevent the radiator from “coming out”. But this does not cause problems during dismantling, since the leaking heat exchanger can be sawed and removed. But it’s impossible to install a new radiator because of the pedals.
The second nuance is the design of the radiator itself. The heat exchanger fittings for connecting the cooling system pipelines are long and pass through the engine shield. Thanks to this, the connection of the pipes with the radiator is carried out in the engine compartment and if the fastening clamps are loosened, the antifreeze flowing through the leak does not enter the passenger compartment. But due to the long fittings, you can only pull out the heater radiator by moving the heater housing toward the passenger compartment, and this is only possible with the front panel removed.
The replacement methods that car enthusiasts have come up with involve some modifications to the heater elements, allowing the installation of a heater radiator. In the future, these modifications make it possible to replace the heat exchanger without problems and in a short time.
Removal algorithm
As for removing the element, with all three replacement methods without removing the panel, dismantling is performed in the same way. The algorithm for removing the heater radiator is as follows:
- Drain the antifreeze from the cooling system.
- We dismantle the engine air filter along with the air duct.
- Disconnect the battery terminals and remove the battery from the car.
- Remove the battery mounting plate.
- Under the steering rack we find two pipes through which coolant is supplied to the heater radiator, loosen their clamps and pull the tubes off the fittings.
- Near the fittings we find a nut that secures a mounting plate with a rubber seal through which the heat exchanger fittings pass to the engine shield. unscrew this nut.
- Let's go to the salon. On the driver's side, remove the decorative side trim of the center console.
- Unscrew the gas pedal and move it to the side.
- We remove the brake light sensor located near the brake pedal.
- Since it will not be possible to remove the brake pedal without dismantling the steering column and mechanism, we do this. We remove the bracket for fixing the pin that connects the brake pedal to the vacuum booster, remove the pin and bend the stop plate of the brake light sensor. After this, we lift the pedal up and it does not interfere with removing the radiator.
- Unscrew the three screws securing the radiator to the body.
- Since the radiator outlet is blocked by fittings, they need to be sawed off or broken off.
- After sawing off the fittings, the radiator will “come out” of the seat.
But dismantling the heat exchanger is only half the battle; you still need to install a new element, but the fittings prevent this from being done.
Radiator installation methods
You can install a new radiator by:
- shortening fittings;
- trimming the heater housing;
- expanded installation of a heat exchanger.
One of the methods for installing the VAZ Kalina heater radiator is to shorten the fittings. Having trimmed them, we put the heat exchanger in place. But using this method, you will have to additionally change the rubber coolant supply pipes to longer ones (the pipes from the VAZ-2109 are suitable) and slightly modify the plate with the seal.
The disadvantage of this method is that after shortening the fittings, their connection with the rubber pipes is located in the passenger compartment, and in the event of a leak at the connection, the leaked antifreeze will end up on the floor.
In order not to shorten the fittings, we trim the body a little on the side and bottom. By cutting out a piece of the case, the window for placing the radiator in the seat will increase, which will allow you to install a new element. After installation, the cut pieces of the body are installed in place and secured with bolts, and the cut line is sealed with sealant. The negative fact of this method is cutting the body. In addition, if the cut lines are poorly sealed, the efficiency of the stove will decrease due to dissipation of air flow.
The third method is an expanded installation. With this installation, the fittings are directed towards the passenger compartment. To connect the heat exchanger of the stove to the cooling system with such an installation, you will need long pipes and special corner adapters with which the tubes are connected to the fittings. This installation method does not require cutting the body or shortening the fittings, but it is not suitable for the VAZ Kalina equipped with air conditioning, since some elements of the air conditioning system interfere with the pulling of the tubes.
It is up to the car owner to decide which replacement method to use. Finally, a little advice - during the work process, pay attention to the ECU - move it to another place or at least securely wrap it with plastic film to protect it from antifreeze.