Car manualsManuals. Adviсe. Scheme. Photo
Guide selection:
Click to open menu
Chevrolet Niva
Service and operation
1. Vehicle structure 2. Recommendations for operation 3. Malfunctions along the way 4. Engine 5. Transmission 6. Chassis 7. Steering 8. Brake system 9. Electrical equipment 10. Body 11. Vehicle options 12. Car care 13. Purchasing spare parts 14. A trip to a service station 15. Winter operation of the car 16. Preparing for technical inspection 17. Applications
Manuals → Chevrolet → Niva (Chevrolet Niva)
Replacing an additional heater fan resistor
Disconnect the negative cable from the battery. Disconnect the fan casing from the heater radiator casing and remove the fan guide casing (see above).
For clarity, the operations for dismantling the additional heater fan resistor were performed on the fan casing removed from the vehicle.
Disconnect the wire lugs from the terminals of the additional resistor.
Use a screwdriver to pry up and remove the two spring washers securing the housing of the additional resistor to the fan casing.
Remove the additional resistor from the fan casing.
We carry out assembly in reverse order.
Video
This is interesting: Replacing the Chevrolet Niva wheel stud
Self-diagnosis of stove malfunction
If the safety elements are intact, you need to check how efficient the fan is by first opening its power supply connector. The electric motor in the stove is located either in the space under the hood (behind the engine shield near the passenger compartment), or under the dashboard of the car interior.
Read also: Why do you need a coffee machine for the office?
The location of the heating fan and how to open it are in the vehicle operating instructions. There is also a circuit for starting the fan.
When studying the circuit, you need to find out which of the connector pins of the electric motor is positive when starting the first speed of the fan. Next, any contact of the control device is connected to this pin, another of its contacts is shorted to ground, the ignition system is turned on and the fan switch is turned to any position. If the control lamp turns on, then the cause of the fan malfunction is the electric motor. Otherwise, fan malfunctions occur due to a break in the wiring leading to the heating switch.
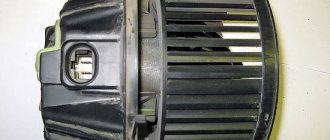
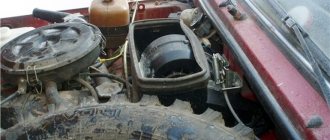
6. Removing and installing the heater fan and additional resistor
Heater block
| 1 – heater radiator; 2 – screw; 3 – air flow distribution box; 4 – executive motor of the “fresh/recirculated air” switching valve; 5 – screw; 6 – heater fan; | 7 – heater fan casing; 8 – screw; 9 – block of resistors with overheating protection; 10 – screw; 11 – lever of the central damper; 12 – damper lever that controls air temperature |
Removal
| EXECUTION ORDER |
| 1. Remove the glove box. |
| 2. Disconnect the electrical connectors from the auxiliary resistor (9). |
| 3. Disconnect the electrical connector from the heater fan (6). |
| 4. Unscrew the screw (10) and remove the additional resistor. |
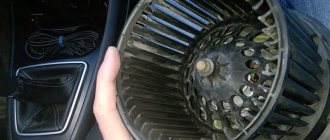
| 5. Pull the heater fan down. |
Installation
| EXECUTION ORDER |
| 1. Install the heater fan. |
| 2. Install an additional resistor and secure with a screw. |
| 3. Connect the electrical connectors of the additional resistor and the heater fan. |
| 4. Install the glove box. |
Website design and development
After the expiration of copyright, in Russia this period is 50 years, the work becomes public domain. This circumstance allows you to freely use the work, while respecting personal non-property rights - the right of authorship, the right to a name, the right to protection from any distortion and the right to protect the author's reputation - since these rights are protected indefinitely.
© Auto manuals. All information presented on this site is the property of the project or other indicated authors.
Decoding the fuses of the mounting block for VAZ 2109, 2108, 21099.
Decoding will be done in double format, where F1-F16 is the mounting block 2114-3722010-60, 2114-3722010-18, and numbers from 1 to 16 are the old-style mounting block 17.3722.
- 1 (8 A) F9 (7.5 A) – Right fog lamp;
- 2 (8 A) F8 (7.5 A) – Left fog lamp;
- 3 (8 A) F1 (10 A) – Headlight washers, relay and washer valve;
- 4 (16 A) F7 (30 A) – Headlight cleaners, headlight cleaner relay, heater fuse, front and rear window washer motor, radiator cooling fan relay, glove compartment light, rear window heating relay;
- 5 (8 A) F16 (15 A) – Oil pressure lamp, turn and hazard indicators, rear lights, windshield wiper switch gear, brake fluid level lamp, parking brake lamp, “STOP” lamp, temperature and fuel level indicator.
- 6 (8 A) F3 (10 A) – Tail lights and interior lighting.
- 6 (8 A) F6 (30 A) – Window regulators and power window relays.
- 7 (8 A) F10 (7.5 A) – Rear state lighting. numbers, dashboard lighting, cigarette lighter lighting, heater lever lighting.
- 8 (16 A) F5 (20 A) – Horn, engine cooling fan motor and its relay.
- 9 (8 A) F10 (7.5 A) – Dimensions of the left headlight and left rear light.
- 10 (8 A) F11 (7.5 A) – Dimensions of the right headlight and right rear light./li>
- 11 (8 A) F2 (10 A) – Hazard alarm and its lamp.
- 12 (16 A) F4 (20 A) – Cigarette lighter, heated rear window and its activation relay.
- 13 (8 A) F15 (7.5 A) – High beam of the right headlight.
- 14 (8 A) F14 (7.5) – High beam of the left headlight and lamp for turning them on.
- 15 (8 A) F13 (7.5 A) – Low beam of the left headlight.
- 16 (8 A) F12 (7.5 A) – Low beam of the right headlight.
Causes of failure and replacement process
Don’t be surprised by the fact that when the resistor burns out, the stove refuses to work at the first three speeds, but at the fourth it functions quite successfully. This is not difficult to explain, it is the resistor that regulates the operating mode of the stove at the first three speeds; fortunately, its actions do not extend to the fourth speed, so even after it fails, this speed continues to operate successfully.
Chevrolet Niva heater fan operation diagram
Replacement algorithm
So, since during subsequent manipulations you will come into contact with devices whose operation depends on power supply, you must first turn off the power to the heating and ventilation system. This is not difficult to do; you just need to disconnect the negative terminal from the battery. This requirement cannot be neglected, since we are talking about your health and even life.
External glove compartment bolts
Now you will need to arm yourself with a screwdriver, since you will have to unscrew a sufficient number of bolts and screws. Start by removing the bolts securing the glove box, holding it to the console. You will easily find these bolts at the bottom of the console, where the passenger's feet are usually located. After that, open the glove compartment itself and unscrew the internal bolts. You will notice that now it will not hold tightly, it will be able to succumb to your movements and pull it towards you, do this, but it is better not to remove it completely, so as not to complicate the assembly process for yourself later. Disconnect the wires that go to the backlight bulbs. Thanks to these actions of yours, you will now be able to discover the object that you were “striving for” so much. Unscrew one bolt holding the resistor and remove it.
Next, you, of course, need to install a new analogue in the free space and return the glove compartment to its place, performing successive steps in the reverse order.
Replacing the rheostat
Sometimes replacing a resistor will not lead to the desired result, because the problem lies in a technical malfunction of another, no less important device, such as a rheostat. We hasten to draw your attention to the fact that the process of replacing a rheostat is much more complicated, because the device itself is located much deeper. It’s not difficult to guess why the manufacturer “hid it” so deeply, since everyone who has the slightest understanding of electrics knows that the rheostat gets excessively hot during operation, so it is placed next to the fan.
To get to this device, you will still need:
- completely remove the glove compartment;
- remove the fuse panel;
- remove the fan;
- remove the recirculation curtain.
It is inconvenient to unscrew the bolts holding the rheostat, but if you want to restore the operation of the heating system in your own car, make an effort and be patient to complete such technical tasks as efficiently as possible.
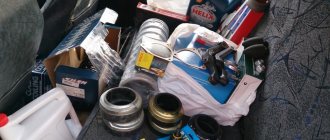
Instruments for measuring resistance
Burnt resistor
After completing these steps, you can be calm and absolutely confident that your stove will work flawlessly, and you will be able to choose the speed mode of the fan at your own discretion, without limiting your desires.
So, the process of replacing a resistor or rheostat is accompanied by some problematic issues, which consist, rather, of inconvenient unscrewing of some parts, which is very important to do in order to reach the space where the designated devices are located. All other actions will not be difficult even for beginners if they follow the proposed algorithm.
DIY fuse replacement
One of the reasons why the heating system refuses to work is a burnt-out fuse for the VAZ-2112 stove, located behind the heater. The fuse that belongs to the heating system is marked F7. The current strength is at 30A. This part is also related to the operation of the cigarette lighter, optics washer, lighting system in the glove compartment and heating on the rear window. Thanks to such a system, you can easily determine that it is the fuse for the VAZ-21124 stove that needs to be replaced - not only the heater will refuse to work, but also all the elements that were listed above.
There is nothing difficult in replacing the VAZ-2112 heater fuse, you already know where it is located and what marking it has. We simply remove the burnt out part and install a new one in its place. But fuses don't just blow. This is caused by a short circuit in the car circuit. If it is not found and repaired, the fuse will blow again and require replacement. And this is much more difficult, because in some cases it is necessary to go through the entire circuit of the car in order to detect the short one.
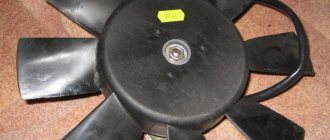
How does the Niva Chevrolet heater fan work?
Like any automobile electric motor, the heater fan on the Chevrolet Niva is a DC commutator motor with the ability to stepwise adjust the speed. A motor with catalog number 2123-8118020 with a removable impeller on bushings is installed on the conveyor ; however, there is an alternative to it on floating bearings from the Luzar company with catalog number lFh-01211 ; there is a similar bearing motor from the Boutler company.
The stock engine can reach a peak of 3000 rpm , while the analogs spin up to a maximum of 2750 rpm . The maximum current consumption for the Luzarov motor is 25 A , for the native one - about 18 A.
Heater motor luzar lfh-01211 12V/14A.
The difference is significant, since the heater motor circuit is protected by fuse F18 rated 25 A.
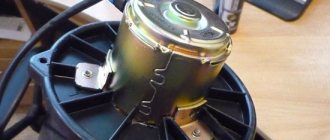
Additional resistor
The operation of the electric motor in four modes is ensured by an additional resistor , which often causes various malfunctions. Its catalog number is 2111.8101012 or 2123-8118022-01 .
Additional resistor 2123-8118022-01.
At the first speed, the engine should consume no more than 5.1A , at the second and third 9 and 14A, respectively. At the maximum, fourth rotation speed , the voltage is supplied bypassing the resistor. Actually, all possible culprits for the malfunction of the air supply to the cabin are indicated; it’s time to name the symptoms of the malfunction.
Types of resistors, their features
Of the resistors described above that are used in the design of a car, two types can be noted - load, they are also constant and variable. In general, these are two main types that have fairly wide application in various fields.
Of course, there is a whole range of different resistors that differ in their design features. For example, thermistors, in which the resistance changes with temperature, or photoresistors, which change their parameters depending on the illumination. But we will not touch on them for now, but will consider only the two types indicated.
Fixed resistors are so called because the resistance they create is constant.
For example, if it is indicated that the main parameter of a given element is 30 Ohms, then it provides the resistance of exactly this value and it is impossible to change it.
In variable resistors, the resistance can be changed, manually. An example of this is the already mentioned control of the electric motor of the heating system.
Variable resistors also include trimmers.
In such resistors, you can also change the parameter manually, but its adjustment is not performed at any time, as is done in a variable one, but only when it is necessary to reconfigure the operation of the entire circuit in which it is included for a long period.
Trimmers are not used in vehicles, although they can often be found in household appliances.
Step-by-step procedure for dismantling the stove motor
The stove motor is not so easy to get to!
Before we begin dismantling the stove, we prepare all the necessary tools and make sure that the key is not inserted into the ignition switch. To make it easier to dismantle the stove motor, the manufacturer recommends dismantling the entire dashboard, along with the instrument panel, wiring and other fasteners, followed by their dismantling and removal from the interior
However, we consider this method to be too long and not rational, because it is much simpler and easier to dismantle the motor simply by looking from below
To make it easier to dismantle the stove motor, the manufacturer recommends dismantling the entire dashboard, along with the instrument panel, wiring and other fasteners, followed by their dismantling and removal from the interior. However, we consider this method to be too long and not rational, because it is much simpler and easier to dismantle the motor simply by looking from below.
- So, to do this, we dismantle the glove compartment, otherwise there is no way to get the engine out of the seat.
When dismantling, we must be careful.
Remove the air duct on the right side and the power plug on the motor body itself. Next, using a Phillips screwdriver, unscrew the three screws connecting the motor to the impeller.
Then, using long flat screwdrivers, insert them in the center and separate them from each other
(When carrying out this work, pay special attention to the position of the pulley stopper and the impeller, because it can simply fly out - approx.).
Or, if you do not want to disconnect the motor from the impeller, you can unscrew the four screws in the air intake and remove the entire assembly.
Next, we remove the entire structure and begin to inspect it.
Inspection of the stove motor and replacement
We inspect the motor and impeller for damage.
Depending on the presence of certain malfunctions, the stove motor may need:
- Cleaning and blowing the impeller from dirt and dust.
- Lubricate all moving parts to avoid heat and unnecessary friction.
- Replacement of power wires or rubber pipe.
In order to diagnose the condition of the motor, you just need to bring its terminals (red and black wires directly to the battery - approx.). And if the motor is working, it will turn on at maximum power.
This is interesting: Replacing the critical brake fluid level sensor Chevrolet Lanos 2005 - 2009
Selecting a resistor by resistance
Most people, when an electrical appliance fails, send it in for repair or replace it, although in many cases it is the resistor that is to blame, especially since it is one of the most common elements in any circuit. But there are also those who undertake repairs on their own.
And often DIY repair enthusiasts have a question about how to choose the right resistor for a particular circuit.
To do this, let's take the simplest circuit, including a power source and one consumer.
Even at the beginning, it was indicated that electricity has three main characteristics - voltage, current and resistance. It is based on these parameters that all the necessary calculations are made using Ohm’s law.
According to this law, since we need to determine resistance, we should divide the voltage by the current.
For example, our power supply provides a 12 V circuit with a current of 0.02 A.
To determine the resistance, we carry out mathematical calculations - 12/0.02 and get a circuit resistance of 600 Ohms.
Now directly about how to calculate the resistance of a resistor for use in a particular circuit. For example, let's take a 12 V power source and a consumer (3.5 V incandescent lamp, 0.28 A).
First, the lamp resistance is calculated - 3.5/0.28 = 12.5 Ohms. Now we find out how much current will flow through the existing lamp - to do this, take the voltage of the power source and divide by the resistance: 12/12.5 = 0.96 A, which is 3.5 times the current required for the consumer to operate, and if you connect consumer, then the lamp filament will simply burn out.
To prevent burnout from occurring, a resistance in the circuit of 43.75 Ohms (12.5 * 3.5) is required. And since the lamp itself creates resistance, an additional 30 Ohm resistor must be connected to the circuit. During the calculations, we get - 12 V / 42.5 Ohm (lamp and resistor resistance) = 0.28 A.
That is, we received the current strength necessary for normal operation of the consumer. In this case, the element included in the circuit acted as a current limiter.
What kind of malfunctions can there be?
If the engine is working properly, but the cooling fan is not working, then this condition of the ventilation and heating system may be caused by a simple wiring break. In this case, a thorough visual inspection is carried out while simultaneously testing the electrical circuit with a tester.
Sometimes a malfunction of the cooling and heating system manifests itself in the constant rotation of the fan motor at maximum speed. Despite the apparent insignificance of such a breakdown, it can lead to an excessive increase in temperature in the cabin.
In addition, operating the stove in this mode produces the maximum noise level, which also creates discomfort. The reason for this “behavior” of the ventilation and heating system may be a malfunction of the additional resistor. Replacing this element allows you to completely eliminate the damage.
Purpose
The main purpose of a resistor is to create resistance to be able to control and adjust the current and resistance. In fact, it is a kind of filter that allows you to obtain electricity with certain parameters at the output.
It provides all this by holding current, dividing and reducing voltage.
The main parameter of a resistor is the resistance it creates in the circuit, and it is measured in Ohms.
Resistors in the electrical circuit of a car.
It is precisely because of its function that this element is so often used in cars. Below we will look at some of the main components of a car, where a resistor is used and what specific function it performs there.
Important nuances
There are several important points that must be taken into account when changing the heater fan on a Chevrolet Niva. Here they are:
- The cabin filter cover should be removed very carefully, since the latches that hold it in place are easily broken. This point is especially relevant if you have to change the fan in the cold;
- when lowering an unscrewed electric motor, you should remember that there is a small guide bushing on its shaft, which is very easy to lose: it falls, rolls down the glove compartment directly into the engine compartment and it will be very difficult to find it there;
The guide bushing from the Chevrolet Niva heater fan is very easy to lose
Installing a LUZAR fan on a Chevrolet Niva is justified only as a last resort
Replacing a broken fan on a Chevrolet Niva is not that difficult. Even a novice car enthusiast who has held a Phillips-head screwdriver at least once in his hands can cope with this task. The main thing is not to damage the latches on the cabin filter cover and not to lose the fan guide bushing.
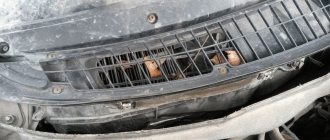
Location of the heater resistor on VAZ 2110-2112
To replace a burnt-out resistor yourself, it is enough to know where the part is located, as well as to have a minimum set of tools on hand. Regardless of what year the car is, the location of the rheostat remains the same - in the engine compartment, near the heater fan. During a visual inspection, this resistance block cannot be seen, because it is hidden by a plastic cover (“frill”).
For an accurate understanding of where the part is located, here is a photo.
Heating and ventilation system components
The heater fan (ME-255) supplies air to the passenger compartment through air ducts. Its rotation speed is controlled by a three-position switch on the panel.
An additional resistor is designed to reduce the fan rotation speed (intermediate rotation speeds).
The heater radiator is installed in the passenger compartment under the panel in a plastic case and serves to transfer heat to the interior.
And also interesting: What are the differences between the Lada Bronto and the regular Niva?
The heater valve is installed at the inlet of the heater radiator and serves to regulate the flow of antifreeze that passes through it.
The damper control levers serve to distribute air flows that are directed into the cabin, as well as to control the heater tap.
The design of the heater has a number of disadvantages, for example, strong fan noise, as well as its low performance. We'll talk about this and other problems in the improvements section.
Keywords: stove 4x4 | 4x4 air ducts
- AvtoVAZ recalls Lada Vesta, XRAY and Largus due to problems with brakes
- What is the fuel tank volume and range of the Lada XRAY?
- Pros and cons of Lada Granta Cross
- What accessories for Lada 4x4 are best to choose?
Cooling system
So, the load resistor is used in the car’s cooling system, or more precisely, in the radiator fan power circuit.
It is worth noting that previously this electrical element was not used in this circuit, and everything worked very simply - when a certain coolant temperature was reached, the temperature sensor closed the contacts of the fan power circuit, and it started working.
The use of a resistor made it possible to make the fan motor operate in two or even three modes.
The process of supplying power to the fan has changed somewhat. Relays have also been added to the system, and in modern cars the electronic control unit is already responsible for turning on the fan.
If only fourth speed works
In cases where the motor refuses to work at the first, second and third speeds, but turns perfectly at the fourth, the same resistor with three isolated windings is to blame. If you can’t buy it, you can try to restore it yourself. True, only in the case when the thermal fuse has blown, naturally, no one will rewind the windings, the game is not worth the candle.
Fan resistor
You can remove and check the resistor without dismantling the engine. It's done like this :
- Use a Phillips screwdriver with a short blade to unscrew the rightmost screws securing the glove compartment.
Unscrew the rightmost screws securing the glove compartment.
Move the glove compartment aside to get to the resistor.
We remove the contact block.
Unscrew the screw securing the resistor.
Built-in fuse
To replace the built-in thermal fuse, any type KSD-160 or RY01-165 is suitable . They work up to a temperature of 150-165 degrees . To solder a new resistor, be sure to use low-melting solder so as not to overheat the part, and during soldering, hold it with thick pliers for better heat dissipation. Good luck to everyone and a comfortable temperature in the cabin!
Why do you need a stove rheostat?
I started the car in the evening, started it, and smelled something burning. The heater was turned on at first speed and when I started it, apparently all the energy was spent to start the engine, but the heater motor did not start. As a result, the heater heater resistor burned out. I turned on the 4th one, it works. And the stove fan works at 4 even without a resistor. Just don’t know why a turbo aircraft is needed at all)
The photo shows that the thermal fuse is located by bending it as close as possible to the heater resistor coil. If the resistor is heated to 117 degrees, its internal circuit melts and breaks. The same thing can happen when soldering a new one. But in fact, it burns out not from temperature, but from increasing current strength when the stove fan cannot move. When the fan cannot move, the load on this fuse increases to 17 amperes.
removed resistor In fact, the resistor itself rarely burns out; the shiny part soldered to pin 4, called a thermal fuse, burns out. Such fuses are still installed in irons and refrigerators. And since this is a fuse, it’s very easy to check whether the resistor itself is working; take any piece of wire and try to short it with a “bridge”. That's exactly what I did. I turned the heater on to first, shorted it out, it works at all speeds. If it works, then it's the fuse. We go to the radio parts store (“World of Electronics” SAMARA on Fizkulturnaya Street) and buy a new one for 15 amperes 117 degrees for 25 rubles. Solder in a new fuse. When soldering, do not overheat, overheating more than 117 degrees will cause the fuse to fail! You need to solder with a heat sink. Overheating will cause the part to become unusable. We put it in place under the glove compartment shelf. Voila, the stove works on all 4.
Features of the VAZ-2114 heating system
First, let's outline how the “fourteenth” stove works. Everything here is quite simple - exactly the same as on the predecessor of the VAZ-2114 - the “nine”. Here are the main details of the heating system of the “fourteenth”:
- radiator;
- faucet;
- fan;
- switch that regulates air flow.
As you can see, there really is nothing complicated here. Warm air is supplied to the cabin through special dampers. In this case, the power of the fan is controlled using a special resistor. Problems with it lead to the fact that the stove does not work in the first and second positions of the switch.
From 2 spirals with different resistances - 0.23 and 0.82 Ohms. Let's look in a little more detail at what role the designers assigned to this part. So, when the fan is turned on in the first position, current is supplied through both spirals. One more click - and the electricity is already flowing one at a time, with less resistance. If you turn on the fan at third speed, the current will be supplied to the motor directly, bypassing the resistor.
Accordingly, if the first two provisions do not work for you, then the problem should be looked for here. In this regard, the question arises, where is the heater resistor on the VAZ-2114. You won't have to look for it for long. The designers placed the resistor above the accelerator pedal. You can get to it without any problems. It is worth noting that the resistor itself fails quite rarely. Most often, problems with the resistor arise after burnt contacts or due to a melted block with 3 tips. In both the first and second cases, the malfunction can be eliminated quite simply. You just need to clean the contacts, or purchase and install a new block.
Let's look at the resistor replacement procedure in a little more detail. You will have to do this if this is the problem. Remove the dashboard console trim located on the left. Next, you need to disconnect the wires from the resistor and unscrew the screw that secures it. After that, all that remains is to remove the part and inspect it. You can use a multimeter to check the resistor for breaks. If we find any, we buy a new one and then install it in place. The installation process is installed in the reverse order described above. As you can see, there really is nothing complicated here. It’s quite possible to fix the problem yourself without spending extra money on visiting a car service center.
By the way, if there are problems with the fan, it is also recommended to check the fuse responsible for its operation. In principle, for any problems with electrical appliances, experienced drivers advise troubleshooting along the path of least resistance, moving from simple to complex. Accordingly, the first thing you should check is the fuses. Moreover, if they fail quite often, you will need to carefully inspect all the wiring.
If problems arise with heating, you should inspect the 40-amp fuse, designated F7. It is responsible not only for the operation of the heater fan, but also for the headlight washer motor, glove box lighting, heated rear window and cigarette lighter. Accordingly, if everything listed above also works fine, then the problem really lies in F7. To fix the problem, you just need to replace it with a new one.
Power dissipation
In addition to resistance, the resistor has another important parameter - power dissipation.
Any resistor acts as a kind of limiter and, due to its resistance, conducts only a certain voltage and current through itself. At the same time, the excess that it did not miss does not accumulate in itself, but converts it into thermal energy and dissipates it.
Therefore, resistors are designated by power dissipation.
The discrepancy between this element and its dissipation power will lead to its overheating and destruction. Power dissipation is measured in Watts.
The power dissipation can be determined both by the voltage passing through it and by the current strength.
As for voltage, the formula for calculation looks like this:
P= U2/R
Where:
- P – power;
- U – voltage in the circuit;
- R is the resistance of the resistor.
To calculate the current strength, the formula looks like this:
P= I2*R
Where:
- P – power;
- I is the current passing through the resistor;
- R – resistance.
An important condition when choosing a resistor for this parameter is that its power dissipation should be twice as large as that obtained in the calculations.
For example, we have a current of 0.1 A and a resistor resistance of 100 Ohms.
Based on the formula, we obtain a dissipation power of 1 Watt (0.12 * 100 = 1), but for normal operation of the element we select a resistor with a dissipation power of 2 Watts.
Note that all manufactured resistors have a strictly defined power dissipation value, which makes their selection easier.
In addition, you can even visually determine what power dissipation the resistor has. Everything is simple here, the larger the element, the higher the value.
Here we looked at resistors - one of the most common elements in any electrical circuit of a car. After all, they allow you to control the basic parameters of electrical energy by influencing just one of its characteristics.
Finally, we note that during calculations it is necessary to monitor the dimension of the parameters. That is, use only amperes, volts and ohms, and if it is indicated that the current is 20 mA, then you should convert this value into amperes, obtaining a value of 0.02 A for calculations.