To work you need to have:
- Heated mirror kit. In my case, these are heating elements made by Salina;
- Copper wire 0.75-1 mm long 8-10 m;
- Small female terminal (2 pcs.);
- Terminal-ring “ground for screw” (2 pcs.);
- Clamp terminal (1 pc.);
- Fuse holder (1 piece);
- Soldering iron, probe, several screwdrivers, needle file;
- Heat shrink, electrical tape.
Note: The above components may differ depending on the connection scheme you choose. In my case, the connection will be made by connecting the heated mirrors to the heated rear window. Below I will provide three alternative connection methods that can also be used.
To enlarge the image click on it!
General information
Modern cars are mostly equipped with a heating system. But vehicles, such as the VAZ, for the most part lack this advantage. However, this does not mean that the situation cannot be corrected. Agree, home craftsmen already redo a lot of things in classic VAZ models. For example, the chassis, engine and much more are being modified. Compared to this, installing a heated mirror system seems like baby talk.
All you need is free time, desire and theoretical knowledge, which you will get from this article. In general, there are two ways to implement the plan. One of them is the installation of heating elements, the second - light bulbs. We will look at each of them, and you can decide which one you like best.
Using heat lamps
The essence of this method, as you probably already guessed, is that several lamps are installed in the housing, which are insulated and warm up the mirror. For these purposes, a pair of 12-volt lamps and some wire will do. Of course, in this case the lamps are not used for illumination, do not forget about this. Their heat will be quite enough to free the mirror from ice in a couple of minutes.
Naturally, the first step is to dismantle the mirror. To give it better thermal insulation properties, the body can be additionally insulated. It’s up to you to decide which material to use, since their choice is quite large. It can be paronite, textolite, varnished fabric and much more. In addition, the material will act as insulation in case the plus of the lamp comes into contact with the mirror body. But since in most cases the side mirror housing is made of plastic, you have nothing to fear. In principle, a thin layer of foil can be glued on top of the same PCB. It will be used as a heat reflector. Do-it-yourself mirror heating for VAZ-2101 and VAZ-2107 is not much different.
Varieties
There are several options for organizing heated exterior rear-view mirrors, which are conventionally divided into electrically dependent and independent of the on-board power supply at 12 V or 24 V.
The implementation of heating depends on the specific material you will use.
The following varieties are distinguished:
- Film heaters. Very easy to use, easy to install and at the same time quite effective. An option for the lazy, if you will;
- Heating from light bulbs. Initially, all motorists who did not have standard heating, but wanted to get it, used light bulbs. Today the technology is outdated, but still relevant;
- Conductor elements. It uses a special board that has heating elements. There is nothing difficult to install, and the range is extensive;
- Wire. A special wire is used as heating. It can also be implemented if you follow some rules.
To provide some clarity, I propose to now consider each option separately.
Based on the information received, you can decide what suits you and which idea is better to abandon.
You can organize homemade heating on any mirror. It all depends on your wishes, skills and financial capabilities.
Judging by publications on Drive2, homemade heating systems are most often found:
- for VAZ 2110;
- Daewoo Nexia;
- Daewoo Lanos;
- VAZ classic;
- Lada Kalina;
- Renault Logan;
- on Gazelle trucks;
- VAZ 2109;
- Renault Sandero;
- Chevrolet Aveo, etc.
If you want something similar for yourself, I suggest you get acquainted with short excursions into the issues of creating heating using one method or another.
Using light bulbs
This is the oldest method among all existing ones. But there is absolutely nothing surprising about the fact that incandescent lamps are used for heating.
In fact, such light bulbs are heating devices. They spend about 90% of electricity on heat, and only 10% goes to light emissions. To create a heating system, it is best to take a pair of low-power 10-watt light bulbs, or 1 double-filament light bulb, which will allow each spiral to be connected separately. Usually their size fits perfectly into the mirror body. It is only important to place the lamp so that it does not touch the internal surfaces of the mirror and the body itself.
The process of installing the heater itself is quite labor-intensive. But many cope on their own.
If you are interested in the details of the process, it can be divided into several stages. Think carefully before using lamps. However, the method is outdated and there are a number of alternative solutions.
But I will still describe the process step by step. It looks something like this:
- the mirror housing is removed;
- the body is disassembled;
- the front wall is treated with heat-resistant material;
- a layer of foil is applied on top of the insulation to reflect heat;
- the light bulb is fixed with wires using a socket or clamps;
- everything is carefully isolated;
- connect to power;
- display button;
- assemble everything in reverse order;
- check functionality;
- start heating.
Active stage of work execution
Often you have to face the fact that there is not enough space to place the appropriate socket under the lamp. In this case, there are only two options. One of them is to take a smaller light bulb, which is not recommended, the second is to use a heat-resistant clamp, which takes up virtually no space. Don't forget to solder the wires and carefully insulate this area. In any case, the most important thing is to prevent the lamp from touching the back of the mirror. This can lead to both damage to the latter and destruction of the heating element during movement.
Next, you should connect the heated mirrors to the vehicle's electrical network, for which you will need a pair of wires with a dense and flexible sheath. At this stage it is extremely important to ensure free adjustment of the mirror. To do this, you need to lay the wires correctly. They should not be stretched, nor should they bend in some areas.
About AvtoVAZ, Hermes, customer focus and the couch drifter (part 2)
In the last post, I talked about the reliability of VAZ boxes, the plant’s responsiveness and care for customers, and the “best” dealer selling buckets. Link to post at the end.
On 04/06 a meeting took place with Yardrey. The meeting was unsuccessful, since I didn’t hear anything new during the consultation and he said that at the moment an examination was needed, and if completed successfully, he would enter into the ensuing “war” with the dealer in court.
On 04/09 they called from Hermes and scheduled the examination date on 04/14. The examination will be paid for by the dealer, but I can bring my own independent expert to the meeting, but if there is no evidence of the manufacturer’s guilt, the costs of the dealer’s examination and my examination will fall on me. Yardrey's expert said that it is necessary to conduct metallurgy, remove error logs from the machine, etc. In short, the matter is called difficult.
The Hermes representative, in a telephone conversation, did not forget to remind me about the costs of the examination if I was wrong. They certainly know how to apply pressure.
We will definitely carry out an examination from the salon. I talked with a lawyer I know (unfortunately, he is from another city and did not take up this case due to his busy schedule) and he said that their expert must not only confirm these damages, but prove that the destruction of the box occurred due to for improper operation (clutch wear, tire wear, error logs, etc.)
On the one hand, I am calm, knowing how the car was used, and on the other hand, I don’t want to lose money.
There will be another post based on the results of the examination. It’s a shame for our auto industry and this incident will be a lesson for me. I won’t take the car to another dealer, because... The operating manual is the same in any salon. And many thanks to those who supported!
Ps edited specially for @iBorisych.
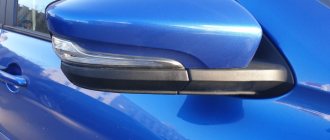
Do-it-yourself heated side mirrors: features
It would be useful to talk about the effectiveness of the method. You probably guessed that this indicator directly depends on the performance of the lamp. For example, a 12-volt product with a power of 21 watts will heat the mirror in 2-4 minutes. However, if you did not pay due attention to the foil sticker, then this result can worsen significantly. In addition, it is not recommended to leave the heating on for a long time. The temperature in the case will gradually increase, which may damage the plastic or mirror.
Heated rear view mirror does not work
Malfunctions in the heated rear view mirror affect vehicle safety. If a breakdown occurs, you can periodically clean the mirror surface yourself. But this is not always convenient and effective, especially in rain and snow.
Heating helps combat bad weather conditions while maintaining excellent visibility for the driver. And if a breakdown occurs and the heated rear view mirror does not work, you can independently determine the malfunction, its causes, and carry out simple repairs.
About safety rules
We have already figured out a little about how to use the first method to heat mirrors with your own hands. “Kalina” or “seven” - you must not forget about safety rules.
Firstly, the connection must be made only through a special fuse, and secondly, the cracks and holes in the side mirror housing must be completely sealed. This is necessary in order to prevent moisture from entering and the possibility of a short circuit.
In addition, always remember not to leave the wires exposed, as this may cause a short circuit in the housing, etc. It is advisable to place the switch in a place convenient for you so that you do not need to be distracted from the road. In principle, following these simple rules is not so difficult.
Basic faults
Additions to the conventional mirror element make driving even more comfortable. Just in case, the repeater makes it clear to inattentive traffic participants where the driver is going to go. Heating will promptly evaporate moisture - raindrops, and will not leave stains that distort the image. The following malfunctions may occur during operation of the machine:
- The fasteners have become loose. Each part is held in place by several fasteners at different points. They may become so loose that tightening them will be useless. Everything will depend on the severity of the damage. In some cases, replacing the fasteners will be sufficient.
- The heating does not work. Check the connection of the wire blocks. Perhaps it is enough to strengthen the wire connections so that they no longer come loose.
- The electric drive does not work. Adjusting the position of mirror devices while sitting in your seat is much more convenient than doing it manually. Check the wiring.
- Turn signal repeater. If the repeater does not work, it means the signal is not reaching it. The problem, again, is the wiring.
- Broken mirror element. It will be enough to replace it with a new part, but during the replacement you should be extremely careful. It is important to prevent splinters from getting under the cover.
Using heating elements for heating
As noted above, today many modern vehicles are sold with mirrors that have a heating function. You can buy such mirrors in specialized stores. But if you do not want to spend money, then you can use an alternative method. To do this, you will need to visit a car store and find a special heating element there. It costs a penny, so buy 2 pieces at once.
Here you will need a little more skill compared to the first method. In this case, it is necessary to remove the mirrors from the car. After this, it is worth separating the mirror element from the plastic. This can be done using heat. The easiest way is to use a household hair dryer. Under constant heat, using a knife, you can separate the mirror surface from the body. In the future, it needs to be thoroughly degreased, since the heating element will be glued.
In principle, you will get a very effective heating of mirrors with your own hands. "Gazelle", unlike a passenger car, requires the installation of heating elements that are more powerful and larger, remember this.
Procedure
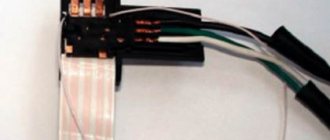
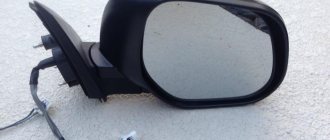
Now you can begin installing the heater. First, remove the holder with the mirror from the case. On most cars, it is enough to pry it with a screwdriver or something flat from below and pull it towards you.
Based on the characteristics of the holder, we choose the method of fastening the wire. If the inner surface of the holder is smooth (as in the photo), then stick double-sided tape on it.
Then we lay a piece of wire on this surface. This can be done arbitrarily, for example, in a zigzag or something else. The main thing is to place it so that the thread covers as much of the surface of the holder as possible. In this case, the wire should not intersect anywhere. Scotch tape will hold the nichrome thread well.
If the inner surface of the holder has any protrusions or fastening elements, then it will not be possible to stick the tape. In this case, a soldering iron will help to secure the wire. Everything is simple here - we apply a nichrome thread to the surface and press it with a heated soldering iron. The plastic will begin to melt and the wire will sink into it. Once cooled, the plastic will become hard and will hold the thread. But here it is important not to overdo it with heating the plastic, so as not to “push” it to the mirror. It is enough just to “drown” the wire in it a little and that’s it.
In this way, we fasten the wire along the accessible surface of the holder without touching the fasteners.
When laying the wire, its ends should be placed towards the side of the holder that is closer to the door, and so that they do not touch each other. To these ends we solder terminals for connecting to the wiring or simply the ends of prepared wires. Then the resulting connections need to be insulated.
Installation of heating system
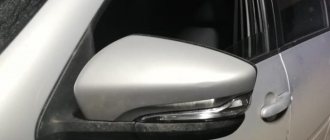
The dimensions of the mirror and the heating element must match. The latter may be smaller by only a few millimeters. If there is no electric mirror drive, then you will need to make a couple of holes in the housing to drain the wires and connect them to the power supply.
Please note that it is important to properly glue the heating element to the mirror. As for the contacts, it is better to use a soldering iron. In this case, you will receive a reliable connection, which must then be insulated. The final step is to glue the mirror surface back to the frame. To do this, the plastic must be degreased. “Moment” is suitable as glue.
Assessing the extent of damage
If the mirror falls off the window, there may be 3 scenarios, on which the method of further fastening depends:
- There were no traces of glue or scratches left on the glass after the mirror fell from there. This is the best option, and you need to glue it back with a special adhesive.
- There was a layer of glue left on the glass when the mirror came off. To re-fix the component, you just need to wipe off the old adhesive composition with a solvent or special substance.
Of course, some brands of cars, for example VAZ, sell brackets for attaching to the roof of the car. There are also universal mirrors with suction cups on sale. However, it is worth considering that installation on brackets requires making new holes. And the suction cups may turn out to be of poor quality and quickly come off. Therefore, the best option is to use glue.
A few important details
So we described how to make high-quality heated mirrors with your own hands in several ways. "Grant", modernized in this way, connects to the network in one way, "Gazelle" - in another, and so on. It is for this reason that there is no point in describing how to correctly route the wiring from the mirror to the on-board electronics of the car. Here you are free to choose your preferred route.
At the very end, you need to bring everything to the power button, which it is advisable to place in a convenient place. Of course, do not forget that everything must be well insulated. It is not recommended to use wires that are too thin, as they can be damaged already at the installation stage.
Required
| Name | vendor code | Price, r |
| Heated, electrically adjustable exterior mirrors with turn signals (LED) | 21910-8201005-20 21910-8201004-20 | 4 500 |
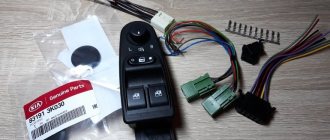
| Joystick/control unit from Lada Kalina (with central locking) | 11180-3709810 | 850 |
| Connector - electric mirror block (female) | CB-00090291 | 150 |
| Block for power window control unit 1118 | CB-00039007 | 50 |
| Connection block to power window button | CB-00033485 | 50 |
| 10 PIN connector with contacts for mirror control | 170 | |
| Wing turn signal plug | 21700-8212104 | 150 |
| Door card blank | 83191 3K030 | 30 |
Where can I buy
: In our online store (category Mirrors Grants, Kalinas, kits for mirror conversion)