The operational characteristics of vehicle power units are largely determined by the quality of the air-fuel mixture prepared and supplied by the carburetor. The equipment previously assembled at the Volzhsky Automobile Plant is no exception. If malfunctions occur in its operation, you often have to carry out maintenance and adjustment of the components yourself. Setting up the DAAZ 2107 carburetor with your own hands makes it possible to save money and quickly prepare the car for a trip.
The sponsor of this article is the website "Interior Design" - this is an information portal about the interior design of apartments and houses, new items, photos, videos, the best styles, options for the perfect combination and recommendations from professionals
Symptoms of a device malfunction
Carburetor failure can look different. The most common situations in which the driver should pay attention to the condition of this unit:
- The car engine does not start even after several attempts. There may be two reasons for this: either there is no fuel-air mixture in the float chamber, or the proportions of this mixture are incorrect and it cannot ignite in time;
- the engine stalls at idle or its operation is unstable. The most common reason for this is a clogged nozzle. In addition, interruptions in the operation of the motor may occur due to damage to any o-ring or hose. Finally, such malfunctions can be caused by a malfunctioning solenoid valve in the carburetor;
- Engine idle speed is too high. This malfunction may occur due to incorrect carburetor adjustment or due to loose air dampers. It also occurs due to too high pressure in the float chamber, resulting from oxygen entering through damaged hoses or sealing joints.
Conclusion
As you yourself have seen, a carburetor is a complicated thing, but you don’t need any special intelligence to adjust the idle speed. Do not try to repeat the procedure if your “Seven” is on gas, the process will be pointless because the carburetor does not work with this type of fuel. You can try to set up the injector, but there is a high probability of only harming the device, since the actions described there are ineffective, so it is better to turn to professionals. All the procedures described and more are clearly demonstrated in the video, where the cheerful specialist easily and simply finds a common language with the carburetor. I wish the same for you, all the best!
Do-it-yourself dismantling of the unit
To remove the DAAZ 2107 carburetor, auto mechanics recommend proceeding in the following sequence:
- The hood of the car is opened, the clamp on the warm air intake hose is loosened using a flat screwdriver, after which the hose is disconnected from the thermostat tube.
The air intake hose is disconnected from the thermostat
The mounting plate of the DAAZ 2107 carburetor is removed manually
The air filter from the VAZ 2107 is removed after removing the mounting plate
The choke cable of the DAAZ 2107 carburetor is disconnected using a screwdriver
The hose for removing crankcase gases from the DAAZ 2107 carburetor is removed manually
The wires of the economizer control system are disconnected from the DAAZ 2107 carburetor without much effort
The hose of the vacuum ignition timing regulator is removed from the DAAZ 2107 carburetor by unscrewing the screws
The solenoid valve control hose is manually removed from the DAAZ 2107 carburetor
The return spring of the solenoid valve of the DAAZ 2107 carburetor is manually removed from the socket
Fuel hoses from the DAAZ 2107 carburetor are removed manually after loosening the clamps
The DAAZ 2107 carburetor mounting nuts are unscrewed with a 14-mm open-end wrench
After unscrewing the fasteners, the DAAZ 2107 carburetor is removed manually
Adjusting the idle speed yourself
The idle speed setting is performed as follows:
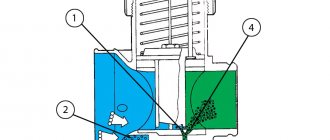
- The minimum speed is set with the carburetor mixture quality screw, at which the engine begins to operate unstably, but so as not to stall (indicated by number 2 in the figure).
- Increase the rotation speed by adding a mixture (indicated by number 1 in the figure).
Repeat this procedure, with the mixture quality screw, until the engine runs stably and when you press the gas pedal sharply, the car should not stall and there are no failures in its operation.
This adjustment method is used very often and with normal driver experience, a positive result is guaranteed.
How to adjust the carburetor
As a rule, after removal, all parts of the carburetor are thoroughly cleaned of dirt and deposits. Let's look at the main stages of cleaning.
Cleaning the jets
Jets are thin channels in the carburetor through which air and fuel are supplied. Mechanical cleaning of these channels is strictly prohibited, so the jets can only be cleaned with compressed air. To purge the channels, motorists use a tire pump. As a rule, this is enough.
Electric car pump, which is convenient for cleaning the jets in the DAAZ 2107 carburetor
But if the carburetor is very dirty, place it in a container with kerosene for half an hour. After soaking in kerosene, even the most stubborn stains are easily removed.
Cleaning the float chamber
The best tool for cleaning the carburetor float chamber is a rubber medical bulb, with the help of which all remaining fuel, along with accumulated contaminants, is carefully pulled out of the chamber. Do not wipe the float chamber with fluffy materials, as fluff may get into the jets.
It is convenient to clean the float chamber of the DAAZ 2107 carburetor with a rubber bulb
Flushing the throttle valve
The throttle valves in DAAZ 2107 carburetors are cleaned using various cleaning compounds purchased at auto stores (most often this product is WD40 liquid).
The damper itself and all adjacent structural elements are washed with liquid: small channels, valves, etc. And the crankcase ventilation channel should also be washed.
Video: cleaning the throttle valve on a VAZ 2107
Checking the throttle opening
Adjusting the VAZ 2107 carburetor - checking the opening of the throttle valve.
To make this adjustment you will need to remove the carburetor.
Next, on the removed carburetor, turn the three-arm lever counterclockwise all the way, indicated in the figure by the letter A.
We take the wire and check the gap, indicated in the figure by the letter B, this gap should be 0.7 - 0.8 mm.
If the gap does not match, then either bend the rod, indicated by the letter B in the figure, or move the tip of this rod to another hole, as shown in the figure.
Self-adjustment of the carburetor
As a rule, when setting up a DAAZ 2107 carburetor, car enthusiasts adjust fuel consumption and idle speed. Let's look at these stages.
Idle speed adjustment steps
Setting up the carburetor in this mode is easy:
- A carburetor with a properly adjusted idle speed allows the car engine to operate stably even with very low CO levels. To do this, the car engine warms up for 10 minutes. After this, the fuel quality screw in the carburetor is turned out as much as possible.
Setup with additional devices
Having obtained a multimeter and a gas analyzer, the adjustment results will be similar to those achieved by car service specialists.
- Adjust the correct ignition angle using a multimeter (connected to the distributor coil) and fix the distributor.
- We insert the gas analyzer into the exhaust pipe and start the car.
- Set the mixture quantity screw (indicated in the figure as number 1) in such a position that the crankshaft rotates within the range of 840-960 rpm.
- We look at the gas analyzer, if the CO value is exceeded, we adjust the quality of the mixture (number 2 in the figure).
- After this, the crankshaft rotation will decrease slightly, repeat step 3. The last steps are repeated until the values are at least a little similar to the factory values. To check, you need to sharply press the gas pedal several times and release it. When configured correctly, the speed increases smoothly and quickly, and is released automatically and without interruption.
Preparing the carburetor for adjustment
VAZ 2107 - in the photo - the car is carburetor and is sensitive to fuel quality, therefore sometimes it needs to correct the capacity of channels and gaps
If the engine starts and runs stably at any speed and under any load, fine adjustment is unlikely to be needed. As a rule, this must be done in cases where the engine's fuel consumption exceeds the nominal values, when the engine is difficult to start, and dips appear in transient operating modes during sudden acceleration. Absence or instability of idle speed can also be treated by adjusting or cleaning channels and cavities.
Sometimes there are situations and clear symptoms that it is necessary to adjust the ignition timing or adjust the valves of the VAZ 2107, but the carburetor may be quite serviceable. Therefore, it is worth adjusting it only when there is confidence in the serviceability of the ignition system, the accuracy of setting the thermal clearances of the valves, after checking the functionality of the fuel pump, and good compression in each of the cylinders.
Adjustment may not bring results if the carburetor is clogged or has obvious mechanical problems or leaks. Therefore, a thorough inspection and assessment of the external condition of the device is necessary. Adjustment and configuration begin only when all these conditions are met.
Adjusting the idle speed of the VAZ 2107
Today we will talk in detail about how to independently adjust the idle speed on a VAZ 2107. It is worth noting that the adjustment on the car is made after carburetor repair, as well as when the engine is idling unstable. Theory
The crankshaft rotation speed at idle should be in the range of 820–900 rpm, and the carbon monoxide (CO) content in the exhaust gases should be in the range of 0.5–1.2% (at 20 °C 760 mm Hg) . Adjusting the idle speed on a VAZ 2107 car is carried out using the adjusting screws for the composition (quality) and quantity of the carburetor mixture. On the new carburetor, plastic bushings are pressed onto the screws, which limit the rotation of the quality screw to 50°, and the quantity to 90°. This is done in order to maintain factory settings during the warranty period.
Adjusting the idle speed should be done on a warm car engine, with the carburetor air damper fully open. To adjust the idle speed, you will need a multimeter and a gas analyzer.
How to adjust the idle speed of a VAZ 2107
1. Prepare the car for adjustment.
2. Before adjusting the idle speed, we check the ignition timing and, if necessary, on the VAZ 2107 we adjust the ignition timing.
3. Connect one probe of the multimeter in the mode for determining the crankshaft rotation speed to the terminal of the primary winding of the ignition coil, and the other to ground.
4. Insert the gas analyzer sensor into the exhaust pipe and turn on the gas analyzer.
5. Start the car engine.
Note:
In the absence of a multimeter, we control the crankshaft rotation speed using the tachometer on the car’s instrument panel.
7. By rotating the mixture composition (quality) screw with a slotted screwdriver, we achieve the required concentration of CO in the exhaust gases. At the same time, the engine speed of the VAZ 2107 will change.
8. By repeating the operations specified in paragraphs 6 and 7, we achieve the required values of the crankshaft speed and CO concentration in the exhaust gases.
9. If it is not possible to adjust the idle speed on the VAZ 2107 within the limits allowed by the restrictive bushings, remove them and make the adjustments again.
10. To check the correct idle speed adjustment, sharply press and release the gas pedal on the car. The engine should increase the crankshaft speed without interruption, and the engine should not stall when the pedal is released.
Let us remind you that the previous article was about cleaning the fuel filter of a VAZ 2107 carburetor with your own hands.
Checking and adjusting the float chamber
Before checking and adjusting the carburetor on the VAZ 2107, you must remove the air filter along with the housing. And at the same time, check its condition, since a clogged dust filter greatly restricts air access to the engine, and this can also affect both the proportions of the working mixture and the operation of carburetor peripheral systems. Once the filter and housing are removed, unscrew the carburetor cap and gain access to most of the jets, the float chamber and the primary and secondary chamber diffusers. To begin, unscrew the plug of the filter mesh at the bottom of the lid near the fuel supply fitting. The mesh is carefully cleaned, washed, the internal cavity of the screw plug is washed, and the condition of the aluminum or bronze sealing gasket is checked.
When cleaning the internal cavities of the carburetor, you must follow important rules. Firstly, it is extremely undesirable to clean with fluffy or hard rags, since the fluff can easily clog the channels and jets. Secondly, when mechanically cleaning channels and jets, you should never use metal objects. They can irreversibly disrupt the throughput of the calibrated holes, then it will not be possible to correctly adjust the VAZ 2107 carburetor. The jets are cleaned only with wood chips, and ideally with compressed air or special cleaning liquids. The cone valve and its seat are cleaned using the same method.
Video tips for setting a stable idle
Before adjusting the fuel level in the carburetor, you need to make sure that the float is intact, has no mechanical damage and does not leak gasoline or sink in it. Otherwise, the brass float is replaced. The float is adjusted by changing the angle of the thrust tabs. The factory recommends maintaining the following clearances - with the needle valve closed, the distance from the float body to the carburetor cover gasket should be 6.5 mm. In this case, the maximum free play of the float body should be no more than 8 mm, and the distance to the gasket in the extreme position should be within 14-14.5 mm. These values are achieved by bending the persistent tabs. Check the operation of the float and cone valve by supplying gasoline with the cap installed, followed by monitoring the fuel level in the chamber.
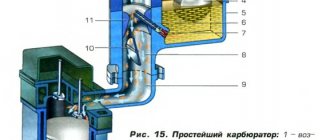
Design of Weber-Ozone carburetors
Unlike many mixture preparation systems on foreign cars, domestic devices have structural simplicity and good maintainability. They do not have complex pneumatic and electronic emission control systems, however, they coped well with their functions, easily adjusting to both the then accepted emission standards and power modes.
The easiest way to understand the operation of a carburetor is to divide it functionally into nine main systems. They are quite simple, sometimes so simple that the concept of a system is hardly strictly applicable to them. However, each of them introduces its own nuances into the VAZ-2107 carburetor setup.
Maintaining the level in the float chamber
To accurately dose the mixture, it is necessary to have a more or less stable level of gasoline accumulated in the chamber that supplies all systems. Then its pressure at the bottom of the chamber will be constant, which is important for the gravitational pressure of the fuel at the inlet to the metering nozzles.
This is implemented quite simply; a thin-walled float is placed in the chamber, which, as gasoline enters, floats up and closes the needle valve at the carburetor inlet. The fuel pump pressure is limited, so excess gasoline will not enter the chamber. As consumption progresses, the valve opens again.
Main dosing
There are two of them, since the carburetor is two-chamber. They consist of spray diffusers, air and fuel nozzles, emulsion tubes in wells. The systems perform precise mixing of gasoline with air at constant flows. It is the ratio of the sizes of the jets that mainly affects the efficiency of the car during uniform movement. The cameras are switched on sequentially, that is, at low loads only the first one is activated. Then the second throttle opens, and the carburetor begins to pump out the maximum of its performance into the cylinders.
Idle system
With Ozone, the fuel supply is organized autonomously when the throttle is closed. Gasoline does not flow from the nozzles of the main metering system, and air bypasses the damper through the idle system, mixing with fuel there. The idle mixture quality adjusting screw and the diaphragm stop screw for pneumatic control of the system activation are also located here. They set the amount of air, that is, the idle speed.
Transition systems of both chambers
These are small holes in the walls of the housing next to the dampers, which supply a small amount of fuel emulsion at the beginning of the throttle opening. Designed for a smoother transition from idle to the activation of the main dosing system of the first chamber and at the very beginning of the throttle opening of the second. They contain their own fuel and air jets.
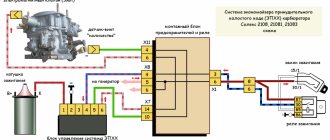
Forced idle economizer
Performs two functions: it turns off the fuel supply during engine braking mode and prevents flashes from occurring in the cylinders after the ignition is turned off. It has a pneumatic drive, the diaphragm of which blocks the diffuser of the idle system. The economizer is controlled by an electronic unit through a vacuum control valve.
6. Accelerator pump
When you press the gas pedal sharply, the main metering systems do not provide rapid enrichment of the mixture at the required speed. Therefore, a small diaphragm-type pump with a check ball valve is installed in the carburetor, which, when you press the pedal, injects a certain amount of gasoline through a calibrated atomizer installed on top into the diffuser of the first chamber.
7. Econostat
Designed for power enrichment of the mixture in maximum modes. Designed as an additional fuel channel in the small diffuser of the secondary chamber. When the air flow here is strong enough, the resulting vacuum simply begins to suck additional gasoline from the float chamber.
Start choke control
To start a cold engine, a highly enriched mixture is required, since cold gasoline in a cold carburetor is poorly atomized and some of it simply condenses on the walls. The problem is solved quite simply; a manually operated damper is installed at the air flow inlet. The driver, by pulling the “choke” button through the cable drive, closes the damper, while at the same time, through a separate arm of the drive lever, the throttle of the primary chamber is slightly opened.
At the first flashes in the cylinders, the vacuum under the throttle increases, and the pneumatic drive of the air damper is activated, which provides some clearance for air intake, determined by the adjusting screw of the pneumatic chamber diaphragm. The presence of a spring-loaded telescopic rod in the damper drive provides a certain freedom, due to which the mixture composition is approximately regulated at start-up. The driver can roughly set the degree of air shutoff by pushing down the button, and the pneumatic system ensures that the engine does not stall due to over-enrichment of the mixture.
Some carburetors were equipped with an automatic choke control system at start-up, but it was not particularly reliable; the choke handle predominated on production cars.
Throttle drive
The machine uses two throttle valves located at the bottom of the carburetor, one for each chamber, with semi-independent sequential control.
At light loads or at idle speed, only the primary chamber should operate. This ensures normal mixture formation, and therefore efficiency. But in an area of high air flow, you will need to open the damper of the second chamber. For this purpose, pneumatic control is used. The pneumatic drive monitors the vacuum in the zone of maximum air flow speed, that is, it actually measures the air flow and, upon reaching a certain threshold, stops blocking the opening of the second throttle. If the first throttle is already open to a certain amount, that is, the driver has depressed the pedal sufficiently, then the second damper begins to obey his commands. The carburetor provides the maximum needs of the engine.
Setting up and checking the launch system
This system is used to start a cold engine and ensures its warming up by approximately 1.5-2.5 thousand revolutions. When the engine warms up, the system is turned off manually and the engine starts idling at a speed of about 800-900 rpm.
Maintenance and adjustment of the starting system comes down to cleaning the vacuum supply channel in the central part of the carburetor, checking the gaps and stroke of the air damper, checking the functionality of the vacuum reverse drive of the air damper, and the starting clearances of the primary chamber damper. With the air damper closed, the lever system should slightly open the fuel damper by 0.8-0.9 mm.
The second important gap is between the air damper and the wall of the primary chamber. When the damper is closed, this gap should be about 5-5.5 mm. It is adjusted by a screw, which is located under the brass threaded plug on the body of the vacuum air damper position regulator. The functionality of the starting system is checked with the air filter installed and the engine cold.
Adjustment without additional devices
If you couldn’t find special devices, you can make adjustments without a gas analyzer, but only if you have a tachometer. The procedure is basically the same, only you need to turn the screws a little differently.
- We set the mixture quantity screw to the position of the nominal crankshaft speed (820/900 rpm).
- Using the quality screw we catch the maximum speed.
- We increase the crankshaft speed to 950-1035 rpm (15%), using the quantity screw.
- We check the quality screw; it should be in the position of the maximum possible revolutions for the current location of the quantity screw.
- We repeat steps 3 and 4 until, after completing the third step, adjusting the quality screw will only lead to a decrease in speed.
- We tighten the quality screw to the nominal speed.
Let's sum it up
As you can see, many of the work on adjusting the carburetor are not difficult, but as practice has shown, not all motorists can perform them correctly. Even if, it would seem, you did everything correctly, it still doesn’t matter whether fuel consumption is high, or the engine doesn’t idle, or the CO level is high.
Therefore, if you have no experience in this matter, adjust the VAZ 2107 carburetor, leave it to a special category of people - carburetor specialists. These are highly specialized specialists who will adjust your carburetor quickly and efficiently.
We are cleaning the carburetor.
Photo of the location of carburetor parts
General diagram of the DAAZ 2108 unit
Jet placement diagram
Scheme for purging the cover channels
Fuel nozzles are removed with a wooden stick or toothpick
Replacing the needle valve
This is what the floats installed on the Solex lid look like
Air damper drive
Adjusting the air damper drive.
Work order:
- Removes the car's air filter.
- We take the air damper handle and move it away from us, ensuring that it takes a vertical position. In this case, the air damper itself should also take a vertical position.
If this does not happen, then we make adjustments.
While holding the bushing from turning (you will need a 7 mm wrench for this), loosen the screw that secures the air damper rod. In this case, the air damper itself, under the action of the spring, will rise to a vertical position.
After this, tighten the screw that was previously unscrewed in the reverse order.
When the handle is fully retracted, the air damper should close the inlet of the neck.
Reinstall the air filter in reverse order.
How to check the strainer
This is done as follows. Use manual fuel pumping and fill the float chamber with fuel, after which you will be able to see the shut-off valve close. Then move the top filter cover and remove the valve. It must be thoroughly washed in solvent, then dried using compressed air.
When the engine behaves incorrectly during loads, there are dips or loss of power, or the car “reacts poorly to the pedal,” most likely you have a problem with the fuel supply. In addition, often the cause is a faulty strainer.
Important! It is strictly forbidden to wipe the bottom of the float chamber using a fluffy or any other rag, since after such cleaning, invisible fibers may remain on the bottom of the chamber, which will clog your jets during operation.
You might be interested in: Replacing the fuel filter for Lada Kalina. Fuel pump repair: replacing the mesh
The float chamber is cleaned using a rubber bulb and then dried with compressed air.
Checking the tightness of the shut-off needle is carried out using a bulb, since the pressure force that occurs during squeezing is equal to the pressure in the fuel pump. When replacing the carburetor cover, you need to make sure that the floats are in the up position. You should feel strong pressure during installation, after which you need to listen carefully to the carburetor for air leaks. If there is even the slightest leak, the needle and valve body must be replaced.
Design Features
The main parts of the carburetor include the exhaust shut-off valve, the burnt fuel assembly outlet compartment, the transition chamber system, the throttle valve, the dosing system, the econostat, the float chamber, as well as the autonomous exhaust system. Each of these nodes performs its own function. We won’t delve deeply into this issue - the knowledge you’ve already gained will be enough to set it up.
- Float chamber.
- Econostat.
- Autonomous idle system.
- Idle clearance valve.
- Throttle valve.
- Dosing system.
- Transitional system of two chambers.
- Crankcase gas removal department.
Modifications of carburetors installed on the VAZ 2105
On the “five” or VAZ 21053, 3 types of carburetors can be installed. All models are supplied in an unfinished form. Let's look at how they differ from each other.
DAAZ
The DAAZ or Weber carburetor is probably the sportiest type of carburetor, as it is equipped with large and maximally open, non-clamped jets. Car service experts say that this model is affordable and very reliable. There are no unnecessary bells and whistles here. With it, the car starts perfectly, drives well, and the idle system is easier to adjust.
These models are produced by the Dmitrov Automotive Aggregate Plant under license from Weber. The disadvantages include high fuel consumption. Theoretically, if Ozone consumes 7 liters of gasoline, then DAAZ consumes all 8.5 liters. In practice, DAAZ carburetors, especially used ones, can consume up to 14-15 liters of fuel per 100 km.
"Ozone"
An improved model of the old, classic DAAZ. It received the name “Ozone” due to its environmental friendliness, because a perfectly tuned carburetor of this type allows you to reduce gasoline consumption to 7 liters per 100 km.
The downside of Ozone is its complex design, which often leads to problems with the secondary chamber. This malfunction is associated with the fact that the additional camera is activated not mechanically, as on Webers, but using a pneumatic valve. Also, Ozone carburetors are highly sensitive to contamination. As a result, the adjustments are disrupted, the second chamber begins to open with a delay or does not close completely. What does this lead to? Acceleration dynamics deteriorate, engine output decreases, and maximum speed decreases.
"Solex"
Licensed products from Solex. A carburetor of this type has proven itself on the VAZ 2105, 21054 and other classics only on the good side. It turned out to be economical and at the same time dynamic. The design is completely different from DAAZ. There is a “return” - a fuel return supply system, as well as a number of additional auxiliary electronic systems.
Thanks to the reverse supply system, excess gasoline re-enters the tank. This makes it possible to save almost 1 liter of fuel per 100 km, which is very good. The autonomous neutral speed system, equipped with electrical adjustment, has proven itself well. There is also a separate cold start subsystem.
Despite such advantages, the Solex carburetor, especially found in the CIS, turned out to be somewhat problematic. For example, the fuel channels on it quickly become clogged, since they are narrow. If this model is not serviced in a timely manner, failures in the neutral system will begin.
In some cases, a carburetor of a non-standard or non-standard type may be installed on the “five”. This installation requires certain modifications followed by proper adjustment. For example, such options are carburetors 21073 and 21083.