The Priora car has managed to establish itself as a reliable and trouble-free vehicle, the characteristic feature of which is ease of operation and ease of maintenance. However, even with him, unfortunately, problems sometimes occur. Among the most common breakdowns that occur with this car are problems with the central locking. This device has a number of features, without knowing which it is unlikely that it will be possible to eliminate the problem.
In this article we will tell you what to do when the central locking in the Lada Priora does not work properly, and what exact reasons lead to its failure.
Peculiarities
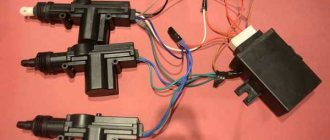
Unlike other models coming off the assembly line of the Volzhsky Automobile Plant, the Priora does not have a separate control unit on the central lock. Its functions are performed by a single electrical package controller. In addition to this unit, the vehicle protection system installed at production also includes an APS-6 type immobilizer. Thanks to this, the car owner does not need to install an additional security system on his car.
In reality, there are quite a lot of reasons for the central locking malfunction. Problems often arise due to:
- controller;
- keys;
- immobilizer;
- driver's door lock;
- broken wiring;
- shorting it to the ground of the car, etc.
If this or that problem occurs, you should pay attention to the window regulators, as well as the adjustment of the mirrors. If they do not function, then, most likely, the failure occurred due to a malfunction of the signal wiring coming from the 5th pin of the driver's door module or from the 5th pin of the HZ terminal, which supplies the controller itself.
Also, quite often, the failure of the central locking is caused by a malfunction of the immobilizer itself, because both of these elements are interconnected.
A breakdown in such a situation will be indicated by an audible alarm and flashing indicators.
Below we describe the most common breakdowns with central locking in Priora and ways to eliminate them.
Connection points
Power is supplied to the security system from the ignition switch; the negative terminal is attached to a metal element connected to the car body. To operate the remote engine start unit, you need to use the cable coming from the limit switch under the parking brake lever. Information about the operation of the motor is transmitted to the head unit via a separate cord connected to the speed sensor.
Lada Priora alarm connection points include cables going to switches mounted in the doors, under the lids of the luggage compartment and the power unit compartment. Additionally, the wires of the original siren (or an alternative unit) are connected. If the alarm system supports switching of the CAN-LIN digital bus, then it is also necessary to connect the points (in accordance with the factory documentation).
Why does the central locking system not work?
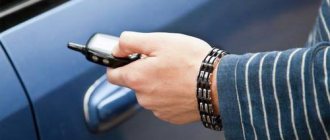
Quite often a situation arises when the central lock cannot be opened with a key or key fob. As a rule, the problem here is solely due to a faulty relay or due to damaged wiring.
If the key normally opens the central locking system, but the key fob does not, then most likely the battery in the latter is simply dead or its button needs to be cleaned. Experienced specialists note that in their practice, signal receiver or transmitter failures have occurred extremely rarely. You can check it simply - just use a spare remote control or insert a new power supply into the existing one.
The inability to open with the key is due to incorrect operation of the activator. This device is located directly in the driver's door, and it is responsible for distributing the signal through the locking mechanism. First of all, in this case, check:
- wiring;
- circuit breakers;
- terminals.
To inspect the activator, you will need to remove the trim from the previously mentioned door.
Operating principle of the central lock
The system of this device consists of the following elements:
- main electronic control unit;
- push-button door switches;
- door electronic control devices;
- window lift drives;
- limit switches for closing windows and doors. When closing, the central locking sends signals here to prevent arming of a car with open windows. Therefore, often failures when closing doors are associated with violations of the window control.
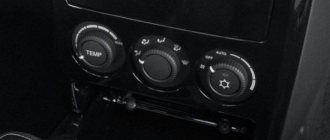
For example, the domestic one installs a central locking system on all versions of the Kalina model, which works with a remote control. Inside the cabin, on the driver's door handle there is a central locking button. It can be controlled from the driver's seat.
In addition, the ignition key can be used as a remote control. One press will open the driver's door, two will open the other locks. To lock the car, you need to hold the button once for a long time.
Trunk control is not available on all models. In addition, there is also a rear door locking feature designed to protect children.
Circuit breakers
If the lock stops working, you need to check if there is power in the circuit. Most often the fuses blow. They can fail not only due to a short circuit, but also due to overload. The latter often occurs if the rods do not work properly (for example, they have not been lubricated for a long time or have frozen if the breakdown occurred in the cold season).
Meanwhile, if burnout occurs regularly, then you need to find out what exactly provokes this breakdown. Often it is the activator that causes frequent short circuits.
Troubleshooting control buttons
A fairly common malfunction is the failure of the window lift control buttons. Most often, the Priora power window buttons become oxidized, or their contacts begin to come off. To eliminate faults of this kind, you will need to clean the contacts from oxide or re-solder the buttons. When re-soldering, the contacts will fit snugly against each other, thereby ensuring uninterrupted operation of the power window.
Wiring
In general, the wires remain a weak point in Priora, and so far the manufacturer has been unable to do anything. For this reason, it is extremely important to regularly check their integrity. This is a labor-intensive task, but very necessary.
They start testing them from the doors - it is at the points of their entry that the insulating layer is most often damaged, which, in turn, provokes a short circuit. The procedure looks like this:
- the wires are disconnected from the activator;
- use a key fob to close the lock;
- the power wire must be live;
- If you open the door, the electricity will flow through another vein.
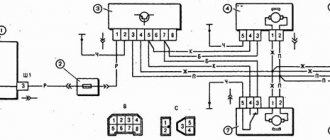
Wiring diagram of power windows Lada Priora
Left front door wiring harness diagram : 1 - block to the rear wiring harness; 2 - to the speaker; 3 — window lift electric motor; 4 — switch block; 5 — door lock; 6 — rear view mirror;
Wiring harness diagram for the right front door : 1 - block to the rear wiring harness; 2 - to the speaker; 3 — electric window lift motor; 4 — switch block; 5 — door lock; 6 — rear view mirror; 7 — block to the rear wiring harness;
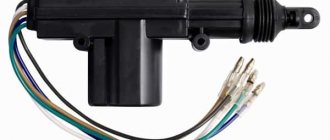
Actuators
If only one of the doors does not open or malfunctions regularly occur, the culprit is most likely a malfunction of the activator. The thing is that it works in tandem with a motor. The latter sometimes has windings that burn or the gears that cause the lock rod to move become unusable. This unit cannot be repaired - it is simply replaced with a working one.
Also, quite often problems with central locking occur after replacing or disconnecting the battery. In general, the entire locking system is powered by the on-board battery; for this reason, it is undesirable to disconnect it without good reason. De-energization leads to malfunctions of the controller, and sometimes to its breakdown.
Electronics
In addition to the reasons described above, the problem may lie in small electronics. The check should begin with the key fob. First of all, the battery and the condition of the buttons are checked. Perhaps they stick and do not work at the right time. If the board itself is faulty, the key fob simply will not respond to external stimuli. The LED on its body will not light up. It's good if you have a spare key fob. Otherwise, you will have to change the alarm, or find exactly the same key fob.
Next, the alarm control unit is checked. The verification method is usually indicated in the instructions. Lastly, they check the microboard located on the central locking drive motor. At the same time, they look at the condition of the drive itself. All failed parts are replaced. The most difficult thing is with the control unit. It is practically beyond repair. Therefore, it is much easier to install a new alarm. Sometimes the key fob loses synchronization with the unit, then it will have to be reprogrammed.
Restoring synchronization
"Prior" - ground clearance. "Lada Priora" - technical characteristics, ground clearance. VAZ "Priora"
Let's say the keys on the key fob were pressed 1000 times outside the system's coverage area. Then synchronization between the following devices is lost: the key fob and the central locking control module. If the power to the chip installed in the key fob is turned off even for a short time, this will also cause a loss of synchronization. The maximum time interval, as we found out from the reviews, is 6 seconds.
VAZ key fob in two versions
The instruction manual attached to the cars of the Granta and Kalina-2 family says the following: in case of loss of synchronization, the key fob is re-registered, that is, data about it is entered into the system memory. The recording procedure is quite complex, and to complete it you need a “learning key”. If synchronization is indeed lost, try this:
- Turn on the ignition with the key you want to synchronize;
- Wait 6 seconds;
- The immobilizer lamp should start flashing, and then the ignition is turned off;
- After 10 seconds the ignition is turned on again. If the immobilizer lamp does not blink, it means that synchronization has been restored.
How to turn off the standard alarm
It is very important to know that if the factory anti-theft is activated, it is simply impossible to disable it yourself. The file, having revived, will no longer fall asleep. The only civilized way to deactivate an armed and trained alarm is to remove the ECU from the car and either replace it with a new one that is not trained, which is very expensive, or give it to specialists for reprogramming. It is many times cheaper and more reliable. There is also a popular way to “deceive” a trained unit - when the chip is removed from the training key and taped with tape at the base of the ignition switch. However, it is worth remembering that this is a rather clumsy and risky method. The risk of failure of the Priora standard alarm program increases and, accordingly, there is a danger of its unauthorized activation at the most inopportune moment. Therefore, if it is activated, then it is better to use it, especially since user reviews about it are very good.
In the video you can watch the training process of APS “Priors”, “Kalina” or “Grants”, with two working keys:
Two schemes (simple and complex)
First of all, before connecting the alarm, you need to study the instructions included with it. The main unit always has relays installed: one of them closes when the locks are locked, the second acts on opening. The connector to which the relay contacts are connected usually has 6 pins. There is nothing complicated here.
In the first case, we will use only this connector. The second circuit uses another contact, called “signal output for 2-step lock opening”. Find it on the main unit.
We connect the alarm in a simple way
A push-button module is installed in the driver's door of the Lada Priora. The door trim must be removed and the connector for this module must be found:
We will need a brown cord from the connector. It is a signal, and the alarm relay is connected to its break:
Two wires connected to each side of the cut cord will have to be pulled to the main unit. The common contacts of the relay are connected to one of the wires.
It must be remembered that when carrying out any installation work, first disconnect the negative terminal of the battery.
All wiring in the considered circuit is signal, but this does not mean that the connection points need not be isolated. Wires should not touch metal parts of the car. If contact occurs, it is necessary to use additional protection: electrical tape, heat-resistant tube, etc.
The best option for connecting to the central locking system
Having made the connection, as discussed above, you can notice the following: all locks are activated from the key fob for closing, and only one, the driver’s, is activated for unlocking. This defect can be eliminated 100%, which will require 2 or 3 additional relays. First, let's look at where the connection points are:
The block that is visible in the photo is designated BUS-2170. It is equipped with three connectors, but we need one (three-row).
Find three wires in connector X1:
- Sixth (red-black). The cord goes to the actuators and is the power one.
- Thirteenth (green-black). Front right power window control cable.
- Eleventh. Same as “13”, but for the rear window lifter.
How to connect an alarm system to the central locking of a Priora Lux? Three wires are broken (all indicated), and the cables from the break points are pulled to the signaling unit. If you don't have rear power windows, the last cord will be missing. And if there are no power windows at all, cables 3 and 2 do not break (they are still missing).
The BUS unit will be installed behind the dashboard, near the gas pedal. To remove it, dismantle the side panels and unscrew two 10mm nuts. These nuts secure the block on both sides. From each of the break points, a cable is laid to the signaling system, which also applies to the brown cord coming from the door block:
Here we use additional relays (K1-K3), a 15 Ampere fuse and nothing more.
Dead battery
This reason refers to the situation when the central locking does not lock the doors or open them. Everyone has encountered a situation where, in the morning, when you press a button on a key fob, nothing happens.
Sometimes drivers forget to turn off electrical appliances in the car, which leads to deep battery discharge. It’s easy to verify this; just open the car with the key and turn the ignition key. It will not turn on at all, or it will be impossible to start the engine. To solve this, you just need to charge the battery. The system will work again.
Additional rear door locking
The rear door lock can be locked by pushing down the lock button on both the open and closed doors.
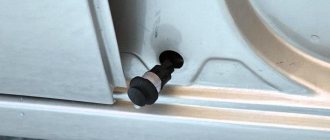
At the ends of the rear doors (near the locks) there are latches for additional locking, which can be used when traveling with children or in other cases to prevent the doors from opening from the inside.
For additional rear door locking...
...push the latch down and close the door. In this case, the rear door can only be opened from the outside when the lock button is raised.
Mechanics
In addition to reasons related to electronics, the central lock does not close one door due to mechanical faults. If the lock is standard, then it is more difficult to diagnose. But if simple activators are installed, everything is much simpler. In cases where only one door does not close, it is worth checking the drive rod.
Standard locks, especially on foreign cars, are a single unit with mechanical and electrical parts. Often on old machines, plastic drive elements - gears and shafts - wear out over time. As a result, the motor rotates, but the central lock does not close one door. The force required to open a door is always less than to close it.
The lock rod is fixed to the cylinder lever - it can fall out of its place. Then the lock will not work. The driver will hear the motor running, but the desired action will not occur.
In the case of Chinese activators, the mount may slip along the rod, which controls the opening or closing of the lock. When the latter closes, the activator pulls the lever down, but slips. As a result, the door does not close. You need to disassemble the casing and tighten the fastening bolts.
Ghostex › Blog › Connecting the signaling system to the central locking system on Priora-2/Grant/Kalina-2
Where is the idle speed sensor located on the Priora fret 8 and 16 valves: diagram
This topic is dedicated to those whose central locking (CL) malfunctions due to the signaling, that is, every time or after the tenth attempt they open/close the locks.
This problem appears on the latest Priors, Grant and Kalina-2 Lux, if such a block is installed on the driver's door.
And on such cars there is such a “central body electronics unit” (CBEC), which is glitchy with locks.
There is a simple solution to this central locking problem, but it requires reconnecting the signaling, the presence of direct hands, a head and a soldering iron.
Let's get started:
1. We disassemble the door and remove the block of buttons in the driver's door and disassemble it, it is not difficult, the bottom cover is fixed with latches, remove it and remove the board. Here she is:
2. We need a central locking button. This one:
We take 2 wires and solder them to it.
And we put the block back together and make a hole in the body for the wires.
3. Next, we find 2 wires laid separately in the door, they come from the signaling and connect to the brown
wire in the gap.
This brown
wire goes from the lock to the button block.
And so, we find the connection point and disconnect the signal wires, and restore the brown wire.
And we connect these two wires from the signaling to the two wires coming out of the button block, and it makes absolutely no difference which one goes to which one.
4. Next, we look for the signaling itself and take it out. The central locking is the same on all signaling systems, only the colors of the wires are of course different, then I will tell you using the example of Starline, KGB and Tomahawk signaling (with start or just with feedback), since they have almost the same wires colors and I feel more comfortable with an example.
We will work with a small central locking connector with 6 wires, inserted here:
And on other alarms, find 6 central locking wires using the diagram in the instructions.
A little about the central lock contacts:
out of these six wires we have: 2 - normally closed contacts, 2 - normally open and 2 common contacts - these are outputs to the central locking system or the drive itself.
These signals have: - blue and green common outputs to the central locking; - blue-black and green-black normally closed contacts; - black-red or blue-red and green-red (or also blue-white and green-white) normally open contacts.
5. This is the diagram you used to connect the central locking system to.
Now we have already hooked up the brown wire and remade the wires for the button.
From this diagram you can see that the common outputs (blue and green) are connected into one wire and go to the door buttons; we leave them unchanged.
Next, we need normally open contacts on the signal (black-red or blue-red and green-red), one of them is connected to ground, disconnect it from ground and connect the normally open contacts together in any way, since they can be greatly shortened by unnecessary. And then we connect these two combined wires (black-red or blue-red and green-red) with the second wire going into the door, in this case green-black (this is a normally closed contact on the locking relay), only by biting it off the signaling connector .
This is how it should turn out.
Thus, our signaling will, as it were, press the central locking door button.
That's all, put on all the connectors and you can try. I hope it will be useful to someone, good luck!
Attention, there is a drawback to this alteration!
After the modification, the signaling system will seem to press the central locking button, when arming the doors will close, when disarming they will open, but the downside is that if you arm the door, they will close, and if you arm it again, the doors will open and the car will exit. security, and the doors are open, so make sure to arm it once, and it will work perfectly.
Now I’ll think about adjusting this, and I’ll post a correction in the future.
Source
Technical information Tomahawk TW 9010
The anti-theft system has the following technical characteristics.
- Silent security function.
- Protection against opening doors, trunk and hood.
- Timers for turbine cooling.
- Measuring the interior temperature.
- By starting the power unit based on temperature and time.
- Automatic engine start after a certain time.
- Control of additional devices via three channels.
- Self-diagnosis of the system.
- “Panic” and Anti-Robbery mode.”
- Hidden "Override" key.
- Searching for a car in a parking lot.
- Protection against signal interception.
- Possibility of using up to four key fobs.
What is a car alarm
The possibility of increased control and warning range, as well as reliable operation in extreme urban radio interference, is ensured by the use of a 128-channel patented transceiver with FM modulation and a narrow bandwidth.
Remote starting and control of the operation of various types of engines is provided by a specialized processor. The existing key fobs implement an intuitive control principle. The pictograms on the keychain are presented in Russian.
The StarLine A91 Dialog car alarm can be installed on various cars with gasoline, diesel or turbocharged engines, with an automatic or manual transmission.
Thanks to more than 60 standard, programmable functions, not only reliable protection is provided, but also comfort when using a car alarm such as StarLine A91 Dialog.