Car owners who love innovation and change always make attempts to improve their cars, and Kalina is no exception. They install spoilers, increase engine power, and modify the interior. Car headlights can greatly change the appearance of a vehicle. But before you start tuning the lighting system, you need to find out the characteristics of the standard Kalina lights. This will allow you to understand what replacement options exist and whether it is worth changing anything at all.
Characteristics of standard Kalina headlights of different configurations and models
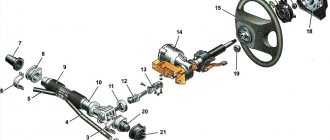
Car headlights are devices that are designed to illuminate the road at night or when visibility is insufficient due to bad weather conditions. Headlamp structure (see photo):
- Frame.
- The wire.
- Glass.
- Lamps.
- Reflector.
- Decorative insert.
- Headlight plugs.
The block headlight on Kalina includes three sections:
- low beam;
- high beam and side lights;
- direction indicators.
When you turn on the low beam, only the low beam lamps light up, when you turn on the high beam, the low and high beam lamps come on. Front direction indicator sections
| Number in photo | Name | EEC | Power, W |
| 1 | Low beam light | H7 | 55 |
| 2 | High beam light | H1 | 55 |
| 3 | Front turn signal lamp | PY21W | 21 |
| 4 | Side light bulb | W5W | 5 |
The difference between the headlights in different versions of Kalina:
- sedan, hatchback and cross – rectangular glass with a bend in the upper part;
- station wagon – elongated headlights with increased area;
- sport - has an increased area to illuminate a larger section of the road.
In the “Lux” configuration, the headlights received a modified design and increased brightness.
The manufacturer installed two and Bosch headlights on Kalina. Information about the manufacturer can be found by inspecting the product. If the AL index is marked on the glass, it means the manufacturer is Bosch.
It produces low beam lamps from polycarbonate without a cap. JSC "Avtosvet" also produces products from polycarbonate, but its distinctive feature is the presence of a low-beam lamp cap. The elements have proven themselves to work well, but like many other devices, they can also fail.
How to choose your own
The optics configuration differs depending on the car model. The sedan (1118) and station wagon (1117) have rectangular headlights with a slight bend in the upper part. Hatchback (1119) and Lada Kalina Sport are equipped with elongated models with a larger lighting area. There are two types of rear optics - a rectangular block with rounded edges; on the Universal and Sport, teardrop-shaped headlights are installed. To select, you need to find out the manufacturer's article number.
The table shows the catalog numbers of lighting devices:
| Optics type | Model: 1118 and 1117 | Model: 1119 and "Sport" |
| Front right headlight unit | 11180-3711010-00 | 11180-3711011-00 |
| Front left headlight unit | 11180-3711010-01 | 11180-3711011-01 |
| Rear right lamp | 11180-3716010-00 | 11190-3716010 |
| Rear left lamp | 11180-3716011-00 | 11190-3716010 |
| PTF right | 11180-3743010-00 | 11180-3743010-00 |
| PTF left | 11180-3743011-00 | 11180-3743011-00 |
In addition to Chinese analogues, the market offers optics models from two (Kirzhach) and Automotive Lighting (Ryazan). In the first years of production, the Ryazan plant supplied headlights with glass front parts. Subsequently it was replaced with polycarbonate.
You can determine whether it is original or fake by looking at the lamp cap bracket; it should be positioned vertically. Additionally, the thickness of the plastic and the manufacturing quality of the mounting brackets are analyzed.
Possible problems and methods for solving them
The fact that the Lada Kalina headlights stop working is due to many factors that the driver cannot influence. These are exposure to moisture, metal fatigue, and a combination of minor deformations that have appeared over years of operation. The most common problem that owners of this car face is the breakdown of the high or low beam.
A similar nuisance can occur while driving. Driving such a car in the dark is unsafe and can endanger the health of the driver, passengers and pedestrians. It is advisable to repair the breakdown immediately, in the field. Fortunately, in most cases the problem is resolved within 10 minutes.
Do you need headlight washers and auto-corrector for xenon?
The second point is the mandatory presence of an auto-corrector and a headlight cleaner for xenon. However, the point here is not the xenon itself, but the power of the luminous flux, which for almost any xenon lamps is more than 2,000 lumens. This number is the limit of what is permissible without auto corrector and headlight washers.
But the main thing here is that it makes no difference whether xenon is in the fog lights or in a regular head light with that amount of luminous flux. The Technical Regulations separately list fog lights with xenon:
1.3.7. Adaptive front lighting systems that perform the function of low beam, regardless of the light source used, low beam headlights with light sources of the LED class, as well as low beam and fog headlights TR CU 018/2011 164 with light sources of any class having a nominal luminous flux of more than 2000 lumens, must be equipped with an automatic headlight leveling device.
And the most interesting thing is described in the note to paragraph 1.3.7 of the Technical Regulations:
Note: Replacement HID light sources in categories D1R, D2R, D3R, D4R, D1S, D2S, D3S, D4S and halogen incandescent lamps in categories H9, H9B, HIR1 have a luminous flux rating greater than 2000 lumens.
Under what conditions are auto-corrector and washer not needed?
But there is still a small number of types of gas-discharge lamps, which sometimes have a luminous flux power of less than 2,000 lumens. They do not require PTF washer and auto corrector.
Such lamps include, for example, types D8S and D6S. In general, lamps rated less than 25 watts often (but not always) produce less than 2,000 lumens.
However, the disadvantage of such lamps is that if you set out to increase visibility from fog lights with xenon, then it is practically impossible to achieve this with lamps with a power of 25 watts or less - they do not shine.
The low beam lamp on Kalina burned out
The first step is to check the integrity of the low beam lamp. The design of the headlights on Kalina requires the presence of high and low beam lamps, the performance of which does not depend on each other. It is likely that if the low beam has disappeared and the high beam is present, the problem is a burnt out light bulb.
To replace the lamp you need:
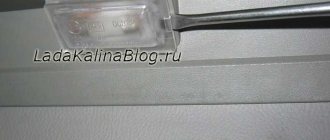
- remove the protective cover from the headlight housing by pulling one of its petals;
- disconnect the wires from the lamp;
- disengage the spring clip and move it away from the light bulb;
- remove the low beam lamp from the Lada Kalina headlight housing.
Installing a new headlight is carried out in the reverse order. If the high beams do not work, the procedure is similar:
- disconnect the wire block from the lamp;
- remove the latch by squeezing its ends;
- remove the lamp and install a new one.
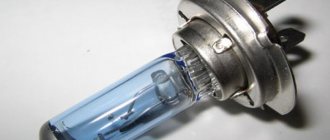
Lada Kalina lamps are halogen and should not be handled with bare hands. Failure to comply with this recommendation may result in darkening of the light and rapid failure of the product. You need to use gloves (they often come with the lamps). If you don't have gloves at hand, you can use a napkin or dry cloth.
How to avoid fogging headlights
During operation of the light elements, the housing heats up. To reduce the temperature inside, the design provides ventilation holes - breathers. However, moist air can get inside through them, which will lead to fogging. This may be temporary. But if there is a lot of moisture, it will affect the light intensity.
Prevention of fogging of headlights on Lada Kalina:
- before visiting a car wash, turn off the running lights in advance to stabilize the temperature inside the car;
- checking ventilation, cleaning from dirt and dust;
- use an absorbent to remove condensate; it is placed inside the housing.
If the negative effect does not go away 1-2 days after fogging appears, it is necessary to take action to eliminate it. To remove the front transparent panel, you need to remove 4 staples and heat the sealant layer using a hair dryer. This must be done carefully so as not to break the case; the effort should be small.
Fuse blown
To fix the problem, you need to replace the part. It is necessary to open the block in which all Kalina's electrical fuses are concentrated and find the blown one. It is worth using a location diagram if a person does not know where the right one is located. Finding and changing the fuse is a matter of two minutes.
Are fuses blowing at an unenviable rate? It makes sense to test the car's wiring yourself or seek help from a professional electrician. If the fog light has disappeared, the solution to the problem is similar.
Fuse block diagram for Lada Kalina
How to polish headlights on Kalina
The reasons for the appearance of defects (turbidity, chips, yellowness) on the surface of polycarbonate or acrylic glass are a long service life, mechanical stress, and temperature changes. To eliminate this, polishing is done. However, this will cause the protective factory coating to be removed. The solution is to use special means.
How to properly polish the headlights yourself on a Lada Kalina:
- Abrasive wheels – P800-P2000. They can be used to remove large scratches.
- Combined type polishing paste. In addition to abrasive, it must contain protective components.
- Before work, the headlights are washed and the edges are protected with masking tape. Otherwise, there may be an impact on body parts.
- Apply the paste to the surface and gently rub over the entire area.
- If the factory protective coating has been damaged, apply varnish. Apply 1-2 layers at short intervals.
It is recommended to use a two-component varnish. It has good adhesion and retains its protective properties longer. An alternative is acrylic-based compositions. Characterized by rapid polymerization, they can be used to polish the glass of a Kalina headlight without preliminary mechanical treatment.
Other causes of breakdowns
The reasons for the loss of light may be a broken wire, loose contact of connectors, breakdown of controls, etc. If the problem cannot be visually detected, it is recommended to test the wiring to identify network breaks. Calling did not bring results - contact an auto electrician. Neglecting the problem can aggravate the situation and lead to breakdown of other electrical elements in the network, then repairs will cost much more.
Kalina's headlight glass may fog up, which leads to a decrease in light brightness. If frequent fogging is observed, there is a high probability of depressurization of the headlight housing. It is recommended to remove it and thoroughly coat the joints with sealant.
Reasons and methods for replacing light elements on Kalina
You may need to replace the headlight on a car of this model for a number of reasons. Impacts to the body from other drivers or animals, careless driving on uneven roads, rough repairs of parts under the hood can damage the integrity of the fasteners. Light elements become loose and can fall out at the most unsafe moment on the road. Headlights that do not fit well in the grooves must be replaced.
Replacement is a simple process if you approach it responsibly and without nerves. For an experienced master, this operation takes about 3 hours. But even if you have never encountered such a situation before, these instructions will help you replace the headlight without any problems.
The entire process of removing the Kalina headlight can be divided into 5 main stages:
- unscrewing the bolts from the crankcase protection;
- removing the license plate (will allow you to get to the lower radiator grille);
- removing the lower and upper radiator grilles;
- unscrewing the front bumper (you will have to remove a large number of bolts and screws);
- removing the bumper amplifier (it interferes with dismantling and putting back the headlight).
When the screws holding the headlight on top and bottom are unscrewed, you should remove its housing, first carefully clamping all the wires. During repairs, it is recommended to inspect the inside of the bumper and the metal underneath for signs of corrosion. If such formations exist, you need to clean them and coat them with a rust converter.
After carrying out these operations, reassembly follows. During the process, you need to monitor the position of the rear, front, left and right illuminator - the headlight should fit into the connector without effort.
Fine or imprisonment for xenon in fog lights?
In the context of the punishment for xenon light in the PTF, everything is similar to the ban on it in head lights. As we mentioned above, legislation often does not directly separate PTFs and headlights, and the Administrative Code is no exception. It provides for punishment for non-compliance with the Basic Provisions of the Traffic Regulations, paragraph 3.4 of which we cited above.
But what punishment is provided for xenon in fog lights: a fine or deprivation of rights? The question is ambiguous, because on the road you may well be deprived of your license in almost 90 percent or more of cases. Moreover, even in higher courts. You can be left without a license for xenon for a total period of time from six months to 1 year for violating the correct color of the light emitted by the headlights and their operating mode, the Basic Provisions of the Rules (Part 3 of Article 12.5 of the Administrative Code). And this is also why fog lights will be confiscated.
But why are we talking only about practice?! Because in theory, neither the color of the headlights when installing xenon in foglights (if it is white, yellow or orange), nor even their operating mode is affected. According to the Technical Regulations, there are only two modes:
If your xenon lights do not blink, then the mode is also not broken. And it should also be taken into account that in order to form a criminal offense for such an offense, both conditions must be met.
The legal punishment (unfortunately, in most cases only in theory) is a fine of 500 rubles under Part 1 of the same article, which provides for any violations of the Basic Provisions of Traffic Regulations, with the exception of exceptions (listed in the following parts of this article of the Administrative Code).
Cancellation (termination) of registration for xenon in PTF
Separately, a very important point should be noted - the cancellation of registration for the installation of xenon xenons in the PTF. This is quite possible, including in practice. The fact is that vehicles whose design has been amended are not subject to registration (clause 3 of Order No. 399).
At the same time, paragraph 51 of the same Order prescribes that in case of violations identified in already registered cars, in the form of changes in design, the registration of such cars is subject to termination (cancellation) until the reasons for cancellation are eliminated.
Rules for adjusting light
After installing the headlight, you need to adjust the luminous flux. You can do this yourself or by contacting a specialist. When making adjustments yourself, you should direct the light from the headlight to the wall with the markings. There should be 5 meters between the car and the wall.
We measure the distance from the ground to the car headlight (H), draw a vertical line on the wall parallel to the center of the car, then draw a horizontal line equal to the height H+10 cm. Set the Kalina headlight adjustment switch to position 0 and turn on the lamps. Using the adjustment screws, we adjust the luminous flux as shown in the figure.
Replacing a headlight on a Kalina with a little skill and patience is a simple process, although it takes several hours. Basic recommendations: put screws and bolts in one place to prevent their loss, check the functionality of the lamps before assembly, do not be nervous.
Tuning options
You can increase the attractiveness of your car for yourself and others by tuning the lighting system. Main options:
- tinting;
- installation of bilens;
- installation of LEDs in dimensions;
- creating angel eyes.
Many car enthusiasts choose tuning of headlights on Kalina, such as tinting - applying a special film over the entire surface of the glass of the device to give the car an original design. Another popular option is installing xenon. Almost all workshops offer this service, but only experienced craftsmen can carry out the installation efficiently.
Bi-xenon installation
With their own hands, car enthusiasts can install bilens into the lighting device. The first step will be acquiring the necessary elements. Attention should be paid only to those products that can easily fit into the cavity of the Kalina headlight. For example, if you buy a G-5 kit, you will have to cut the lenses.
Work begins with dismantling and disassembling the headlight. Then, using a file, they cut the seat in the shape of a cone, due to which the lens will fit into the body by about a centimeter. It is necessary to remove the cap so that it does not block the flow of light, and then mount the lens in the prepared place. The element is secured using factory fasteners.
After installing the lenses, the car owner needs to stop by the stand to adjust the luminous flux and position of the lamps in accordance with the current GOST.