Small electronic sensors help maintain the efficiency of the engine and vehicle safety systems at a high level. The throttle position control element also falls into the category of electronic products of this type. Modern domestic cars are also equipped with sensors that allow you to accurately determine the opening angle of the throttle valve.
The features of replacing such a part on the Lada Kalina, as well as its purpose, will be discussed in detail in this article.
Removal
Cleaning the Lada Kalina throttle assembly begins with its dismantling.
Note. There is an opinion that it is not necessary to remove the component. This is true, but in this case all the carbon deposits will pour into the engine!
First of all, you need to turn off the engine, let it cool, and then remove the terminal from the battery.
Then the clamps securing the hoses and pipes are unscrewed:
- Small – 4 units;
- Large – 1 unit.
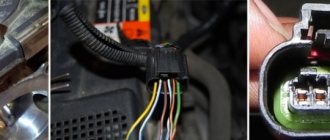
The plugs are disconnected from two sensors - TPS and IAC.
The accelerator cable is removed.
To prevent antifreeze from leaking, the hoses must be fixed at the top. In addition, you can insert M12 bolts into them.
In the end, all that remains is to unscrew the 2 nuts using a 13mm socket and remove the remote control.
Pros and cons of the e-gas pedal on Lada Kalina
On the latest Lada Kalina cars, an electronic e-gas pedal is mandatory.
Oddly enough, it was this innovation by VAZ that caused a lot of gossip among motorists: most of the Lada owners spoke out extremely against the innovation, and after they tried it in action, their opinion only strengthened. Is e-gas really that bad, or does this electronic device still have its advantages? More on this later. We take this opportunity to recommend our partners, who specialize in the transportation of special equipment. Professional and affordable transportation of special equipment in Moscow is an excellent choice for your business. We sincerely recommend Busischik.ru for its professional and responsible approach and attentive attitude towards its customers.
We recommend that you read: the ranking of the most stolen cars in 2012 from insurance companies. Find out what is stolen most often before buying a new car - this will help you avoid unnecessary risks. And all technical specifications of the Lada Kalina Universal are available at: https://kalinaclub.com/modifikacii/universal-modifikacii/lada-11173-universal-texnicheskie-xarakteristiki.html.
Malfunction of the Lada Vesta throttle assembly
Throttle assembly problems are a common phenomenon on all modern cars, and Lada Vesta is no exception. The reason lies in the fact that this unit includes many components that are influenced by external and internal factors. It is important to make sure that the problem is a malfunction of the throttle assembly. Below is a list of elements whose damage can lead to similar symptoms:
- Accelerator pedal position sensor
- Throttle Motor
- Idle speed control
- Damper position sensor
- Mechanical elements of the case
- Air filter and air intake elements
- Electronic engine control unit
If any of these parts are damaged, signs of a malfunctioning throttle assembly may appear. Therefore, before rushing to the auto store for a new throttle assembly, it makes sense to conduct a detailed diagnosis of all the elements associated with it.
Ignition module (IZ)
The ignition module consists of two ignition coils placed in a housing and filled with dielectric resin. Each of the coils is responsible for supplying a spark to two cylinders. The MH rarely fails completely, as one of the coils is damaged and, consequently, two cylinders fail at once.
Signs of malfunction:
- The engine is twin;
- Loss of dynamics;
- Increased fuel consumption;
Replacing the throttle position sensor
To perform this repair, a minimum of time and tools will be required. All you need is one Phillips screwdriver, as short as possible. Since there is not much space to work. I used a very short one, as shown in the photo below, and it worked great:
First of all, we need to unscrew the plug from the filler neck and remove the plastic casing:
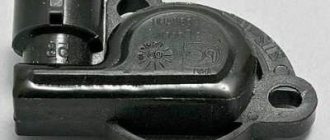
This sensor itself is located in the throttle assembly, and it is most convenient to reach it from the right side of the car. The photo below shows its location:
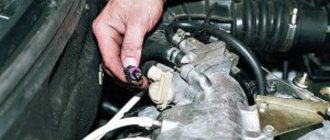
We disconnect the power plug of this device by simply pressing the plastic lock up and slightly pulling the wires to the side:
After which you can unscrew the two bolts securing the TPS and remove it:
Pay attention to the foam pad that is located in the seat. If it is damaged, it will need to be replaced with a new one.
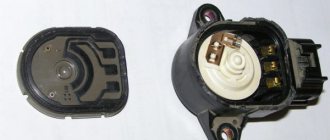
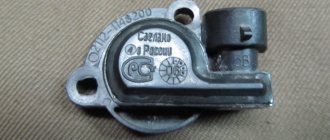
This is what the sensor looks like when removed from Kalina.
The price of this part in auto parts stores ranges from approximately 300 to 750 rubles, depending on the manufacturer. Installation is carried out in the reverse order of removal. As you can see, there are no difficulties in replacing, everything is at hand and accessible. When installing, please note that you will need to turn it a little so that the holes on the sensor itself and the place where it is mounted match. But I think this will become clear when you install it.
If you are faced with a situation where the engine idles unevenly or the car periodically stalls for unclear reasons , then the fault of the power unit may be a malfunction of the throttle position sensor . You should not immediately go to a service station, because this problem can be eliminated on your own.
New throttle position sensor
In this article we will look at the main signs indicating the failure of this sensor, learn how to check the TPS, and also get acquainted with its design. This instruction is suitable for owners of VAZ 2110, 2114, Priora, Kalina and even Renault Logan .
Frequent injection system malfunctions
Symptoms such as jerking, dips, and jerking during acceleration often appear. In this case, the treasured indicator indicating an engine error does not light up. The first thought is that the spark plugs are faulty. And then the driver remembers that his Kalina has been driving for a year or more, and these important elements of the ignition system have not even been unscrewed. If after replacement no positive effect is observed, you should immediately pay attention to what kind of gasoline you are pouring into the tank. This is the most common cause of car breakdowns.
Ignition coils are Kalina’s sore spot
Pay attention to the ignition module. It is quite possible that the malfunction lies there. But the module can only be checked using modern motor testers. Therefore, you need to contact an experienced auto electrician who will quickly identify the fault and replace or repair the module. If it is possible to install and test a working element, take advantage of it. The engine started working perfectly - run to the store for a new module. Repairing this unit is possible, but finding a professional technician is quite difficult.
No less often, on VAZ-2110, Priora and Kalina cars, the problem of floating speed occurs. The tachometer doesn't know where to go. The needle gradually moves from the minimum 850 rpm. up to maximum 1200 rpm. The malfunction is obvious, but the treasured lamp, which should indicate an error, does not light up! In this case, the throttle position sensor is clearly broken, which is especially common in old models of VAZ cars of the 2110 family, as well as in modifications of the Lada Kalina. In recent years, fairly high-quality TPS systems have begun to be installed, so problems with them rarely arise.
A malfunction of the idle speed control can be determined by the following symptom: it is impossible to start the engine without pressing the gas. The sensor is located next to the TPS, directly on the pipe. But you shouldn’t change it right away; try rinsing and cleaning it first. Very often the regulator simply becomes dirty, so it feels like it has failed. The price of such items has now dropped, and the choice of them in stores is very large.
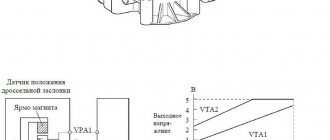
Operating principle of the sensor
In most cases, the position sensor is mounted on the damper axis, the attachment to which must be as rigid as possible; even minimal play is prohibited. Potentiometer pins:
- Signal output connecting to the machine's ECU;
- The supply voltage is standard 5 Volts;
- “Ground” is the “minus” of the power supply, located on the body of the car.
The maximum resistance of the sensor is recorded when the damper is closed, while the ECU voltage level is minimal. When you press the gas pedal, the throttle opens, at the same time the resistance level changes, and the voltage also increases to the maximum value.
The electronic control unit of the Kalina machine has firmware in which all the necessary information is entered. Depending on the level of valve opening, the control unit changes the ignition timing and the opening time of the injectors. Non-contact type throttle position sensors are also used - magnetoresistive. The design of these sensors includes:
- Permanent magnet rigidly connected to the throttle valve;
- High sensitivity electronic element processed with special material.
When you press the gas pedal, the permanent magnet begins to rotate. At the same time, the resistance level of the sensitive element changes, this happens due to a change in the magnetic field around it. However, in this case, the ECU of the Lada Kalina records the change in angle, and not the voltage. When the throttle position sensor breaks down, as a rule, problems appear related to starting the engine, the speed changes, gasoline consumption increases, and acceleration of the car becomes difficult.
Conclusion
All of the above symptoms should not be attributed to malfunctions of the throttle position sensor. They may cause other problems. For accurate diagnostics, it is recommended to connect a scanner and read errors with the throttle sensor readings. Only in this way will it be clear that the TPS needs to be changed.
If this material became useful for you and I was able to help you decide on finding a breakdown, give it a “Like”, it’s not difficult for you, but I’m grateful for my work. Share with your friends, let this article help more car enthusiasts. Good luck on the roads.
Source
Checking the throttle sensor response
With the ignition off, disconnect the engine management system wiring harness connector from the throttle position sensor.
Terminals “A” and “B” are indicated on the plug retainer, and terminal “C” is marked on the opposite side of the plug body.
To check the power circuit of the sensor itself, we connect the tester to terminals “A” and “B” of the plug.
The voltage should be 4.8 - 5.2 volts.
If there is no voltage at these terminals, then you need to check the serviceability of the circuit itself (which means there is a break or short to ground somewhere) between terminal No. 32 of the controller and terminal “A” of the wiring harness block.
Then we check the circuit between terminal No. 17 of the controller and terminal “B” of the block - the sensor is grounded.
If the circuit is OK, but the voltage is not normal, then the controller is faulty.
Sensor check:
To check the sensor, connect the plug to it.
And where the wires come out of the plug, insert two wires or two needles, where the terminals “B” and “C” come out.
We connect the tester and turn on the ignition.
When the throttle valve is closed, the voltage should be 0.35 - 07 V
When the throttle is open (gas pedal is pressed), the voltage should be 4.05 - 4.75 V
If the voltage does not correspond to these readings, then the sensor is faulty and must be replaced.
- Checking wires and spark plugs Lada Kalina
- How to check the ignition coil of a Lada Kalina
Tips and tricks
If the sensor is being replaced for the first time, it is possible to make some annoying mistakes that can lead to rapid failure of the new sensor or make the replacement and diagnostic process less comfortable. Experienced craftsmen advise when performing such work to pay attention to the following features:
- There is too little space in the engine compartment, so a shortened Phillips screwdriver should be used to remove the TPS.
- After removing the sensor, you should carefully inspect the foam gasket located in the seat. If there is severe wear or damage, it should be replaced.
- You can check the TPS of the Lada Kalina without an assistant. In order to independently change the position of the throttle valve with a multimeter connected, you should increase the length of the wire with which the measuring device is connected to the sensor output. After that, you should install the tester in the direct line of sight of the driver, and smoothly press the gas pedal yourself.
The cost of a new throttle position sensor is relatively inexpensive. If this part is the culprit for the unstable operation of the internal combustion engine, then after replacing it, fuel consumption will be reduced, that is, the costs of operating the car will be significantly reduced. In addition, wear will be reduced on many parts that were overly stressed when the machine jerks. The comfort of driving a car, which is completely free of any problems in the operation of the engine, is significantly increased, which makes it possible to preserve nerve cells, which, unlike car parts, cannot be restored.
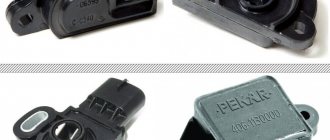
TPS design
The throttle position sensor is a device that is designed to accurately distribute the amount of fuel mixture entering the engine combustion chamber. Its use in modern engines allows increasing the efficiency of the car, as well as increasing the efficiency of the power unit. It is located in the fuel supply system on the throttle valve axis.
This is what the TPS design looks like
At the present stage of development of automotive technology, the following types of TPS are presented on the market:
Non-contact throttle position sensor with pin designation
The latter structurally have resistive contacts in the form of tracks along which the voltage is determined, while non-contact ones carry out this measurement based on the magnetic effect. Sensor differences are characterized by their price and service life. Contactless ones are more expensive, but their service life is noticeably longer.
Operating principle
As mentioned above, the sensor is located near the throttle valve . When you press the pedal, it measures the output voltage. In the case when the throttle valve is in the “closed” position, the voltage in the sensor is up to 0.7 Volts . When the driver presses the gas, the throttle axis rotates and accordingly changes the inclination of the slider at a specific angle. The sensor response is manifested in a change in resistance on the contact tracks and, consequently, an increase in the output voltage. When the throttle is fully open, the voltage is up to 4 Volts . The data is for VAZ cars .
These values are read by the vehicle's electronic control unit. Based on the data obtained, he applies changes to the amount of fuel mixture supplied. It is worth noting that this entire procedure occurs almost instantly, which allows you to effectively select the engine operating mode, as well as fuel consumption.
Coolant temperature sensor (DTOZH)
The DTOZH is installed in the thermostat housing and reads readings about the coolant temperature, transmitting them through the computer to the dashboard. The sensor also forms the fuel mixture when starting the engine in the cold season, making it a little “richer”.
Signs of malfunction:
- No warm-up speeds;
- Difficult to start in the cold season;
How to replace the throttle assembly, popularly the throttle valve, on a VAZ 1117-VAZ 1119?
Removal: 1) At the very beginning of the operation, you will need to drain all the coolant from the car’s engine cooling system, all this is done because the hoses through which the coolant runs are connected to the throttle assembly and when you disconnect them (And they will have to be disconnected, since you will have to remove you still need a throttle assembly) liquid will flow out of them, which will stain the entire engine of your car. (For information on how to drain fluid from the system, see the article: “Replacing coolant in a VAZ”)
Note! Although, in principle, you don’t even have to drain the liquid, of course, if you can quickly rearrange the hoses, that is, to do this, first place a small container under the throttle assembly, after which the screws of all the clamps are loosened (Not counting the clamp of the central hose, since this hose goes only only for crankcase ventilation and fluid will not flow out of it) that attach the hoses to the throttle assembly fittings and after that, disconnect all the hoses (Only the side hoses, as was said earlier, don’t be afraid to touch the central one as nothing will flow out of it) disconnect (From coolant will flow from them) and is sharply connected to these same fittings, but only on the adjacent new damper! (If you decide not to drain the liquid, then be aware of one thing, do not touch or disconnect anything on a hot engine, otherwise you will get burned, in addition, make sure that the liquid does not get on the wiring, otherwise it will ruin it and most importantly, beware of yourself, since the liquid will dry out the skin if it gets on it, especially be afraid for your eyes, so if it gets anywhere, immediately rinse the area with clean water and thereby wipe it off completely)
2) Then press out the plastic clamp and then disconnect the block of wires that is connected to it from the throttle position sensor (see photo 1), and after that do exactly the same operation with the idle air control sensor and thereby disconnect the block of wires from it too (see photo 2).
Note! Both of these sensors are present directly on the throttle assembly itself, so you won’t confuse them with anything!
3) Next, grab a screwdriver and use it to loosen two clamps, first loosen the clamp that secures the crankcase ventilation hose to the main air supply pipe (see photo 1), then when the clamp is loosened, disconnect the hose and direct it anywhere did not interfere with further removal, and after that, use a screwdriver to loosen the clamp that secures the main air supply pipe to the throttle assembly (see photo 2) and then disconnect it from the assembly itself.
4) After which you will need to loosen the two screws of the clamp that secure the drain and coolant supply hoses to the throttle body fittings and then disconnect both hoses (see photo 1-2), when they are removed, loosen the clamp securing the ventilation hose in the same way crankcase (see photo 3) and the hose that comes from the canister purge valve (see photo 4) and disconnect all these hoses.
5) And to complete the operation, unscrew the two nuts that secure the throttle assembly to the receiver (see photo 1) and then move it along the studs and thereby remove it completely from the car (see photo 2), but when removed, in addition remove the sealing gasket from the receiver indicated by the blue arrow.
Note! This gasket is responsible for sealing the entire system, so when you remove it, carefully inspect it from all sides and if you find traces of cracks, or if it is compressed too much or is otherwise deformed, then replace it with a new one!
Installation: Install a new throttle assembly in the reverse order of removing it, but before installing a new one, check whether it has an idle air control sensor (Indicated by a blue arrow), and also whether there is a throttle position sensor (Indicated by a red arrow), if these sensors it won’t, then remove them from the old assembly, they are very easy to remove, just unscrew the two screws that secure them and after that they can be removed from the throttle assembly and installed on the new one.
FakeHeader
Comments 23
Pedal adaptation helps me personally! When I came for diagnostics, about six months after purchasing the car, the diagnostics showed that the gas pedal was not adapted! I performed the above operation on rpm from 1000 to 4000 and it adapted! These failures, if you suddenly give the gas to the floor even for a second, are annoying! After chipping there was not a single failure at all, you press sharply and it immediately slips without delay! For some reason, about a month later, a small failure appeared again!
This is not an adaptation! What you described is enabling the misfire diagnostic function.
Throttle valve adaptation is done as follows:
1. Ignition on 2. Wait 30-40 seconds. 3. Start the internal combustion engine. 4. Turn off the ignition 5. Wait for the main relay to turn off. 6. Everything
But only then we go to the track and adapt the passes.
But before this, you need to warm up the internal combustion engine until the fan turns on three times.
initialization, and then the above written by the author! Helps! ) BC State1 for help or diagnostics
The staff transfers to 95th without training, many ride on 92nd
You read more carefully (— adaptation of the throttle position zero. For this, the first turn on of the ignition switch after replacing the controller) after replacing the controller. Removing the terminal from the battery or resetting the settings by the staff does not affect anything. Again, we carefully read (adaptation of the misfire diagnostic function of the controller in order to avoid damage to the catalytic manifold and possible fire of the car) misfires have nothing to do with the pedal in general. In the first case, all this is done at the factory. This is only necessary when the brain changes or the throttle assembly.
or by “resetting” it with initialization using diagnostic equipment, my B.K can do initialization, so for whom how
If the staff resets it, won’t it work?
I think no! The state only resets the values to zero! This is different!
I’ll try this during the day, otherwise I’ve already sinned on the filter, you press the pedal, from 2 to 3 there are dips, that is, no!
try! Let me know if it helped or not!
I need to try it, otherwise there are holes in my guts
everything is clear, I just changed the firmware, I did it! But when I drove around after buying the car for about six months and stopped by for diagnostics! It revealed that for some reason the pedal was not adjusted! And even after the firmware, the car was tearing out from under itself, and about two weeks ago small gaps appeared again! I tried from 1000 to 4000 as it was written to do everything, the pedal became more responsive! But it’s still not the same as right after the firmware!
Repair and dismantling of the sensor
The potentiometer in the Lada Kalina is fixed on the throttle axis. In order to access it, you will need to remove the decorative cover. The lower voltage threshold at the control output is about 0.7 Volts. The maximum opening of the throttle valve corresponds to a voltage value of 4 Volts and higher, the maximum level is 5 Volts. To check the functionality of the damper position sensor, you need a multimeter that measures the voltage at the signal output. If the voltage periodically jumps when the damper is closed, it is recommended to clean both the part itself and the sensor contacts. In most cases, the root cause of all problems and malfunctions is precisely the contamination of the elements and contacts of the device. If the sensor fails, the following changes can be diagnosed:
- The controller stores the digital fault code in memory;
- A light comes on on the instrument panel indicating a breakdown;
- The damper opening angle is calculated by the electronic control unit based on the level of air flow and the number of crankshaft revolutions.
Before you begin the process of repairing or replacing the throttle sensor on a Lada Kalina car, you need to disconnect the negative terminal from the battery. After this, you need to disconnect the sensor itself from the power supply - by removing the plug by pressing a special plastic latch. The throttle position sensor in the Lada Kalina is secured with two screws, after which the entire assembly can be removed.
The removed part is inspected for damage, and the width of the sensor shaft is measured (standard - five millimeters). The throttle body may need to be cleaned. If dirt has accumulated on the axle, the sensor will have difficulty moving. If there is play, there is no way to remove it: winding it up with electrical tape or any other materials will only worsen the situation. The only way to get rid of the backlash is by completely replacing the entire damper position sensor.
How to check TPS Lada Kalina
You can diagnose the Lada Kalina TPS without dismantling this element. For this purpose, you can use a multimeter or any DC voltmeter designed for low voltage.
Checking the functionality of the element is carried out in the following sequence:
- Disconnect the negative terminal of the battery.
- Disconnect the wires from the sensor. The plug can be easily removed by slightly pressing the lock upward and pulling the wires to the side.
- Connect the “+” of the multimeter to the contact of the sensor through which power is supplied. The conductor should be connected using a thin copper wire.
- Install the plug onto the sensor.
- Connect the battery.
- Turn on the ignition.
- Connect the “–” of the multimeter to the “ground” of the car.
If power is supplied to the TPS, the display of the electronic meter will show a voltage in the range from 4.5 to 5.0 Volts. If current is supplied to the sensor, but the engine is still unstable, then a more detailed check should be carried out. For a more accurate diagnosis, you will need an assistant. To carry out the work of measuring voltage while moving the throttle valve, you must:
- Turn off the ignition and disconnect the negative terminal of the battery.
- Connect the “+” of the tester to the TPS terminal, which goes to the electronic control unit, and “–” to the vehicle ground.
- Connect the battery and turn on the ignition.
- Ask an assistant to gently press the gas pedal.
When the damper opens smoothly without jerking, the voltmeter readings should also change. When the positions of this element correspond to the maximum flow of gasoline into the engine, the voltage should be about 5 Volts. With the damper completely closed, the main terminal of the sensor should be in the range from 0 to 0.5 Volts.
If, during diagnostic work, no deviations in the change in output voltage were detected or the potential difference did not increase smoothly when the damper was slowly opened, then this part must be replaced.
Signs of a malfunctioning throttle valve Lada Vesta
There are a number of indicators that indicate a malfunctioning throttle valve. Symptoms may vary depending on the part that fails. To understand which direction to move, you need to familiarize yourself with the list of possible symptoms of damage to the throttle of your Lada Vesta:
- Uneven idle speed
- Stopping the engine, both at idle and when pressing the gas
- The engine does not start or stalls immediately after starting
- Loss of engine power
- Jerks when accelerating
- Check Engine Light Is Intermittently or Constantly Illuminated
As you can see, there are quite a lot of signs indicating throttle valve problems and all of them can indicate many other malfunctions. Therefore, before repairing the throttle assembly, you need to rule out possible malfunctions of other parts of your car. To do this, use the algorithm of actions given below.
VAZ electronic throttle: design, diagnostics, flushing and repair.
In this material I want to talk about the design, diagnostics and repair of the Delphi electronic throttle valve (pipe), installed on VAZ cars together with the M74 engine management system. The reason for writing this article was one very typical malfunction on a VAZ 2115 car with an atypical cause, which I will talk about a little later. I would like to warn you right away that the author of this article does not bear any responsibility for unqualified intervention and repair of the electronic throttle valve in the event of its failure and emergency situations on the road, since repair of this unit is not provided, but only replacement.
Design. An electrically driven throttle valve (pipe) is designed to dose the amount of air entering the intake manifold. Changing the amount of incoming air is achieved by turning the damper with an electric motor, which is controlled by a controller. Main parts of the throttle assembly: All photos are clickable!
1. Housing 2. Damper 3. Gearbox 4. Electric motor 5. Throttle position sensors.
The connection diagram is shown below:
Removing the throttle assembly: 1. Turn off the ignition, remove the minus terminal from the battery. 2. Unscrew the clamps and remove the intake pipe hose from the throttle body. 3. Disconnect the harness block. 4. Unscrew the 4 bolts securing the throttle assembly from the intake manifold and remove it.
Typical faults and their diagnosis. A childhood problem of the first car releases, error P2135 (Mismatch of signals from sensors A and B of the throttle position) manifests itself in the form of unstable idling, speed limit to 2000 and loss of traction. It can be successfully treated by crimping, bending and soldering the contacts of the throttle body block or by replacing the entire electrical wiring harness. On most cars it has been cured for a long time, on new ones it almost never occurs. Floating speed and unstable idle. Here we will dwell in more detail, since this phenomenon is common and appears sooner or later on almost all cars. The main reason here is the mismatch between the throttle opening angle and the amount of incoming air. On most cars it can be treated by washing. It is advisable to wash the throttle valve at least once every 20-30 thousand km. otherwise, deposits of soot and oil particles create obstacles to air movement during idle with all the ensuing consequences. Therefore, the throttle assembly must be kept clean and tidy - this is an axiom. The second reason for floating idle speed is throttle play. How does it manifest itself and how to diagnose it. Below is a screenshot of the SMS diagnostic program. The parameters were taken from a VAZ 2115 car with an M74 engine management system.
Here it is worth paying attention to the high air flow, relative filling and injection time. At the same time, the opening angle of the throttle valve is very small and the controller, trying to stabilize the idle speed, drives the ignition timing into the minus. This happens because the actual angle of the throttle valve does not correspond to the angle calculated by the control unit due to backlash. Moreover, if you initialize the throttle, then the engine may work normally for some time, but after some time or after a restart, the situation with the speed floating repeats. It is worth mentioning here that if the throttle is dirty, the parameters will also differ from the norm, with the only difference being that the valve opening angle becomes larger than usual. As an example, here is a screenshot with normal parameters:
How to eliminate throttle play. To do this, the throttle assembly must be disassembled. From the gearbox side, unscrew 4 screws (Torx 15) securing the cover.
Here we see the gears of the transmission mechanism.
The middle gear is simply removed.
On the other side there are throttle position sensors and an electrical connector. They are fastened with very rare pentagonal Torx screws. Photo below:
We're filming. The electric motor in the housing and the damper axis are visible.
Next, you need to use a press or vice to squeeze out the throttle axis from the TPS side towards the gears.
Remove the axle.
There is no need to remove the electric motor if it is in good condition. You can check it simply by measuring the resistance at the contacts. The resistance should be approximately 10 to 30 ohms.
Below is a photo of all the components of the electric throttle in disassembled form.
The position of the throttle valve, when the electric drive is not engaged, is determined by the position of the spring whiskers between the stops - lugs in the throttle body and is approximately 10% of the opening relative to the closed position.
Play along the axis of rotation of the throttle valve appears due to wear on the aluminum spring stops. Marked with a red arrow:
There are 2 options here: either replacing the throttle assembly, which is not cheap; at the time of writing (September 2013) it costs about 2,500 rubles. Or you can remove the backlash by eliminating the gap between the spring mustache and the body bosses. The essence of the method I propose for eliminating the backlash is to slightly move the spring mustaches by the amount of the gap, by cutting, for example with a needle file, grooves for the mustaches in the plastic stops on the gear itself.
After modification, we check the play by hand. However, it should be taken into account that a slight play of the order of 0.1-0.2 mm along the axis of rotation will still be present due to the loose fit of the spring on the axle bushings.
If everything is in order, we assemble in reverse order. The throttle valve axis is secured against displacement with a tight-fitting washer, photo below:
You can press this washer back onto the axle using a suitable tube or, for example, a 10mm deep socket.
Important note! After repair, replacement of the electronic throttle body, or replacement of the ECM, it is necessary to perform zero adaptation of the throttle position. This is done very simply. The first switching on of the ignition after repair must be accompanied by a delay of at least 30 seconds. During this time, you will hear the electric damper drive turn on, turn the damper until it is completely closed and return it to its original position. After this procedure, the throttle adaptation can be considered completed and the engine can be started.
Fuel pressure sensor (FPS)
Used to transmit information about pressure in the fuel system to the ECU. DDTs are mounted on different types of engines, running on both gasoline and diesel (with Common Rail). Installation location: fuel rail of the power unit.
The task of DDT is to maintain pressure at the required level and ensure normal operation of the power unit. This ensures normal power and noise levels. Sometimes a car has two sensors - high / low pressure.
DDT has a simple device:
- sensor component (metal membrane);
- strain gauge (an element that, when deformed, leads to a change in its electrical resistance).
The thicker the membrane part, the higher pressure DDT can withstand.
As for strain gauges, they are needed to convert mechanical actions into electrical commands. In normal mode, a voltage from 0 to 80 mV is generated at the output.
If this parameter is exceeded, a special valve in the fuel system is activated, ensuring normalization of pressure.
The breakdown of DDT manifests itself in the following signs:
- ignition of the Check Engine lamp on the “tidy” (P0191 in the scanner);
- excessive consumption of fuel;
- difficulties starting the power unit;
- loss of engine power;
- shutdown on XX;
- fuel leakage from fuel hoses/rail.
If any of these symptoms appear, it is advisable to check the computer for errors.
The reasons for the breakdown of DDT include:
- damage to the internal elements of the sensor;
- wiring fault;
- contamination of the mesh on the regulator due to debris getting into the fuel, for example, when the fuel filter did not cope with the job;
- wear/wedge of the locking element inside the pressure regulator;
- incomplete fit of the DDT casing to the rail;
- ECU failure.
To check the old sensors, it was enough to turn off the “return” of the fuel supply for a while on a cold engine. If the engine stops running, it means the problem is in the DDT.
On new devices you need to measure the voltage, which should be about 5 V.
It is also worth checking the voltage between the “minus” of the chip (black wire) and the “plus” of the battery (red wire). If the voltage is about 12 V, then the DDT is working. When checking with a pressure gauge, the pressure should be about 2.5-3 atm.
Causes
Usually the reason for carrying out work is interruptions in the functioning of the power unit - idle speed “floats”, or even the engine stalls or does not start.
IMPORTANT! The manufacturer states that the throttle assembly is non-separable, and therefore its repair in case of damage is excluded. A new component needs to be installed.
As for the regulations, it is recommended to clean it once every 50,000 km.
The main “miscalculations” of VAZ
Of course, no matter how much VAZ praises e-gas, this mechanism also has serious drawbacks. For example, if it fails, this device cannot be repaired. A complete replacement will be required, which will be very expensive. Although today there are “traditional craftsmen” who have adapted to repair the device themselves, this is not always effective - driving with such e-gas is even dangerous.
As for the responsiveness of the car, not everything is clear here either. Many motorists claim that the old Kalinas were much easier to pedal and responded better to pressure. E-gas responds to them with a delay, and this can become a critical problem, especially if you need to quickly avoid a collision or simply quickly overtake.
Algorithm of actions for identifying a throttle malfunction
It is important to understand that the most reliable way is to download error codes to a smartphone or PC using the diagnostic connector. But, if this is not possible or the connector does not work, you can verify that the node is faulty using the following algorithm:
- Check the air duct for foreign objects, dirt, water, etc. If necessary, clean the channels.
- Make sure the air filter is suitable.
- Use a tester to check the functionality of the accelerator pedal position sensor.
- Test the functionality of the idle air control.
- In the same way, rule out malfunction of the damper position sensor, as well as the electric motor.
- If everything is in order, then it makes sense to disassemble the assembly and verify the integrity and functionality of the damper itself.
All measurements with the tester must be made with the ignition on and at different positions of the accelerator pedal.
Sources
- https://1ladakalina.ru/obsluzhivanie/snyatie-i-chistka-drosselnogo-uzla-lada-kalina.html
- https://olade.ru/neispravnost-drosselnoj-zaslonki
- https://kalina-2.ru/remont-vaz/kak-pomenjat-datchik-drosselnoj-zaslonki-na-kaline
- https://tuningkod.ru/chip-tuning/drosselnaya-zaslonka/datchik-polozhenija-drosselnoj-zaslonki-kalina-zamena.html
- https://avtomechanic.ru/lada-kalina/diagnostika/proverka-datchika-drosselya-lada-kalina
- https://Vaz-Russia.com/remont-vaz-1117-kalina-universal/zamena-drosselnoy-zaslonki-na-kaline.html
Reason 7. Automatic transmission with surprise
If the car does not pick up speed, and you press hard on the gas, the reason may be in the automatic transmission. At the same time, you can hear that the engine is roaring like a wounded bison, but the power does not reach the wheels. To check if the problem is really in the automatic transmission, do the following:
- Drive onto a flat road without turns. Set the handle to Drive.
- Drive a couple of kilometers, observing the behavior of the car. If when you press the gas, the speed decreases, the problem is in the braking system. If the car does not pull and you hear a loud sound from the engine, then you need to check the automatic transmission.
It will not be possible to close the list with 7 reasons, however, the remaining breakdowns can only be calculated by a master diagnostician. We wish your horse not to break!
We recommend watching:
Road signs additional information pictures with...
How to change the intermediate shaft in the field