Heading optics contains 4 lamps
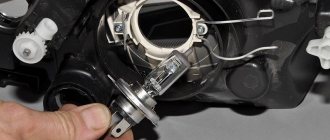
Let's look at how the directional optics, that is, the front headlight, is designed. The block contains four compartments, each of which contains one element:
- High beam lamp (H1);
- Low beam lamp (H7);
- Combined lamp for running lights and “dimensions” (W21/5W);
- Turn signal lamp (P21W yellow - PY21W).
The standard size of the element is indicated in parentheses.
If we talk about low and high beams, standard power lamps (55 watts) are installed from the factory. It is not recommended to greatly exceed this value. Lighting fixtures of sizes H1-H7 look like this:
H1 – high beam, H7 – low beam
When making a purchase, the main thing is not to confuse an H7 lamp with a halogen lamp of a similar size (H4). Also, some companies produce 24-volt lighting devices.
When replacing halogen light sources, adhere to the following rules: do not touch the glass with hands without gloves; it is recommended to degrease the lampshade before installation. “Secunda” is suitable as a cleaner.
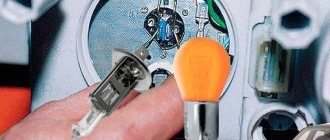
The following text shows the side and running lights:
Its standard size is W21/5W. Well, the turn signal bulbs in the directional optics use standard ones. They are equipped with a metal base, their standard size is P21W (PY21W).
The yellow lampshade looks like orange
How do you remove headlights?
The lighting system in Kalina includes:
- glass or polycarbonate;
- frame;
- lamp plugs;
- the lamps themselves;
- reflectors;
- wiring;
- decorative inserts.
To replace and adjust the headlights, most often you have to remove the front bumper. Only after this all the screws from below, as well as from above, will become more accessible. Once they are dismantled, you can remove the headlight itself, having first removed all the wires and pads.
But not every car owner has enough experience to dismantle the entire bumper. In addition, a common problem is the lack of time to change the entire lighting system. That is why replacing lighting without complete dismantling is considered more popular.
To disassemble the headlight with your own hands, you need to prepare the following tools:
- one key for 8 and one for 10;
- Phillips and flathead screwdrivers;
- new lighting system component.
To modernize the lighting on Kalina, you need to take the following actions:
- Remove the air filter housing and the special coolant unit.
- Remove the PTF plug using a screwdriver.
- Using a 10mm wrench, unscrew the bolt located underneath the headlight.
- Remove the bolts located on top of the light blocks. They are located near the radiator. In this case, you need to use the key 8.
- Remove the screw that secures the light to the car's fender using a large Phillips screwdriver.
- Rotate the light block so as to move the part near the radiator a little closer to the car engine. This will allow you to remove the fasteners located below from their seats.
- Remove the lower iron fasteners. To do this, you need to unscrew several bolts with a short head.
- Remove the headlight by pulling it towards you. Try not to damage the varnish layer, because the lamp is located next to the wing and bumper.
Many car owners have thought about the design and design of the Lada Kalina headlights. In fact, the design features of this element are quite simple. Since 2004, Kalina has been equipped with monoblock headlights.
Video about replacing headlight glass on a Lada Kalina. In the process, the headlight is completely disassembled:
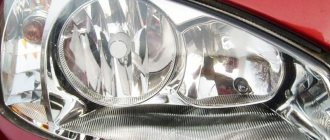
Headlight unit installed on a car
Like most new generation cars, VAZ 1117-1119 models are equipped with headlights of a simple design. Let's look at what elements are included in this node:
- Outer glass that protects the light bulbs and prevents water and dirt from getting inside.
- A plastic case to which all the main elements are attached.
- The rubber seal between the glass and the body provides good water and dirt resistance.
- Lamps for signaling turns, as well as low and high beam.
- There is a plastic reflector installed inside the case, which has a mirror surface and reflects the light of the bulbs.
Each headlight unit is equipped with light bulbs, which are well, one might say tightly, fixed in the housing, which ensures their resistance to vibration.
Headlight diagram with explanation
Tail lights and lamps
The following elements are used as brake light lamps in Kalina-2: lamps with a P21W socket and a transparent bulb. Replacing such an element will not be difficult.
Brake light bulb, VAZ-2192/2194
The rear turn signals are equipped with the same bulbs as discussed above. Their bulb is colored yellow (type PY21W).
The reversing light in the hatchback is provided by a lamp of the following standard size - R10W. If we talk about the station wagon, they use lamps of a different type - W16W. They do not have a metal base.
These are the reversing lamps
In conclusion, we note the following: the light of the side and fog lights in the rear lights is provided by a combination lamp. Its standard size is P21/4W. Good luck with your choice!
It is important to know! When performing any actions with electrical equipment, you must first disconnect the negative terminal of the battery. The terminal fastening is unscrewed with a 10 mm wrench.
Replacing lamps in standard Kalina foglights
It is better to change bulbs in standard fog lights in the inspection hole. Sequencing:
- Fix the car and remove the wheel above which you need to replace the lamp.
- Unscrew the fastenings of the fender liner and dismantle it.
- Move the protective boot and disconnect the connector with the wires.
- Turn the PTF counterclockwise and remove it.
- Install the new one by turning it clockwise.
- Put on the connector and boot.
After replacing the lamps, all that remains is to check and adjust the fog lights.
Other lamps in the station wagon and hatchback
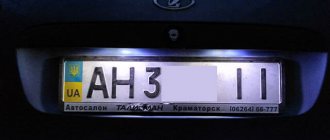
To illuminate additional equipment in Kalina-2, lamps of standard size C5W are used. They are:
- In the license plate light socket ;
- In the trunk light;
- In the glove compartment lighting module.
The interior is illuminated by a C10W lamp, and additional side lamps are equipped with T4W lamps.
Light bulbs and body turn signals
The side turn signals are equipped with incandescent lamps without a socket (W5W). And H11 lamps can be installed in the front fog lights. Successful replacement.
Lada Kalina Sedan reStyle › Logbook › 46. Installing PTF (part 1)
Once again, I strongly welcome you, friends! after purchasing the PTF "Luch" and installing the wiring, the installation day finally came... now if you plan to do something with the car, you first have to look at the weather forecast))) The installation day was on Saturday, because... There was a forecast of rain on Sunday...
so let me start the story...
Initially, I planned that an electrician would install the PTF... But, a couple of days before the installation, I decided to first try to figure out the wiring myself... I unwound this tangle of wires, dug up a connection diagram on the Internet, it’s strange that it wasn’t included in the kit... and started connecting everything along the chain on the hood ... in the end everything worked out for me! almost the first time... and it was the first time in my life that I was doing something like this... Having made sure that everything was correct, at the places of twisting, I covered those places with note paper indicating +this or-, where or what this or that wire goes to...
this is what it all looked like...
The long-awaited day has come... So... after reading articles about installing PTF, I decided that the most optimal and less time-consuming thing is to remove the wing fenders. I somehow didn’t want to remove the bumper again and force it... The space with the removed fender liner is quite enough for all sorts of manipulations related to the installation of the PTF... I didn’t even have to remove the wheel.
Next, we install the PTFs themselves, they are held on by 3 self-tapping screws, screw them on with maximum effort... so that the PTF does not wobble or chatter... while driving. any free vibration of the PTF will lead to the fact that the beam of light from the PTF will rush from end to end on every hole or bump...
after installation we connect the mass
Having finished installing the PTF on the driver's side, we do the same on the passenger side...
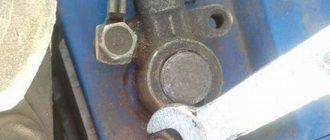
after I removed the PTF plug, such a surprise awaited me...
key for 10 I don’t know how it ended up there... but I was lucky that it didn’t get on the timing belt or somewhere else where it shouldn’t have ended up...
We run the + ohm wire through the space behind the lower radiator grille...
in the photo it seems to be free... but I deliberately laid it out this way in order to photograph it and show how and where it passes...
after + we stretched it to the PTF on the driver's side, we cut off the extra piece of wire, and connect EACH wire + from EACH PTF to the fuse holder... + I inserted a 10A fuse into the pin fuse holder
further... the most difficult thing for me... because I overlooked this point in the articles... what I spent the most time on... is extending the wiring from the PTF to the interior...
firstly... I thought for a long time... where to bring the wires into the interior... secondly, I spent no less time thinking “how to do this?”))) in total, I probably spent 2 hours searching... thinking... and trying on...
I tried for a long time to insert the wires through the hole where the hood release cable comes out... but the wire is stringy. and a decent gap would form... which would lead to water flowing through it...
I had to think about it again...
In the end, I found a suitable place to connect the wiring to the interior, but to do this I still had to remove the windshield wiper motor...
This is the hole where the wiring from the windshield wiper motor enters the interior, it’s a very convenient hole, it’s located high, and water won’t leak, and it’s sealed with a rubber ring...
Then the question arose... how to insert the wire... again time for trying and thinking... I went rummaging around the garage... and my eyes fell on the multifunctional sprayer)))), and it was the tube that caught my eye...
here is the sprayer itself... cheap and really MULTIFUNCTIONAL)))
I put the wire into this tube...
the perforation stayed in it very well and tightly...
wire + from PTF to relay wire + from relay to battery
The tube was led into the cabin through the rubber seal that I mentioned above.
OK. We brought the wiring into the cabin... further. Another half an hour of thinking about how to now run this wiring to the PTFs...
We are looking for another hole, we found it... we tried it on and inserted the wiring,
we hide the whole thing beautifully... and connect the wiring to the destinations... + from the relay to the battery we connect to the battery,
+ from the relay to the PTF we carry out again using our miracle tube... we find the main wiring harness, which is hidden in a corrugation, which in turn comes out of the engine compartment into the fender area on the driver's side, and we push the wiring through to the PTF, measure it, cut it off, hook it up...
Now you can breathe... because the hardest part of the work is done...
let's go to the salon... check if we did everything correctly...
that's right! that's right. everything is working…
twist all the wires and heat shrink them...
it seems like everything, BUT one thing remains... the PTF button...
+ to the PTF button I took from +a the power window relay... according to the following diagram
Let me explain... this is done so that the PTFs are, firstly, autonomous... and secondly, as we know, after we turn off the engine, power is supplied to the electric windows for another 20-30 seconds, or until the door opens... FOR EXAMPLE, if you use the PTFs as DRLs , after we turned off the engine, the dimmer will not warn us that the outside lights (side lights, high beam) remained on... and at this moment such a scheme will come in handy... because now, for example, you won’t leave the PTFs on...
How to replace low beam, high beam, and PTF lamps on a Lada Kalina 1
Several years ago, the government approved a law according to which during the daytime it is necessary to drive a car with either low beam headlights or DRLs (daytime running lights).
As a result, car low beam lamps began to burn out much more often. The first generation Lada Kalina is no exception.
Which fogs to choose for Kalina?
Before installing fog lights on Kalina 2 or 1, you need to decide on the type of optics and its manufacturer. Every car enthusiast who has ever connected a PTF knows that a lot depends on the manufacturer and type of optics. For Lada Kalina cars of the first and second generation, you can find many types of headlights on sale. Moreover, they differ from each other not only in type and manufacturer, but also in the efficiency of the glow, as well as in the configuration.
Connection diagram of optics with relay and button
The most common manufacturers of PTF for Kalina:
- the domestic company Kirzhach is one of the most trusted manufacturers, which boasts decent quality fogs;
- Luch is another domestic brand that has earned the trust of our compatriots;
- Bosch is a world-famous company that produces not only PTF, but also many other types of parts and components for cars;
- Prosport is a Chinese brand that entered the domestic market not so long ago.
As for the varieties, the optics may differ in appearance:
- headlights can be double;
- round shape;
- in the shape of a square;
- oval lanterns.
It is best to select optics that match the design of the plugs installed in the bumper (the author of the video is the Lada1119 channel).
Which low beam lamps to choose for Kalina
As we already indicated above, H7 lamps are installed in the low beam. Today a large number of lamps of varying quality are offered with this type of base. We recommend installing only high-quality and proven lamps that have already proven themselves.
- PHILIPS H7-12-55 LONGLIFE ECO VISION (4x lifespan) lamp price from 400 rubles (lamp installed from the factory)
- PHILIPS H7-12-55 +30% Vision lamp price from 300 rubles (with increased brightness)
- PHILIPS H7-12-55 +130% X-TREME VISION 3700K set price from 1500 (considered one of the brightest halogen lamps)
- OSRAM H7-12-55 Ultra Life (3x resource) price from 400 rubles (just like Philips was sometimes installed from the factory)
- OSRAM H7-12-55 +30% Super lamp price from 300 rubles (lamp with increased brightness by 30%, similar to philips)
- OSRAM H7-12-55 +110% NIGHT BREAKER UNLIMITED set price from 1500 rubles (110% more light than a regular lamp)
- BOSCH H7-12-55 Pure Light lamp price from 250 rub.
- MAYAK H7-12- 55 price per lamp from 90 rubles (inexpensive Chinese equivalent)
- GE H7-12-55 (PX26d) (General Electric) price per lamp from 180 rub.
If you want your low beam lamps to last as long as possible, you should choose
- PHILIPS H7-12-55 LONGLIFE ECO VISION
- OSRAM H7-12-55 Ultra Life
These lamps have an extended lifespan and therefore last longer than regular or high-brightness lamps. However, we note that some owners do not have enough light in a car with these lamps.
If there is not enough light, you can install lamps with increased brightness +30% or +110, +130% - but you must be prepared for the fact that they burn out faster than simple lamps. We do not recommend using them as DRLs.
- OSRAM H7-12-55 +110% NIGHT BREAKER UNLIMITED
- PHILIPS H7-12-55 +130% X-TREME VISION 3700K
When installing such lamps, it is better to install running lights and drive on them during the day, so as not to “burn out” expensive lamps with increased brightness.
Disassembling the headlights of Lada Kalina (Kirzhach)
You will need: hair dryer, utility knife, flat screwdriver.
Removing the glass of these headlights without breaking it is not an easy task, requiring time (sometimes up to 6 hours) and patience. The difficulty of disassembly is that the sealant in this case is more “difficult”. Often, heating it with a hairdryer causes the plastic of the headlight housing to melt faster, so many people resort to other disassembly methods. For example, heat the entire headlamp unit in a cardboard box using a technical hair dryer to a certain temperature. After this, the sealant will easily give in under a little pressure from a screwdriver.
If you don’t have a hairdryer at hand, then a regular oven may come in handy. Turn it on at 150-160C and wait 5 minutes. Then put the headlight in the oven on a wooden board and bake it for about 15 minutes. Then, wearing gloves, we pull out the headlight with a slightly softened sealant, and using slotted screwdrivers of different sizes, we pry the glass around the entire perimeter of the headlight. The black plastic that runs along the perimeter will change its original shape, you should not be afraid of this, since it will then level out. After about 10 minutes, the sealant will begin to harden, so we work quickly. Did not have time ? Not then we take the headlight into the oven again (this procedure can continue up to 10 times). We remove the mask (backing) of the headlight by unscrewing all the adjusting bolts (asterisk) from the outside. After disassembly, you can begin tuning Kalina's headlights.
Why does the low beam headlight lamp on Kalina not light up?
If you notice that the low beam headlights on your Kalina have stopped working, there may be several reasons. To eliminate it, you should check each of the reasons in turn.
- Lamp burned out
- Poor contact of the lamp socket
- Fuse burned out
First of all, check the fuse of the headlight on which the lamp does not light. Each headlight has its own separate fuse. In Kalina these are F12 and F13 . Pull out the fuse and check it visually; if it is intact, then the problem is in the block or the lamp itself.
Features of installation and configuration
As noted above, you can install Lada Kalina fog lights with your own hands; this does not require special equipment and devices, everything is very simple.
Installation
We will consider the option of removing the bumper, as it is easier for novice craftsmen. In the future, if you suddenly need to replace the fog light on Kalina, you can do it without removing the bumper, since you will know how the element is attached and how it is connected.
In general, the installation instructions look like this:
First, the bumper fastenings are unscrewed; all fastening points can be found in the instruction manual; the screws are located both along the grille and under the arches. To free the structure, the side parts are slightly removed from under the arches.
To remove the bumper fasteners, remove the latches securing the grille (green arrows)
- Next, using a flat screwdriver, the plugs are removed from the structure, after which you can attach the headlights themselves, which are most often framed according to the size of the hole. Fastening will not cause any difficulties, this is done using three self-tapping screws, the main thing is to do everything carefully so that the structure stands level and is fixed as firmly and reliably as possible.
- The next step is laying the wiring harness that comes with the kit. This is done from the interior: first, the carpet is removed, and in the area of the clutch pedal you can find a large bundle of wiring and a plug. The plug is pressed to clear the hole, after which the harness is tied to a piece of wire and pulled under the hood, the photo shows where the plug is located.
Finding a place to lay the wires under the hood is not difficult.
Using plastic clamps, the wires are attached to the main bundle, after which the harness is pulled along the left side and along the front bumper so that the connection nodes are located near the location of the PTF
It is important that the wires are secured and not dangling. After laying the wiring in the car, you can connect the fog lights using connectors, and the negative wires are screwed to the nearest bolts on the car body.
Important! Don’t rush to screw the bumper on; if something is done wrong, you won’t have to disassemble the structure again
Important! Don’t rush to screw the bumper on; if something is done wrong, you won’t have to disassemble the structure again
- The system operates through a relay, which is best installed under the panel, and do not forget to securely fix the structure. Power is supplied through the pink wire from the fuse box, the fuse capacity should be 15A.
- To connect the PTF, pins 30 and 87 are used; all connections must be equipped with terminals to ensure the best contact.
The relay controls the operation of the entire system
Next, a button is installed in the cabin, after which you need to check the operation of the fog lights. To do this, connect the battery terminal and turn on the PTF. If everything is fine, the system can be assembled, but Kalina’s fog lights still need to be adjusted.
How to adjust the light
Lensed products shine especially brightly, and once set up you will appreciate their effectiveness
For best performance in low visibility conditions, you need to adjust the light, this is quite simple:
- Before you adjust the fog lights on Kalina, you need to find an area with a flat surface and a wall or a solid fence in front of it. It is in this place that all necessary work will be carried out.
- First of all, check the tire pressure, it must be the same for the car to stand level. After this, measure the distance from the ground to the center of the PTF and draw a horizontal line on the wall at the same height. GOST standards regulate. so that there is a weight weighing 75 kg in the driver’s seat, you can seat any person with approximately this mass.
- The work is carried out in the dark, the car is located at a distance of 5 meters from the wall, after which the fog lights are turned on. The adjustment itself is made using a screw, the location of which is shown in the photo. That is, for adjustment you only need a thin Phillips screwdriver.
The main advantage of this type of work is simplicity
First, one headlight is covered with thick cardboard or other opaque material, after which the light flow is adjusted with a screwdriver so that its center is located on the line or slightly below it. The same thing is repeated with the second PTF, after which the adjustment can be considered complete.
To give additional reliability to the glass and protect it from falling stones, we recommend ordering the production of stickers for the headlights; they will protect the surface from scratches and cracks.
Fog lights for Kalina: technical requirements and features
Did you like the article? Follow our channel for new ideas of useful car tips. Subscribe to us in Yandex.Zen. Subscribe.
Appearing in the factory program in 2004, Lada Kalina became one of the few Togliatti-made cars whose equipment was maximally ready for the installation of additional equipment.
And the equipment itself was an order of magnitude higher than its predecessors:
- Electronic ignition;
- Window lifters;
- Immobilizer;
- Power steering;
- Seats for installing PTF in the front of the car.
How to install fog lights on a Kalina car?
Installation is carried out without the need to dismantle the bumper. In order to perform installation, you only need to unscrew and remove the front parts of the fender liners. The bumper plug can be removed using a flathead screwdriver. The manufacturer often includes a special frame mount in the kit. It is installed instead of a plug in the bumper. The optics themselves are installed and secured last.
But there is an installation method where it is necessary to dismantle the bumper. To do this, first unscrew the screws and the mounting bolt, and then remove the sides of the bumper from under the wheel arches. Next, the plugs are removed and fog lights are installed. "Kalina" continues to stand still. From the inside, the PTF is secured to the bumper with three self-tapping screws. Outside, until it clicks, a decorative frame is installed in place of the plug.
Readiness of electrical equipment
The electrical wiring on the Lada Kalina met modern requirements.
Already in the basic version:
- double-filament fog lamps were installed in the rear headlight units;
- the electrical circuit included relays and fuses (see also the article VAZ wiring: the need for modernization).
The diagram roughly shows:
- PTF circuit fuse (F9 according to international classification);
- Electronic immobilizer (anti-theft system);
- Rear headlights with PTF sections;
- Vehicle lighting control unit (installed on the instrument panel);
- Egnition lock.
For reference: In the photo, the symbol “A” indicates the wire from the power source. “Mass” is indicated in black.
Installation instructions
Here we consider a step-by-step algorithm of actions that will be required for execution so that the entire procedure is completed successfully.
1. First we remove the LADA Kalina bumper. To do this, unscrew the entire list of fastening components.
The screws are located on:
- lower bumper panel along the perimeter;
- in the wheel arches.
Now we remove the sidewalls of the element from the arched openings and completely remove the bumper from the car.
2. Next, remove the plugs by bending their latches. Here we use a flat screwdriver.
3. Unscrew the screws securing the fog lights. Each of the products is secured by three such fastening components.
4. We move inside the Lada Kalina salon. In the area of the pedal assembly we find a wiring harness. At this point we push out the sealing element and use a metal wire to pull out the wiring relating to the power supply to the fog lights. These cables are located next to the main trunk harness.
5. We connect the PTF wiring with the main wires.
6. Now we position and fix the power cables for the fog optics so that it is as convenient as possible to remove the connectors from the device terminals.
7. We attach the negative terminals to the screws of the LADA Kalina body.
8. The power consumed by anti-fog optics reaches 110 W, so we connect these devices using a relay with a button.
9. The button itself can be installed directly on the panel in the cabin, for example, next to the cigarette lighter.
10. To provide the lighting components with supply voltage, you will need to connect the pink wire to the relay. It is located in the safety block.
11. To protect the circuit of the headlights we are considering, you will need to use a fuse link with a rating of 15 A.
12. The power contact group of the relay with terminals “30” and “87” is connected to the cables leading to the fog lights.
13. Upon completion of all switching work, we check the correct installation and connect the battery power.
14. We press the button installed inside the cabin. If all connections are made correctly, then the fog lights illuminate the space, delighting the owner.
15. We install the bumper using the reverse algorithm of manipulations.
Do-it-yourself headlight installation is completely completed.
Principle of operation
Before you do it yourself and install the purchased PTF kit on your car, you should understand the principles of operation of fog lights, and also find out what the car manufacturer recommends on this issue.
Advice: it would be useful to order the production of stickers for the headlights when purchasing foglights. They will protect the glass from branches and plant stems, as well as from stones flying from under the wheels.
Technical requirements
Current rules stipulate that fog lights should only work with side lights or low beam headlights (see also the article VAZ 21099 wiring diagram: carburetor with “Euro” panel). This is primarily due to current road safety requirements.
The second point that you should pay attention to is the installation location, determined by the provisions of GOST 8769-75:
- From the road - not lower than 250 mm;
- From external dimensions - no closer than 400 mm.
Note! In addition, clause 2.3.4. it was determined that PTFs should emit only white or only selective yellow light. But it must be the same for both headlights mounted on a given vehicle.
Technical features
Currently, there are two main types of PTF used on Lada Kalina, in which:
- The formation of a light spot is carried out on the headlight glass due to the marks applied to it. Such PTFs are considered classic and are commonly called a headlight with a reflector;
- The light spot is formed in a convex (parabolic) lens installed instead of glass. It is considered more progressive because it is equipped with halogen or xenon lamps. In everyday life they are called lensed.
Features of installation and configuration
As noted above, you can install Lada Kalina fog lights with your own hands; this does not require special equipment and devices, everything is very simple.
Installation
We will consider the option of removing the bumper, as it is easier for novice craftsmen. In the future, if you suddenly need to replace the fog light on Kalina, you can do it without removing the bumper, since you will know how the element is attached and how it is connected.
In general, the installation instructions look like this:
First, the bumper fastenings are unscrewed; all fastening points can be found in the instruction manual; the screws are located both along the grille and under the arches. To free the structure, the side parts are slightly removed from under the arches.
To remove the bumper fasteners, remove the latches securing the grille (green arrows)
- Next, using a flat screwdriver, the plugs are removed from the structure, after which you can attach the headlights themselves, which are most often framed according to the size of the hole. Fastening will not cause any difficulties, this is done using three self-tapping screws, the main thing is to do everything carefully so that the structure stands level and is fixed as firmly and reliably as possible.
- The next step is laying the wiring harness that comes with the kit. This is done from the interior: first, the carpet is removed, and in the area of the clutch pedal you can find a large bundle of wiring and a plug. The plug is pressed to clear the hole, after which the harness is tied to a piece of wire and pulled under the hood, the photo shows where the plug is located.
Finding a place to lay the wires under the hood is not difficult.
Using plastic clamps, the wires are attached to the main bundle, after which the harness is pulled along the left side and along the front bumper so that the connection nodes are located near the location of the PTF
It is important that the wires are secured and not dangling. After laying the wiring in the car, you can connect the fog lights using connectors, and the negative wires are screwed to the nearest bolts on the car body
- The system operates through a relay, which is best installed under the panel, and do not forget to securely fix the structure. Power is supplied through the pink wire from the fuse box, the fuse capacity should be 15A.
- To connect the PTF, pins 30 and 87 are used; all connections must be equipped with terminals to ensure the best contact.
The relay controls the operation of the entire system
Next, a button is installed in the cabin, after which you need to check the operation of the fog lights. To do this, connect the battery terminal and turn on the PTF. If everything is fine, the system can be assembled, but Kalina’s fog lights still need to be adjusted.
How to adjust the light
Lensed products shine especially brightly, and once adjusted, you will appreciate their effectiveness. For best performance in conditions of limited visibility, you need to adjust the light, this is quite simple:
- Before you adjust the fog lights on Kalina, you need to find an area with a flat surface and a wall or a solid fence in front of it. It is in this place that all necessary work will be carried out.
- First of all, check the tire pressure, it must be the same for the car to stand level. After this, measure the distance from the ground to the center of the PTF and draw a horizontal line on the wall at the same height. GOST standards stipulate that the driver's seat must have a weight weighing 75 kg; any person with approximately this weight can be seated.
- The work is carried out in the dark, the car is located at a distance of 5 meters from the wall, after which the fog lights are turned on. The adjustment itself is made using a screw, the location of which is shown in the photo. That is, for adjustment you only need a thin Phillips screwdriver.
The main advantage of this type of work is simplicity. First, one headlight is covered with thick cardboard or other opaque material, after which the light flow is adjusted with a screwdriver so that its center is located on the line or slightly below it. The same thing is repeated with the second PTF, after which the adjustment can be considered complete.
To give additional reliability to the glass and protect it from falling stones, we recommend ordering the production of stickers for the headlights; they will protect the surface from scratches and cracks.
What can you buy?
Despite the wide variety of fog lights in auto parts stores, many owners do not understand what to choose and which fog lights are best for Kalina.
Many are also confused by the different terminal blocks, which forces them to look for adapters to integrate the PTF with the standard electrical wiring system (see also the article Wiring diagram VAZ 21074 - injector: we understand the intricacies).
If you approach the choice from a practical point of view, then for the Lada Kalina, without additional alterations and changes to the standard electrical circuit, the following are suitable:
- Fog lights Kirzhach on Kalina (lensed);
- Classic PTF made by Bosch (headlight with reflector);
Advice: we can also recommend Luch foglights, since they are a copy of the German ones. But their main advantage is the price, while the quality is much worse.
Among the advantages of these models is the fact that the adjustment of Kalina’s fog lights will be simpler and more understandable due to their installation in the standard mounting locations of the front bumper.
Installation methods and types of PTF
For the Lada Kalina model, different types of fog lighting devices are applicable. Headlights can be:
- double and rounded;
- square, recessed and oval;
- suitable for outdoor installation.
Not all devices from this list are equally suitable for installation in the model we are considering. The thoughtfulness of the purchase should be in the foreground here, so that the owner of the LADA Kalina does not have to frantically redo the standard fastenings in the future.
To avoid such an unpleasant moment, we recommend taking a closer look at the options and manufacturers below:
- "Bosch". An eminent German manufacturer, whose products, in particular PTF, boast high-quality optics and a long-range collected beam of light. Only available as a complete set.
- Option from . It is a kind of analogue of the above-mentioned German products, but the price is much more favorable than its competitor. The quality indicators of these PTFs are far from ideal.
- "ProSport" fog lights of Chinese origin. This manufacturer is also based on the supply of spare parts for Russian models.
- Products "Kirzhach". These PTFs have lens-shaped glass, which provides a bright beam with an enviable range.
Note that the fog lamp options indicated here are equally suitable for installation on LADA Kalina and do not require additional manipulations to fit them into standard places.
The entire list of manipulations in this case will be reduced to removing the “original” plugs and installing new fog lights in the seats.
Experience knows the two most common methods of installing fog lights.
- With the removal of the bumper (this is the method that will be described here).
- Without the need to remove this body component. This method is usually used by professional technicians who install PTF in a car.
If you are new to this issue, then the most suitable method of installing fog optics would be to do it yourself, which involves removing the bumper.
The photo shows the installation kit of the products.
How to adjust the light output
After installing new headlights or removing the front bumper, the car owner needs to adjust the light output.
The fact is that fog lights have a completely different principle of illuminating the road surface:
- PTFs have a clear upper boundary (cut);
- This is due to the physical properties of fog.
For reference: the whole point is that drops of moisture literally hang above the road, but do not touch the road surface. It is in this narrow space that the fog lights shine. If the luminous flux is higher, the light will be reflected in the drops like in a mirror and blind the driver.
The best solution to the problem would be to visit service stations that have special adjustment stands designed for any car model. But if this is not possible, or the fog light on Kalina was replaced and removed from its original location, then you can do this operation yourself.
How to remove, change and adjust the headlight of a Lada Kalina (station wagon, hatchback): lamp replacement and tuning
Design and features of optics on Kalina
Before you disassemble the front or rear lights or change the bulbs in the optics of the Kalina station wagon, sedan or hatchback, let's understand its structure:
- external glass designed to protect light sources and prevent moisture and dust from entering them;
- a plastic case onto which the main components are fixed;
- a rubberized seal between the headlight housing and the glass is used to ensure the tightness of the structure;
- low and high beam lighting sources, as well as turning lights;
- a plastic reflector located inside the housing, characterized by the presence of a mirror surface and used to reflect light from lamps.
Kalina diode optics If the lights are not adjusted, this can cause inconvenience not only to the car owner, but also to drivers of oncoming cars.
If the car owner can properly adjust the headlights, this will allow optimal illumination of not only the road, but also the side of the road. At the same time, the optics will not blind oncoming drivers. When the low beam is operating, only the corresponding bulbs turn on. If the driver activates the high beam, then the high and low beam sources are turned on. The headlight itself for Kalina is equipped with an electromechanical drive and can be easily adjusted using a corrector. The corrector itself is installed on the center console, so adjustments are made from the passenger compartment. The regulator is connected to the drive located directly in the headlight using wiring (the author of the video is the Lada Kalina channel).
Dismantling and repair of optics
One of the most common malfunctions in the operation of optics, if you do not take into account the failure of lighting sources, is damage to the headlight glass. If the lamp itself is damaged, it will have to be removed and disassembled to change the glass.
How to disassemble the headlight and how to replace the brake light bulb:
First you need to open the trunk and move the brake light source to the left. The Kalina brake light lamp must be pressed and turned to the left, so that the device can be removed from the installation location. The installation procedure is performed in reverse order. If you need to replace the glass, you will have to remove the bumper to do this. To do this, you need to unscrew the corresponding fasteners. After dismantling the bumper, it is necessary to disconnect all the wiring connectors that are connected to the optics. After completing these steps, you can unscrew the lower fasteners of the flashlight; to do this, use a wrench. After this, similar actions are performed with the upper bolts securing the optics. When all the screws are removed, the optics themselves can be removed. The next stage will be the glass repair itself.
You need to pull the headlight towards you and carefully remove the rubberized seal. It is usually attached to the lantern quite tightly, so most likely you will have to use a utility knife to cut the elastic. After the headlight housing and glass are separated from each other, all remaining adhesive and sealant should be removed from the perimeter of the housing.
To do this, you will also need to use a utility knife, and if the residues are small, then use sandpaper. Make sure that the surface on the housing is clean and free of sealants and dirt. Before installing new glass, the housing around the perimeter of the installation will need to be treated with a solvent. This will allow the surface to be degreased, so that the fit of the new glass will be maximum. Next, apply glue to the new seal and connect the glass itself to the body. The tightness of the structure must be optimal, otherwise the problem of fogging of the optical glasses from the inside may arise. Press the headlight on both sides so that the lens is connected to the housing as firmly as possible. At this stage, the repair can be considered complete; assembly is carried out in the reverse order. When installing the lights, they will need to be readjusted.
How to choose a light bulb
Many car owners complain that the low beam bulbs in the Lada Kalina often burn out; there can be many reasons, but most often the reason for failure is in the light sources, so we will tell you how to choose a high-quality option:
It is better to choose those brands that have good reviews from car owners and specialists; of course, their price will be much higher than that of budget solutions, but reliability will also be at a completely different level.
We do not recommend installing Mayak lamps; this is the cheapest Chinese-made option, which is not distinguished by quality and can cause malfunctions in the system
Modification The manufacturer installs H7 type H7 low-beam halogen lamps with a power of 55 Watts on the cars, which is exactly what should be installed. Using options with higher power may cause overheating of the machine wiring and, as a result, short circuits or even melting of the connectors. Products with an extended service life are marked Long LifeCharacteristics
Remember that options with increased light output have a shorter service life than regular lamps. Therefore, decide for yourself what is more important to you – lighting brightness or durability.
As an option, you can consider LED elements for installation in fog lights in Lada Kalina, they have a long service life with high brightness, but their cost is high
Service life Of course, exact numbers are not indicated anywhere, but remember that replacing low beam bulbs on Kalina, and in other cars, should be done once every 1-2 years, even if the elements are working. This is due to the fact that during operation, light output inevitably decreases over time.
Important! If the light bulbs burn out frequently, then measure the voltage on the generator; it is possible that it is excessive.
Fog lights
PTFs for Kalina are installed only on expensive trim levels. However, all wiring is installed from the factory and there are “ears” for mounting on the bumper. To install headlights, you will have to purchase a power button, frames in body color and a relay.
Installation of fog lights:
- Use a screwdriver to remove the plugs under the PTF.
- Screw the lights into the standard recesses.
- Snap frames to hide excess cavity.
Lada Kalina Cross uses matte black plugs that do not require painting. When installing on your own, you should buy bolts for fastening the headlight in advance.
How to connect the electrical part
Connecting the PTF to the standard wiring does not take much time. To search for the braid, you should inspect the area of the spar at the entrance of the main beam. The PTF plug is taped to the wires with electrical tape.
Fog lights Kalina 2 are often equipped with detailed instructions and an additional switch that must be installed instead of the old module to turn on the light. Connecting to pre-laid wiring does not take much time and does not require laying additional contacts.
If there are no power cables in the braid, you will have to independently pull the wires into the cabin, connect them to the connector, fog lights with plus and minus, and connect them through a relay. A detailed description of the connection is included with the part in the form of a diagram.
During the installation process you will need:
- insulating tape;
- copper wires;
- corrugation;
- connectors suitable for lamps.
How the work is carried out
Let's figure out how to replace the low beam light bulb on Kalina with your own hands, the process is quite simple and, by and large, does not require any special devices, you only need your hands. But still, the tool may be needed at the preparation stage.
Preparation
It is important to ensure a comfortable and safe working environment, so remember the following:
- The work can be done anywhere - even in the yard near the house, but it is advisable to go to the garage. There you can not be afraid of precipitation and, if necessary, find this or that tool.
- First of all, the hood is opened and the terminal is removed from the battery. We remind you of this in every review. Therefore, make it a habit to de-energize the system when working with electrical equipment to prevent short circuits and electric shock.
- Further preparation depends on what engine is installed in your car, you need to provide access to the rear of the headlight housing, and for this you need to disconnect the expansion tank on the left, and the options on the right may be different. Therefore, be guided by the situation and decide for yourself. What needs to be removed and what should not be touched.
Replacement process
Replacing the low beam bulb on Kalina is as follows:
What to have on hand
To carry out the work, we will arm ourselves with the following items:
- keys 8 and 10;
- flat and Phillips screwdrivers;
- a 6-sided key that regulates the spread of light;
- electrical tape, wire cutters, pliers (possibly a soldering iron);
- ties for fastening the wiring and a piece of strong steel wire;
- actually, headlights;
- The most important thing you will need for repairs is a kit for connecting fog lights to Kalina.
Button, relay and wires with connectors
Although the included end caps are usually black, you can paint them to match the body color however you wish. High-quality fog lights are usually equipped with Philips bulbs that are quite good in their characteristics.
The kit, which includes a button for turning on Kalina's fog lights, as well as wires, connectors and connectors, and a turn-on relay will need to be purchased separately. However, if your car has an air conditioner, then the space for the button is automatically occupied.
Parts for installation in the front bumper
Sequence of work
So, below are detailed instructions, using which you can easily equip your pet with fog lights:
- as in a number of other electrical works, our actions begin by disconnecting the power from the battery (minus terminal);
- Now you can start dismantling the bumper. We need to unscrew the screws and remove the black plastic grilles. It may be necessary to remove the license plate;
We begin work on installing the PTF
- the grilles and bumper are attached with screws and self-tapping screws - you can feel them with your hands, even without a hole. When you remove the bumper, you will see that the mounting points are indicated by arrows. This will allow such work to be completed much faster in the future;
- the wheel arches additionally hold the bumper with 3 self-tapping screws - do not forget to unscrew them as well;
- Now you can carefully begin to remove the sides of the bumper from under the arches, using rocking movements, and remove it entirely. Bend the plugs using a flat-head screwdriver;
- The fog lights themselves are attached to three screws each;
- now we need to extend the wiring into the cabin (as the video in this article shows). Many people recommend removing the driver's wheel and arch protection at this point;
- where the clutch pedal is located, we will find the place where the wires are collected in a bundle and push the seal outward;
- Now you can stretch the wiring using rigid steel wire. The idea is to tighten the wiring from the interior into the space under the hood. You can immediately provide wiring for connecting LED parking lights, alarms, remote hood opening and everything else that has not yet been installed;
PTF assembly
Our new wire blocks will go along with the factory ones, after which they can be tied together with plastic ties like clamps. If there is a need, a wiring diagram for fog lights on Kalina can help with this;
Assembling the headlight completely
We continue our PTF installation algorithm:
- We maintain the required length for the foglights and begin to screw the negative terminals to the bolts. For this purpose, you can use any bolts located on metal parts of the body, except for the engine crankcase mounting bolts, since through them there is no normal contact between the protection and the car body;
- It will be more convenient to run the wire to the right headlight under the radiator grille;
Connecting wires
- if it is necessary to lengthen the wires, twist them, or better yet, solder this place and insulate it;
- the power that the fog lights consume requires connection through a relay, which is controlled by a button (see photo);
- take power from the pink wire that leads to the fuse box (relay K7). It is designed to turn on the high beams, and voltage appears only when the ignition is on;
- use a 15 Amp fuse;
- contacts from the relay are connected via wires with a cross-section of at least 0.75 mm to the wires of the fog lights and to the relay;
- After making all the connections, we need to check how we assembled our kit and whether there is power in the circuit. To do this, connect the ground of the car and check how the headlights shine when turned on by the button;
Bumper with headlight installed
All that remains is to reassemble the bumper in reverse order, making sure that the wires do not get pinched anywhere. The price and degree of complexity of such repairs will be within the power of any Kalina owner. In order to adjust the headlight beam, there is access to the adjustment screw from below.
Maintenance and replacement of the rear light
To replace the lamps in the rear light of Kalina 2 station wagon and hatchback, you need to remove the entire headlight unit. To do this you need:
- Unclip the plug next to the seat belt bolt.
- Unscrew the nut.
- Open the seal window and unscrew the remaining fasteners.
- Pull out the flashlight.
- The lamps are pulled out by turning the base counterclockwise.
When replacing lamps in a hatchback body, carefully remove the nuts so that they do not roll under the trim. The missing part will rattle while driving and you will end up having to disassemble the entire luggage compartment.
The Kalina sedan has special compartments in soft upholstery for access to the nuts. There is no need to remove additional plugs.
To keep your car in excellent condition, you need to periodically replace lamps, clean optics, or install new ones. Removing front, rear headlights and foglights in Kalina does not require expensive tools or special knowledge.
Lada Kalina Station Wagon Lady in Red 8V › Logbook › Replacing the light bulb in the fog lamp.
Hi all! So the hour came when the first light bulb on my girl burned out) By the will of fate, it became the light bulb in the left fog light. To replace it, a standard H11 lamp (12V 55W PGJ19-2) from Osram was purchased. The replacement procedure consists of removing the front fender liner, disconnecting the block and replacing the lamp. It's simple. And now, in order.
For convenience, many people remove the wheel. I didn’t do this, mostly out of laziness, but everything worked out great without removing the wheel. So let's get started:
For work we will need: 1. Cloth gloves, so as not to get your hands dirty. 2. Key and socket 8. 3. Phillips screwdriver. NB: Keep in mind that the wheel will be a little in the way to a certain extent, so if you do not intend to remove it, I recommend using a short screwdriver.
Using a 8mm head, unscrew the two bolts on the inside, then use a Phillips screwdriver to unscrew the five screws (two on the inside, two on the outside of the bumper mount and one on the bottom under the bumper) and pull off the fender liner, or rather its lower part, since it consists of two parts.
Now we see the fog lamp, or rather its rear part. unclip the pad fastenings on the sides and pull it down. Then we take the lamp by the base and carefully, using some force, turn it counterclockwise and remove it. We insert the new lamp and fix it by turning it clockwise. NB: do not hold the lamp by the bulb, as grease marks will remain on it and it will quickly burn out. If you accidentally took it, wipe the flask with alcohol or white spirit. We reconnect the block, check the operation of the lamp and if everything is fine, return the fender liner to its place.
The whole job took me about an hour.
We unscrew them with a 8mm head.
We unscrew the remaining five with a Phillips screwdriver.
We snap off the latches and carefully pull the block down.
Removed. Now turn the lamp counterclockwise and remove it. Here she is, the hero of the occasion. It burned out in the very center of the spiral. The new light bulb shines just as brightly after replacement.
Headlights
Replacing a headlight yourself will require preparation of the car and tools. To work you will need:
- set of wrenches;
- screwdrivers;
- rag;
- gloves to protect hands.
For ease of work, you need to wash Kalina in advance and clean the space in the garage. To replace the headlights, you need to remove the bumper and unscrew several mounting bolts.
Dismantling
Steps required to remove headlights:
- Open the hood lid.
- Disconnect the battery terminal.
- Pull out the clips from the front of the fender liner.
- Unscrew the radiator grille fasteners and remove it.
- Unclip all the clips along the contour of the bumper and unscrew the screws.
- Remove the bumper without scratching the corners of the fenders and headlights.
- Disconnect the optical power plug.
- Remove the two screws holding the light on top.
- Remove the lower headlight bolts.
- Carefully remove the part.
Before assembling and installing a new headlight, you should check the presence of light bulbs and their functionality. To do this, connect the flashlight to the connector and check all the functionality. When installing a new part, you should not rush; it is important to be careful and not damage the case or glass.
Repair
To disassemble the Kalina headlights, they will need to be dismantled. You can repair the Kalina headlight by polishing the glass, replacing it, washing the internal parts, or restoring the reflector.
To remove the glass you will need:
- Dismantle the part.
- Heat the headlights in the box using a hair dryer.
- Tear off the glass.
- Carry out all the required work and assemble the lantern using a special sealant.
To disassemble the headlight, it will take several hours, depending on the experience of the car owner. Replacing Kalina's headlight glasses will improve the exterior and increase light transmittance.
During operation, it is important to follow safety precautions, do not leave the hair dryer unattended and use gloves.
Installation
Before installing the lights, you should wash the mounting points and mounting space. Installation is carried out in the following order:
- The power plug is connected.
- The Kalina headlight mounts are aligned and secured with standard bolts.
- The bumper is hung from the front and screwed onto self-tapping screws.
- The radiator grille is installed.
- The left and right fender liner clips are being returned.
In versions with fog lights, you will have to additionally connect the connectors to the lamps when installing the bumper and disconnect them during removal.
Which optics is better to choose
While using the machine, the lights are subject to sudden temperature changes, impacts from stones and small grains of sand. These factors negatively affect glass, reducing its transparency, worsening light characteristics.
High-quality headlights that meet safety requirements are installed from the factory. Unofficial replacements are equipped with xenon lenses, “angel eyes” and modified reflector geometry. These lights look beautiful, but wear out faster due to poor quality materials and can fog up in humid weather.
When choosing new optics, it is better to trust the official ones. When purchasing, it is important to clarify the modification of the body and the year of manufacture of Kalina. Depending on the configuration, there are darkened masks or improved lighting characteristics.
Low and high beam optics
Depending on the body type, Kalina has different parts installed:
- sedan, hatchback – standard optics;
- sport, station wagon - are equipped with a more elongated reflector with an increased area to increase the lighting area by 20%.
To connect improved optics to Kalina, you do not need to lay additional wires or change contact connectors. The optics are no different in mounting points and shape.
When purchasing flashlights, you should pay attention to original parts with improved performance. This will improve the characteristics of the beam without interfering with the wiring or altering the standard fasteners.
Fog lights
When buying new PTFs, it is better to choose from original parts. Standard lights are equipped with durable glass and a high-quality reflector that directs the beam in accordance with GOST.
Fog lights for Kalina are produced by:
The models differ in the shape of the glass, but there is no difference in quality. The headlights are connected to the standard wiring and installed in the mounts on the bumper. There are no fog lights in the basic trim levels. To connect them, you will have to additionally purchase a button for the interior, a PTF relay, and remove the bumper plugs.
In stores you can find modernized flashlights with lenses for gas-discharge lamps or LED modules. Such products are not certified for use in Kalina because they do not meet transport safety requirements. For such parts you can receive a fine and an order to eliminate the malfunction within 10 working days.