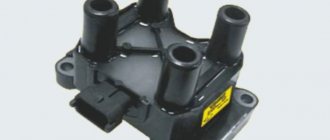
The ignition coil of Vesta cars converts low-voltage voltage from the battery into high-voltage voltage on the spark plugs. This is the basic principle of this part on all machines. This article will be useful for owners of a Lada Vesta with a 1.6 and 1.8 engine - we did not notice any differences in details. Let's consider the criteria regarding malfunctions of individual ignition coils on Vesta. Let's talk about how to properly replace the IKZ, and list the reasons for its failure. The price of the product for Lada Vesta cars roughly starts from 1000 rubles.
When the ignition coil does not work, it can cause various problems with the car, from lack of spark to engine stalling. Therefore, it is better to study this topic so that your vehicle remains on the move for as long as possible.
Lada Vesta - engine troubles on cold start! Part 1
Ignition coils: new old technologies
Progress, as we know, cannot be stopped. This thesis obviously applies to the development of the automotive industry - every year cars and their systems become more complex, turning, without exaggeration, into works of engineering art. However, there are components that remain virtually unchanged for decades. Simply because they have proven their effectiveness and reliability.
For example, car ignition systems haven't changed much in the last 50 years. Most of them today still require a distribution element and an ignition coil to generate an electrical impulse to ignite the air-fuel mixture in a gasoline engine. The coil itself is a fairly simple device: it is still a transformer with two windings on an iron core. But, as often happens, simplicity in this case is truly synonymous with genius. In our case - efficiency. Let's just imagine: to ignite the air mixture, an electrical impulse of approximately 15,000-30,000 volts is needed. Where can you get such a charge if the battery only provides 12 volts? The same coil generating a high-voltage pulse comes to the rescue.
However, do not think that the coils have not undergone any changes at all. Indeed, in modern conditions it is not enough to simply “charge”; it is necessary to do it in such a way that an accurate impulse actually leads to ignition and complete combustion of the mixture under any engine operating conditions. That is why a modern ignition coil works in tandem with an electronic control unit, which serves to control the pulse time. It can be built into the coil, placed separately, or located inside the engine control unit.
However, it should be remembered that, despite its simplicity, the ignition coil, like other automotive components, is subject to wear and failure over time. Especially due to temperature changes, which is so typical for Russian operating conditions with frosty winters and hot summers. So, if the coil is not changed in time, it can lead to damage to the ECM, which is much more serious and more unpleasant in terms of repair costs.
In the context of replacing ignition coils, qualified car mechanics advise paying attention to Delphi products. The main advantage of Delphi products is 100% original quality. This means reliability, long service life, as well as a wide range of vehicle models. Delphi ignition coils provide the precise amount of electricity to create voltage at the spark plug, resulting in optimal engine performance. In addition, similar to other Delphi ignition system components, the coils allow engine management systems to more tightly control emissions, fuel consumption and performance. Moreover, depending on the specific application, one Delphi coil is capable of servicing one, two, six or eight spark plugs.
Reels, despite their simplicity, require careful handling. Here's what Delphi experts advise those who decide to replace or repair them:
- The coils should not have visible damage and fit tightly onto the spark plugs. A damaged part can lead to early failure, and a poorly installed coil can lead to misfires.
- Never disassemble or remove the block from the reel.
- Do not scratch the reel body or casing or hit the reel.
- Do not use a hammer or other impact tools to install the coils. Install them using your hands only.
- Do not use any inappropriate materials when working on the high voltage terminal that connects to the high voltage winding.
- Do not spray paint or other sprays onto electrical connectors.
- Always use reasonable force when installing the wires and the coil itself.
- Do not hang the ignition system by the wires.
- Do not use force when connecting the wires to the ignition coil.
Failure to follow these guidelines may result in misfire, reduced coil life, voltage leaks, coil deposits, short circuits, cracks, etc.
In addition to coils, Delphi's range of ignition system components includes products such as distributor caps and rotors, EGR valves, idle air control and boost air valves, ignition units, and ignition cable kits.
Delphi is one of the largest suppliers of equipment for the assembly lines of global automakers. Therefore, when purchasing Delphi components, you receive a reliable, productive and durable product of original quality.
Share link:
Liked this:
Similar
Briefly about the structure of conductors
Previously, traditional explosive wires with a copper stranded core (in jargon - armored wires) were used to supply a discharge from the coil to the spark plugs. The disadvantage of such products is the gradual breaking of thin wires due to low elasticity. In modern cars, manufacturers install flexible cables with a non-metallic core made of carbon-impregnated fiberglass. The current-carrying part is wrapped in several auxiliary shells:
- polymer shielding layer;
- silicone-based internal insulation;
- frame in the form of a braid made of durable synthetics;
- external silicone insulation.
Old products with copper conductors had practically zero resistance, causing the radio installed on the car to “wheeze” from interference. Today's high-voltage wires have increased resistance, allowing them to screen out interference.
To connect to the spark plug “cradle” contact, the carbon core is brought out beyond the insulation and bent in the opposite direction. From the outside, the core is crimped with a copper terminal placed on the spark plug contact. The connection is protected from above by a dense dielectric cap. The second end of the conductor is connected to the ignition coil in a similar way.
An important advantage of the new high-voltage armored wires is elasticity and flexibility. Thanks to these qualities, the product lasts much longer than its copper predecessors. But sooner or later there comes a time when the carbon-silicon explosive wires wear out and begin to “mope”
But sooner or later there comes a time when the carbon-silicon explosive wires wear out and begin to “mope.”
Replacing spark plugs in Lada Vesta, SW and SW Cross cars
In order for the engine of a Lada Vesta car to work smoothly and without failures, it is necessary to control almost every main component of it; if an ordinary driver is not able to perform most of the work on the engine, then the spark plugs are precisely the element that is under the control of the car owner. In order to to replace / gain access to the spark plug on a Lada Vesta, the first thing you need to do is disconnect the ignition coil chip (see photo above), this is quite simple to do, you just need to press the plastic lock and pull it towards you. If after the work done the result looks the same as in the photo, then you are on the right track and you can continue the process.
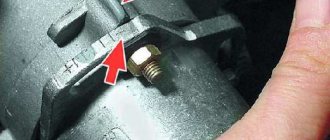
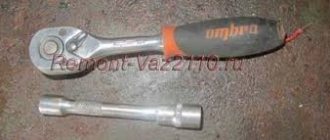
The next necessary step is to remove the ignition coil; this is done using a wrench with an E-8 head. In the photo above you can see one star bolt, it is this that will need to be unscrewed, after which you can get the coil itself:
Oxygen sensor
Determines whether oxygen remains in the exhaust gases. Before taking measurements, also inspect it - it may be damaged and a multimeter will not be needed at all. Then the element just needs to be replaced.
If everything is in order, measure the voltage and resistance as with the ABS sensor. The algorithm is the same. Start the car and watch the device. After start-up, the numbers 0.1-02 volts will appear on the screen. When the car warms up, the device will show up to 0.9 volts. If you didn’t notice that the indicator has changed, the sensor is most likely faulty.
If the voltage test is successful, find out the resistance readings. The norm ranges from 10 to 40 ohms.
Lada Vesta - changing spark plugs - Behind the wheel magazine
In accordance with the maintenance regulations for the Lada Vesta car, we replace spark plugs every 30 thousand kilometers.
From the factory, the car is equipped with Brisk super DR15YC-1 spark plugs.
We carry out the work on a cold engine.
P1050015 (Copy)
A sharp jerk upward.
P1050020 (Copy)
...remove the plastic engine casing.
DSC_0055 (Copy)
By pressing the latch of the individual ignition coil wiring harness block, disconnect the block from the coil connector.
DSC_0056 (Copy)
Using the E-8 head we unscrew the screw securing the ignition coil...
DSC_0063 (Copy)
What to consider when choosing candles
When purchasing spark plugs, their design is not the only selection criterion. The article number of the original Vesta candles is 21120-3707010-00. Before buying candles, you need to read the manufacturer’s recommendations, who will advise which option is best to take. This information is also available in the vehicle manual.
Data with tables of interchangeability of these elements is freely available on the Internet. The following comparative tables contain the main parameters of the product:
- thread size on the body part;
- type of installation of the part in the cylinder head - flat or cone-shaped;
- turnkey size;
- length of the threaded connection on the rim.
Using data from such tables, you can easily select product options from several brands.
The heat rating is an indicator that indicates compression when ignition occurs that cannot be controlled.
If this criterion is not observed, it can lead to glow ignition in the engine, where the fuel ignites uncontrollably. Therefore, it is better to choose candles that work in the range of average values.
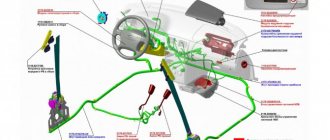
Control systems SU 21129 Lada Vesta
Page 1 of 3
Engine ignition system 21129
The ignition system of the 21129 engine uses 4 individual ignition coils (Fig. 1). The ignition system has no moving parts and therefore requires no maintenance or adjustment, with the exception of the spark plugs.
The current in the primary windings of the ignition coils is controlled by a controller that uses information about the engine operating mode received from the engine control system sensors. To switch the primary windings of the ignition coils, the controller uses powerful transistor valves.
Rice. 1
Ignition coils
Ignition coils have the following circuits:
Primary winding power circuit
The vehicle's electrical system voltage is supplied from the main relay (ignition relay) to contact “3” of the individual ignition coil.
Ignition coil primary control circuit
Rice. 2
The controller switches to ground the circuit of the primary winding of the ignition coil, which supplies high voltage to the spark plugs of the corresponding cylinders:
— contact “1” of the individual ignition coil.
Engine detonation dampening system
To prevent engine failure as a result of prolonged detonation, the ECM adjusts the ignition timing.
To detect detonation, the system has a knock sensor.
The controller analyzes the signal from this sensor and, when detonation is detected, which is characterized by an increase in the amplitude of engine vibrations in a certain frequency range, it adjusts the ignition timing using a special algorithm.
Adjustment of the ignition timing to dampen detonation is carried out individually for the cylinders, i.e. it is determined in which cylinder detonation occurs, and the ignition timing is reduced only for this cylinder.
If the knock sensor malfunctions, the corresponding malfunction code is entered into the controller's memory and the malfunction indicator turns on. In addition, the controller at certain engine operating modes sets a reduced ignition timing, which eliminates the occurrence of detonation.
Engine cooling fan
The controller controls the relay unit for turning on the electric fan of the engine cooling system. The electric fan turns on and off depending on the engine temperature.
The electric fan operates in two modes - at maximum speed and at reduced speed.
rice. 3
The reduced speed of the electric fan is activated when the coolant temperature is above 102 °C, as well as when there are DTOZh fault codes in the controller’s memory or when the air conditioner is running. In this case, the electric fan relay unit is controlled from the “X1.1/H2” contact of the controller.
The reduced speed of the electric fan turns off when the coolant temperature drops below 98 °C.
The maximum performance of the electric fan is switched on when the coolant temperature is above 103 °C, as well as when the refrigerant pressure in the line is high, both with the air conditioner running and the air conditioner not working. In this case, the electric fan relay unit is controlled from the “X1.1/H3” contact of the controller.
The maximum performance of the electric fan is switched off when the coolant temperature drops below 98 °C.
Article continued on page 2
Instead of an afterword
When buying a used car, it is useful to know how to find an electrical leak and understand its cause. Take a multimeter to inspect your car - you will save yourself from unpleasant surprises, such as a suddenly dead battery, power surges or burnt wiring.
For the same purpose, check the car's history. This can be done directly during a conversation with the seller. It is convenient to use the Autocode service - monitor information from 13 sources at once: traffic police, RSA, EAISTO, banks, tax and other services. The verification will take 5 minutes.
Afterwards you will find out the actual mileage, number of owners, history of fines, as well as information about theft, participation in an accident, restrictions on car registration and much more. Be carefull!
Having fully studied the online report, it is still worth taking a closer look at the technical nuances of the car when purchasing. And if you are not confident in your knowledge, or it is not possible to go for an inspection, order an on-site inspection service. The specialist will conduct a diagnosis for you and make a detailed conclusion from a professional point of view.
How to check the ignition coil on Lada cars
The car jerks, there is no traction, vibration is felt, or the engine is rough; all these are symptoms of improper operation of the individual ignition coil (IIC). Other signs of a faulty ignition coil are the presence of errors 0301, 0302, 0303 and 0304, indicating misfire in one of the cylinders. Let's look at a few simple ways to check the ignition coil with your own hands.
It is worth noting that the process of checking IKZ on modern Lada cars (XRAY, Vesta, Largus, Granta, Kalina and Priora) does not have significant differences. All actions are performed in the same way.
Visual inspection of the IKZ
Remove the ignition coils from the engine using a 10mm or Torx E8 socket wrench (depending on the powertrain model). Carefully inspect the removed coils. There should be no cracks, damage to the rubber cap, melting or leakage of plastic. The spring located inside the coil must be in the correct position.
Checking the ignition coil with a multimeter
Checking the voltage at the terminal block of the wires:
- Disconnect the block with wires from the ignition coil (on the H5M engine, to access the coils of cylinders 1 and 2, remove the intake pipe).
- Turn on the ignition and measure the voltage at terminal 3 of the wiring harness block (the numbering of the terminals is on the ignition coil).
- The voltage at the terminal must be at least 12 V. If it is less or absent, it means the battery is discharged, there is a fault in the power circuit, or the engine control unit (ECU) is faulty.
- Turn off the ignition.
How to check ignition coil resistance:
- We set the switch on the multimeter to the 200 Ohm position and close the probes (the instrument error will be displayed on the screen, which will need to be subtracted from the readings during testing).
- We check the primary winding of the ignition coil by connecting the probes of the device to the contacts.
- The resistance between pins 1 and 3 should be close to zero (about 1 ohm).
- The resistance between pins 1-2 and 2-3 should be high (tend to infinity).
- Set the switch on the multimeter to the 2000 kOhm (or 2 MOhm) position.
- We check the secondary winding of the coil by connecting the red probe to the spring inside the rubber cap, and the black probe to pin 2.
- For good contact, it is best to remove the rubber cap from the coil and connect the probe directly to the coil contact, having first cleaned it of deposits.
- The resistance should be about 300-400 kOhm.
Attention! The resistance of the secondary winding of the ignition coil is highly dependent on its temperature. Carry out the test when the coil is completely cool. Compare the resistance of all four ignition coils to each other. A faulty ignition coil can be identified by very different values, provided that all coils are from the same manufacturer.
The process is also shown in the video:
Checking the ignition coil yourself. Video instruction ZR:
The simplest way to check the ignition coils is to swap them. If misfires change the cylinder, then this coil is not working. To more accurately determine the fault, special equipment should be used (for example, a spark gap or an oscilloscope).
Let us remind you that you can find a problem in engine operation by independently measuring the pressure in the fuel rail, or by checking the compression in the cylinders.
Typical coil faults
The main problems include:
- systematic operation of the vehicle in elevated temperature conditions;
- wear of the insulating materials inside the plastic case, as a result of which the current conductivity decreases;
- short circuit of conductors;
- transformer burnout due to low voltage of the on-board network (below 11.0 V);
- mechanical damage to conductor products: breakage, peeling, deformation;
- excessive vibration of the power unit;
- breakage of conductors inside the circuit.
Differences for 8-valve engine
Firstly, keep in mind that for an engine with 8 valves (VAZ-11189), a key of 21 mm is used, not 16. Second, instead of disconnecting the plug on each coil, you will need to disconnect the shank power cable on each plug. There are also design differences - on an 8-valve engine, the spark plugs are located directly at the top of the cylinder block. However, as a result, there is nothing complicated here either; in short, the procedure looks like this (described for each candle):
- disconnect the shank wire;
- using the 21 socket, unscrew the spark plug;
- replace the old spark plug with a new one by tightening it (but not excessively);
- connect the tail cable back.
How to clean a candle at home
You can clean it at home using a chemical method. As an active agent in which the candle will be placed, chemical household products are used that can quickly cope with rust, various deposits and scale - “Domestos”, “Komet”, “Silit”, etc.
The substance is poured into a container, which can then be thrown away, and a candle is placed in it. It is left in this solution for 50-60 minutes. After the product sits in the solution, it will change color and become cloudy.
But to get an ideal result, after this it will also be necessary to clean the spare part manually. To do this, take an old toothbrush, brush or toothpick. Instead of detergents, you can use folk ones: vinegar, phosphoric acid.
There is also a thermal method for cleaning candles. It consists in the fact that the product is heated to such a state when the formations completely dry out and form a crust, which can be easily removed with a copper brush. For heating, you can use a regular burner or blowtorch.
But cleaning candles is not always a necessary procedure. If there is mechanical damage on their surface, then the part needs to be completely replaced.
Selection of spark plugs
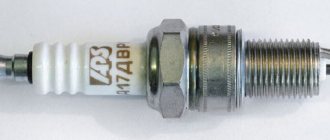
For Vesta, the manufacturer has provided the following sets of candles:
- Name: AU17DVRM. .
- Name: DR15YC-1. Manufacturer: BRISK (Czech Republic).
- Name: Manufacturer: BOSCH (Germany).
Each working spark plug must contain the correct gap located between the electrodes. The correct values should be between 1mm and 1.15mm. When using the HR16/H4M engine from Renault-Nissan, the gap is slightly different: from 0.85mm to 0.95mm.
Replacement period
The manufacturer guarantees trouble-free operation of the spark plug kit installed at the enterprise for one and a half years (if the mileage does not exceed 20 thousand km). After replacing the standard exhausted kit with a new one, subsequent replacements, as already described, must be carried out every 30 thousand km. ways.
The ignition coil of Vesta cars converts low-voltage voltage from the battery into high-voltage voltage on the spark plugs. This is the basic principle of this part on all machines. This article will be useful for owners of a Lada Vesta with a 1.6 and 1.8 engine - we did not notice any differences in details. Let's consider the criteria regarding malfunctions of individual ignition coils on Vesta. Let's talk about how to properly replace the IKZ, and list the reasons for its failure. The price of the product for Lada Vesta cars roughly starts from 1000 rubles.
Which is better: simple or iridium
In search of the best spare parts, car owners spare no expense and buy iridium spark plugs. But the question arises: is it worth overpaying for a promoted product, or is it enough to install standard products? This is especially important given the high price of iridium spark plugs, which is sometimes twice or even three times as much.
The popularity of this choice is due to the following advantages:
1. Reducing the electrode size to 0.4 mm, which improves cleaning efficiency and extends service life.
2. Maintaining engine power at the original level even during long-term operation.
3. Reduced fuel consumption, which is especially noticeable after one or two years.
4. Reducing the toxicity of exhaust due to better combustion of fuel in the chamber.
5. Stable engine starting even in severe frost, thanks to a more powerful spark.
6. Service life more than 100 thousand km.
7. Smooth and quiet operation of the motor. Iridium spark plugs make sense on expensive cars, because their price is higher than the recommended options. In addition, you need to choose a model wisely, taking into account the features of the ignition coil. There are situations when, after installing an expensive spare part, the car starts to drive even worse.
The quality of the fuel is no less important. If you skimp on gasoline, even expensive iridium spark plugs won't last long.
Standard reel - article number and price
Let's look at the articles, the cost of the IKZ, you can navigate by price. Lately, counterfeit parts have become common. By buying such a fake, you reduce its use by half. In order for the car to work well, the choice of parts should be approached with full responsibility.
- 2112-3705010-12 JSC "SOATE", Stary Oskol - 1165 rubles.
- IKZ – 1000 rub.
- 2112-3705010-11 “ITELMA”, Moscow – 1215 rubles.
- 2112-3705010-13 “NORTH”, Novosibirsk – 1515 rubles.
As you can see, ignition coils are affordable and you can purchase them without significant damage to your wallet. How to distinguish a fake from a factory IKZ:
- The first distinguishing feature is that the original reel has a body made of plastic, while the fake one is made of metal.
- The fake part lacks special stamps and a lightning bolt symbol, which indicates high voltage. If you look closely at the contacts of a fake IKZ, you will notice that they are thicker and round. The factory number is marked with an oval on the original part.
see also
Comments 32
Do you happen to know the production date of this reel? I recently installed one with the same catalog number and the coil itself looks different (like the original) www.drive2.ru/l/546508407369108922/
What if the coil flies even if the LPG is installed? Is this not a warranty case?
Yes, even if it’s not a warranty case, then the loss of 1000 rubles will not make you poor))) And so, for a friend on a grant with installed LPG, the rollers and the radiator of the condenser (or stove) were changed without problems.
In theory, the Priorovskaya coil should be suitable? I have in stock, 16 valve.
Certainly. Here's a non-original for example
What if the coil flies even if the LPG is installed? Is this not a warranty case?
Depends on dealer
the reel costs 1000 rubles, cool, on Mazda 7 rubles