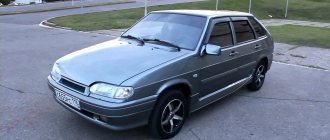
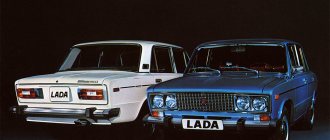
VAZ 2107
VAZ 2107 (seven) is a classic, in the past the pride and beauty of the Volga Automobile Plant. Currently, this morally and technically outdated car has ceased to be produced, but until recently it was not only sold by the car plant, but what is most surprising was that it found its buyers! In fact, the answer is simple - the simplicity of the design, the unique appearance and price of the car did not leave other models in this category much chance of winning the fight for a buyer. As a rule, the owner of the “seven” was a not very rich car owner, who with his own hands could not only go through all the “guts” of his iron friend in the middle of a field, “on his knees,” but also significantly improve its appearance and technical characteristics. That is, the owner, who was not indifferent to his car, sooner or later still began to tune his car to one degree or another.
What is this operation and what is hidden behind the word tuning?
- Firstly. Tuning is a change, an improvement to suit your personal needs, that is, in essence, adjusting the product to suit you;
- Secondly. Tuning is divided into 3 stages:
- Engine.
- Appearance.
- Salon.
This procedure was in demand more than ever in the domestic automotive market. Ask why? Yes, because a new domestic car is like a new apartment - no repairs, no conditions. Theoretically, you can use it, but is it convenient?
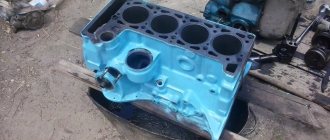
Usually all improvement work starts with the engine, this is:
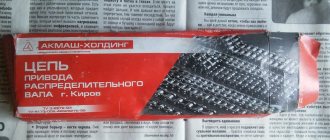
- Carburetor improvement;
- Replacement of valves, spark plugs and armored wires with foreign ones
- Installing a zero-resistance air filter;
- Installation of lambda probe;
- Enlargement of the combustion chamber.
The interior of the Seven is so unattractive that you can redo literally everything here without hesitation or regret. Removing, reupholstering, and replacing the VAZ 2107 ceiling is a standard procedure for owners of used cars.
Also some of the most common jobs are:
- Reupholstery of seats, interior;
- Installation of electric windows;
- Improvement of the heater, in particular the left pipe;
- Noise insulation;
- Installation of a smaller diameter steering wheel, decent acoustics.
External tuning includes:
- Body painting;
- Installation of alloy wheels, body kits;
- Tinting.
Do I need this? Everyone decides for themselves.
In essence, tuning the “Seven” does not require large financial investments, but it brings enough “hemorrhoids” to the performer of this trick. In general, this activity qualifies as a hobby, a passion, much like collecting stamps... Most car owners pay too much attention to the external appearance of the “iron horse” while forgetting about the car’s interior. But the quality and materials of the interior directly affect the comfort of driving a car. Therefore, the entire impression of tuning the interior depends on the condition of the VAZ 2107’s ceiling upholstery . To get a taste for it, I would first suggest changing the steering wheel to a more modern model, after which you can move on to the interior itself. For example, purchase additional sets of accessories for the dashboard, since there is nowhere to put ordinary small things in the cabin, and these simple pockets and recesses are the best suited for storing various small things. Just looking at the classic Lada, I immediately have an irresistible desire to change something about it. And therefore, in this article I propose to analyze such a moment as tuning the ceiling of a VAZ 2107, which includes replacing the rear view mirror and sun visors. Next, we present to your attention detailed instructions - VAZ 2107 ceiling tuning.
Changing the ceiling of a VAZ 2107
VAZ 2107 (seven) is a classic, in the past the pride and beauty of the Volga Automobile Plant. Currently, this morally and technically outdated car has ceased to be produced, but until recently it was not only sold by the car plant, but what is most surprising was that it found its buyers! In fact, the answer is simple - the simplicity of the design, the unique appearance and price of the car did not leave other models in this category much chance of winning the fight for a buyer. As a rule, the owner of the “seven” was a not very rich car owner, who with his own hands could not only go through all the “guts” of his iron friend in the middle of a field, “on his knees,” but also significantly improve its appearance and technical characteristics. That is, the owner, who was not indifferent to his car, sooner or later still began to tune his car to one degree or another.
Let's start with dismantling
Removing the sun visor
So:
- Pull the visor axle out of the holder by pulling it in your direction.
Stage 1
- Three self-tapping screws are unscrewed with a Phillips screwdriver.
Stage 2
- We remove the visor.
Stage 3
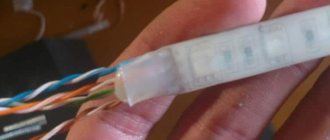
Removing the interior rear view mirror
- Stage 1.
Using a screwdriver, remove the decorative trim of the mirror bracket
- Stage 2.
Unscrew the two screws with a Phillips screwdriver
- Stage 3.
Removing the mirror
With a mirror, the issue is easily resolved - I bought a larger one and secured it on a standard mount, but the visors force me to make a choice - either re-tighten it with a carpet or buy tuning ones. For most, the second option is preferable; they both look and cope with their duties better than standard ones.
Removing a hard ceiling
Many car owners have a question: how to remove the hard ceiling on a VAZ 2107? Most of the advice boils down to the need to dismantle the windshield, but I suggest trying a more gentle, although also labor-intensive, method. I wanted to post a video, but I think we’ll make do with instructions and photos. In a VAZ 2107, replacing the ceiling begins with dismantling the rear seats, removing the side plastics on the rear and front pillars, as well as dismantling the front passenger door. After unscrewing all the fasteners on the ceiling, it easily fits into the opening of the removed passenger door. And although this method seems very difficult, believe me, the new ceiling upholstery of the VAZ 2107 is worth the effort!
Advice! Buy four new plastic plugs that secure the ceiling to the roof.
Removing the rear seats
Unscrew all fasteners
We take you out of the salon
We pull out
Removing a soft ceiling
The soft ceiling lining of the VAZ 2107 can also be removed in two ways - both with removing the windshield and without dismantling it. In the second case, you will have to be a little nervous, since picking out the brackets holding the ceiling from under the windshield sealing rubber is not a pleasant task (it can be solved by using a screwdriver and some kind of mother).
In order to remove the ceiling of a VAZ 2107 with soft upholstery, you need to dismantle:
- Door seals;
- Handles above doors;
- Sun visors.
We begin to remove the upholstery from the windshield. And then step by step:
- We feel for the first arc (the first seam from the windshield);
- We push it by the middle, towards the trunk;
- The arc rotates around its axis, thereby weakening the upholstery;
- We remove the arc from the side niche of the roof profile, slightly squeezing it in the center.
- Further, with other arcs, in a similar order.
Now we are faced with the question of whether to stitch the leatherette so that we get hinges (a high-quality, but labor-intensive option with a big disadvantage - the seams are visible) or glue a new one directly onto the new skin.
In any case, having removed the ceiling from the VAZ 2107, you first need to wash it...
Old ceiling
...and cover it with material...
Sheathing
Result
...or cover it with vinyl.
Vinyl
About the hard ceiling on the VAZ 2107
Owners of the domestic car VAZ 2107, known as the “seven,” often resort to the need not only for repairs, but also for tuning. Most of the elements and components of this car, the design of which was developed back in the 80s of the last century, need modernization. One of the elements that needs tuning is the ceiling. How to make a hard ceiling on a VAZ 2107, and why such modernization is needed, we will consider in detail in the material.
Features of the sound insulation process
In order to produce high-quality noise insulation, you first need to understand where the noise comes from, where it is more and what its nature is. It is known that the main sound comes from the running engine and exhaust system. Hence the conclusion: it is necessary to isolate the floor and the front engine partition as much as possible.
The noise that can come from the street is eliminated by soundproofing the doors and roof. Don't forget about the luggage compartment either. The noise from the trunk can be very annoying. As a result, it turns out that it is best to soundproof the entire interior completely. This process is also called complete sound insulation. Whereas partial means soundproofing of part of the cabin, for example, only the floor.
To understand the processes, it is easiest to turn to physics. After all, both sound and vibration have such a parameter as vibration frequency. And if vibration is usually low-frequency, then sound is the opposite. Therefore it is more difficult to isolate and absorb
This already implies the importance of the thickness of soundproofing materials.
Is sound insulation really necessary?
This question can only be asked by owners of foreign cars who have never been to a VAZ-2107 showroom. Having driven once behind the wheel or as a passenger in a VAZ Seven, you immediately understand that sound insulation is necessary. In the cabin you can clearly hear the sound of the engine, gearbox, noise from the wheels and other sounds outside the car.
Those who like to listen to high-quality sound in the VAZ-2107, which lacks sound insulation, will be greatly disappointed. Buying expensive musical acoustics will not help. As long as there is no good sound insulation in the cabin, the music from the speakers will be greatly distorted.
High-quality sound insulation brings joy not only to the ears of the owners of the 2107 model. During the cold season, the car will be warmer and the interior will warm up faster. In hot weather, with proper treatment, the interior of the car will be cooler and more comfortable. Many advantages of the complete sound insulation of 2107 can only be appreciated in person. All questions about necessity will then disappear by themselves.
Why is such a ceiling needed?
From the factory, all VAZ 2107 cars are equipped with a suspended ceiling, which has some disadvantages. Due to these shortcomings, some car owners are trying to replace it with a VAZ 2107 hardtop. You can do this yourself, and you don’t need to go to a car service center to carry out easy tuning of the interior.
First, let's look at why many owners of sevens strive to replace the soft ceiling with a hard one. The reasons for this are varied:
- The standard suspended ceiling does not have an attractive appearance, so when modernizing the interior, it is important to update the roof.
- Over the course of the car's operation, the upholstery becomes very yellow, which greatly spoils the interior of the car.
- A thin layer of material does not in any way affect the noise reduction of the car roof.
- The soft upholstery is easily damaged, so it is enough to catch it with a sharp object to disturb the interior of the car.
In addition, various additional elements can be attached to the hard ceiling, for example, lampshades for illuminating the interior of a car. Once you decide to modernize your roof, you won’t need to invent anything. Ready-made roof options are available in automotive stores or can be found on the Internet. Installing such a roof takes a minimum of time, and as a result, the interior of the Seven becomes more modern. When carrying out such restyling of the ceiling with your own hands, we recommend that you simultaneously reduce the noise of the roof.
But even installing a ready-made rigid base is a simple option that not all car owners agree to. After all, if you carry out modernization, it is advisable to do it in such a way that the roof completely satisfies the owner of the car. To do this, you will need to make the ceiling for the interior of a VAZ 2107 car with your own hands. This will require more time and effort than with a purchased hard ceiling option, but the wait and effort are completely worth it.
Installing a hard ceiling on a car
Installing a factory-produced hard roof is a snap. Fastening is carried out using standard places, and there is no need for additional modifications or changes. Detailed instructions on how to install a VAZ 2107 hard ceiling are described below.
- The first step is to disconnect the negative terminal from the battery to eliminate the possibility of a short circuit.
- Initially, the trim is removed, which can be done without dismantling the front and rear windows. However, you will need to remove the glass from the back or front in order to move the new structure into the car interior. It is recommended to remove the rear window. Some craftsmen resort to inserting the structure into the interior through the door, bending it slightly, but this option is too risky, as it can be damaged.
- After removing the soft sheathing, it is necessary to clean the inner surface of the roof, followed by gluing noise-reducing materials.
- The frame can be covered with carpet or other materials using special glue.
- After this, you can begin installing the hard ceiling. If you use a hard roof on a VAZ 2107, then the process of installing it is that you need to alternately fix the structure around the perimeter with pistons.
- The rubber door linings fit behind the new trim.
- The handles are screwed on using M6x30 bolts.
- The interior lighting is installed in place, and then the rear view mirror and visors are fixed.
Dedicated to all those who are tired of the stretched roof!
Unfortunately, the tension roof never made me happy. I have a station wagon and often end up stuffing all sorts of crazy things into it (like refrigerators, washing machines, skis...), but of course this doesn’t go away without any traces, as a result, there are cuts and holes on the ceiling, through which you can see something similar to glass wool . Well, you can still come to terms with this because... You don’t really focus on this, and it doesn’t affect the speed) But let’s face it – when any passenger, getting into the car, says, “OOOOOO…. you have a hole here” At this time, poking your finger into it and examining what’s inside is simply unrealistic.
Somehow I got a hard roof from 07 for free. I threw it in a far corner of the garage with the pretense of “it’ll come in handy someday.” And it was needed...
For the rework we will need:
We remove (I tore off with hatred and without any pity) the old roof...
Next, we measure everything and cut off as much as necessary. I cut off the front so that 1-2 cm went under the canopy base (you can not cut off the front, but just buy original canopies for this roof and leave everything as is. I didn’t get pinned like that...). At the back I cut off the part where the area becomes most even, i.e. the roof is rounded at the end and it was at this rounding that I cut it off.
So! Trim, then we trimmed, but now we need to grow as much as necessary. For this I used regular hardboard! The width in some places is 4 mm. So, we measure again a suitable piece, only so that it fits under the plastic paneling at the hinges! After this, you need to wet the ends of the cut piece, or rather soak it (it’s better to do this with boiling water). When the hardboard gets wet, you can put it on our future structure and press it with something so that it takes a suitable shape and at this time we help it dry with a hairdryer.
After the hardboard dries, in the piece from which we cut everything off, we make a recess the thickness of the hardboard. So that it comes out seamlessly!
Next, we take epoxy and glue these two pieces together. When the resin dries, sand it slightly.
Next, we take glue with the carpet and begin to tighten it.
I threw out the old soundproofing and glued on the newest one
Next, we install the roof. This is done within 5 minutes. We screw on the handles, later the cover with visors, and all other plastics. That's all in principle.
As practice has shown, due to the fact that the roof became longer and heavier, it began to sag in the center! This was simply corrected by 2 screws screwed into the stiffening ribs at the ceiling
For those who have sedans, it will be slightly more ordinary, i.e. there will be no need to cut off the back part (front part if desired) of the roof and increase it, but simply cover it with carpet and install it. But the rear window will have to be removed 100%
Source: vaz2101spb.ru
Materials for upholstery
When choosing fabric, you need to take into account quality, wear resistance, price, and color. The fibrous structure should stretch, this will allow the fabric to be securely fixed to the panel. Possible varieties:
- Genuine Leather. It looks beautiful, but is expensive. Creates sound insulation and withstands humid and harsh climates. The ease of care is dictated by the fact that the fabric does not absorb dirt and does not deteriorate when using aggressive detergents.
- Eco-leather or substitute. It has high wear resistance and is durable. The characteristics are identical to the natural base, only the substitute does not tolerate the effects of chemical detergents. With improper care, microcracks appear, which are then filled with dirt.
- Alcantra. Consists of thin and viscous fibers. The material has a high rate of moisture rejection, so it does not shrink. After the Alcantura is stretched on the panel, it will take the shape of the structure and will not sag over time. There is only one minus - the low level of sound insulation.
- Vinyl and leatherette. They provide strength and durability, and they are also very convenient for reupholstering. The material transmits sound well, so you will need to install an additional layer of insulation.
- Carpet. This is an artificial automotive fabric. This lining will last for many years. It withstands temperature changes, repels dirt, cleans quickly, and blocks the growth of fungus.
Some car enthusiasts are experimenting and upholstering door panels with velvet and even faux fur. Such fabric will partially create sound insulation, but will cause difficulties during cleaning.
What seats can be installed?
If we talk about the standard seats of the VAZ 2107, they cannot boast of originality and the fact that they provide an ideal fit. This can be explained simply: the VAZ is a budget car and the manufacturer’s installation of special expensive seats on it would cause a significant increase in the price of the car.
In addition, we must take into account that people have different weights and configurations. A seat that may be comfortable for one person may not be suitable for another. That is why, in order to improve the appearance of the car, as well as to choose the most comfortable seat for the driver, many car enthusiasts install seats from other cars on the VAZ 2107.
Racing
This is the most expensive option and is very rarely chosen for VAZ. Such seats are used by racing drivers, and their price can be comparable to the cost of a “seven”.
When creating such models, fiberglass is used. Their main feature is that the back and pillow have a one-piece design. To perfectly fit the seat to the driver's figure, special inserts are used.
The racing seat back and cushion are a one-piece design
Although the seat is highly durable and reliable and perfectly follows the driver’s figure, getting in and out becomes more difficult. The fact that the backrest and cushion are made of fiberglass makes driving on our roads unbearable. These seats can only be used if the car is racing.
Sports
If we compare racing and sports seats, the latter have backrest adjustment, as well as shoulder rests, hip and back support. They are quite comfortable, which allows the driver to drive the car comfortably. The sports seats are equipped with a four-point belt, which ensures high safety. It should be taken into account that sports seats are comfortable if there is a hard suspension; if it is soft, then such seats are not suitable for long trips.
Sports seats provide high safety
Anatomical or ultra-comfortable
If you prefer a comfortable and slow ride, then you should choose anatomical seats. These seats provide a comfortable seating position and good torso support during sharp turns or sharp maneuvers.
They have different adjustments that allow you to customize the chair for a specific person, taking into account his anatomical features. There are models in which heating is installed, and they also have the possibility of vibration massage. This solution allows you to drive a car for a long time, and a person will not feel pain in the back, neck or lower back even during long journeys.
Anatomical seats provide a comfortable and comfortable fit
Seats from foreign cars
Often VAZ 2107 owners install seats from foreign cars in them. There are many options, but the most commonly used are the following, as they require little or no modification:
- seats from Mercedes W210 (1996);
- Toyota Corolla (1993);
- SKODA and Fiat.
Volkswagen seats fit well, but their disadvantage is that the seating position is high and therefore this solution is suitable for people of short or average height. When installing seats from Peugeot and Nissan, you will have to work hard, since their fastenings are slightly mismatched. To more securely fix a chair from a foreign car in the body of a VAZ 2107, it may be necessary to create additional holes.
Seats from different foreign cars are suitable for VAZ 2107
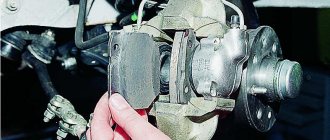
Removing the front seats
The seat needs to be pushed all the way forward, after which you can see two mounting bolts on the slide that need to be unscrewed. After this, the chair is moved back as much as possible, the two fastenings at the front are unscrewed. In this case, you need to unscrew the nut on the left with a No. 13 wrench. After these steps are completed, the chair can be easily removed from the interior, making it possible to repair it.
The front seat adjustment mechanisms are known to jam quite often, so they can also be disassembled for the following work:
- cleaning from dirt,
- applying lubricant,
- repair, repair
- replacing worn parts.
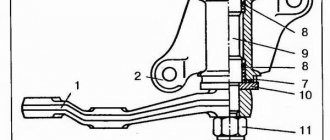
The VAZ skid consists of a limiter, a bracket for a screw rod, a lock for the internal guide, a rod, guides, sliders and a roller with a rubber ring, a spring, a latch, a back reinforcement, a cotter pin, a handle for the latch from the mechanism for moving the skid, and other parts.
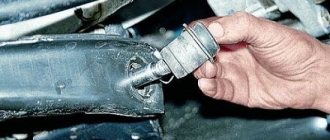
To carry out the work, you need to dismantle the spring, remove the pin from the rod, unscrew the bolts from the mounting of the slide on the VAZ seat and remove the slide. After this, the cotter pin/screw rod is unscrewed (removed from the bracket), the sliders are moved along the guides, the rollers with limiters are removed, and the sliders are removed. Assembly is carried out in reverse order.
If the lock for the backrest position of the chair is broken, then in the store you need to purchase a spare part such as a lock comb, or the lock itself. Now you should cut off the broken part with a grinder and weld a new one, having previously covered the chair in places close to welding with a wet cloth so as not to burn it. If the repair is supposed to be done in a workshop, then car owners are advised to remove the seat trim, take out the foam rubber, springs and give only the frame, since the welder does not always work carefully. By the way, the seat upholstery can be washed or cleaned at the same time.
Tuning the interior of the "Seven"
It would be a good idea to reupholster the updated chair yourself. To do this, the old seat upholstery must be carefully ripped apart at the seams, moistening the places where it is glued to the cardboard elements with gasoline. The removed covering is used as a pattern, on the basis of which a blank is made from a suitable fabric. It is assembled using glue, thread or heat sealing. The foam elements and springs are updated, and new upholstery is put on the seat.
Motor shield
The engine partition is the most important source of noise in the VAZ 2107. After all, it is located directly next to the engine, transmitting noise, vibration and sounds.
It is the noise reduction of the engine shield that is considered the most important element of car sound insulation. Alas, this process is quite complicated, since you will have to completely dismantle the dashboard.
But the “seven” is good because it does not cause serious problems in this matter. For insulation you will need a set of materials:
For the first layer you will need Bimast Bomb
With its help, the entire surface area is covered, paying special attention to the front wheel arches and flat areas. Technological openings are also closed with it; The second layer is an Accent with a thickness of 10 to 15 millimeters; The side panels and the top of the shield are covered with Bioplast 10 millimeters thick, since it additionally plays the role of an anti-creak; It is additionally recommended to treat the wheel arches on the interior side with Splen, applying a layer of it on top of the noise absorber; After this, standard insulation is installed, which will have to be trimmed in some places.
Otherwise, you will not be able to place the dashboard in its position properly.
Do-it-yourself soundproofing of a car
Soundproofing a car with your own hands is not as simple as it seems. In addition, it may not produce the appropriate effects. First of all, you need to choose the right materials and their quantities. Secondly, it is necessary to dismantle a number of interior trim elements. For example, when soundproofing a door, it is necessary to completely remove all internal parts. Also, a number of problems will cause you a large number of clips and screws, you can easily break them. Preparing soundproofing materials is not easy. In addition, if all elements are incorrectly adjusted, the noise reduction effect may not appear at all.
Soundproofing doors yourself? Let's see what it looks like inside and out.
Preparing an appropriate amount of soundproofing material - for example, vibration dampers, sound insulators, noise absorbers, anti-creaks - on average, one door needs a little more than a square meter of soundproofing material. We remove the door trim. Depending on the car model, it is necessary to unscrew a different number of bolts and clips (be sure to find information on dismantling the upholstery of your car). Disassemble the inside of the door; for convenience, lift the glass up. Unplug the speaker, then remove it, disconnect the electrical connector in the door and remove the protective film, if present. The interior decoration of the door consists of two layers of metal - the outer (panel) and the inner, on which the speakers and internal door handles are installed. The metal that will be glued with sound insulation must be washed, dried and degreased. We glue the cut materials to the cleaned outer part of the door trim. This is quite difficult, because your hands will have to be inserted through the technological holes in the inside of the door
This should be done carefully so as not to close the holes responsible for draining water from the door (at the bottom). Using a sound-absorbing layer, we glue it to the interior door trim (from the interior side). We connect the electrical wiring back, connecting the speakers, lower door lights or power windows, if any. We also install speakers and interior door handles. We install plastic covers and trim on the doors.
Summarize. It is possible to make proper sound insulation, even yourself and if the budget is limited. The process is not complicated and can be done independently. But there is an effect, as you can see from your own experience.
Soundproofing
How to soundproof doors
So, we've sorted out the materials. Now it’s time to start directly installing the ShM on the VAZ 2113.
First of all, every driver strives to reduce the level of engine noise. It does not go through the hood, as some people think, but through the engine compartment. This means that if you properly perform a noise test on this part of the car, a significant effect can be achieved.
The door noise on the VAZ 2113 plays an important role.
This is especially important for drivers who are partial to good music.
Soundproofing doors helps solve the following problems:
- The level of noise coming from the street will be reduced;
- Knocks and squeaks produced by internal elements will be reduced;
- The sound quality of musical compositions in the cabin will significantly improve, especially if the speakers are installed in the doors.
Here's how to do the procedure on a VAZ 2113 yourself:
The doors are being dismantled. The casing is dismantled.
Car soundproofing: panel processing
- The next stage involves processing all internal elements of the door mechanisms, such as rods and wires, with Madeline. This is done so that they do not make squeaks or knock when the car shakes;
- Next, the drainage holes are closed. The pieces are cut in the shape of a circle with a small allowance along the contour;
Covering technological holes
Soundproofing continues:
- On the skin side, the metal of the door is covered with a sound absorber. As a rule, they try to cover the surface completely using materials 10 mm thick. The wires are brought out, the speaker is left open;
- To reduce overall vibrations and resonance, the casing is also treated with materials.
Finally, the door is assembled.
If the above instructions are not complete enough, there is a reason to watch the video review, study photos, materials and diagrams. On our website you will find many interesting publications regarding sound insulation. Good luck!
Replacing seats
You can make the interior more comfortable by installing seats from another car model or special seats for auto tuning on the VAZ 2107. The latter are produced in various modifications, which allows you to choose a seat that suits the car owner.
You can install any car seats from foreign cars that are suitable in size in the VAZ interior. It should be noted that such a replacement requires welding to change the fastening design. During welding, it is necessary to protect the casing from sparks. If you don’t have a welding machine at your disposal, you will either have to be content with the available selection of car seats, or contact a specialist.