02/04/2022 6,943 VAZ 2106
Author: Ivan Baranov
Domestic “sixes” in practice are cars that have proven themselves to be quite reliable in terms of electrics. However, if problems arise in the electrical part, they must be resolved as quickly as possible. In this article we will tell you what the charging circuit of a VAZ 2106 car is, what malfunctions may occur in its operation and how to eliminate them.
[Hide]
How many amperes does a car alternator produce per battery?
The current strength required by the electrical system of each car is individual and depends on the number of electricity consumers and their values. And also the charge current must be sufficient to charge the power source.
It is worth noting that ampere readings appear only when there is a load in the vehicle’s electrical system and, accordingly, the battery is discharged. After starting the car engine, the charging current is about 6-10 amperes and drops over time, because the battery is charging, taking on the main energy consumption. If you turn on additional equipment - headlights, radio or heated mirrors, you can see an increase in the charging current values.
When purchasing a generator, pay attention to its technical characteristics, which the manufacturer indicates on the case - that’s where you will find information about the maximum current that will flow to the battery. In the table below you can see the approximate current values that the generator shows at different loads
In the table below you can see the approximate current values that the generator shows at different loads.
Table 1. How many amperes the generator produces under load.
Table of energy consumption by different equipment.
Charging the battery is necessary in cases where it takes on part of the load of the energy supply system. How much energy does the equipment in the car need?
| Side lights and vehicle lighting | ~40 watt |
| Headlights and fog lights on both sides | ~250 watt |
| Stove fan at maximum power | ~200 watt |
| Cooling fan runs briefly | ~250 watt |
| Heated rear window | ~150 watt |
| Fuel pump and engine management | ~80 watts |
| Radio (medium sound level) | ~100 watt |
Table 1. Electricity consumption in the car by additional equipment.
By simple calculations we get a total consumption of 1070 watts, which when converted to amperes will be approximately 90A. For many car generators, such a load, and they are the first to take it upon themselves, is at the limit of the equipment’s capabilities. When a certain threshold is reached, the system will transfer part of the load to the battery. Therefore, it is necessary to carefully calculate the characteristics of the generator and battery.
Reasons for this phenomenon
Guys, I’ll say a few words about “special” recharging from a charger - many people do this on purpose! REMEMBER! Thus, they increase the density of the electrolyte to the required level - in our range it is approximately 1.27 g/cm3, if the density is lower (already with a charged battery), then the battery may freeze at subzero values. We need to raise it! And how to do it? It’s very simple - you need to evaporate a small amount of water from the electrolyte, thus the acid concentration will increase and the density will increase.
Now “non-special” overcharging, as they say under the hood of the car, its main reasons:
The generator charge regulator relay has failed. This relay “sees” charging, and when it reaches 12.7 Volts, it turns off the power supply from the generator. If this relay fails, then the generator will constantly charge the battery, and its currents are considerable, it will boil very quickly! This is the most common reason. Fortunately, this relay costs a penny. A short video, let's watch.
Remote controller
Why does a gasoline engine emit white smoke through the exhaust?
ATTENTION! A completely simple way to reduce fuel consumption has been found! Don't believe me? An auto mechanic with 15 years of experience also didn’t believe it until he tried it. And now he saves 35,000 rubles a year on gasoline! Read more". This often happens to drivers
The brushes of the generating device burn out. The regulator is built in along with the brushes. We have to change everything together. And here’s some advice from experts: it’s better to install an external regulator than a built-in one. The models released recently are too underwhelming
This often happens to drivers. The brushes of the generating device burn out. The regulator is built in along with the brushes. We have to change everything together. And here’s some advice from experts: it’s better to install an external regulator than a built-in one. The models released recently have not been praised very much.
Okay, do you think I’ll install an external one, but how do I connect it? It turns out that there is a convenient scheme that makes it easy to carry out all this modernization.
Some important points:
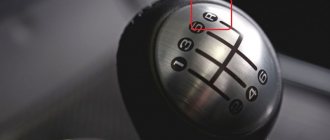
do not confuse the chips on the regulator numbered 67 and 15 (the first should be connected to the generating device, and the second should go to the fuses);
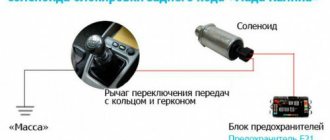
This is what the connection diagram looks like
In the lower photo we see a diagram that shows the connection of the already built-in regulator relay.
It is suitable for connecting to “fives”, “sevens”, VAZ 2104, if the PG is installed from a VAZ “kopek”. As you can see, the remote-type regulator relay is connected via two terminals. Pin 15 goes to the fuse.
The second pin 67 is connected to the generator. The wire is connected to the brush chip.
Also, the remote-type relay must be connected to ground - any part of the body.
A relay is nothing more than a switch that serves to close and disconnect individual zones of an electrical circuit that occur at specific electrical values. A machine relay is otherwise called a load voltage switch, and this is 100 percent true. When the power supply unit, fan or starter consumes more current than necessary, the relay trips.
The relay consists of an electric type magnet, an armature and a switch. In this case, the electromagnet is a cable twisted around an inductor with a magnetic rod, and the armature is a special plate that controls the contacts.
As soon as electrical voltage passes through the magnet winding, an electric field is created. A special pusher presses the armature against the core and, thereby, the contacts switch.
Attention. There are two types of relays used on VAZ cars
This is a non-contact relay-regulator and MER (electric). It is the diagram of the last relay that is shown in the picture below.
The non-contact relay or NERR is a fairly new unit that does not require any additional adjustments or regulation. As for the MED, this is an old-style device, the production of which has currently been suspended.
So, the BRN or built-in regulator is a device consisting of a microcircuit, a transistor and a housing with brushes. If the built-in regulator fails, it is replaced with a new one, or an external one is installed.
The external regulator is easy to install if you strictly follow the instructions.
Modernization involves dismantling and disassembling the generating device.
Checking and replacing the voltage regulator relay VAZ 2107
You can also check the relay regulator in a garage, but this will require several tools. Here they are:
- household multimeter (the accuracy level of the device must be at least 1, and the scale must be up to 35 volts);
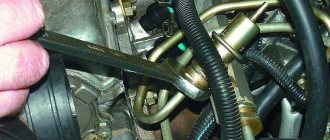
- open-end wrench 10;
- flat screwdriver.
A simple option for checking the regulator
First of all, the relay regulator must be removed from the car. This is not difficult to do; it is secured with just two bolts. In addition, during the test you will have to actively use the battery, so it must be fully charged.
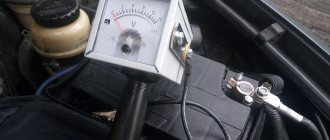
- The car engine starts, the headlights turn on, after which the engine idles for 15 minutes (the crankshaft rotation speed should not exceed 2 thousand revolutions per minute);
- The hood of the car is opened, and the voltage between the battery terminals is measured using a multimeter. It should not exceed 14 volts, and should not be lower than 12 volts.
A difficult option for checking the regulator
This option is used in cases where the failure of the regulator cannot be determined in a simple way when checking (for example, in situations where the voltage between the battery terminals is not 12 volts or higher, but 11.7 - 11.9 volts). In this case, the regulator will have to be removed and “ringed” it using a multimeter and a regular 12-volt light bulb.
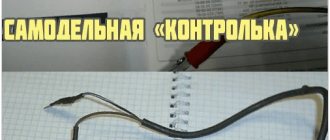
- The VAZ 2106 regulator has two outputs, which are designated “B” and “C”. These contacts are supplied with power from the battery. There are two more contacts that go to the generator brushes. The lamp is connected to these contacts as shown in the figure below.
The sequence for replacing a failed relay regulator
Before starting work, you need to decide what type of regulator is installed on the VAZ 2106: the old external one, or the new internal one. If we are talking about an outdated external regulator, then removing it will not be difficult, since it is attached to the arch of the left front wheel.
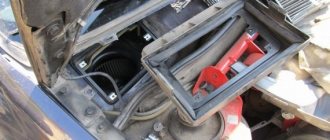
If the VAZ 2106 has an internal regulator installed (which is most likely), then before removing it you will have to remove the air filter from the car, since it interferes with access to the generator.
- On the external relay, use an open-end wrench to unscrew the two bolts holding the device on the left wheel arch.
- After this, all wires are disconnected manually, the regulator is removed from the engine compartment and replaced with a new one.
There are a couple of important points that cannot be left out. First of all, there is a problem with external regulators for the VAZ 2106. These are very old parts that have been discontinued a long time ago. As a result, they are almost impossible to find on sale. Sometimes a car owner has no choice but to buy an external regulator in person, using an ad on the Internet. Of course, the car owner can only guess about the quality and actual service life of such a part. The second point concerns the removal of internal regulators from the generator housing. For some unknown reason, the wires connected to the regulator on the generator side are very fragile. Most often they break “at the root,” that is, right at the contact block. Fixing this problem is not so easy: you have to cut the block with a knife, resolder the broken wires, isolate the solder points, and then glue the plastic block with universal glue. This is very painstaking work
Therefore, when removing the internal regulator from the VAZ 2106 generator, extreme caution should be exercised, especially if repairs have to be carried out in severe frost
So, in order to check and change a burnt-out voltage regulator, the car owner does not need special skills. All he needs is the ability to use a wrench and a screwdriver. And basic understanding of how a multimeter works. If all this is present, then even a novice car enthusiast will not have any problems replacing the regulator. The main thing is to strictly follow the recommendations outlined above.
What to consider when choosing a new battery
According to the passport, the battery is designed for 3-5 years of active use (in reality it turns out to be less). Therefore, over time, it becomes necessary to buy and connect a VAZ 2107 battery instead of a failed one.
When purchasing a new battery, you should consider a number of parameters and characteristics. Battery type: serviced and maintenance-free. The first option allows you to check and replenish the electrolyte level. This makes it possible to use the battery longer.
The next question is: what power will the battery on the VAZ 2107 be most efficient. Batteries with a capacity of 50–60 Ah are suitable for this model. However, given that modern cars are equipped with energy-intensive equipment, it is better to opt for more capacious batteries. In addition, carburetor VAZ models require more powerful batteries - they consume more energy when starting. In terms of dimensions, the VAZ 2107 requires power supplies with dimensions of 242*175*190 mm. The vast majority of samples available on the market fit them.
When choosing a battery, you should also take into account the place of residence of the owner of the “Seven”. For those who live in the south, you can purchase a less powerful battery. Northerners are advised to prefer a battery with a higher capacity: in the cold, the car starts with high energy consumption.
Generator VAZ 2106: purpose and functions
A car generator is a small electrical device whose main task is to convert mechanical energy into electrical current. In the design of any car, a generator is needed to charge the battery and feed all electronic devices while the engine is running.
The generator's task is to ensure uninterrupted operation of all electrical systems of the machine and the battery.
How exactly does the generator work on a VAZ 2106? All processes of energy conversion from mechanical to electrical are carried out according to a strict scheme:
- The driver turns the key in the ignition.
- Immediately, the current from the battery through the brushes and other contacts enters the excitation winding.
- It is in the winding that the magnetic field appears.
- The crankshaft begins to rotate, from which the generator rotor is also driven (the generator is connected to the crankshaft by a belt drive).
- As soon as the generator rotor reaches a certain rotation speed, the generator enters the self-excitation stage, that is, in the future, all electronic systems are powered only from it.
- The generator performance indicator on the VAZ 2106 is displayed in the form of a control lamp on the dashboard, so the driver can always see whether the device has enough charge for full operation of the car.
Standard device for the "six"
Design of the G-221 generator
Before talking about the design features of the VAZ 2106 generator, it should be clarified that it has unique clamps for mounting on the engine. On the body of the device there are special “ears” into which studs are inserted and tightened with nuts. And so that the “ears” do not wear out during operation, their internal parts are equipped with a high-strength rubber gasket.
The generator itself consists of several elements, each of which we will now consider separately. All these devices are built into a light-alloy cast housing. To prevent the device from overheating during long-term operation, the case has many small holes for ventilation.
The device is securely fixed in the engine and connects to various car systems
Winding
Due to the fact that the generator has three phases, windings are installed in it immediately. The purpose of the windings is to generate a magnetic field. Of course, only special copper wire is used for their manufacture. However, to protect against overheating, the winding wires are covered with two layers of heat-insulating material or varnish.
Thick copper wire rarely breaks or burns out, so this part of the generator is considered the most durable
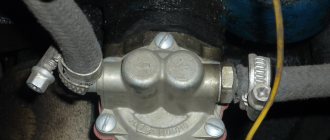
Relay regulator
This is the name of the electronic circuit that controls the voltage at the output of the generator. The relay is necessary to ensure that a strictly limited amount of voltage reaches the battery and other devices. That is, the main function of the relay regulator is to control overloads and maintain an optimal voltage in the network of about 13.5 V.
A small plate with built-in circuitry to monitor the output voltage
Rotor
The rotor is the main electric magnet of the generator. It has only one winding and is located on the crankshaft. It is the rotor that begins to rotate after the crankshaft starts and gives movement to all other parts of the device.
The rotor is the main rotating element of the generator
Generator brushes
The generator brushes are located in brush holders and are needed to generate current. In the entire structure, it is the brushes that wear out the fastest, since the main work of generating energy falls on them.
The outer side of the brushes can quickly wear out, which is why there are interruptions in the operation of the VAZ 2106 generator
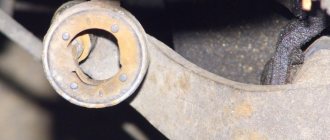
Diode bridge
A diode bridge is most often called a rectifier. It consists of 6 diodes that are placed on a printed circuit board. The main job of a rectifier is to convert alternating current into direct current to maintain stable operation of all electronic devices in the car.
Due to its specific shape, drivers often call the diode bridge a “horseshoe”
Pulley
The pulley is the driving element of the generator. The belt is tensioned simultaneously on two pulleys: the crankshaft and the generator, so the operation of the two mechanisms is continuously interconnected.
One of the generator elements
Trouble-shooting
First you need to clean the battery terminals and the inner surfaces of the wire terminals on the battery. If this does not produce results, the voltage at the generator output (terminal “30”) is measured relative to “ground” with the engine running (crankshaft speed 1000-1200 rpm). If the voltage is noticeably different, the contact between terminal “30” and the wire is cleaned, and the wire itself from the generator to the battery is called. As a last resort, this wire should be changed.
The warning lamp and sensor (on-board voltmeter) show the presence of a charge, and the battery is flat, but checking with a multimeter shows a normal voltage of 13.6-14.2 V at the battery terminals. When a large load is turned on (for example, high beam headlights), the gauge arrow turns white scale sector.
Such symptoms may occur when the alternator belt tension is weak. It is necessary to measure the tension (with a force on the belt of 10 kgf, the deflection should not be more than 12-17 mm), and if the tension is weak, the belt is tightened or replaced.
The cause may also be a breakdown of one of the negative diodes, a burnout of one of the positive diodes of the rectifier, or a break in one of the stator phase windings. When the engine is not running, the negative diodes are checked: the “+” terminal of the battery is disconnected from the vehicle network and a test lamp is connected to it. Use the lamp leg to touch each of the three bolts securing the generator rectifier unit. If the lamp is on, the negative diode connected to the bolt is broken.
To check the positive diodes, connect the “+” terminal and disconnect the “-” terminal from the body, to which the test lamp is connected. Again, use the lamp leg to touch each of the three bolts securing the generator rectifier unit. Burning of the lamp also means breakdown of the positive diode. If you have a multimeter, simply measure the resistance of the diodes in the polarity in which the diode should be locked: for negative diodes “+” to the bolts, and “-” to the body, for positive diodes “+” to terminal “30” of the generator, and “ -" - to the bolts. A diode rectifier with a broken diode is completely replaced.
The break of one of the branches of the stator winding is checked by ringing them with a multimeter or a “tester” with a battery between the two bolts of the rectifier unit. The absence of contact of any winding with each of the two remaining ones indicates its breakage, and the generator must be repaired or replaced.
Check the generator brushes
Another reason could be wear on the generator brushes. The brush assembly from the PP is removed. If the brushes are less than 5 mm long, the unit is replaced with a new one. If the brushes are not worn out, they should be inspected for the possibility of distortion and “sticking” in the housing wells.
The charge lamp does not light up when the ignition is turned on. The charge sensor and other control devices do not work. The generator did not charge.
The cause of this malfunction is that fuse F10 (10 A) has blown. If nothing has changed after replacement, look for the reasons in the ignition lock or relay (if installed).
When the ignition is turned on, the control lamp does not light up. The charge sensor and other control devices are working. The generator does not charge.
The wire is disconnected from plug “61” of the generator and shorted to ground. If the lamp is on when the ignition is on, the generator excitation winding is faulty or there is no contact in the plug itself. The surfaces of the pins are cleaned, the bends of the plug connectors are pressed, and connected. It is checked again and if the charge lamp does not light up again, the plugs Ш5-Ш10 of the mounting block and the pins in the connector of the block with the instrument panel are cleaned. If there is no result, then the lamp itself has burned out. To replace a light bulb, the instrument panel is removed, the socket is removed from behind the panel, and the lamp is changed.
The battery light comes on when the ignition is turned on. When the engine is idling, the charge lamp lights up dimly, charging disappears or there is no charging at all.
The reason may be poor contact of the pin of the wire connection block to the instrument panel. It is attached with a rivet and often oxidizes. If you solder it to the board track, this problem is eliminated. Also, loose contact at the connection points along the wire path from the shield to plug “61” of the generator gives the same symptoms.
How to determine the charge level?
Primary control of the charge level on the VAZ 2107 is carried out by instruments on the panel: a control lamp and a voltmeter. If the charge is normal, the indicator arrow will be in the green area, and the control lamp should go out when the engine is running.
To more accurately check the voltage level, you need a voltmeter. As mentioned earlier, the correct charge is 13.6 - 14.1 volts.
You can purchase a special automotive electronic voltmeter or one combined with a watch. Installed both instead of the standard clock and on the dashboard.
Preparing to Troubleshoot
If a problem is detected, we begin diagnostics. First, let's prepare the tools.
- Multimeter (voltmeter);
- Emery cloth or needle file;
- Knife;
- Pliers;
- 12-volt indicator lamp (control).
Generator overload
If the battery is charging, but the voltage is insufficient, it means the generator is overloaded. This is facilitated by the installation and connection, in addition to standard electrical equipment, of various gadgets that require electricity. The generator is operating at the limit of its capabilities.
Modern drivers love various car tunings. Thus, serious music systems, powerful lighting and other equipment are installed. Someone also increases the battery power. So, with a 70 Ah battery, the standard VAZ generator cannot fully charge it. It just doesn't have enough power. As a result, the generator provides little charge.
Problems with the battery: charging the VAZ 2106 and diagnosing faults
As a rule, before checking the regulator of a VAZ 2107, 2106 or any other car, it is necessary to review in general terms the design and operating principle of such a regulator.
Let's start with the fact that the design of the regulator may differ. Old VAZ 2106 models have outdated contact regulators. At the same time, newer versions already use an electronic regulator.
So, the contact external regulator is still the basis. This is a semiconductor type device manufactured on a single board. The main element is the winding (brass wire is used), the winding consists of just over a thousand turns, and there is a copper core inside the winding. The winding has a constant resistance of 16 ohms.
Charging scheme "Six"
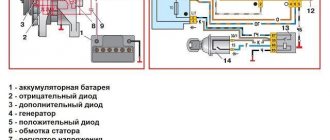
The circuit for the VAZ 2106 includes the following components:
- generator device with excitation winding;
- diode rectifier bridge, which is part of the generator design;
- battery;
- voltage regulator, which can be either mechanical or electronic;
- battery charge lamp;
- relay for this indicator.
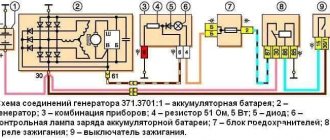
The VAZ 2106 charging circuit is activated when the ignition is turned on. When the engine is running, the battery is recharged by the generator unit, which in turn is driven by the crankshaft. The rectifier device that any generator is equipped with is designed to convert voltage to DC. After this, the regulator comes into operation, thanks to which the voltage level in the network fluctuates around 13.5-14.3 volts. Today, “sixes” usually use electronic regulators, which are characterized by a longer service life.
When the driver turns the key in the ignition, a current appears at the relay contacts, causing the battery charging lamp to blink on the dashboard. The lamp lights up until the engine starts - when the power unit is started, the current is generated at the output of the generator mechanism.
Wiring diagram for the "six"
Causes of charging failure and their elimination
If the battery for the VAZ 2106 begins to work less reliably, it is necessary to diagnose the electrical circuit. To do this, you may need a tester (voltmeter or multimeter).
If the VAZ 2106 does not have a charger, the reasons may be the following:
- The VAZ 2106 battery charging indicator may light up when the engine is running if the generator belt is worn out or its tension is very weak;
- the malfunctions lie in the mechanism itself - the generator brushes could wear out, the diode bridge or armature could fail, the coils could also burn out;
- if the battery is not charging, the reason may be a faulty voltage regulator;
- The reason why the indicator may light up may be an open circuit.
As practice shows, one of the most common malfunctions is relay failure. To diagnose its performance, you will need to remove the wires from the element and short-circuit them to each other - in this case the motor should start. If all other system components are operational, the voltage in this area should be 17 volts or higher. If this parameter does not increase, you will need to check whether there is voltage at the terminal that is connected to terminals 15 of the relay (there should be +12 volts). If the parameter is missing, you need to diagnose the safety element that is responsible for the circuit; if the fuse is working, then you need to check the circuit itself (the author of the video is the WORLD OF USEFUL ADVICE channel).
Types of generator faults
Due to the fact that any generator is an electromechanical device, there will be two types of faults - mechanical and electrical.
The first includes the destruction of fasteners, housing, malfunction of bearings, pressure springs, belt drive and other failures not related to the electrical part.
Electrical faults include winding breaks, diode bridge faults, brush burnout/wear, turn-to-turn short circuits, breakdowns, rotor beating, and relay-regulator faults.
Often, symptoms that indicate characteristics of a faulty generator can also appear as a result of completely different problems. As an example, poor contact in the fuse socket of the generator field winding circuit will indicate a generator malfunction. The same suspicion may arise due to burnt contacts in the ignition switch housing. Also, the constant lighting of the generator malfunction indicator lamp can be caused by a breakdown of the relay; the blinking of this switching lamp may indicate a generator malfunction.
The main signs of a malfunctioning autogenerator:
- When the engine is running, the battery discharge warning lamp flashes (or stays on continuously).
- Discharging or overcharging (boiling) of the battery.
- Dim car headlights, a rattling or quiet beep when the engine is running.
- Significant change in headlight brightness with increasing speed. This may be acceptable when increasing the speed (re-throttle) from idle, but the headlights, having lit up brightly, should not increase their brightness any further, remaining at the same intensity.
- Extraneous sounds (howling, squeaking) coming from the generator.
It is necessary to regularly monitor the tension and general condition of the drive belt. In case of cracks and delaminations, immediate replacement is necessary.
Reasons why the generator is not charging
- Brush wear
The most common reason why the generator does not charge the battery. This is wear on the brushes. The carbon contacts that transmit voltage from the regulator relay to the rotor windings are erased and the contact disappears. With this malfunction, the warning lamp on the instrument panel stops lighting up.
That is, when the ignition is turned on, if everything is working properly, the charging control icon should light up. The engine starts and the lamp goes out. This means that the generator is running and charging the battery.
In case there is no contact on the brushes. The light does not light up when the ignition is turned on. You can make sure that the reason is in the contacts.
The wire that goes to the regulator relay must be shorted to ground. Turn on the ignition. The light should light up. This means that there is no contact between the brushes and the slip rings. Or there is a break in the rotor winding.
If the charging indicator lamp does not light up when the wire is shorted to the housing. This means the LED has burned out. Which lights up the charging icon. Or a broken wire. It is necessary to ring the circuit from the regulator relay to the instrument panel.
2. Malfunction of the relay regulator
How to check whether the generator is charging the battery if the regulator relay integrated circuit fails. Two faults are observed. The generator stops charging. Because the relay regulator does not supply voltage to the rotor winding. Or, on the contrary, the generator voltage increases with increasing speed. This exceeds the permissible voltage for the vehicle's electrical system. This may cause the battery to overcharge. Which will lead to destruction of the plates and short circuit of the battery. Excessive voltage will also lead to failure of the vehicle's electrical equipment.
Checking the regulator relay
The relay regulator can be checked. Using a power supply capable of smoothly changing the voltage from 10 to 20 volts.
The relay regulator is connected according to the following diagram:
When the voltage increases above 14.2 _+ 0.3 volts, the light should go out. If the voltage decreases, the light comes on. This means that the relay regulator is working
3. Low tension of the generator drive belt.
If there is any doubt that the generator is not charging, the first thing to check is the tension of the drive belt. Because the resulting magnetic fluxes create resistance to rotor rotation. When the generator starts up. A loose belt slips on the generator pulley. The rotor stops rotating. The generator does not produce voltage
If you don't immediately pay attention to the belt tension. Generator diagnostics will not give results
In fact, the fault will have to be found on a working generator. This malfunction is classified as curious. But they fall for it very often.
These are external signs of how to check whether the generator is charging the battery. If they were not enough to determine the malfunction. Next you need to remove the generator. Disassemble it and check its elements separately.
What else to check
- Voltage regulator;
- Generator rectifier unit;
- Diodes;
- Generator for broken windings;
- Generator brush assembly;
- Contacts on the terminals of the generator, mounting block.
Let's continue... Diodes are checked with a test light or multimeter. If one of them is broken, the entire rectifier will have to be replaced.
To check the stator winding you need the same device. The resistance between the fasteners of the rectifier unit is measured. If there are no contacts between them, you need to replace either the winding or the entire generator.
The generator itself often fails due to wear on the brushes. To check them, you need to remove the brush assembly and measure the length of the elements. If it is 5 mm or less, the brushes must be replaced.
Almost all of the above system components are replaced when they fail, since they cannot be repaired. Only some of the generator problems can be repaired, but this can only be done by a qualified auto electrician.
The worst thing is if problems with recharging occur while on the road. Without recharging the battery, it will eventually run out completely. And even if you manage to find the cause of the breakdown and eliminate it, you will no longer be able to start the engine with the starter. It will be possible to start a VAZ-2017 with a dead battery only from a tug or pusher.
Which cars are affected by the problem?
Naturally, the probability of the battery receiving an excess charge on new foreign cars is significantly lower than on products with a significant mileage from the domestic automobile industry. However, there are a number of models where overcharging is considered a common problem.
We are talking about classic VAZ cars. Among the “classics”, this malfunction most often occurs on the “six” (VAZ 2106).
Trucks and some UAZ models are equipped with on-board voltage sensors and sometimes these sensors begin to signal an increase in the charging current between the generator and the battery (18V or more). This is not normal and may lead to rapid overcharging. However, often the problem is in the sensors themselves, which show incorrect information.
Naturally, the probability of the battery receiving an excess charge on new foreign cars is significantly lower than on products with a significant mileage from the domestic automobile industry. Nevertheless, there are a number of models on which overcharging is considered a common problem. We are talking about VAZ cars in the classic version. Among the “classics”, this malfunction most often occurs on the “six” (VAZ 2106).
Loss of charging on a VAZ sixth model: how to deal with it?
Domestic “sixes” in practice are cars that have proven themselves to be quite reliable in terms of electrics. However, if problems arise in the electrical part, they must be resolved as quickly as possible. In this article we will tell you what the charging circuit of a VAZ 2106 car is, what malfunctions may occur in its operation and how to eliminate them.
Is it possible to charge a full battery?
Reasons for discharging the VAZ 2110 battery Many motorists know the phenomenon of battery overcharging. It occurs when, for some reason, the voltage regulator starts to work incorrectly, so the voltage at the generator output exceeds 14.5 Volts. The optimal voltage of a fully charged battery is 14 Volts. When the voltage difference between the generator and the battery exceeds one volt, the latter begins to absorb additional energy, which leads to boiling and evaporation of the electrolyte, as well as destruction of the lead plates. As a result, the electrolyte level first decreases, then the battery capacity decreases.
If the generator voltage regulator is working normally, then the voltage is maintained at 14 - 14.5 Volts, due to which the battery avoids overcharging. All this fully applies to stationary battery charging, which is carried out using a special charger.
If the voltage at the output of the device does not exceed 14.5 Volts, then the battery will take the amount of electricity that is necessary to change the density of the electrolyte. When the voltage of the generator and the charger are equal, the rate of absorption of electricity will drop so much that further charging becomes meaningless.