Lada Granta › Logbook › Thermostat, replacement + thermoelement
I also brought this topic up for discussion here www.drive2.ru/l/512624482658025528/ But I don’t have the patience to hold on any longer, the temperature outside dropped to 5 degrees in the morning, and I’m already tired of warming up the car and after a long drive, the maximum I have is this
Full size you'll heat it up
I decided to change it completely, I couldn’t find the luzara, the 92 gram inserts also didn’t want to boil in traffic jams around the city in the spring, I decided to do it this way, take a thermos assembly + thermocouple.
Full size we only need the body
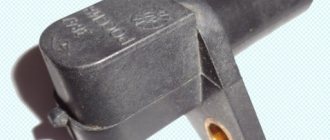
Full size thermocouple 88g.
Full size and full set, but we won't need it
We extract the full size using side cutters.
We remove the standard 85g thermocouple from the housing.
Full size standard is much heavier in weight than its analogue
We rearrange the thermoelement, put the spring from the new thermoelement, it is softer.
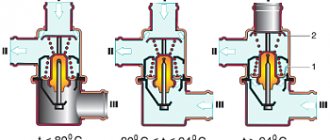
Full size heating up
Full size opening started at 88g
Full size fully opened at 94
We take the modified thermos and go to the car. I drained the antifreeze in a fashionable way through the RB hose using a compressor, drained about 2.5 liters
Removing the old thermos
Full sizeMore dead than alive
It’s good that I decided to take a new housing, the old one was not sealed, it was blown out easily, it is not surprising that the car could not heat up, part of the coolant was wasted. Naturally, it was not possible to save the factory gasket, I installed another one, which was much inferior in quality, and applied a thin layer of sealant for peace of mind
Well, then we move the coolant sensor to a new thermos and put everything back together
I filled it with coolant, started and drove the car so that the face was higher, waited for the fan to work, the stove blew out with heat, which means it was pumped, although the losses when removing the old thermos were about 200g. Now the results.
Full size in the city ranges from 87 to 90g -
On the highway at a speed of 100 km/h it cools down a little, but within 86-87 degrees. I'm happy with the work done, the stove worked fine, it heats up faster, it takes about 40 minutes to replace the thermos. I boiled the old thermos out of curiosity, it works, it only opens 80 degrees narrower and siphons into a large circle, I'll try to experiment, there's a thermoelement left from the new thermos, sharpen the stem , grind the thermos so that it is airtight and let it remain as a reserve. Good luck to everyone and smooth roads.
The Granta thermostat is a key part of the engine cooling system. ensuring the optimal temperature of the coolant and the power unit itself. Thermostat malfunctions can lead to overheating and breakdown of the car engine, so it is advisable for owners to know how to check and replace the LADA Granta thermostat.
Replacing the thermostat from 77C to 92C
Lada Kalina replacing thermostat thermocouple
Many Grant owners complain about rather problematic and weak thermostats in their cars. Most of the complaints are related to the fact that the device allows access to antifreeze after the engine has warmed up to 80C. In fact, there is no malfunction in this, it’s just a feature of the operation of specific engines - they are initially configured to operate at this temperature.
Most often, such features are not taken seriously by car owners, and do not interfere with the functioning of the engine. Perhaps the only noticeable difference will be cooler air inside the car at sub-zero temperatures outside. However, converting the car to gas fuel will significantly complicate this situation.
In such circumstances, the element can be modified, although not recommended by the manufacturer, after which it will open at 92C. The modification will require the purchase of a new thermostat, however, replacing the entire part will not be necessary; all you need from the new thermostat is a sensor.
To carry out this work you will need:
- drive the car onto a ramp or into a pit;
- drain the antifreeze;
- remove the air duct (it will interfere with the work process);
- dismantle the thermostat (or simply remove the cover from the device without losing the seal);
- install a new thermoelement;
- press the thermocouple with a spring and a limiter.
As a result of the above manipulation, the response temperature will increase by approximately 15%.
Fuel consumption on the Lada Granta Removing the ceiling lamp on the Lada Granta
Generator Lada Granta Electrically heated windshield on the Lada Granta Noise insulation of the rear shelf on the Lada Granta
Features of the LADA Granta cooling system
As in previous LADA models, upon reaching a certain temperature, the thermostat switches the coolant flow from a small to a large circuit. The small circuit includes:
- cylinder water jacket;
- water pump;
- interior heater.
The difference is that the heater radiator is connected to a small circuit in series and not in parallel. This forces all the coolant to pass through it, improving the heating of the cabin. The thermostat opening temperature is 85 degrees. Upon reaching this mark, the valve opens and the liquid begins to circulate through a large circuit into which. In addition to the small circuit elements, a cooling radiator is included. The advantage of the modernized cooling system is that antifreeze from the engine jacket falls directly onto the thermostat thermocouple without mixing in its housing. This allows the element to respond to the actual engine temperature, opening on time and preventing overheating. The manufacturer has set the permissible thermostat opening range to 85–7 degrees. That is, it can open at both 78 and 93 degrees. According to the official letter from the manufacturer, sent to dealers, the operating temperature of the Grant engine may be 10 degrees lower than that of previous VAZ models. This does not mean that the engine is “underheated” and does not lead to an increase in fuel consumption, deterioration of lubrication and a decrease in engine life. However, owners of the LADA Grant often change the thermostat to a new one, with an opening temperature closer to 90 degrees, or modify the standard thermostat by changing the thermal element.
Revision option
As evidenced by reviews from grant owners, the manufacturer supplies this model with a rather weak thermostat. Usually it opens access to antifreeze after the engine warms up to 80 radii. This is due to low-quality wax inserts, which we described above.
In most cases, such a problem is not perceived as something serious, since it does not harm the operation of the engine in any way. The only drawback is that in winter, when there is frost, the interior can be cool. The situation becomes more complicated if the owner of the car switches to gas.
In this case, it makes sense to modify the thermostat so that it opens at 92 degrees. To do this you will need to purchase a new one. The entire element does not need to be replaced, so only the insert is taken out of the purchased one.
Experts advise choosing the model – VERNET TH4898.92D. Its cost is low - approximately 400 rubles.
The step-by-step replacement procedure is as follows:
- first of all, the car is driven onto a ramp or pit;
- drain antifreeze from the cooling system;
- remove the air duct because it is in the way;
- the thermostat itself is dismantled (but you can leave it in place and only remove the cover from it, the main thing is not to lose the seal);
- the old thermocouple is removed and a new one is inserted;
- they press it with the original spring and limiter.
On average, the response temperature after such a procedure increases by 15 percent.
The whole process is recorded in this video:
All cars whose engines are cooled by a special liquid have at their disposal a device called a thermostat. Lada Granta is no exception.
In the Grant model, the thermostat is located between the radiator and the engine. In the article we will talk about the concept of a car thermostat, what components it consists of and how it functions, and also consider the main types of thermostat malfunctions.
The thermostat is called the antifreeze (antifreeze) temperature regulator in the engine cooling system. It increases the engine warm-up rate and maintains the required thermal state.
The key job of the thermostat is to hold back the flow of radiator fluid until the engine has warmed up. If the engine remains cold, the coolant does not pass through it to the radiator.
The thermostat opens when the engine temperature reaches 95 degrees. Thanks to its operation, the engine warms up faster. Thus, in the Lada Granta, the thermostat reduces the amount of harmful emissions and reduces engine wear to a minimum.
If desired, you can clearly see the operation of the thermostat at home. Place the thermostat in a container filled with water, then place it on the electric stove. As the moment of boiling water approaches, the thermostat valve will open approximately 2 cm. It is recommended to experiment with a new thermostat without removing yours from your own car.
How to change the thermostat of LADA “Granta”
The LADA Granta is equipped with power units with 6 and 8 timing valves. The location of the thermostat in these models is different, and accordingly, the replacement procedure is also different.
To replace the thermostat on the eight-valve Granta version you need:
- Phillips screwdriver;
- socket wrenches for 10 and 13;
- crosshead screwdriver;
- key T30;
- container for coolant.
Replacing the LADA Granta thermostat (8 valve) is performed as follows:
- install the LADA Granta on a site that has a slope so that the front part is higher than the rear;
- unscrew the bolts securing the engine protection and remove it;
- place a container for coolant under the radiator;
- remove the cap covering the expansion tank;
- Unscrew the drain plug on the radiator;
- drain the coolant into a container;
- tighten the drain plug on the radiator;
- press the latch and disconnect the wiring block from the coolant temperature sensor;
- loosen the clamp securing the rear hose to the thermostat cover pipe;
- remove the hose from the pipe;
- loosen the clamp securing the front hose to the thermostat cover pipe;
- remove the front hose from the pipe;
- unscrew the nut holding the ground wire to the thermostat mounting stud;
- remove the washer and the ground wire tip from the stud;
- unscrew the two nuts securing the thermostat to the engine, remove and set aside the washers;
- pull the thermostat housing off the studs;
- remove the thermostat gasket;
Important: when removing or replacing the thermostat, the sealing gasket must be replaced with a new one!
- unscrew the three bolts holding the thermostat cover;
- remove the cover;
- press out the thermostat fixing plate, overcoming the resistance of the spring;
- turn the plate, remove it from the grooves and pull it out;
- remove the spring;
- pull the thermostat out of the housing.
The new thermostat is installed in the housing in place of the old one; further operations should be performed in the reverse order of removing the part.
Tip: before installing the hoses on the pipes, you should lubricate the latter with a thin layer of sealant, this will prevent possible leakage of coolant.
Sequencing
- We place the car within the perimeter of the repair area.
- Loosen the clamp of the air supply pipe (Phillips screwdriver).
- Remove the mass air flow sensor (MAF).
- We unscrew the expansion tank cap and remove the vacuum.
- We unscrew the three clamps on the cooling system distributor and pour the waste into a plastic container (about 3 liters).
Preparatory processes before installation
- We press the block with wires from the engine control unit, disconnect the temperature sensor terminal.
- Using a key set to “13”, unscrew the negative terminal and remove it from the regulator body.
- Using the “8” head, we loosen the clamps of the supply pipe – the antifreeze return to the radiator.
Supply pipe clamps
- Remove the rubber pipes from the regulator.
Disconnect the rubber pipes
- Using the “13” socket, unscrew the two nuts that secure the thermostat to the wall of the cylinder block.
Two nuts - clamps to the block
- We remove the mechanism from its normal place and clamp it in a vice for preventive maintenance.
Clamp in a vice
- Using a Torx T-30 wrench, unscrew the three screws of the cover and remove it.
Removing the cover
- The connection between the cover and the body is sealed with a rubber gasket. We inspect it, if there is mechanical damage or deformation, we replace it with a new one.
- We grab the spring with pliers, press it, and release the metal plate.
Metal plate
- Release the regulator bottle.
Regulator bottle
- To check the functionality of the distributor, lower it into a container of water, gradually heat it up, bring it to a temperature of 85 - 90°C. We observe the movement of the rod. In good condition, it will move closer to the top.
Temperature adjustment
- We assemble the parts in the reverse order and install them in their original place.
Note to the driver!
Lada 2112 › Logbook › Modification of the grant thermostat
Let me start with the fact that a year ago I installed a thermostat from a grant from BEHR. For a long time I was looking for a thermostat from this particular company in my city and in the end it was found. After installing it, the car began to warm up faster and the heater began to heat a little better, which is exactly what I wanted. After driving with it during the winter, I noticed that with it the car keeps the temperature while driving at 77-79, which is very low for the proper operation of our engine. In the heat of the summer, even in the longest traffic jams, the car was reluctant to warm up, which definitely made me happy, but in the end I decided to replace the thermocouple with a 92-degree thermocouple. The Wahler 3091.92D thermocouple fits into the BEHR housing without modifications. The search for this element in my city was unsuccessful... Either the price was higher than the price of the thermostat assembly, or the waiting period was more than a month. If I'm not mistaken, I was one of the first to install the BUBLS-64 grant thermostat. After recording about the installation, everyone pestered him with questions: what? How? and why?))) It was from him that I came across an idea for improvement for people like me who couldn’t find a thermocouple from Wahler that fits without much modification. This thermoelement was Wahler 3017.92D50. Again, it was not available anywhere and I was offered a Wahler 3017.92D2 instead. They differ only in the presence or absence of a gasket. To implement it, you need to grind a new plate, because... the native one is 1 mm smaller and the consequence does not completely cover the small circle and does not maintain a normal temperature. This element was purchased for 550 rubles and given to my father to make a plate for it. Let me tell you right away that the photos are not mine, because... I did it a month ago and didn’t even think about registering for a drive, so I didn’t take any pictures)) Here is a link to his used one. Modification of the Grant 2190 thermostat or even warmer.
Thermostat assembly from BEHR
Thermoelement and plate for it
After the modification, the stove began to fry and the consumption dropped by about 1.5 liters. With this element, the temperature on the go stays at 88-90 degrees. If anyone is interested in what and how, ask questions)
Greetings, car enthusiast on the blog AAuhadullin.ru! Today we’ll talk about the Renault Logan thermostat and see what it looks like in the video.
In the engine cooling system, the thermostat is responsible for maintaining the optimal engine temperature under all driving conditions. Its failure has a negative impact on the temperature of the engine. This is especially dangerous when the thermoelement remains in the closed position and the liquid begins to circulate only in a small circle. The temperature begins to rise in square proportion, which can lead to complex and expensive repairs to the power plant.
In today's video we will compare two types of thermostats for Renault Logan models, which are suitable for 8 and 16 valve engines.
Owner reviews
| № | Positive |
| 1. | Vladimir: I’ve been actively using the car for two years now, and there are no comments about the heating system. I know about the problem of premature valve opening, but for me it is not significant. |
| 2. | Kirill: after 45,000 km I noticed that the regulator opens the valve already at 81°C. I visited a service station, after diagnostics the technician said that the defect was known, but had not yet been corrected by the manufacturer. Comrades recommended shortening the stock rod. |
| 3. | Vitaly: after buying the car, I shortened the regulator rod by 2.0 mm, and the valve activation threshold increased to 87°. This is enough for me, I don’t need to increase it any more. |
| 4. | Dmitry: I knew about the problem of underheating even before buying the car, I prepared in advance. Instead of the standard core, I installed 3091.92 V at 90° C. Now the system works properly. |
| 5. | Gennady: at 80,000 km I replaced the flow regulator for the first time, did not install the original core, bought a Wahler: 3017.87 D. I have been actively using it for two months, no comments. |
| 6. | Alexander: a year has passed since the purchase of the car, the valve opens at 80°C. I know that the threshold is low, but it doesn’t matter to me. I did not notice any increased fuel consumption. |
| 7. | Vasily: after purchasing the car, I replaced the antifreeze with imported one, installed a core from Wahler: 3017.87 D. |
| Negative | |
| 1. | Ivan: The car is a year and a half old, but I can’t fix the problem of early activation of the valve. On the advice of my comrades, I changed the cores, sharpened the stem, nothing helps. |
| 2. | Alexey: extremely dissatisfied with the car, the model is crude, there are many flaws and defects. You constantly need to dig around and fix breakdowns. |
| 3. | Vasily: the thermostat was replaced after a mileage of 50,000 km, after which faults were discovered in the ignition system and so on. |
Conclusion
The problem of early activation of the thermostat valve on the Lada Grant (2190) is known. Engineers are constantly looking for a solution. As alternative, effective methods, use the tips outlined at the beginning of the article.
Gates and Phoebe thermostats
Renault Logan thermostats are presented in two different ones and “febi”.
First, let's look at the product in the video:
As you can see in the video, its opening temperature is 88 degrees Celsius.
The response temperature of the “febi” thermoelement is 89 degrees, which is one degree higher.
When roughly determining the diameter of the products, using a regular school ruler, we find that the diameter of the “gates” thermostat is approximately 48 mm, and “febi” - 50 mm. As can be seen from the measurements, the products have different outer diameters. Accordingly, the diameter of the rubber sealing gaskets is different.
Rubber gaskets for thermocouples
Externally, rubber gaskets also differ. So the “gates” gasket is rectangular in section, but oval.
Also shown in the video is a RENAULT rubber gasket from CORTECO (023603H). The gasket is offered as a repair gasket. Let's try to combine it with our products.
As you can see from the video, the gasket apparently fits the thermostat from . However, if you compress it in diameter, then an “extra” piece of gasket appears in one place, in the form of a gap. This “speaks” that after installing the thermostat, antifreeze will flow into this gap.
Then we install the rubber gasket on the second product. It is immediately noticeable that the gasket is too big for the febi and the thermostat will not work correctly because the coolant will freely pass past the gasket.
When installing the “original” gaskets from the thermostat kit, they fit tightly, without any gaps.
Gates products with an outer diameter of 48 mm will not fit Russian-assembled Logan, since a thermostat with an outer diameter of 50 mm is installed there.
Selection and installation of batteries for Lada Granta
Since 2004, AvtoVAZ began a serious update of its products. First came Kalina (Kalina), followed a few years later by Priora (Priora).
And only since 2011 a model called Granta (Granta) has been produced. Many car enthusiasts and subject matter experts claim that it was Granta that became a new impetus in the development of the domestic automobile industry. Perhaps the words are too strong, but still.
The Granta model still exists in a single generation. But in 2018, the car underwent a planned restyling, which affected the appearance and made some technical changes.
Since the car is not only domestic, but also belongs to the budget category, one cannot count on the long service life of the original factory battery. In most cases, battery replacement is required approximately 2-3 years after purchasing the car. In some cases, the factory battery lasts 3-4 years, but this is rather an exception to the rule.
Thermostat structure and operating conditions
The thermostat contains metals such as copper and brass alloy. The essence of the device's operation lies in a small cylinder turned towards the engine.
In the middle of the cylinder there is a synthetic wax ball, which at a certain temperature (82 degrees Celsius) begins to melt (the wax expands significantly under the influence of heat, changing its solid state to a liquid).
A special pin is pressed into the wax cylinder and is connected to a valve. When the wax melts, as a result of expansion, it begins to squeeze the pin out of the cylinder, while opening the valve through which coolant flows. When the engine stops and cools, the wax in the thermostat hardens and returns to its solid state.
Basic thermostat malfunctions
The thermostat is a small, but no less important component of the car. A malfunctioning thermostat will most likely strand you on the side of the road. There are many reasons why a thermostat fails, but the most popular reason is corrosion.
If the thermostat is stuck and is in the completely closed position, the engine will most likely overheat, regardless of the driving mode and ambient air temperature.
If the thermostat is in the open position, but not all the way, the motor will overheat, but there is a possibility that it will not “boil”. Whether this happens or not depends on how the car is used.
If the thermostat valve is held in a completely or partially open position, it will take a very long time for the engine to warm up to the required operating temperature; in winter, the engine may not reach such a temperature.
With a working cooling system at a temperature of zero degrees, the engine warm-up time should take up to 10 minutes. In case of defective opening, the engine temperature will not rise above 70 degrees even in summer.
In both of these cases, it is necessary to replace the thermostat on the Grant or any other car. Next, let's look at how to check whether our thermostat is functioning.
Advantages of LUZAR thermostats
Computerized dosage of thermal wax LUZAR thermostats have thermal sensors that are filled using special equipment, which guarantees high accuracy of operation.
Patented thermal sensor design To eliminate the possibility of a “breakthrough” of thermal wax from the thermal sensor body (which, according to statistics, is the most common cause of thermostat failure), LUZAR changed the configuration of the sealing gasket in the rod-thermal wax-cylinder interface. With increasing pressure, expanding when heated, the thermowax gasket design - thanks to its specific geometry - forms an increased volume of rubber precisely in places where the thermowax “breakthrough” may occur
This also required changing the geometry of the temperature sensor housing (“cylinder”).
Rubberized valves We have eliminated the cause of insufficient tightness of the thermoelement - the metal-to-metal interface between the metal frame of the thermoelement and the metal valve plate - by using a rubber sealing gasket on the valve plate. Thus, LUZAR thermostats provide faster engine warm-up in winter (which is so important in the Russian climate ).
100% control of thermoelements Each thermoelement is checked for temperature, height and response speed - carried out in special baths with cells.
Warranty 2 years or 125,000 km. Mandatory certificationIn the event of a breakdown, you can easily replace the purchased thermostat through a retail store - just return it with a warranty card and a description of the defect
All products are certified according to the international quality management system ISO 9001 TUV and have GOST-R certificates of conformity.
How to tell if the thermostat is working correctly
In order to find out whether the thermostat is working or not, it is necessary to warm up the engine so that the arrow indicating the temperature does not reach the red mark of the indicator quite a bit.
After that, turn off the engine, go to the hood and open it, look for the upper radiator hose. This rubber hose is usually black in color and is approximately 5cm in diameter.
There are metal clamps at its ends. The upper hose is attached to the top of the radiator. Then we look for the lower hose. It looks like the top one, only it is attached to the bottom of the radiator.
Replacement instructions
There is no particular difficulty in disconnecting and dismantling the battery on a Lada Granta car on your own. You won’t be able to find anything unusual in replacing the battery yourself on such a machine.
If we talk about how to remove the battery from your Granta and install
new power supply, then this procedure can be represented as the following step-by-step instructions:
- prepare 2 keys for 10 and 13;
- turn off the engine, turn off the ignition;
- lift and secure the hood;
- Using a 10mm wrench, loosen the clamp on the negative terminal and remove it;
- Using the same key, unscrew the positive terminal fastening;
- throw the wires aside so that they do not accidentally return to their places;
- using a 13mm wrench, unscrew the fastening of the upper clamping bar;
- remove the clamping bar to the side;
- remove the battery from the engine compartment;
- Observing the polarity, install a new power source;
- secure the terminals and clamping bar.
READ How to install fog lights on a VAZ 2107
In the case of LADA Granta cars, regardless of the engine, the location of the battery is identical, as is the installation method.
When installing a new battery, you must first connect the positive terminal and then the negative terminal. When removing, the sequence is the opposite.
This is the golden rule that must be remembered always and everywhere.
Owners of LADA Granta cars can easily find a suitable power source for their car and literally change the battery in 15–20 minutes with their own hands, without asking for outside help.
Removing the thermostat Lada Granta
The thermostats of the 8-valve engines and the 16-valve Lada Granta engine are located differently, and therefore their replacement for these engines is shown separately. To remove the thermostat of the VAZ-11183, VAZ-21116 and VAZ-11186 engines, do the following: 1. Remove the plug from the expansion tank. Unscrew the drain plug at the bottom of the right radiator tank. Drain the coolant that comes out of the engine radiator into a container. Screw the drain plug back in.2. Release the clamp on the coolant temperature sensor wiring harness. 3. ...and disconnect the block from the sensor
4. Loosen the clamp securing the rear hose to the thermostat cover...
5. ...and remove the hose from the cover fitting
6. Similarly, disconnect the front hose from the thermostat housing pipe.
7. Unscrew the nut securing the ground wire to the upper stud securing the thermostat housing...
8. ...and remove the nut, washer and wire end from the stud.
9. Unscrew the two nuts securing the thermostat housing, remove the washers installed with the nuts...
10. ...and remove the thermostat housing from the studs.
Replace the thermostat housing gasket with a new one each time you disassemble the connection.
11. Remove the three bolts securing the thermostat cover and remove the cover.
12. Overcoming the force of the spring, press down the thermostat fixing plate...
13. ...then, turning it in any direction, disengage it from the grooves...
15. Remove the spring from the housing.
17. Before installing a new thermostat, check it by immersing it in water heated to a temperature of 78-80 'C. Heat the water, stirring constantly, to a temperature of (87±2) 'C.
18. At a temperature of (87±2) 'C, the thermostat rod should begin to move out of the power element. If this does not happen, replace the thermostat.19. Install the thermostat into the housing in the reverse order of removal, and the cover onto the housing.
Replace the cover seal with a new one during each disassembly and reassembly.20. Install the thermostat to the engine in the reverse order of removal.21. Fill the cooling system with liquid (see “Replacing Lada Granta coolant”). Close the expansion tank cap, start the engine, check for coolant leakage through the thermostat hose connections and warm the engine at idle to operating temperature to remove any air pockets from the system. You can see how to remove the thermostat on a 16-valve Lada Granta engine in the article “Removing the thermostat on a Lada Priora car”
Design of LUZAR thermostats
The terms should be distinguished:
- thermostat in a broad sense (car part, thermostat in a housing, thermostat as a “function”)
- thermostat in the “commodity” sense (a replaceable part of the thermostat, can be either a thermostat in the housing or a thermoelement; what is sold as a thermostat for a given machine)
- thermoelement (“working” part of the thermostat, in some cases may coincide with the name of the thermostat in the “commodity” sense)
- temperature sensor (the executive part of the thermostat is part of the thermoelement; it is a brass cylinder with a filler that expands when heated)
An automobile thermostat consists of a temperature sensor, which is a brass cylinder with a filler (technical paraffin or thermal wax), which expands when heated, with a rod on which spring-loaded plates of the main and bypass valves are placed; the temperature sensor is rigidly fixed to the frame, through which the thermoelement can be installed in the thermostat housing. The valve discs have rubber seals.
Automotive thermostats can be cased or uncased, depending on the design laid down by the designer of the engine.
Design image
- modern automotive industry, with the increasing complexity of automobile engines, is switching to the use of electronic thermostats, where temperature control is carried out by sensors, and the thermostat valves are controlled by micromotors (LUZAR does not produce electronic thermostats)
- Many modern engines have not one, but two or more thermostats - for non-uniform temperature control in different parts of the engine.
Checking the serviceability of the Lada Granta thermostat
To check the thermostat on a Lada Granta car, start the engine and touch the lower radiator hose with your hand; it should be cold. After the coolant temperature reaches 85-92 'C, the hose should begin to heat up. If this does not happen, remove the thermostat and check its functionality. To check the removed thermostat, follow the procedures in paragraphs 17-18 (see instructions above)
Parts for modifying the Lada Granta thermostat
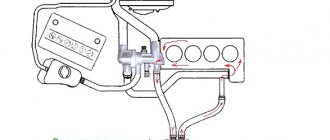
Installation diagram
A fitting will be cut into the thermostat to supply heating to the throttle assembly
Slightly modified scheme
The next and, perhaps, the most basic modification is the installation of another thermoelement from the WAHLER 3091.92D (92C) . We begin to install the thermoelement from the WAHLER 3091.92D (92C) thermostat into the VAZ 2190 thermostat.
From this thermostat we only need the thermoelement itself and the spring. We cut the thermostat according to the diagram shown in the figure below, and remove the elements we need, then we install them into the thermostat from Granta!
The arrows indicate the places where you need to cut the thermostat.
We need a thermocouple and a spring, the body is in the trash.
Installing new elements in a VAZ 2190 thermos
Parts from WAHLER 3091.92D took their place
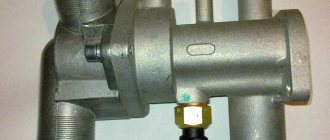
The next modification will be to introduce an additional fitting into the thermostat cover, which will supply OX to heat the throttle assembly. There is nothing much to talk about here, a fitting was purchased, a hole was drilled in the lid and the thread was cut. Next, install the fitting through the copper washer. Everything was thoroughly sealed with sealant.
Additional fitting for heating DZ
To install a thermos we will need: - UAZ 451-1303018 tee - M8×85mm studs - 2 pieces - clamps - sealant - pipes (laying around in the garage)
And so we start everything by dismantling the old thermos and replacing the mounting studs. Then we put the tee from the UAZ on a large circle and connect it to the expansion barrel. I’ll tell you right away that you’ll have to suffer with the tee... Because. the pipes are 32mm in diameter, and the tee is 38mm, well, a little effort and the pipes will fit
Studs and tee in place
Next is the thermostat itself.
No thread, only argon
The cut pipe from the stove fit well onto the expansion tank
At the same time I replaced the hoses with the Throttle
After I assembled everything, started the engine and in less than 5 minutes, the temperature on the dashboard rose to 50 degrees. While driving, at the third speed of the heater motor, hot air blows out of it, this has never happened before.
Review of Manufacturer Prices
| Name / article / OEM | Price, rub.) |
| Thermostat Lada Granta Behr-Hella | From 1200 |
| Lada Granta (winter 92C) luzar 92LT 0192 OEM: 2190-1306010-92 | From 1150 |
| Thermostat Luzar (LUZAR)LT 0190 OEM 21900-1306010-00 | From 1150 |
| Wahler thermostat WL54546435 | From 1300 |
| Behr Thermot-Tronik2190-1306010 | From 1250 |
| Thermostat Lada Granta Luzar 92LT01082 21082-1306010 | From 1100 |
*prices are current as of December 17, 2018.