Unfortunately, it was a quick repair; I had to do everything myself in 2 days off, given that it’s 15-18 outside, and it’s not too warm in the garage, down to -10. In general, let’s go step by step. Breakdown: I was driving for work. And suddenly, after one of the stops, I started my car, and realized that when I turned the heater motor control, nothing was happening, at first I thought, well, who knows, it happens, I tried a few more times, silence, checked the fuse, everything is fine. Realizing that the engine was noisy not because it had not been lubricated for a long time, but because it was dying, I put the car in the garage and a decision was made to repair it myself, since the cost of the engine ranged from 1000 to 1800 rubles, and I paid for the repair If only about 1000 rubles more, let's move on to the main thing: - The first thing you need is to disconnect the negative terminal! to avoid any short circuits - Next, you need to unscrew all the screws holding the casing, exactly as shown in the photo with yellow arrows.
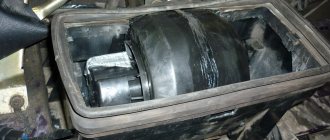
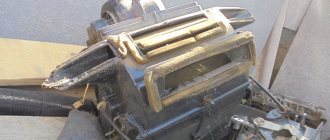
Next, we remove the frill and see this picture
further, for more convenient removal, you will need to either bend the casing or remove it, it is difficult to remove because it is attached from below in hard-to-reach places, but I was able to do it, I think you will find it and it will not be difficult to feel with your hand where exactly it is held, so we will skip this moment.
Next, remove the cabin filter, this is the thing on the left with a mesh, there are 4 fasteners. In general, I will indicate all the mounting points where you need to unscrew so that the engine is separated from the radiator
Next you need to naturally disconnect all the chips and carefully, try to move part of the stove to the left so that it comes out of the grooves on the right side, pay special attention to the fastening on the left to the body, because unfortunately I broke it off, but it does not particularly affect the fastening and installation .
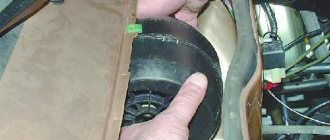
Next we see the following frame:
Unscrew the 3 bolts securing the motor from the housing and remove)
Reassemble in reverse order! DO NOT FORGET! BEFORE ASSEMBLY, MAKE SURE THAT THE NEW SPARE PART IS OPERATING!
I hope this will help someone at least a little, because I haven’t found a normal description for myself on how to remove the new type motor! And in the end I went to suffer in sub-zero weather myself)) Less breakdowns for everyone!
On the VAZ of the “tenth” family, which includes the VAZ-2110 model, the designers introduced an automatic heater control system (AHC) into the interior heating system, which increases the ease of use of the stove.
Design of the VAZ-2110 heater
The SAUO replaced manual control of the heater, but otherwise the stove remained structurally the same. As in earlier models, the interior heating system is a housing with a radiator installed inside, connected to the cooling system of the power unit - a heat source, dampers that redirect the air flow to the desired zones, and a fan driven by an electric motor, which creates the air flow. SAUO is a controller that, depending on the set parameters, monitors the temperature in the cabin and regulates the position of the dampers, maintaining the specified mode.
Important practical points
Some difficulties may be associated with the installation of the micro-gear damper. For this work you need to hire an assistant. First you need to connect the contacts to the new motor. If the heater damper is turned against the clock, cold air is supplied. This means that you need to turn on the car’s ignition and switch the sensor on the heater control system so that it is located opposite the blue dot. Checking the micromotor gear can be carried out according to the opposite scheme, which involves turning the damper along the clock mechanism and installing the sensor near the red mark. The micromotor gearbox must turn more than it normally does. The square can be treated with a special lubricant, which will facilitate installation.
When installing the motor, you need to pay attention to the alignment of the holes for the screws. An invited assistant must turn the temperature regulator and press on the electric motor
If the squares coincide, we can talk about a successful replacement of the gearbox, the operation of which will be carried out at a high level.
In some cases, you can observe incomplete insertion of the square along the length of the damper. You shouldn’t get upset ahead of time, because even if the micromotor reducer is only a third of the way in, its functioning will still be at a high level. The gearbox will need to be turned several more times from one mark to another so that the heating system fixes the operating range.
Stove fan
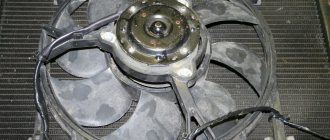
Structurally, the fan consists of a DC electric motor with a commutator-brush assembly and an impeller mounted on the electric rotor. motor. The electric motor is powered from the vehicle’s on-board network. There are several modes of fan operation, the difference between which comes down only to the rotor rotation speed, and this is realized by inserting a resistor into the power supply circuit of the electric motor.
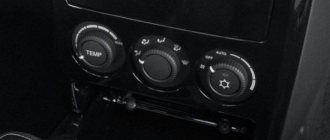
The fan operating mode is set using a handle located in the heater control unit on the center console. Initially, on the VAZ-2110, this handle was part of the design of the SAUO controller, but functioned separately from the controller itself. Later, the ACS added an automatic fan control function (position “A” on the handle), using which the controller regulates the rotation speed of the electric motor in order to maintain the set temperature.
The electric motor used in the design of the VAZ-2110 fan is simple, but it has “weak points” - the commutator-brush assembly and bearings. Wear of these elements causes incorrect operation and complete inoperability of the fan. Short circuits and winding breaks in the stove drive are rare, but don’t forget about these breakdowns either.
Symptoms of failure. Heater components that affect fan operation
Signs of a malfunctioning stove fan are quite obvious and impossible not to notice. Common symptoms of failure:
- Increased noise, grinding noise during operation.
- Significant reduction in air injection efficiency.
- The fan does not turn on.
- Spontaneous change in the rotation speed of the electric motor.
- It can be determined by ear that the electric motor is operating under heavy load.
In some cases, such consequences result from malfunctions in the power supply and fan control circuits, so you should check them first. This applies to:
- fuse (blowout is the cause of complete failure of the electric motor);
- resistor (if it is faulty, some speed modes of the electric motor stop working);
- controller (the knob for switching fan modes is part of its design, so malfunctions of the automatic control system affect the functioning of the electric motor);
- wiring terminals of the power and control circuits (oxidation, damage to wires is one of the reasons for a malfunctioning electric fan).
If diagnostics of these elements shows that they are in good working order, it is necessary to dismantle and repair the fan itself. But it can be diagnosed first.
Fan check
A check is done by directly powering the electric motor from the battery (we lay wires from the battery terminals and connect them to the power terminals of the motor) - operation under load, difficulty in gaining rotation speed, squeals and squeaks indicate wear of the drive components and the need to replace them. But if, even with direct voltage supply, the electric motor does not start, it is most likely that it has burned out or the windings have broken. Such faults are difficult to fix and it is easier to replace the entire unit.
Popular problems
Most often, owners of the domestic “ten” are faced with situations regarding the stove when the regulator does not respond to user manipulations. That is, the regulator does not work. Whatever position you choose, either cold or only hot air comes from the air ducts.
Scheme
There are different reasons for damper failure.
| Causes of failure | Characteristic |
| Micromotor gearbox jammed | This element is responsible for controlling the damper drive |
| Problem in the control unit | It should be checked in order to understand whether the micromotor gearbox, the damper, or the control unit is at fault |
| The plastic dampers have moved from their seat and are jammed, making it impossible to control the stove. | This is typical for the old-style VAZ 2110 heater damper, when plastic was still used for this component. |
When the gearbox is functioning, but the damper still does not turn, you can hear characteristic sounds - clicks. This indicates that a square shaft rotates inside the socket.
There is only one way to cure such a malfunction - remove the old damper made of plastic with foam insulation, and replace it with a new, modern one. The new type of damper is made of metal, and the seal for it is made of rubber.
Fan repair (step by step)
The disassembly technology is very simple, but proceed carefully. Since electric motor failure lies in the wear of bearings and graphite brushes, let’s consider how to replace these elements:
- Let's disassemble the electric motor. To do this, first remove the impeller, and then the two spring clamps of the motor support.
- We remove the support.
- Unscrew the screws securing the brush assembly and remove it.
- Carefully knock out the rotor.
- We clean the elements from dust and dirt.
- From the inside of the stator, carefully bend the edges of the plate holding the bearing.
- We knock out the bearing and install a new one in its place (for replacement you need bearing No. 609).
- We bend the edges of the plate back.
- We inspect the condition of the collector plates on the rotor and, if necessary, sand them with sandpaper (fine-grained).
- We replace the worn brushes with new ones (we solder the wires of the worn ones, and in their place we solder the wires of the new elements).
- We bend the stops of the brush springs (this will allow you to easily install the brush assembly in place).
- We put the rotor in place.
- We install and fix the brush assembly, having previously seated the brushes in their seats.
- We install brush springs into the holes that covered the stops and bend the stops back.
- Install the fan support and impeller.
- We install the repaired fan on the car.
As you can see, it is not difficult to repair the VAZ-2110 heater fan, and this task can be handled in a garage, even without special skills in car repair.
Home » Repair » Replacement of heater motor 2110, replacement of fan, repair of a new type stove
Drive problem
When changing the damper, do not forget to check the functionality of the actuator.
Drive unit
If the micromotor gearbox does not work, it will have to be repaired or simply replaced with a new one.
- Having removed the trim and trim from the windshield, directly behind the vacuum booster of your “ten” you will find a micromotor gearbox. Disconnect two connectors from the amplifier - the micromotor and the micromotor-reducer. Now unscrew the screws and
- remove the micromotor gearbox. You have to remove the motor from it.
- Connect it to the automatic control system to check its functionality.
If the device does not work, you can try to repair it. For this:
- Bend the pressed side slightly and remove the lid;
- Check the condition of the commutator, brushes and bearings;
- Replace the specified components or correct them;
- If the gear teeth are worn out on the gearbox, it will have to be replaced;
- Be sure to lubricate the bearings. Ideally, a silicone-based lubricant should be used;
- If the above measures do not help, simply install a new unit.
Replacement of the heater motor (fan) of VAZ 2110, 2112. New model. Stove repair
Rumbling, squealing, grinding, uneven rotation of the heater fan indicate the need to replace the heater motor. We go to the store and buy a new type of motor (large with three screws, manufactured since 2004). Bought in St. Petersburg for 1350 rubles. We prepare the car for work. Open the hood and remove the negative terminal from the battery. Let's start looking at:
- We remove the rubber caps from the wiper arms, use a 10mm wrench, unscrew the two nuts and remove the wiper blades.
- Using a slotted screwdriver, pry up the decorative plugs and unscrew the four screws securing the frill.
- Using a 10 mm socket wrench, unscrew the two nuts securing the frill at the edges.
- Remove the rubber seal and unscrew the screws securing the engine compartment shield from the frill.
- Disconnect the rubber hose for supplying washer fluid to the injectors.
Assembly
When installing a new damper, be sure to make sure that the fork located on its axis is clearly engaged with the lever. If the flap is in the raised position, you did everything right. Otherwise, it will be impossible to control the device, so you can forget about restoring the functionality of the stove.
Damper location
After this, reverse the assembly procedure according to the dismantling steps. Refill the system with coolant and check that the new damper is in place.
It is important to ensure that there are no leaks or tight hose connections.
Turn on the stove and check how the heater behaves. If everything is normal, you have carried out competent and successful work, for which we congratulate you.
How to remove and replace the heater motor on VAZ-2110, 2111 and 2112
Hi all. Today we will tell you how to get to the VAZ-2110 heater motor and remove it for repair or replacement. The procedure is relatively simple, you don’t have to disassemble the heater itself and this is a big plus, because disassembling it is really not as easy as it seems. So, let's start by following the instructions and removing the windshield trim and trim, the right soundproofing padding and the windshield wiper itself.
First of all, disconnect the battery. Then disconnect the positive connector of the heater motor:
Then, having gained access, unscrew the nut securing the heater motor mass:
We take a strong flat screwdriver and carefully unclip the latches of the stove body, be careful, they are springy, do not lose sight of them
