Typical radiator malfunctions
There are two main radiator malfunctions:
- Clogged grille and radiator tubes.
- Radiator leakage.
Since the Niva is often operated in difficult road conditions, the likelihood of contamination of the grille from dusty outside air is very high. Clogging of the cells reduces the heat transfer area of the radiator, and as a result leads to a decrease in the heat released from the air ducts into the passenger compartment. In such cases, the stove radiator is dismantled and washed under high pressure.
Clogged radiator tubes are also common. If the outlet pipe is barely warm or cold, then the radiator tubes are clogged. This happens for various reasons, including the entry of foreign objects into the cooling line during repair work. In such cases, the tubes themselves are also washed. To do this, it is not necessary to remove the heater radiator. It is enough to separate the radiator pipes from the cooling system and supply water under pressure into one of the radiator pipes.
A leak in the radiator tubes can be determined by a coolant leak, which usually forms on the right side of the center console in the passenger foot area. As a rule, a leak is accompanied by the smell of antifreeze (antifreeze) in the cabin. Don't rely on the smell of antifreeze alone. Coolant vapor is very volatile and can be misleading as to the source of the leak. The smell of antifreeze also indicates a leak in the engine compartment.
The leakage of the heater radiator occurs due to natural wear and tear of the metal from which it is made. Constant cycles of heating and cooling, exposure to various chemicals and consumable liquids eventually lead to the destruction of the metal and the formation of cracks. Cracks in a copper radiator can be soldered. The aluminum radiator will have to be replaced with a new one.
Typical malfunctions of the VAZ-2121 heater radiator can be eliminated in a garage environment
When do you need to replace your heater radiator?
The heater radiator is an essential unit that is an integral part of a modern car and is structurally part of the engine cooling system. Only at first glance it may seem that the operation of the “stove” does not affect the performance of the car and the efficiency of its operation.
In fact, the quality and smooth operation of this unit directly depends on:
- comfort of the driver and passengers while driving;
- good visibility, which directly affects road safety;
- efficiency of electrical equipment, instrumentation, etc.
Moreover, if measures are not taken in a timely manner to repair and (or) replace the heater radiator and restore the functioning of the system as a whole, this may have a negative impact on the operation of the entire engine cooling system and lead to breakdown of the power unit.
In what cases is it necessary to replace the heater radiator?
The car owner’s task is to monitor the technical condition of the vehicle, carry out inspections before leaving, and periodically undergo regular maintenance. Signs indicating the need to replace the radiator (or at least repair) are:
- The heater is not operating correctly - there is not enough heat to maintain a comfortable temperature in the cabin; cool air is blowing from the vents at idle speed of the engine.
- Reduced fluid level in the engine cooling system (controlled by the level in the expansion tank).
- The appearance of traces of antifreeze or antifreeze on the crankcase protection or on the surface under the car.
- Fogging of the glass, the appearance of a thin oily film on the windshield.
It is important to remember that the comfortable air temperature and microclimate created in the car interior all year round is ensured by the reliable and efficient operation of the heater. Therefore, this unit must be maintained in good condition, be able to promptly identify major faults, and, if necessary, know and be able to carry out repair work related to replacing the stove radiator.
Radiator design
The design of the heater radiator is quite simple and reliable, characterized by increased strength and a fairly long service life. The radiator is structurally composed of two aluminum or copper tubes of a certain diameter, located parallel at a certain distance. These tubes are connected by transverse thin metal plates; with their help, honeycombs are formed, inside which thermal energy is accumulated. The ends of the tubes are rolled and additionally treated with special sealed materials.
If you need to buy a new stove radiator, in addition to matching the design features, dimensions and technological holes, it is recommended to pay attention to the following features:
- with what frequency are the transverse plates installed;
- strength and rigidity of the plates, the entire radiator structure as a whole;
- what material are the swirlers made of (plastic ones are unreliable).
The procedure for removing and installing the heater radiator
It is important to understand that performing such a relatively simple operation as replacing a radiator is only possible if the car owner has certain experience, repair skills, knowledge and skills, as well as all the tools and accessories necessary to carry out this work.
A simpler and more profitable solution is to contact a car service center, where experienced auto mechanics will quickly and with a quality guarantee carry out all the necessary repair work. But even in this case, it is useful to know the procedure in order to be able to check whether the work is being done correctly by the craftsmen.
The general procedure for repairing a radiator is as follows:
- Place the car in the box.
- Drain antifreeze or antifreeze from a cold engine.
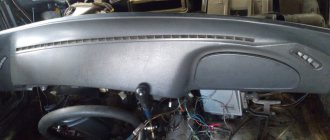
- Disconnect plastic parts and interior elements, freeing access to the radiator (sometimes access is from the passenger compartment through the glove box).
- Remove the center console if necessary.
- Disconnect the hose clamps that connect the radiator to the system.
- Drain the remaining coolant from the radiator.
- Remove the radiator and install a new part in its place.
- Carry out all assembly operations in reverse order.
A motorist can easily do a job like replacing a heater core on his own. The main thing is to comply with all the described conditions and strictly follow the repair instructions issued by the car manufacturer.
Instructions for replacing the stove
Replacing the radiator of the Niva stove is carried out as follows:
- First, you should drain all the coolant from the heating unit and cylinder block; to do this, place a container under the drain hole and unscrew the cap. If you are sure that the entire system is sealed, then there is no need to drain the consumables, just turn off the tap.
- The next step will be to remove the center console and the shelf under the glove box. For greater convenience, you can also remove the gearbox lever, since it will get in the way.
- After completing these steps, you can remove the lower air duct. It is not necessary to remove it, but doing so will make your repair much easier.
- Next, you need to unscrew the bolts that secure the radiator assembly bracket.
- After the bolts are unscrewed, it is also necessary to loosen or completely unscrew the screws securing the front panel on the left and right sides. It is not necessary to completely dismantle the panel.
- Then you can remove the rods from the faucet of the heating unit, after which you can remove the casing with the fan.
- At the final stage, the radiator device is removed, but before that you need to disconnect and dismantle the pipes. Be careful, some coolant may remain in them. The new radiator assembly is mounted in place of the old one, further assembly is carried out in the reverse order, making sure that there are no air pockets in the system. Otherwise, the efficiency of the stove will be minimal.
1. Disassemble the center console and remove the gearshift lever.
2. Disconnect the rods from the heater valve and remove the casing.
3. Remove the old radiator and install a new one in its place.
Heater radiator with air conditioning Niva Chevrolet (replacement)
There are two ways to replace the RP on a Chevrolet Niva with air conditioning, each of them has its own pros and cons:
- the first method will take a lot of time, and you will have to disassemble almost the entire instrument panel;
- the second method is relatively fast, but it is necessary to cut and adjust some parts, as the common people say - this is the “collective farm” method.
In order to replace the stove radiator according to the instructions, we perform the following work:
- First of all, we drain the antifreeze - so that it all flows out, we blow into the expansion tank;
- remove the ground terminal from the battery;
- dismantle the glove compartment, it can be easily removed;
- remove the center console, including the radio;
- unclip the front body panels from both A-pillars;
- remove the decorative panel on the side of the center console (driver's side);
- disconnect the instrument cluster;
- loosen the fastenings of the gearshift lever panel, completely unscrew the two screws closest to the panel;
- dismantle the steering column covers and steering column switches;
- unscrew the bolts securing the panel itself (4 fasteners near the windshield);
- remove the air conditioner control knobs;
- dismantle the heater control unit;
- unscrew the four steering column fasteners (two on each side), lower the steering column onto the driver’s seat;
- remove the air duct located behind the torpedo;
- disconnect all the cables;
- remove the instrument panel frame;
- unscrew the bolts securing the iron frame of the panel, remove the “piece of hardware”;
- we separate the housings of the evaporator and the radiator of the stove from each other, dismantle the air ducts (central, as well as on the left side);
- we approach the clamps of the stove pipes, loosen them, and remove the hoses;
- We remove the stove, change the radiator, then put everything back in place.
The heater radiator on a car with a Chevrolet Niva air conditioner can be changed in another way, but here you will have to heat the plastic and cut out its pieces. The easiest way to use this method is to install a “original” radiator or a copper radiator from a Volga car - it will fall into place more easily. It’s not worth experimenting with copper RP from a “penny” - it won’t fit in size. You will also need long L-shaped stove pipes, they will fit from the VAZ Nine, but you will need adapter tubes and additional clamps - the 2109 pipes are thinner than the Nivsky ones.
The principle of this installation:
- remove the glove compartment, dismantle the air duct on the passenger side;
- after removing the steering column casing and the heater protection in the heater radiator housing (on the driver’s side), we cut out or burn with a soldering iron a rectangular hole for removing the RP; by the contour of the plastic you can understand where exactly the heater radiator is installed;
- We unscrew the clamps of the stove pipes not at the radiator, but under the hood;
- we pull off the stove pipes, drain the antifreeze from them (tilt the hoses down), all the coolant does not need to be drained;
- so that the remaining antifreeze does not interfere with further work, we drill a hole in the old RP;
- Using a soldering iron on an old radiator, we anneal the furnace fittings for the pipes, pull out the control panel to the left (towards the driver);
- on the new stove radiator we install pipes 2109, adjust them to size, assemble the structure with adapter tubes, install the entire assembly in place, secure the RP using a homemade clamp.
To make it easier to carry out all this work, it is better to remove the front seats.
There are many disputes about which replacement is better for a Chevy Niva with air conditioning, but the second method has one serious advantage - the quality of Russian parts often turns out to be unimportant, and if the new heater radiator leaks, you will have to disassemble everything again. In the “collective farm” version, it will be possible to replace the RP a second time very quickly, but disassembling and reassembling the entire instrument panel may take a whole working day.
The quality of heater radiators on VAZ SUVs is a fairly relevant topic and worries many car owners; the interior of these cars with a standard heating system is not always warm. In addition, the “native” heater radiator of Niva cars may leak over time, and then it has to be replaced.
- 1 Types of radiators for the Niva stove
- 2 (adsbygoogle = window.adsbygoogle || []).push(<>); Removing the radiator of the Niva stove
- 3 Replacing the Chevrolet Niva heater radiator
- 4 Heater radiator with air conditioning Niva Chevrolet (replacement)
In this article we will look at what types of heater radiators (HR) there are on VAZ 4x4 cars, how you can replace the RF on the VAZ 21213 and Chevrolet Niva models.
Fan replacement
Experienced car owners recommend not stopping there and continuing to modify the stove by tuning the fan.
Some people suggest getting rid of the fan installed by the manufacturer and installing a figure eight fan instead.
If you also decide to carry out such a replacement, you need to additionally decide whether you will leave the original control of the stove or also replace it with a “eight” analogue.
Having decided on the second option, take care of purchasing the following additional items:
- fan speed switch;
- additional resistor for the stove.
So, after you have completely prepared all the necessary components, you can proceed directly to the process of modifying the fan.
Initially, you should dismantle the old air supply box. Unfortunately, despite the fact that this requires unscrewing only four nuts, it will not be possible to do this without outside help. Your partner will need to hold the screws under the hood while you unscrew them using a wrench.
After this, you can easily remove the air intake. Clean it if it needs it, and then cut away a small amount of the plastic to provide enough space for the new fan to operate.
Install the fan and carefully inspect for anything that may interfere with the operation of the installed fan. If you find such obstacles, carefully cut them off.
Once you are sure that there is nothing else that can prevent the fan from working, secure it with sealant. There are small gaps around the fan nozzle; it is important to eliminate them by covering them with any material. This will prevent warm air from escaping.
Now the assembled fan is being introduced back into the space in which its old counterpart previously “lived”. Everything is securely fastened and the closing and opening of the hood is checked. In some cases, after the introduction of a “foreign” fan, it is not possible to close the hood normally.
If everything is fine, reconnect all wires and install new controls. Upon completion of the work, be sure to check your results in action.
The stove should work perfectly, and warm air should spread very quickly inside the car.
Replacement process
Because replacing a heater core is not an easy process, it should be started when there are compelling reasons and you observe signs that clearly indicate problems in the heating system. Experienced technicians share recommendations based on which you can make a “diagnosis” for your car, indicating that it is time to replace the radiator. If the stove begins to heat poorly, so you constantly feel chills in the cabin of your vehicle, then there is a problem with the heating. If, in addition, you smell antifreeze, then your fears are even more confirmed. You should be even more concerned if you begin to notice that the level of coolant used is constantly decreasing, and under the carpet in the cabin you suddenly find a “swamp” of greasy liquid.
First, of course, check all the pipes and hoses that are part of the heating and cooling system. Make sure they are intact. If this is so, it means that the culprit of such troubles is, after all, your stove radiator, the resource of which has already been exhausted. Even if you don’t have the knowledge of how to change a radiator, don’t give in to the problem. We are ready to help you and give specific recommendations, based on which you will skillfully replace the heater radiator on a Chevrolet Niva with and without air conditioning.
There are two ways to replace the radiator. The first method involves carrying out work that does not require removing the torpedo. However, this method is accompanied by a clear disadvantage, namely that during the task the air conditioner will depressurize, so upon completion it will have to be refilled with refrigerant. The second method can be done by removing the dashboard. Unfortunately, such a replacement of the heater radiator on your Chevrolet Niva will be accompanied by a greater expenditure of physical and time resources. Decide which method will be preferable for you, study the recommendations we offer and get started.
First way
This method is suitable for those who are used to performing all actions at lightning speed, since they cannot allow their vehicle to simply sit idle in the garage. The main disadvantage of this method is that at the very beginning of the action you must release all the freon from the air conditioner. If you want to make the reassembly process easier for yourself, take care of this before disassembling, arm yourself with a marker and mark all the removed bolts, screws and other components.
First, unscrew all the bolts and remove the glove compartment. Next, refocus your efforts on the airbag, if you have one. Remove the passenger air duct by unscrewing the bolts and disconnecting the plugs. Don't be afraid that even when you apply force, the air duct won't give way to you. The manufacturer sometimes glues them together with tape, so increase your pressure and you will succeed.
Remove the pipe located at the bottom, where the passenger's feet are usually located. Next, dismantle the control unit by disconnecting the wires from it. To keep these wires out of your way, you can temporarily tie them together with electrical tape. The next step is to remove the cochlea. You will again have to unscrew several screws, then disconnect the cables and freely pull out the snail. Now go from the hood side, find the air conditioning pipes and unscrew them.
Now we get to the radiator. However, it cannot be dismantled immediately. Initially, you should cut a hole in it, substitute a previously prepared container and drain all the antifreeze remaining in it. Such actions are quite important, because if you ignore them, as soon as you disconnect the pipes and hoses, all the antifreeze will begin to splash in different directions, polluting everything around, including the interior. It will be difficult to continue the process.
Once the antifreeze is drained, you can safely remove the radiator and install a new one. Of course, you can immediately begin the assembly process. Do not forget to visually inspect the outer surface of the pipes and hoses to ensure they are unusable. Otherwise, you will have to repeat this procedure again if you install back the pipe that causes the leak.
Second way
You can also use the second method. First, disconnect the battery, then drain the radiator to the last drop of coolant. It wouldn’t be superfluous to even blow out the expansion tank. Now unscrew the four bolts and remove the radio with its guides. Let's move on to the crucial moment - you have to remove the instrument panel. Press the latch and pull the panel towards you. To make it easier for her to “obey” you, pull her not only forward, but also slightly to the right.
We suggest that you now use a marker and label all connecting parts. In this case, when assembling, it will be easier for you to complete all the necessary actions, and you won’t have to strain your memory. Next, unscrew the bolts and remove the dashboard. The next step involves removing the stove control unit. First, remove its side panel, then slightly pull it towards you, then disconnect the cables and backlight terminals. Next, remove the steering column. On the side of the panel you will see a spacer, which is also important to remove. Direct your efforts to removing the panel amplifier and fan mounts. Now you have managed to get to the stove and air conditioner. These two devices are fastened with four screws, three of them can be easily unscrewed, but the fourth, “the most stubborn” one, will only give in if you bend the edge of the amplifier. Remove the stove tee and its casing. Now nothing will hinder you; you can safely replace not only the radiator, but also, if necessary, even the entire stove. Next, you will need to perform reverse assembly. Take your time, perform all steps in reverse order carefully. In this case, you will be able to complete the replacement in such a way that even the most experienced craftsmen will simply gasp and envy your effective work.
So, the process of replacing a stove radiator is labor-intensive and responsible, but any car owner who is ready to set such a goal can cope with it. Based on our recommendations, it will be easier to understand the sequence of actions, carry them out and get the maximum result.
Replacing the heater tap
The standard heater tap on Niva 21213 does not do its job. Since it has a small cross-section, coolant flows quite slowly through the radiator. In addition, it often becomes a place for coolant to leak into the cabin. Therefore, car owners prefer to exchange it for similar models from other AvtoVAZ, Volkswagen, Toyota or Opel cars. For example, the ceramic faucet installed in 2108 has a large diameter passage opening, which increases the performance of the stove. It is better to install it in the pipe that supplies coolant to the stove, otherwise even if it is closed in the warm season, heated air will still flow into the cabin.
Removing the radiator of the VAZ-2121 stove
The procedure for removing the heater radiator on a VAZ Niva does not require any special skills or abilities. It is important to prepare the necessary materials and tools in advance. Most instructions for repairing car heaters contain a recommendation to drain the coolant before starting work. In practice, many car enthusiasts limit themselves to draining only that part of the antifreeze that is located in the radiator itself and the nearby pipes of the cooling system.
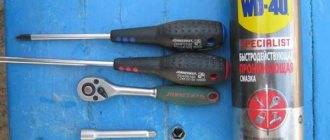
Preparing tools
To replace the radiator, you will need the following tools:
- pliers;
- slotted screwdriver;
- Phillips screwdriver;
- a set of markers for identifying wires;
- spanner set to “7”;
- socket wrench set to “10”;
- socket wrench set to “7”;
- socket wrench set to "10".
Procedure for dismantling the radiator
All operations must be performed in the following sequence:
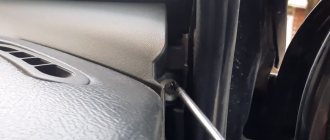
- Unscrew the left self-tapping screw securing the storage shelf.
The self-tapping screw is unscrewed with a Phillips screwdriver - Unscrew the two self-tapping screws on the right shelf fastening.
The right side of the shelf is attached to the upholstery - Unscrew the central fastener of the shelf from the front panel.
The central part of the shelf is unscrewed from the front panel - Carefully lower the right side of the shelf.
The right edge of the shelf moves down freely - Remove the left side of the shelf from the center console panel.
There is a special spike on the left side of the shelf - Unscrew the self-tapping screw securing the floor tunnel lining to the radio mounting panel.
The lower part of the panel is also fixed with a self-tapping screw - Unscrew the screws of the left and right fastenings of the central panel.
The process is shown on the right side, the left side is similar - Remove the radio panel.
The panel is moved to the side - Disconnect the wire connectors from the radio panel.
The wire blocks are detached to remove the entire radio panel - Completely dismantle the panel.
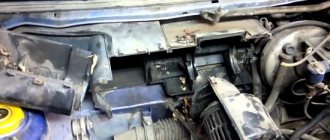
After disconnecting the wires, the panel can be easily removed - In the engine compartment, loosen the clamps securing the hoses to the radiator pipes.
Loosening the clamp is shown using the example of the lower pipe; a similar operation is performed with the upper - Unscrew the screws securing the seal from the front panel.
The screws are unscrewed with a socket wrench with a “7” head - Remove the seal.
The removed seal allows you to remove the radiator pipes from the engine compartment - In the cabin, loosen the nut securing the crane drive rod.
The fastening nut is unscrewed with a “7” key - Remove the heater valve drive rod.
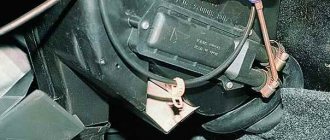
The rod is removed from the crane lever - On the right side of the fan casing, remove the heater tap rod from under the bracket.
The rod is disconnected from the fan casing - Disconnect the spring brackets securing the casing.
The staples are pryed off with a slotted screwdriver - Remove the casing and fan.
The casing with the fan is moved to the side - Remove the radiator.
After removing the fan, the radiator is carefully removed from its compartment - Unscrew the faucet from the radiator.
The tap and pipes are turned off with a key to “10” - Remove the heater valve.
The removed tap is checked for leaks - Remove the lower nut securing the faucet to the radiator.
The bottom nut often falls out and gets lost - Disconnect the outgoing pipe.
The two fastening nuts are unscrewed with a “10” wrench
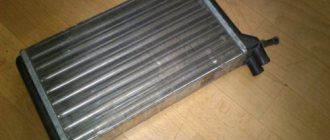
After dismantling, you should carefully inspect the radiator for blockages in the grille and leaks from the tubes. Based on the results of the inspection, a decision is made on the possibility of repair or installation of a new radiator.
Video: installing a radiator
The process of replacing the heater radiator on a classic Niva has been studied far and wide by many car owners. In fact, the procedure is similar to the entire family of AvtoVAZ classics. However, caution and safety precautions should be observed when working. After completing the repair, before driving on public roads, you must make sure that all components and mechanisms of the vehicle are operating normally. Only then should you begin daily use of the machine.
- Author: Andrey Lysenko
Rate this article:
- 5
- 4
- 3
- 2
- 1
(11 votes, average: 4.4 out of 5)
Share with your friends!
Related posts:
Do-it-yourself repair and replacement of the Niva Chevrolet car heater
Diagnosis of faults, repair and replacement of elements of the VAZ 2113-15 stove with your own hands
Diagnosis of faults, repair and replacement of the Chevrolet Lanos heater radiator with your own hands
How to replace the heater radiator on a Chevrolet Niva without air conditioning
Before you begin dismantling the radiator, you will need to drain the antifreeze from the cooling system. To do this, unscrew the bolt on the cylinder block and remove the expansion tank cap. Another option is also possible, in which you open the tank lid and disconnect the cooling tube of the throttle assembly. Instead of this tube, another hose is inserted, through which the liquid is removed. To speed up the process, you can carefully blow out the tank to drain any remaining antifreeze. In addition, it is recommended to disconnect the negative terminal from the battery.
To replace the heater radiator, you need to unscrew the bolt on the cylinder block and the expansion tank plug to drain the coolant
Tools for work
To dismantle the radiator you will need:
- screwdrivers (flat, Phillips);
- pliers;
- wire cutters;
- socket heads of different sizes (8, 10, 14).
How to remove a stove radiator
It is worth taking into account that the manufacturer’s recommendations for car repair are not always the simplest and most accessible for the average motorist. Therefore, quite often you have to rely on the experience of owners who carry out repairs with their own hands using improvised means and tools, resorting to various tricks
Let's start the disassembly procedure:
- We dismantle the glove compartment, for which we unscrew the corresponding fasteners.
We unscrew the screws securing the trim on the right and left sides in the passenger's feet, and remove the terminals of the lighting bulbs. To remove the glove compartment, you will need to unscrew the corresponding screws and remove the side decorative trim in the legs - We loosen the clamps of the rubber pipes from the radiator and carefully tighten them, pouring the remaining antifreeze into the prepared container.
After removing the hoses from the radiator, drain the remaining antifreeze into a prepared container. - After removing the hoses, unscrew the fasteners of the heat exchanger itself and push the part towards you until it rests against the air duct.
- We unscrew the nut securing the relay cover with the “8” head and remove the element.
It will be seen that the subsequent dismantling of the radiator is hampered by a corner of the frame. To solve this problem, use pliers to remove the interfering part of the plastic and remove the heat exchanger itself. To remove the radiator from the seat, you will need to cut off a piece of plastic - On a new radiator, it is recommended to glue the outer edges with foam rubber to avoid air penetration due to leaky connections.
- We also cut off a piece of plastic on the frame of the new heat exchanger, and then insert the part into its seat.
On a new stove radiator, it is necessary to cut off the corner of the frame, which will allow the part to be installed in place - We perform assembly in reverse order.
Possible heater malfunctions and ways to eliminate them
Cherry Niva Chevrolet
If the stove in a VAZ 21214 has stopped working, then, in principle, repairing it yourself is not a particularly difficult task.
The reasons for the malfunction why the Niva stove refuses to work are given below:
- Failure of the additional resistor. This element of the system is located behind the glove box and is designed to control the ventilating device for pumping warm air into the cabin. The problem is solved by replacement.
- Wear of pipes. Over time, the pipes begin to wear out, and temperature changes especially contribute to this. To detect worn hoses, each line must be carefully inspected. Wear may be indicated by cracks and other damage to the pipes through which antifreeze can escape.
- The heater valve is faulty. A breakdown of this component may be indicated by traces of a coolant leak in the vehicle interior. If the heater tap is being replaced, it is better to use a ceramic device; its service life is usually several times higher than that of traditional metal devices.
- Problems in the operation of the control unit. It is best to have this part repaired by a qualified electrician.
- The heater radiator has failed. On Niva 21213 you can easily replace it with your own hands, we will talk about this below (the author of the video is the OWNER G channel).
It is very easy to find a broken fan resistor - the fan only runs at maximum speed.
Air duct modernization
Unfortunately, if you carefully examine the air ducts that your Niva is equipped with, you will be horrified at how it was possible to install so many cracks in it. Is it possible to expect good heating with such a design?
The answer, of course, is simple, since all the heated air is dispersed under the dashboard, and the interior is heated according to the residual principle.
However, it’s good when a problem is so easily identified, then solving it is much easier. Upgrading the air duct involves applying silicone glue to all joints.
Be prepared for the fact that performing such actions is sometimes quite difficult, since not all places have unobstructed access. You still have to get used to it and apply silicone glue to all the joints.
Other details
The standard heater radiator and thermostat are also replaced. Preference is given to three-row copper radiators. They are more efficient in operation and leak less often. The thermostat is replaced with an analogue one or its thermal insert is modified.
Do-it-yourself modification of the stove on Niva 21213 with your own hands is quite labor-intensive and takes a lot of time. To modify the heating system of this car, you can find ready-made kits on sale that make this work easier. The procedure is presented in the video “Remaking the stove on Niva 21213 with your own hands: video instructions.”
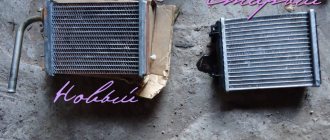
Types of radiators for the Niva stove
It doesn’t immediately become colder in the Niva’s cabin – the stove stops working normally for several reasons:
- the heating tap does not switch (stays sour in the closed or half-closed position);
- The motor rotates at low speed;
- the heater radiator is clogged;
- an air lock is created in the cooling system;
- parts turn out to be defective;
- the valve in the thermostat opens prematurely;
- poor circulation is created in the cooling system due to the water pump.
It may still be cold inside the car due to a blown cylinder head gasket in the engine. To make the interior warmer, car owners often install on Niva 21213 cars:
- three-row copper radiators of the stove, they have better heat transfer;
- The heater motor is 2108, they are more efficient than the standard ones on the Niva.
RP for the VAZ 21213 is produced by various companies, and the quality of stove radiators may vary. On the auto parts market you mainly find parts from manufacturers:
- "Orenburg radiator";
- luzar;
- DAAZ;
- SHAAZ;
- "Likhoslavl Radiator Plant";
- Iran;
Based on the material used, RPs can be made of copper or aluminum, each of them has its own advantages and disadvantages. Aluminum radiator:
- heats up quickly;
- cheaper than copper;
- has high rigidity and low weight.
But aluminum RP is not repairable, it is practically impossible to solder it. Other disadvantages of aluminum include:
- rapid cooling, this metal does not retain heat well;
- susceptibility to corrosion, which is why aluminum RPs fail more often than copper ones.
The main disadvantage of copper RP is that it takes a long time to heat up the interior, but even after stopping the engine, it retains heat for quite a long time. Copper heater radiators are approximately 30-50% more expensive than aluminum ones, but this is not so important - in general, the parts are still relatively inexpensive. The problem with copper RPs is different - the quality of the products is low, and it is not so easy to buy parts of acceptable quality.
Chevy Niva car owners often have problems with heating the interior; the car can be cold even in frosty temperatures of -15ºC - the aluminum radiator of the stove does not heat very well. Another problem on VAZ 2123 cars is that stove radiators often leak.
Aluminum heater radiators on a Niva car are inexpensive:
- VAZ-2123 (Chevrolet Niva) - on average from 700 to 1000 rubles;
- VAZ-21213 (21214/2105) - from 650 to 1100 rubles.
Copper RPs are sold more expensive, their prices range from 1,500 to 2,500 rubles, the cost depends on the brand of the product, the region of sales and the sellers themselves.