Dismantling and assembling suspension components of the VAZ 2115 Lada
The front struts on VAZ 2114-2115 cars wear out much faster than the rear ones, and this is due to the fact that the front part of the car bears a large load, since the main units are located there. If the shock absorbers are leaking, or are starting to leak heavily in potholes, then it would be best to completely replace them. Many people are used to dealing with such problems at a service station, although if you try a little, you can do it all on your own. The main thing is to have all the necessary tools and equipment at hand. Below is a detailed list of everything:
- spring ties
- ball joint or steering wheel remover
- pliers
- hammer
- keys for 13 and 19 as well as similar heads
- crank and ratchet handle
- breakdown
I recommend that you first familiarize yourself with the video, which will be presented below, and then read my photo report on the work done.
Repair
Suspension repair consists of replacing damaged parts and setting the correct caster and camber angles. For example, if as a result of an accident one of the levers is deformed, then:
- disassemble the front suspension;
- remove the bent lever;
- install the new lever in place (it already comes with silent blocks);
- assemble the pendant;
- set the castor and camber angles.
For such repairs, you will need the most common tools, which are available at your nearest auto store. In addition to a jack and safety stands with wheel chocks, you will need:
- set of open-end wrenches;
- crowbar or pry bar;
- ball joint remover.
Most owners of old cars have these tools, but if they don’t, then buy them, let them have them, because maintenance of the suspension of a VAZ 2110 car, as well as other cars, must be carried out at intervals of 10–30 thousand km.
If you want to change the silent blocks yourself, then you will need a special press-in puller, which is available in all car dealerships. In addition, the dimensions of the silent blocks of the VAZ 2110 car depend on their installation location and are interchangeable at the front for all models 2108–2115.
Car suspension tuning
Select rear beam silent blocks only according to the car model, because each generation was equipped with its own beam, therefore rubber-metal hinges designed for cars of one family are not suitable for another. Therefore, what fits 2108–21099 will not fit 2110–2112 or 2113–2115.
When planning to repair your Lada, do not forget that the shape and dimensions of the silent blocks of a VAZ 2110 car depend on the location of their installation, as well as the model of the car; if you have a rear beam from another model installed, then choose hinges taking into account this modification.
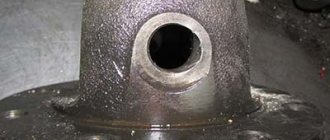
Front suspension device
The main element of the front chassis of the VAZ 2114 is the shock absorber strut, which is designated as number “9”. It is attached to the steering knuckle with two bolts. Compared to the rear system, the front suspension has a more complex design, which can be understood by the number of parts. Number “11” indicates a bolt that passes through the holes of the rack bracket; it has an eccentric washer and an eccentric collar. When the steering gear turns, the top bolt turns. The result is that the car turns. Most often, shock absorber struts fail, since they do the main job.
Signs of front strut failure
As we mentioned, the front struts can “live” much less than 60 thousand kilometers. In order to avoid problems, you must first focus on the driving performance of the car and its behavior on the road.
Rack malfunctions manifest themselves as follows:
- Reduced road stability;
- excessive rocking of the car when hitting obstacles;
- poor car stability during braking and cornering;
- increased braking distance;
- the appearance of oil drips on the body;
- the occurrence of extraneous noise or knocking in the front of the car.
Please note that if there are obvious signs of malfunction, the front struts of the VAZ 2114 should be replaced as soon as possible. If this is not done, the following consequences are possible:
- The car will literally bounce at the races;
- controllability when cornering will decrease (centrifugal forces will pull the car to the side, try to turn around, or even pull it into a ditch);
- tires wear out faster;
- very soon you will need a wheel alignment.
At the same time, timely replacement of shock absorber struts will avoid many problems and save your own budget.
/ Chassis vaz 21144 front suspension diagram.md
Chassis VAZ 21144 front suspension diagram - Design features of the chassis of the VAZ 2114
The design of the VAZ 2114 chassis - rear and front suspension Front suspension How is the VAZ 2114 chassis repaired? Review of the front suspension on the VAZ-2114: detailed repair diagram, individual elements and description Design of the front suspension of the VAZ 2114 VAZ-2114: front and rear suspension
The chassis of the car includes two suspensions - front and rear. During operation of the machine, most of the load falls on the chassis. The quality and comfort of the ride, as well as the safety of the driver and passengers, depend on the condition of the front and rear suspensions. The main function of each suspension is to eliminate vibrations and soften the ride. Also, the tasks of the chassis include reducing roll when turning, ensuring a smooth ride, and providing high information content for the driver in the city and on the highway. On the roads of the CIS countries, the chassis is subject to excessive load, since the condition of the road surface leaves much to be desired. As a result, motorists often turn to car service centers. Things are better with VAZ, since they have more modern systems compared to previous Lada models. Many motorists choose to solve the problem on their own. But in order to understand what has gone wrong, you need to know the suspension structure. The image below shows all the main elements of the rear suspension that can fail. The parts are fastened together by welding. The axles of the rear pair of wheels along with the brake elements are screwed to the flanges. Bushings are installed on the rear suspension arms at the front. One end of the spring rests on the support through a rubber gasket, and the other on the shock-absorbing cup. A complete disassembly of the rear suspension is required if the motorist decides to lubricate all the parts or change them. Most often you need to get to a specific element and replace it. The analysis proceeds as follows: Components of the VAZ rear pillar IMPORTANT. The shock-absorbing spring must be removed using special ties. If they are not used, serious injury may occur as the iron spring is under high pressure. It is attached to the steering knuckle with two bolts. Compared to the rear system, the front suspension has a more complex design, which can be understood by the number of parts. When the steering gear turns, the top bolt turns. The result is that the car turns. Most often, shock absorber struts fail, since they do the main job. Removing Springs Using Ties When removing the bolts that secure the ball joint to the steering knuckle, you must use a socket wrench. Otherwise, the protective cover of the hinge may be seriously damaged, resulting in additional costs. In the case of the front suspension, its assembly proceeds in the reverse order, with the exception of a few features. When installing the mounting bracket to the VAZ body, you need to make sure that the threads of the bushings are not damaged. To do this, you must perform operations carefully. Also, longitudinal displacement of the cushions on the bar must not be allowed. This can happen during installation of the anti-roll bar. A complete set of VAZ chassis elements. VAZ rear suspension diagram. The main parts of the rear suspension are highlighted in color. Components of the VAZ rear pillar Diagram and explanations for it. Removing springs using ties. Select the model VAZ OKA Kalina Granta Priora Niva Vesta Largus Year of manufacture Calculation of tire pressure by car make. Calculation of tire sizes by car make.
The design of the VAZ 2114 chassis - rear and front suspension
The chassis of the car includes two suspensions - front and rear. During operation of the machine, most of the load falls on the chassis. The quality and comfort of the ride, as well as the safety of the driver and passengers, depend on the condition of the front and rear suspensions. The main function of each suspension is to eliminate vibrations and soften the ride. Also, the tasks of the chassis include reducing roll when turning, ensuring a smooth ride, and providing high information content for the driver in the city and on the highway.
On the roads of the CIS countries, the chassis is subject to excessive load, since the condition of the road surface leaves much to be desired. As a result, motorists often turn to car service centers. Things are better with the VAZ 2114, since it has more modern systems compared to previous Lada models. Many motorists choose to solve the problem on their own. But in order to understand what has gone wrong, you need to know the suspension structure.
Disassembling and replacing the front suspension: instructions
- The VAZ 2114 is installed on a viewing hole or raised on a lift. The car must be set to the parking brake. It is necessary to remove the wheel caps, loosen the mounting bolts and unscrew the hub nut. Having secured the front of the car, you can remove the front wheels.
- Next, you need to remove the ball joint pin, which is located in the swing arm of the front strut. The next step is to remove the front stabilizer link (number “24”) from the front suspension arm (number “22”). Next, the stretch marks from the body (30) are removed. Next, you need to completely disconnect the ball joint that is attached to the steering knuckle.
- Now you can remove the front suspension arm. To do this, you need to disconnect it from the body bracket (28). Afterwards the lever is removed along with the bracket and the extension (29, 30). It is also necessary to remove the bolts that secure the pads to the steering knuckle.
- In front of the driver there will be a caliper assembly. To avoid problems with it, you do not need to completely remove it; you need to hang the caliper on a hook in such a way that there is no load on the main hose. The next step is to press the spline shank out of the front wheel hub.
- From the side of the engine compartment, you need to remove the protective fist (“41”). To do this, unscrew the telescopic strut nuts and then remove the solid front suspension strut. It should be together with the wheel hub and steering knuckle. The other front suspension strut is removed in the same way. Next, the racks are removed from the rod.
Replacement of front struts VAZ 2108, 2109, 21099
The front struts of VAZ 2108, 2109, 21099 cars and their modifications will have to be removed and replaced or their parts in case of the following malfunctions: leakage of shock-absorbing fluid, breakdown and knocking when driving, breakage and settling of springs, replacement of anthers and upper supports with support bearings , mechanical damage to parts, front suspension tuning. We replace shock absorbers and (or) or springs of the front struts on VAZ 2108, 2109, 21099 cars in pairs (on both sides). If the stand assembly is replaced, then we also change two at once.
Required tools and accessories
— Socket wrench or socket on “13”
— Spanners for “17” and “19”
— Device for unscrewing the front strut shock absorber rod nut
Tool for loosening the front strut shock absorber rod nut
— Soft metal drift
— Blowtorch or gas torch
Preparatory work
— Jack up and remove one of the front wheels of the car
— We clean the elements of the front suspension of the car from dirt
— We disengage the brake hose from the bracket on the rack
Replacing front struts on VAZ 2108, 2109, 21099 cars
Disconnect the tie rod end from the strut housing arm
Either we remove it with a special puller, or we disconnect the connection the “folk” way (using a pry bar and a hammer). Read more: “Replacing tie rod ends on VAZ 2108, 2109, 21099 vehicles.”
We disconnect the tie rod end using a pry bar and a hammer, creating tension in the connection and hitting the end of the boss
Loosen the shock absorber rod nut
In case you plan to disassemble the rack.
Loosen the shock absorber rod nut using a special tool
Unscrew the three nuts securing the upper strut support to the body
Use a socket wrench or socket set to “13”.
Unscrew the nuts securing the strut housing to the steering knuckle and remove the bolts
It is necessary to mark the position of the adjusting bolt (the upper bolt with the eccentric) with paint or a chisel, so that when installing the rack, it can be returned to its original position. In this case, the camber angle of the front wheels of the car practically does not change.
Unscrew the bolts securing the strut to the steering knuckle of the front suspension
There may be problems at the stage of removing the bolts, as they often become soured in the holes in the steering knuckle. If it was not possible to turn the bolts with a wrench, then first tap them with a hammer, then try to knock them out through a drift. In the most severe case, we heat the steering knuckle at the place where the bolts are attached using a gas torch or a blowtorch and try to unscrew them. Read more: “How to unscrew the bolts of the front struts of VAZ 2108, 2109, 21099 cars.”
Remove the front strut assembly from the car
Pull it out of the wheel arch to the right or left of the hub. Please note that the front pillar is quite heavy.
If necessary, we disassemble the front strut and replace failed parts
We replace the second rack in the same way. The tightening torque of the rod nut is 66-81 N.m, the bolts securing the strut to the steering knuckle are 78-96 N.m.
After replacing the front struts of a VAZ 2108, 2109, 21099 car, it is necessary to check and adjust the angles of the front wheels.
VAZ chassis repair
The working chassis of the VAZ is a soft ride and excellent handling of the car. To maintain the suspension in excellent condition, we recommend regularly inspecting it at a car service center, since it is in this case that specialists will be able to identify deviations from normal performance at an early stage and, as a result, eliminate the problem that has arisen.
The masters of the Exclusive technical center are experienced professionals in their field. They will be able to do a complete diagnosis and repair of the VAZ running gear. All work is carried out using high-precision equipment, and components are replaced using original spare parts.
About VAZ cars
The largest car manufacturer in Russia. The plant was built on the initiative of the Chairman of the Council of Ministers of the USSR Alexei Kosygin in the 1960s. . Equipment and technologies for it were purchased from the Italian concern Fiat. During the Soviet Union, its model range consisted of the following brands: Zhiguli, Niva, Oka, Sputnik, Samara. Today it produces various modifications of cars under the general name Lada, and also assembles Nissan and Renault cars, since these global brands have a controlling stake in VAZ.
Initially, VAZ cars were designed to saturate the domestic market of the USSR. They were affordable, reliable and easy to repair. At the present stage, these qualities have been supplemented by comfort and ease of operation, thanks to many additional options and modern functional equipment. At the same time, the price remained very affordable.
Types of work when repairing the chassis of a VAZ car
Repair of a VAZ chassis may include the following types of work:
- suspension overhaul
- VAZ beam replacement
- bridge replacement
- replacing axle shaft
- replacing VAZ springs
- replacing the support bearing
- replacing the strut support
- VAZ CV joint replacement
- spring repair
- subframe replacement
- cardan repair
Our car service center on Vasilyevsky Island repairs VAZ chassis of all the following models:
- Lada Kalina 1117/1118/1119
- Lada Samara 2113/2114/2115
- Lada Priora (Lada Priora 2170/2171/2172/21728)
- Lada Granta
- Lada Largus
- VAZ 2104
- VAZ 2105
- VAZ 2106
- VAZ 2107
- VAZ 2108
- VAZ 2109/21099
- VAZ 2110
- VAZ 2111
- VAZ 11113 Oka
- VAZ 2114
- VAZ 2115
When contacting the site, you will receive a 5% discount on your first visit to the service center.
Leading manufacturers
When choosing new nodes, you should think about what exactly you want to get and what it will be like for you in the future. We recommend installing collapsible struts, since their design can be disassembled into parts, thereby simplifying and reducing the cost of suspension repairs. This is one of the key advantages of collapsible units.
KYB (Kayaba)
Look at the front element assembly in the photo to first understand what exactly this component of your car looks like. Choosing a manufacturer is a fairly pressing issue, since each of the options presented today has its own advantages and disadvantages. We invite you to familiarize yourself with them in the table.
| Manufacturer | Advantages | Flaws |
| Standard factory | Financially accessible | Not very reliable, can withstand about 30 thousand km, then require mandatory replacement |
| Racks from Priora | Gives rigidity, provides comfort, holds well on the road | There is no sound insulator, the bump stop suffers greatly |
| SS20 | Improved version of Priora struts | There are essentially no disadvantages |
| Plaza | Available in three versions - comfort, sport and supersport, they are of high quality | Afraid of low temperatures |
| Kayaba | The most popular, high-quality, reliable, not afraid of frost | There are many fakes on the market, which makes it difficult to find the original. |
From this we can conclude that spare parts from Kayaba are the optimal solution that will last a long time, reliably, and will not be afraid of harsh Russian winters, during which many analogues among the A-pillars simply will not be able to function normally, causing problems for you.
Disassembling and replacing the rear suspension: instructions
A complete disassembly of the rear suspension is required if the motorist decides to lubricate all the parts or change them. Most often you need to get to a specific element and replace it. The parsing proceeds as follows:
- The VAZ 2114 is installed under an inspection hole, or, as an option, on a lift. In the luggage compartment, the rear and side trims and the seat belt retractor are disconnected. Also in the luggage compartment there are fastenings for the racks to the car body. They need to be loosened; there is no need to unscrew them completely.
- Next, the fastenings of the rear wheel pair are loosened. To do this, you need to remove the hubcaps and then completely dismantle the wheels. Reliable jacks should hold the car at this time; they are usually installed on each side.
- Now it is necessary to dismantle the brake system cables. You need to get them assembled. To do this, the cable fastenings to the suspension arms and the body of the VAZ 2114 are disconnected. Afterwards, the brake drums are dismantled. The cable ends should be removed from the manual drive levers. You also need to disconnect the flanges from the brake flaps.
- Before dismantling the hoses and pipes of the brake system, care must be taken to prevent leakage. Next, you need to dismantle the elastic drive lever, which is used to operate the brake pressure regulator. To remove the lever, you need to disconnect it from the bracket by removing the lock washer, then remove the shackle from the wheel axle.
- The next step is to disconnect the struts (shock absorbers). To do this, remove the rubber cushions, nuts attaching to the body part and the washer. After this, you need to install additional stops for the front wheelset. The rear part should be raised. After this, you can remove the compression stroke buffers, springs and shock absorber covers.
- If you disconnect the body mounting brackets, the entire beam can be detached. The rear suspension along with the struts will lie in front of the motorist. If necessary, you can disassemble the shock absorbers, which is no longer difficult.
Replacing the rear pillar of a VAZ
We wondered when to change the rear struts of a VAZ, you can change them at home yourself. My answer is that you can change the racks yourself at home, but how do you know when to change the racks?
Signs of a faulty rear strut: when driving on the road, the rear of the car sways, and when the rear wheel hits a hole, an impact occurs in the strut.
A sign of a good rear strut, the rear of the car does not sway on the road; when the rear wheel hits a hole, the wheel falls into it without impact, softly.
Based on these signs, we decided that the rear struts need to be replaced. Rear struts are now mostly produced as non-separable ones, so it is better to buy new ones in advance rather than try to pump up old ones, as they may turn out to be non-removable.
Now we need to decide on the choice of rear struts. The rear struts are divided into gas and oil.
Which racks are better to install?
To make your choice, analyze what is most important to you in a car and which roads you drive on most often. Gas struts perfectly hold the car on a good road at high speed, but as soon as you go off-road or on a gravel road, the car turns into a rattle. Since gas struts provide little resistance to compression, small and frequent bumps will be poorly absorbed and will be released into the body of the car. Oil struts are good for those who often drive off-road (in Russia, half the country is off-road), they hold the car a little worse at high speed, but they behave smoothly off-road, since they have no compression resistance, they only resist decompression, thereby , better than gas ones, absorb small and frequent bumps.
To replace the rear struts at home, it is advisable to have spring ties; if there are no ties, you can change them without them, but it will be a little more difficult.
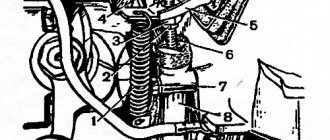
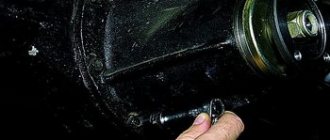
The photo below shows how to lift the car and remove the wheel; be sure to secure the jack with hemp or bricks.
Photo. The car is on a jack, with a safety stump.
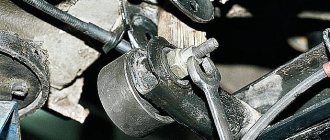
Unscrew the strut bolt, it is shown in the photo below. But this bolt does not always come out easily; sometimes the bolt is on the customer’s strut bushing. A jammed bolt can simply be cut off with a grinder or a hacksaw. You can try to knock it out, first try to turn it with a key; if it turns, it’s fine, pull it out in a circular motion. But don’t try to hit the thread, you can break the thread, thereby widening the end of the bolt, then it will definitely rest against the strut bushing and jam. Try to knock out the bolt like this, take a thin chisel or a powerful screwdriver, drive it between the head of the bolt and the post mount, if the bolt comes out, hammer it in again, drive the chisel in again, swing it with such blows. It is advisable to have WD-40 and spray it into the bolt. If it suffers for so long, the bolt will come out, and if it doesn’t work out, the bolt sits as if welded, then cut it off without sparing it.
Photo. The wheel has been removed, you can see the bolt that needs to be unscrewed to remove the strut.
After the bottom bolt is removed, you need to unscrew the nut of the strut rod; if the car has a panel like in the photo below, it must be removed to get to the rod.
Photo. View of the trunk with a shelf that must be removed to get to the strut rod.
Usually the nut unscrews easily, but just in case, spray it with WD-40 and let it sit for about ten minutes. Insert the spanner wrench as shown in the photo below, and use the eight wrench to keep the rod from turning. By unscrewing the rod nut, the stand will come down.
What's included in the front suspension?
The front suspension of the VAZ-2114 consists of many elements, but many motorists have encountered repairing them individually, and not as a whole system. The front suspension assembly is replaced if the car is involved in a traffic accident and almost all of its elements are destroyed.
So, it’s worth considering what the car’s front suspension consists of, to see what elements are included.
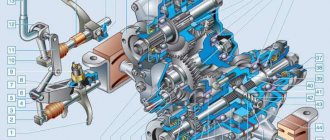
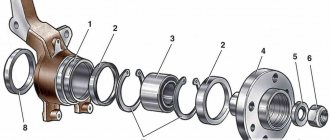
Vehicle suspension device
Design and decoding of VAZ-2114 suspension elements:
1 – upper support of the telescopic stand; 2 – upper support cup; 3 – compression stroke buffer with protective casing; 4 – compression buffer support; 5 – suspension spring; 6 – lower spring support cup; 7 – steering rod ball joint; 8 – steering knuckle; 9 – telescopic stand; 10 – eccentric washer; 11 – adjusting bolt; 12 – rack bracket; 13 – steering knuckle; 14 – front brake protective cover; 15 – brake disc; 16 – retaining ring; 17 – wheel hub nut; 18 – splined shank of the wheel drive hinge housing; 19 – guide pin; 20 – wheel hub bearing; 21 – ball joint; 22 – suspension arm; 23 – adjusting washers; 24 – stabilizer strut; 25 – stabilizer bar; 26 – stabilizer bar cushion; 27 – stabilizer bar mounting bracket; 28 – body bracket for mounting the suspension arm; 29 – suspension arm extension; 30 – bracket for fastening the extension; 31 – protective cover of the ball pin; 32 – ball pin bearing; 33 – ball pin; 34 – ball pin body; 35 – suspension strut rod; 36 – outer body of the upper support; 37 – inner body of the upper support; 38 – upper support bearing; 39 – rubber element of the upper support; 40 – travel limiter of the upper support; 41 – protective cap of the upper support; B - zone for monitoring the suspension joint.
Individual elements of the front suspension
Front suspension elements
Front suspension view from below
As can be seen from the figure above, the suspension is quite simple, but all elements are interconnected and for repair and replacement, it is often necessary to disconnect other parts. Therefore, we will consider the main elements of the front suspension separately, and also indicate the main purpose of the part.
Front shock absorber strut
Front shock absorbers
The front shock absorber or front suspension strut is one of the main elements. This part provides shock absorption and absorption of uneven road surfaces. Also, it bears all the force that is in the car, including the load.
Usually, if this element is frequently loaded or incorrectly replaced, it has an increased degree of wear. Therefore, all motorists need to know the structure and operating rules of the shock absorber strut.
Let's look at how the shock absorber strut is designed, as well as all the structural elements:
Diagram of the shock absorber strut structure
1 – compression valve body; 2 – compression valve discs; 3 – throttle disk of the compression valve; 4 – compression valve plate; 5 – compression valve spring; 6 – compression valve cage; 7 – recoil valve nut; 8 – recoil valve spring; 9 – recoil valve plate; 10 – recoil valve disc; 11 – throttle disk of the recoil valve; 12 – piston; 13 – bypass valve plate; 14 – bypass valve spring; 15 – plunger; 16 – plunger spring; 17 – rod guide bushing with a fluoroplastic layer; 18 – guide bushing cage; 19 – sealing ring of the rack housing; 20 – rod seal; 21 – oil seal cage; 22 – gasket of the rod protective ring; 23 – rod protective ring; 24 – nut of the strut body; 25 – compression buffer support; 26 – rod; 27 – spring cup; 28 – rotary lever; 29 – rod limit sleeve; 30 – rack body; 31 – cylinder; 32 – drain tube.
Front stabilizer
A stabilizer is a suspension element that provides lateral stability while driving, especially when turning . This part is the least likely to fail.
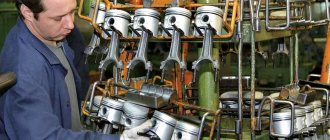
The process of replacing shock absorbers VAZ 2113, 2114, 2115 with your own hands
Stock up on lubricant for cleaning parts
How to replace the front ones (with video)
First, let's look at the step-by-step instructions for replacing the front struts on a VAZ 2114 and 2115.
- With the hood open, remove the protective cap located at the top of the pillar.
- Reduce the tension of the rod fixing nut. To do this, take two keys, one of which prevents the part from turning, and the other one unscrews the rod nut.
- Remove the wheel on the side that needs to replace the shock absorber strut.
- Remove the cotter pin from the telescopic post nut.
- Remove the tie rod end.
- Remove your finger.
- Remove the two bolts securing the steering knuckle to the strut.
- Unscrew the three nuts securing the stand to the glass.
- After completing the last step, you can completely remove the front strut. Assembly is carried out in the reverse order of dismantling.
How to remove and change the rear ones + video
1 — rubber-metal hinge, 2 — bracket for attaching the rear suspension arm to the body, 3 — shock absorber casing, 4 — buffer that takes the load from the compression stroke, 5 — casing cover, 6 — main support washer, 7 — shock-absorbing cushion, 8 — spacer sleeve, 9 - chamber (shock absorber), 10 - insulation gasket, 11 - solid spring, 12 - connecting element for levers, 13 - beam lever, 14 - bracket for fastening the rack structure, 15 - flange, 16 - lever bushing
Now let's move on to replace the rear shock absorber.
- Before starting work, when the car has not yet been jacked up, you need to find a special plastic plug in the upper part of the rack glass and remove it. Underneath there is a nut that secures the rod. To do the job, you need a specialized wrench that can lock the rod in the same position, but at the same time unscrew the nut.
- Jack up the vehicle and remove the wheel. This is required in order to gain free access to the lower rack lock. The process is performed on all cars in question - VAZ 2113, 2114 and 2115.
- Lubricate the bottom bolt securing the rear strut with special lubricant. To do this, you can use WD-40 spray. Use an open-end wrench to fix the nut, and use another wrench of the same size to unscrew the bolt.
- After removing the bolt from the eye, you can slowly remove the rear shock absorber from its mounting location. To perform this task, you need to pry off the bottom of the shock absorber. To do this, use a regular screwdriver.
- Move the strut housing aside, then remove the shock absorber while holding it.
- Remove the following parts from the old shock absorber: rubberized bushing, cup, bump stop, casing, strut. These parts will then need to be installed again, but in the reverse order. Sometimes craftsmen also replace shock absorber cartridges.
Detailed suspension repair diagram
In order to disassemble the suspension you will need quite a lot of tools: a set of keys and sockets, hammers, crowbars, pullers, and also screwdrivers.
So, let's look at a brief diagram of how to disassemble the suspension of a VAZ-2114 car:
- The car must be placed on a lift. Of course, you can use the inspection hole, but this is quite inconvenient and not entirely safe, since dismantling will be carried out on both sides at the same time.
- The first step is to dismantle the caps (if any), disks and loosen the wheel bearing fastenings.
- Next, disconnect the ball joint and also remove the steering rod.
- Unscrew the fastening and remove the stabilizer.
- The next step is to dismantle the lever.
- We remove the caliper.
- We remove the outer CV joint from the hub.
- Now you can remove the brake drum from the steering knuckle mountings.
- We dismantle the steering knuckle.
- Remove the shock absorber strut assembly.
- We disassemble the removed parts.
- Assembly is carried out in reverse order.
Thus, the entire suspension assembly can be replaced. If we take time, then complete disassembly of the VAZ-2114 suspension will take approximately 8-12 hours, if no difficulties arise. Some “kulibins” make it easier to speed up the process, and if the suspension to be removed will no longer be installed. It is worth noting that this method is dangerous and contrary to safety regulations, especially if the motorist has never performed this process. Let's briefly look at how the accelerated process occurs:
- Unscrew the stabilizer.
- We dismantle the upper mount of the shock absorber struts.
- Unscrew the steering rod and brake hoses.
- Carefully unscrew the lever mount.
- The suspension feeds downwards in the assembly.
Tuning
Tuning suspension for VAZ-2114
Many motorists, in order to improve the stability and maneuverability of the car, install a sports version of the suspension, both rear and front.
and “DVT-sport” offer a complete version of the front chassis assembly of the sports version. This kit is specially designed for the 2108-21099 and 2113-2115 car families.
It fits perfectly into the seats and is attached to the body without requiring any modifications. The sports suspension has greater stability and maneuverability, and can also withstand a load on the suspension that is 2 times greater than the standard one. The cost of this option is about 30-40 thousand rubles.
Tuning suspension installed on a car
Diagnostics
If you know what is included in the suspension of a VAZ 2114 car and how it works, you can carry out diagnostics yourself. To do it correctly, follow the following algorithm:
- While driving on a flat or dirt road, listen carefully to the sounds the car's suspension makes - knocking, creaking and other extraneous sounds indicate some kind of defect.
- Evaluate how quickly the wheels lose their tread - if in a year or 3-5 thousand km it has noticeably worn away over the entire surface or in one area, there is something wrong with the suspension.
- Visit the nearest wheel alignment adjustment center and ask to measure the camber and caster; if they differ from the optimal ones for this model, the car needs repair.
- Roll the car into a hole in your garage; if there is no hole, then onto a solid, level area. Be sure to buy safety stands and wheel chocks from your nearest auto store.
- Climb under the car (if you don’t have a hole, then hang the front and back alternately, first lifting it with a jack, then placing it on safety stands, and support the wheels with boots).
- Carefully inspect all rubber cushions and silent blocks; if at least one part is cracked or torn, they all require replacement.
- Insert a pry bar between the lever and the steering knuckle and press it several times with medium force; if you feel any play, the ball joint needs to be replaced.
- Insert the pry bar between the lever and the spacer, then press hard on it; if there is play, change the front silent blocks.
- Insert a pry bar between the beam and the body (if you don't have a hole, hang up the back of the car), then press firmly. If there is play, change the rear silent blocks.
- Using a pair of wrenches, check the tightness of all threaded connections.
- Inspect all springs; if any are broken, replace them with a set.
- Remove the car from the safety stands, then sharply press with all your weight on the body in the area of the shock absorbers and immediately release. If the car rises and at least once, even if just a little, falls and rises again, change the shock absorbers.
Such diagnostics of the suspension of a VAZ 2110 car is applicable to all other front-wheel drive Ladas and is part of regular vehicle maintenance.
conclusions
The installation and repair of the front suspension of the VAZ-2114 is quite difficult and not every motorist can do it. This article examined the design and repair of the front suspension.
As you can see, there is a main group of parts that change when worn out and broken, and there are also a number of parts that are considered consumables and are replaced when the main components are repaired.
It is worth noting that suspension repair has a significant degree of danger, because the fall of one of the elements can lead to injury and even death. Therefore, when performing repair operations you must be extremely careful. Also, many suspension elements are quite heavy, so you need to have an assistant on hand.
Source
How to check the struts of a VAZ 2114, VAZ 2115
Self-diagnosis methods are, to put it mildly, ineffective, so it is recommended to carry out diagnostic work exclusively on specialized equipment. There is one way, but it only works when the rack has already worn out. You will need to stand near the corner of the car (near the right pillar, for example).
Stand near the edge of the right headlight and place your hands on the hood or fender, then rock the car two or three times, and when it is down, sharply remove your hands. If the car then goes up and a little down and immediately stops without unnecessary vibrations, then the strut is most likely normal. We carry out similar actions on the left wing. Most often, one rack fails, so the difference in its “behavior” is obvious.
Another reason for the malfunction of the front shock absorber strut of the VAZ 2114/2115 is the failure of the upper support. The reason for replacing the upper supports is usually one of two reasons:
- ruptures and cracks in the rubber part of the support. As a rule, this occurs due to aging of the rubber. This is fraught with the fact that a support that is in this state will suppress noise and shocks while the car is moving much worse;
- failure of the upper support bearing. It occurs much more often than the breakage of a rubber element, and more anxiety is added, since the support with a broken bearing knocks loudly, even on small irregularities.